Page 3
Function and operation are identical. Other documents that have to be observed When operating the appliance with the MEMMERT AtmoCONTROL PC software, observe the separate software manual. To open the AtmoCONTROL software manual, click on “Help” in the AtmoCONTROL menu bar.
Contents Contents For your safety Terms and signs used......................6 Product safety and dangers ....................6 Requirements of the operating personnel ................8 Responsibility of the owner ....................8 Intended use ........................8 Changes and conversions ....................9 Behaviour in case of malfunctions and irregularities ............9 What to do in case of accidents ..................
Page 5
Contents Malfunctions, warning and error messages Warning messages of the monitoring function ..............42 Malfunctions, operating problems and appliance errors ..........44 Power failure ........................46 Menu mode Overview ..........................47 Basic operation in menu mode using the example of language selection ....... 48 Setup..........................
For your safety For your safety 1.1 Terms and signs used In this manual and on the appliance itself, certain common terms and signs are used to warn you of possible dangers or to give you hints that are important in avoiding injury or damage. Observe and follow these notes and regulations to avoid accidents and damage.
Page 7
For your safety WARNING After removing covers, live parts may be exposed. You may receive an electric shock if you touch these parts. Disconnect the mains plug before removing any covers. Only electrical engineers may work on the electrical equipment of the appliances. WARNING When loading the appliance with an unsuitable load, poisonous or explosive vapours or gases may be produced.
1.5 Intended use incubators ICOmed are intended for incubation of cell cultures or similar. The appliance is not explosion-proof (does not comply with the German occupational health & safety regulation VBG 24). The appliance may only be loaded with materials and substances which cannot form any toxic or explosive vapours at the set temperature and which cannot explode, burst or ignite.
The CO incubator ICOmed is used to generate and maintain constant ambient conditions for the in-vitro fertilisation (IVF) application field, especially for the incubation of oocytes, sperma- tozoa and zygotes in special culture dishes for IVF application as well as for gene expression and the biosynthesis of RNA and proteins.
For your safety 1.9 Switching off the appliance in an emergency Press the main switch at the ControlCOCKPIT (Fig. 1) and disconnect the power plug. This disconnects the appliance from the power supply at all poles. Fig. 1 Switch off the appliance by press- ing the main switch D39062 | Date 09/2018...
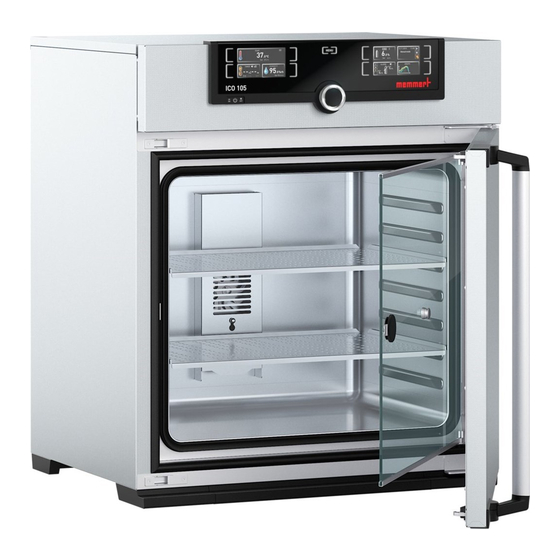
Construction and description Construction and description 2.1 Construction Fig. 2 Construction of CO incubators ICOmed 1 ControlCOCKPIT with capacitive function 4 Stainless steel perforated sheet keys and LCD displays (see page 27) 5 Water tray (passive humidity control) 2 On/Off switch (see page 23)
Construction and description 2.3 Material For the outer housing, MEMMERT uses stainless steel (Mat.No. 1.4016 – ASTM 430) and for the interior, stainless steel (Mat.No. 1.4301 – ASTM 304) is used, which stands out through its high stability, optimal hygienic properties and corrosion resistance to many (but not all!) chemical compounds (caution for example with chlorine compounds).
Construction and description Ethernet interface Via Ethernet interface, the appliance can be connected to a network, so that you can transfer programmes created with the AtmoCONTROL software to the appliance and read out protocols. The Ethernet interface is located on the rear of the appliance (Fig. 4). For identification purposes, each appliance con- nected must have its own unique IP address.
2.9 Declaration of conformity You can download the EC declaration of conformity of the appliance online: English: http://www.memmert.com/en/service/downloads/ce-statement/ German: http://www.memmert.com/de/service/downloads/eg-konformitaetserklaerung/ 2.10 Note in accordance with Medical Devices Directive The product lifetime as intended by the manufacturer is eight years.
Construction and description 2.11 Ambient conditions ► The appliance may only be used in enclosed areas and under the following ambient condi- tions: Ambient temperature 10 °C to 35 °C Humidity rh max. 70 %, non-condensing Overvoltage category Pollution degree Altitude of installation max.
Delivery, transport and setting up Delivery, transport and setting up 3.1 For your safety WARNING Because of the heavy weight of the appliance, you could injure your- self if you try to lift it. To carry appliances of size 50, at least two persons are needed;...
Delivery, transport and setting up 3.2 Delivery The appliance is packed in cardboard and is delivered on a wooden palette. 3.3 Transport The appliance can be transported in the following ways: ► With a forklift truck; move the forks of the truck entirely under the pallet. ►...
Delivery, transport and setting up 3.6 Setting up 3.6.1 Preconditions The installation site must be flat and horizontal and must be able to reliably bear the weight of the appliance (see Technical data on page 14). Do not place the appliance on a flamma- ble surface.
Page 20
Always attach the appliance to a wall with the tilt protection included in the delivery. In case there is not enough space, do not put the appliance into operation and do not open the door. Contact the Memmert service (see page 2). 1. Screw the tilt protection onto the back of the ap- pliance as illustrated.
Putting into operation Putting into operation NOTICE The first time the appliance is operated, it must not be left unattended until it has reached the steady state. 4.1 Connect the appliance to the power supply WARNING Condensation might cause a short circuit. After transport or storage at high humidity conditions, the appliance shall be stored unpacked at normal conditions for at least 24 hours.
Putting into operation 4.2.2 For appliances with passive humidity control: inserting the water tray Mount the provided sealing lip to the narrow side of the water tray (Fig. 10) and fill 1.5 cm to 2 cm of water into the tray (for specifications see section 4.2.1). Place the water tray with the attached sealing lip in the centre of the appliance floor and carefully push it towards the rear panel until the sealing lip is completely under the ventilation opening, touching the rear panel along its entire length (Fig.
Putting into operation CAUTION Danger of suffocation. CO and N can have a suffocating effect in high concentrations. In normal mode, the appliance emits small amounts of CO and N to its surroundings. You should therefore ensure that the room in which it is installed is properly ventilated. A ventilation rate of 250 m³...
Operation and control Operation and control 5.1 For your safety WARNING Leaving the door open during operation can cause the appliance to overheat or pose a fi re hazard. Do not leave the door open during operation. WARNING Gas bottles may burst or explode at high temperatures. Keep the gas bottles away from open fl...
Operation and control 5.3 Opening the door ► To open the door, pull the door handle to the side (to the left or to the right, depending on the door variation, see Fig. Fig. 14 , A). ► To close the appliance, push the door closed and push the door handle to the side (B). Fig.
Operation and control 5.4 Loading the appliance WARNING When loading the appliance with an unsuitable load, poisonous or explosive vapours or gases may be produced. This could cause the appliance to explode, and people could be severely injured or poi- soned.
Page 27
000°C auto off + / - 0.0 End 14:45 13:30 23.11. Set 30 10 11 15 16 Fig. 16 ControlCOCKPIT of ICOmed appliances with O and active humidity control in operating mode TEMP LIGHT LIGHT 12.Sept.2012 Fr 20.10.2010 20:31 13:44...
Page 28
Operation and control 5.5.2 Basic operation In general, all settings are made according to the following pattern: 1. Activate the desired parameter (e.g. tem- TEMP TEMP perature). To do so, press the correspond- .4 °C ing activation key on the left or right or °C .5°C the respective display.
Page 29
Operation and control The status display shows you which operating mode or operating state the appliance is currently in. The current operating state is highlighted in colour and indicated by the text display: Appliance is in programme mode ■...
Page 30
Operation and control Adjustment range: 0 to 20 % in steps of 0.1 % The number 1 or 2 displayed in the gas bottle symbol indicates which gas bottle is currently active. (only for corresponding model) Adjustment range: 1 % to 20 % in steps of 0.1 % 5.5.5 Operation with digital backwards counter with target time setting, adjustable from 1 minute to 99 days ( timer) In timer operation, you can adjust the time the appliance runs at the set values.
Page 31
Operation and control 4. Now, as described under 5.5.2 , set the individual values which you want the appliance to operate at. The set values can be changed at any time while the timer elapses. The changes are effective immediately. Setup , you can choose if the timer should run setpoint-dependent or not.
Page 32
Operation and control Only the programme currently selected in menu mode and shown in the display can be used. If you want to process another programme, you need to activate it in menu mode first (description from page 59). 3. To start the programme, press the confir- 12.Sept.2012 10:44 mation key.
Operation and control You can now ► restart the programme as described ► select another programme for processing in menu mode (see page 59) and run it as described. ► return to manual mode. To do so, reactivate it by pressing the 12.Sept.2012 13:44 activation key next to the status display, then turn the turn...
Page 34
Operation and control Emergency operation °C Setting MAX temperature Controller error Fig. 19 Schematic diagram of how TWW temperature monitoring works Automatic temperature monitor ( ASF) ASF is a monitoring device that automatically follows the set temperature setpoint within an adjustable tolerance band (Fig.
Page 35
Operation and control Mechanical temperature monitoring: Temperature limiter (TB) The appliance is equipped with a mechanical temperature TEMP limiter (TB) of protection class 1 in accordance with DIN 12 880. If the electronic monitoring unit fails during operation and the °C default maximum temperature is exceeded by at least 20 °C, the temperature limiter, as the final protective measure, switches off...
Page 36
Operation and control 5. With the turn control, select ON ( ) or ALARM OFF (). .5 °C .5 °C auto 6. Press the confirmation key to confirm. ALARM The ASF tolerance band setting is acti- vated. °C .5 °C auto 7.
Page 37
Operation and control Adjusting humidity monitoring (only for appliances in the corresponding configuration) 1. Press the activation key to the left of the ALARM display. The temperature moni- ALARM ALARM toring setting is automatically activated. 000°C °C .0 °C auto 000°C auto off 2.
Page 38
Operation and control 5.6.3 CO monitoring If CO monitoring was triggered, this is indicated by the CO display: the actual value is highlighted in red and a warning Fr 20 LIGHT LIGHT LICHT 12.Se symbol is shown ( Fig. 22 ). If the acoustic alarm has been activated in menu mode LIGHT LIGHT...
Operation and control 6. By turning the turn control, adjust the ALARM desired upper alarm limit, in the example on the right 15 %. .0 % 7. Accept the selection by pressing the ALARM Alarm confirmation key and leave the display by pressing the activation key on .0 % the side.
Operation and control ► To display the setpoint and ac- °C 12.09.2012 Fr 20.10.2010 20 tual values for humidity, CO and O : Press the activation key next to the parameter selection. 12 16 20 24 14.00 16.00 18.00 Select the humidity symbol or 12.09.2012 one of the gas bottle symbols with the turn control.
Operation and control 4. In the menu mode, prepare the sterilisation programme for execution (see page 59). 5. Switch to the operating mode and start the sterilisation programme as described on page 31. You cannot set or change any values as long as the programme is running. 6.
Do not try to rectify appli- ance errors yourself by opening the appliance, instead, contact the MEMMERT customer service department (see page 2) or an author- ised service point. 6.1 Warning messages of the monitoring function...
Page 43
Malfunctions, warning and error messages 6.1.2 Humidity monitoring (only for appliances in the corresponding confi guration) Description Cause Action Water tank Fill the water tank with deminer- Page 22 Error display symbol empty alised/distilled water and press the confirmation key HUMIDITY Set 55 .0 %rh...
Malfunctions, warning and error messages Description Cause Action Alarm indicates that the Check if the door is closed. lower CO alarm limit Check that the lines are con- Page 22 was undercut nected correctly, check the valve and level of the gas bottle. If necessary, connect a new gas bottle.
Page 45
Malfunctions, warning and error messages Description Cause Action Displays suddenly look Appliance is in "wrong" Change to operating different mode or menu mode by MENU pressing the T:E-3 ► Temperature operating sen- The appliance can Error message sor is defective. The moni- temporarily be the temperature display toring sensor takes over the...
Malfunctions, warning and error messages Description Cause Action ► sensor is defective No CO control Error message possible the CO display ► Contact customer Page 2 service Set 15 .0 % ► When switching on the Cyan Contact customer Page 2 Not enough storage service appliance, the "start"...
Menu mode Menu mode In menu mode, you can make basic settings, load programmes and export protocols, as well as calibrate the appliance. NOTICE ► Before changing menu settings, read the description of the respective functions on the fol- lowing pages to avoid possible damage to the appliance and/or chamber load. To enter menu mode, press the MENU key.
Menu mode 7.2 Basic operation in menu mode using the example of language selection In general, all settings in menu mode are done just like in operating mode: Activate the respective display, use the turn control for setting and press the confirmation key to accept the change.
Menu mode All other settings can be made accordingly. The settings possible are described in the follow- ing sections. If no new values are entered or confirmed for approx. 30 seconds, the appliance automati- cally restores the former values. 7.3 Setup 7.3.1 Overview SETUP In the...
Page 50
Menu mode SETUP 1. Activate the display. The entry SETUP SETUP address is automatically highlighted. IP address 192. 168. 1 0 0 . 100 Balance Subnet mask 255. 255. 0 . 0 IP Adresse 192. 168. 1 0 0 . 100 Unit Einheit °C...
Page 51
Menu mode 7.3.3 Timer Mode Here, you can choose whether the digital backwards counter with target time setting (see page 30, timer) should run IP address 255. 145. 1 3 6 . 225 setpoint-dependent or not – this determines whether the timer Subnet mask 255.
Menu mode 7.4 Date and time TIME In the display, you can set the date and time, time zone and daylight saving time. NOTICE Always set the time zone (and daylight saving time yes/no) before you set the date and time. Avoid changing the set time after that since this can lead to gaps or overlapping when record- ing measured values.
Menu mode 7. Set daylight savings to off () or on ) with the turn control – in this case Date 12 . 05 . 2012 on ( ). Save the setting by pressing the Time 12 : 00 confirmation key.
Page 54
Menu mode Example: Temperature deviation at 42 °C should be corrected. 1. Press the activation key to the right of the JUSTIEREN Calibrate CALIB display. The display is enlarged Temperatur Cal1 40.0 -0,2 Temperature 30.0 °C and the temperature adjustment option Cal1 Cal2 100.0...
Page 55
Menu mode 9. In the SETUP, adjust the calibration value Cal2 to +1.6 K (measured reference value 30.0 Cal1 minus displayed value) and save the set- 42.0 Cal2 ting by pressing the confirmation key. 60.0 Cal3 10. After the calibration procedure, the TEMP temperature measured by the reference instrument should now also be 42 °C.
Page 56
Menu mode Example: Humidity deviation at 60 % should be corrected: 1. Press the activation key to the right of the JUSTIEREN Calibrate CALIB display. The display is enlarged Temperatur Cal1 40.0 -0,2 Temperature 30.0 °C and the temperature adjustment option Cal1 Cal2 100.0...
Page 57
Menu mode 9. Wait until the appliance reaches the set humidity and displays 60 % rh. The FEUCHTE reference instrument should display 58.5 % rh. .0 %rh 58.5 %rh Set 60 .0 %rh 10. In the SETUP, adjust the calibration value Cal2 to –1.5 % (measured reference value Temperature 40.0...
Page 58
Menu mode 1. Press the activation key to the right of the JUSTIEREN Calibrate CALIB display. The display is enlarged Temperatur Cal1 40.0 -0,2 Temperature 30.0 °C and the temperature adjustment option Cal1 Cal2 100.0 +0,1 40.0 Humidity °C Cal2 is automatically selected.
Menu mode 9. Wait until the appliance reaches the setpoint and displays 10 %. The reference instrument displays 8.5 %, for example. 8.5 %CO2 10. In the SETUP, adjust the calibration value Cal2 to –1.5 % (reference value measured Temperature Cal1 %CO2 minus value displayed) and save the set-...
Menu mode 3. With the turn control, select the pro- gramme you want to make available Select Test 012 Delete Test 022 for use, in this example the sterilisation Test 013 Steri 180 programme Test 014 Steri 180 Test 015 4.
Menu mode 2. Save the selection by pressing the confir- Sound mation key. The adjustment options are automatically highlighted. Keysound At the end On alarm If door open 3. With the turn control, select the desired Sound setting – in this example OFF (). Keysound At the end On alarm...
Menu mode 3. Save your selection by pressing the confir- Protocol mation key. The transfer starts and a status symbol indicates the progress. This Month This Year Complete control range 4. As soon as the transfer is complete, a Protocol check mark appears in front of the period This Month selected.
Page 63
Menu mode 2. Activate the USER ID. To do so, press the USER-ID activation key on the right side of the Activate USER ID display. The display is enlarged Deactivate Activate and the entry is automatically highlighted. 3. Confirm the activation by pressing the USER-ID confirmation key.
Maintenance and Servicing Maintenance and Servicing WARNING Danger due to electric shock. Disconnect the mains plug before any cleaning or maintenance work. 8.1 Regular maintenance Annually: ► Check the sterile filters and the water pump filters in the control unit and replace them if they are dirty.
Storage and disposal Storage and disposal 9.1 Storage The appliance may only be stored under the following conditions: ► in a dry and enclosed, dust-free room ► frost-free ► disconnected from the power supply and gas supply Close the valves of the gas bottles and disconnect the hoses. Gas bottles may only be stored in closed rooms if these are sufficiently ventilated.
Index Index Disposal 65 Log memory 46, 61 Door 25 Accessories 16 Accidents 9 Maintenance 64 Activation button 28 Electrical connection 12 Malfunctions 9, 42, 44 Alarm 33, 34, 36, 38, 39, 42 Electrical equipment 12 Manufacturer 2 Ambient conditions 16 Electronic temperature moni- Material 12 Ambient temperature 16...
Page 67
Index Sound 53, 60 Temperature limiter 35 Water supply 21 SOUND 60 Temperature monitor 33, 34 Water tank 22 Speaker symbol 33, 36, 38, Temperature monitoring 33 Water tray 22 39, 42 Temperature sensor 33 Weight 14 Standards 15 Tilt protection 20 What to do in case of ac- Starting a programme 31 Time 52...
Appendix Appendix T T echnical description according to EN 60601-1-2 EMC – Guidance Operation Manual Amendment Incubator ICOxxmed ICO50med ICO105med ICO150med ICO240med...
Page 69
Appendix T T echnical description according to EN 60601-1-2 Guidance and manufacturer’s declaration – electromagnetic emissions The Memmert CO Incubator ICOxxmed is intended for use in the electromagnetic environment specified below. The customer or user of the CO Incubator ICOxxmed should assure that it is used in such an environment.
Page 70
Appendix T T echnical description according to EN 60601-1-2 Guidance and manufacturer’s declaration – electromagnetic immunity The Memmert CO Incubator ICOxxmed is intended for use in the electromagnetic environment specified below. The customer or user of the CO Incubator ICOxxmed should assure that it is used in such an environment.
Page 71
Appendix T T echnical description according to EN 60601-1-2 Recommended separation distances between portable and mobile RF communications equipment and the Memmert steriliser type S.. The CO Incubator ICOxxmed is intended for use in electromagnetic enviroment in which radiated RF disturbances are controlled.
Need help?
Do you have a question about the ICOmed and is the answer not in the manual?
Questions and answers