Table of Contents
Advertisement
Quick Links
Advertisement
Table of Contents
Troubleshooting

Subscribe to Our Youtube Channel
Related Manuals for Eaton Network-M3


Summary of Contents for Eaton Network-M3
- Page 1 UPS Network Management Card Network-M3 User's Guide English 10/27/2023...
- Page 3 Google™ is a trademark of Google Inc. All other trademarks are properties of their respective companies. ©Copyright 2023 Eaton Corporation. All rights reserved. No part of this document may be reproduced in any way without the express written approval of Eaton Corporation.
-
Page 4: Table Of Contents
1 Table of Contents TABLE OF CONTENTS ............................4 INSTALLING THE NETWORK MANAGEMENT MODULE ................11 Overview ..................................... 11 Unpacking the Network module............................11 Starting with the Network Module ............................11 Mounting the Network Module ............................11 Accessing the Network Module ............................12 2.5.1 Accessing the web interface through Network...................... - Page 5 Settings ....................................78 3.7.1 General ..................................78 3.7.2 Local users ..................................91 3.7.3 Remote users ................................96 3.7.4 Ports .................................... 111 3.7.5 TCP/IP..................................112 3.7.6 Firewall ..................................119 3.7.7 Protocols..................................123 3.7.8 SNMP ..................................131 3.7.9 Certificate ..................................139 Device details ..................................149 3.8.1 General ..................................
- Page 6 4.2.2 Pairing with automatic acceptance (recommended if done in a secure and trusted network)........180 4.2.3 Pairing with manual acceptance ..........................181 Powering down/up applications (examples) ........................181 4.3.1 Powering down IT system in a specific order ......................181 4.3.2 Powering down non-priority equipment first .......................
- Page 7 Description and features ..............................219 Unpacking the EMP................................219 Installing the EMP ................................220 6.3.1 Defining EMPs address and termination ........................220 6.3.2 Mounting the EMP ..............................220 6.3.3 Cabling the first EMP to the device..........................223 6.3.4 Daisy chaining EMPs ..............................224 6.3.5 Connecting an external contact device........................
- Page 8 7.7.8 ping and ping6 ................................274 7.7.9 reboot ..................................275 7.7.10 rest list..................................276 7.7.11 rest get ..................................276 7.7.12 rest set ..................................277 7.7.13 rest exec..................................277 7.7.14 save_configuration | restore_configuration........................277 7.7.15 sanitize..................................278 7.7.16 ssh-keygen .................................. 279 7.7.17 time .....................................
- Page 9 8.10.2 Action ..................................292 8.11 The Network Module fails to boot after upgrading the firmware ..................293 8.11.1 Possible Cause ................................293 8.11.2 Action ..................................293 8.12 Web user interface is not up to date after a FW upgrade ....................293 8.12.1 Symptom ..................................
- Page 10 Applicable product: Eaton UPS-ATS Table of Contents – 10...
-
Page 11: Installing The Network Management Module
Overview 2 Installing the Network Management Module 2.1 Overview 2.2 Unpacking the Network module Unable to render include or excerpt-include. Could not retrieve page. will include the following accessories: • Installation instructions Packing materials must be disposed of in compliance with all local regulations concerning waste. Recycling symbols are printed on the packing materials to facilitate sorting. -
Page 12: Accessing The Network Module
Accessing the Network Module 2.5 Accessing the Network Module 2.5.1 Accessing the web interface through Network 2.5.1.1 Connecting the network cable Security settings in the Network Module may be in their default states. For maximum security, configure through a USB connection before connecting the network cable. Connect a standard ... -
Page 13: Accessing The Web Interface Through Rndis
Accessing the Network Module 2.5.2.1.2 With web browser through the configuration port For example, if your device does not have an LCD, the IP address can be discovered by accessing the web interface through RNDIS and browsing to Settings>Network. To access the web interface through RNDIS, see the Accessing the web interface through RNDIS section. - Page 14 Accessing the Network Module STEP 2 – Right click on the RNDIS local area connection and select Properties. STEP 3 – Select Internet Protocol Version 4 (TCP/IPv4)” and press the Properties button STEP 4 – Then enter the configuration as below and validate (IP = 169.254.0.150 and mask = 255.255.0.0), click OK, then click on Close.
-
Page 15: Accessing The Card Through Serial Terminal Emulation
2.5.3.2.2 Accessing the web interface STEP 1 – Be sure that the Device is powered on. STEP 2 – On the host computer, download the rndis.7z file from the website www.eaton.com/downloads and extract it. For more information, navigate to Servicing the Network Management Module>>>Accessing to the latest Network Module firmware/ driver section. - Page 16 After the card is connected to the PC, manual configuration of the driver is needed for Windows® OS to discover the serial connection. STEP 1 – On the host computer, download the rndis.7z file from the website www.eaton.com/downloads and extract it. STEP 2 – Plug the USB cable and go to Windows® Device Manager.
-
Page 17: Modifying The Proxy Exception List
Accessing the Network Module STEP 7 – The installation is successful when the COM port number is displayed for the Gadget Serial device in the Windows® Device Manager. 2.5.4.3 Accessing the card through Serial It is intended mainly for automated configuration of the network and time settings of the network card. It can also be used for troubleshooting and remote reboot/reset of the network interface in case the web user interface is not accessible. - Page 18 Accessing the Network Module • Select the Connections tab • Press LAN Settings • Press ADVANCED • Add the address 169.254. * Installing the Network Management Module – 18...
-
Page 19: Configuring The Network Module Settings
Configuring the Network Module settings • Press OK. • Close Internet Explorer and re-open it. • Now you can access the address 169.254.0.1 with Internet Explorer and any other browser. 2.6 Configuring the Network Module settings Use the web interface to configure the Network Module. The main web interface menus are described below: 2.6.1 Menu structure Extend menu display. - Page 20 Configuring the Network Module settings Settings: Network Module settings. Device settings: General information, Settings. or Maintenance: Firmware, Services, Resources, System logs. Display Network module firmware version. Time Display Network Module local time (not the UTC time). Installing the Network Management Module – 20...
-
Page 21: Contextual Help Of The Web Interface
Login page 3 Contextual help of the web interface 3.1 Login page The page language is set to English by default but can be switched to browser language when it is managed. After navigating to the assigned IP address, accept the untrusted certificate on the browser. 3.1.1 Logging in for the first time 3.1.1.1 1. Enter default password As you are logging into the Network Module for the first time you must enter the factory set default username and password. -
Page 22: Troubleshooting
Login page 3.1.1.3 3. Accept license agreement On the next step, License Agreement is displayed. Read and accept the agreement to continue. Accounts with identical names When an user attempt to log with a user name that exist both locally & remotely, then only the local account can successfully be logged in by default. ... -
Page 23: Home
Home 3.1.2.1 For other issues For details on other issues, see the Troubleshooting section. 3.2 Home Home screen provides status information for device including measures and active alarms. 3.2.1 Header structure Name Displays the Network module name. Device name Displays by default the Device model or the system name if filled in the section Contextual help>>>Maintenance>>>System information . -
Page 24: Menu Structure
Home Shortcut to the Device details: • Name • Location • Model • • • FW version Device status Displays if the Device is Online, On bypass, On battery... Displays the battery level (in %) and the remaining backup time. Output load level Help: Opens full documentation in a separate browser page. -
Page 25: Energy Flow Diagram
Home Protection: Agents list, Agents shutdown sequencing, Shutdown on power outage. Environment: Commissioning/Status, Alarm configuration, Information. Settings: Network Module settings. Device settings: General information, Settings. or Maintenance: Firmware, Services, Resources, System logs. Display Network module firmware version. Time Display Network Module local time (not the UTC time). 3.2.3 Energy flow diagram Contextual help of the web interface – ... - Page 26 Home 3.2.3.1 Line interactive UPS 3.2.3.2 Online UPS 3.2.3.3 ATS 3.2.3.4 Diagram elements description Description and Description Possible states below the symbol symbols Good Warning Fault Contextual help of the web interface – 26...
- Page 27 Home Input Main utility input. In range Out of nominal range Output Output of the UPS. Protected In overload In short circuit Powered Not protected AVR device The equipment is protected and Normal mode In overload powered through an AVR device. Buck mode Boost mode Rectifier...
- Page 28 Home ATS device The equipment is powered through an ATS device. Description and Description Possible states symbols Green Orange Black Wiring Electrical connection between Energy flow In overload No energy blocks. Out of nominal range Unknown 3.2.3.5 Details To access the device details, press the icon: This view provides a summary of device identification information and nominal values: •...
-
Page 29: Outlet Status
Home Input measures (main and secondary) Output measures Phase #1 Phase #2 Phase #3 Phase #1 Phase #2 Phase #3 Voltage (V) Voltage (V) Voltage (V) Voltage (V) Voltage (V) Voltage (V) Current (A) Current (A) Current (A) Current (A) Current (A) Current (A) Load (W) -
Page 30: Environment
Home 3.2.6 Environment UPS ambient temperature is displayed if available. Sensor status and data are displayed if available, MIN-MAX shows the minimal and maximal temperature or humidity measured by the sensor. Note: To see detailed sensor data, press the icon: Contextual help of the web interface – 30... -
Page 31: Energy Flow Diagram Examples
Home 3.2.7 Energy flow diagram examples 3.2.7.1 Line interactive UPS 3.2.7.1.1 Normal mode 3.2.7.1.2 Buck/Boost mode Contextual help of the web interface – 31... - Page 32 Home 3.2.7.1.3 Battery mode 3.2.7.1.4 Off mode Contextual help of the web interface – 32...
- Page 33 Home 3.2.7.2 Online UPS with single input source 3.2.7.2.1 Online mode 3.2.7.2.2 Bypass mode Contextual help of the web interface – 33...
- Page 34 Home 3.2.7.2.3 Battery mode 3.2.7.2.4 Off mode Contextual help of the web interface – 34...
- Page 35 Home 3.2.7.2.5 HE mode / ESS mode 3.2.7.3 Online UPS with dual inputs sources and Maintenance bypass 3.2.7.3.1 Online mode Contextual help of the web interface – 35...
- Page 36 Home 3.2.7.3.2 Bypass mode 3.2.7.3.3 Battery mode Contextual help of the web interface – 36...
- Page 37 Home 3.2.7.3.4 HE mode / ESS mode 3.2.7.3.5 Maintenance bypass mode Contextual help of the web interface – 37...
-
Page 38: Access Rights Per Profiles
Home 3.2.7.4 ATS 3.2.7.4.1 Normal mode 3.2.7.4.2 Prefered source missing 3.2.8 Access rights per profiles Administrator Operator Viewer Home 3.2.8.1 For other access rights For other access rights, see the Information>>>Access rights per profiles section. Contextual help of the web interface – 38... -
Page 39: Meters
Meters 3.3 Meters 3.3.1 Measures Gauge color code: • Green: Value inside thresholds. • Orange/Red: Value outside thresholds. • Blue: No thresholds provided by the device. 3.3.1.1 Main utility input Displays the product main utility measures. • Current (A) • Voltage (V) Contextual help of the web interface – ... - Page 40 Meters 3.3.1.2 Second utility input (if available) If presents, displays the product second utility measures. • Current (A) • Voltage (V) 3.3.1.3 Output • Voltage (V) • Power (W) • Current (A) Contextual help of the web interface – 40...
-
Page 41: Battery
Meters 3.3.2 Battery 3.3.2.1 Battery status Battery status section is an overview of the battery information. The information displayed depends on the device. 3.3.2.1.1 Overview/Environment • Type • EBM count • Nominal capacity • Nominal voltage • Capacity remaining • Runtime •... - Page 42 Meters 3.3.2.2 Battery health Battery health section provides status of the battery and allow to launch a battery test. The status reflects the last completed battery test result, as well as its critical status (color) and completion time. • Pass • Warning • Fail •...
-
Page 43: Data Logs
Meters 3.3.3 Data logs 3.3.3.1 Logs This log configuration allows to define the log acquisition frequency of the Device measures only. The sensors measures logs acquisition is not settable and done every minutes. Sensors measures logs are accessible in Environment menu. 3.3.3.1.1 Download Press the ... -
Page 44: Access Rights Per Profiles
Meters 3.3.4.1 For other settings For other settings, see the Information>>>Default settings parameters section. 3.3.5 Access rights per profiles Administrator Operator Viewer Meters Battery health: Launch test/Abort Logs configuration 3.3.5.1 For other access rights For other access rights, see the Information>>>Access rights per profiles ... -
Page 45: Controls
Controls 3.4 Controls 3.4.1 Entire UPS Controls are displayed for the entire UPS, and not for specific outlet options. The table in this section displays UPS status, the associated commands (on/off), and the pending action. 3.4.1.1 Status Reflects the current mode of the UPS. The following is a list of potential table values that are displayed based on the UPS topology. •... -
Page 46: Outlets - Group 1/ Group 2
Controls 3.4.2 Outlets - Group 1/ Group 2 Load segmentations allow, battery runtime to remain on essential equipment and automatically power down non-priority equipment during an extended power outage. This feature is also used for remote reboot and the sequential start of servers to restrict inrush currents. 3.4.2.1 Status It reflects the current outlet status. -
Page 47: Group
Controls 3.4.3 Group 3.4.3.1 Entire UPS Controls are displayed for the entire UPS, and not for specific outlet options. The table in this section displays UPS status, the associated commands (on/off), and the pending action. 3.4.3.1.1 Status Reflects the current mode of the UPS. The following is a list of potential table values that are displayed based on the UPS topology. •... - Page 48 Controls 3.4.3.2 Outlets - Group 1/ Group 2 Load segmentations allow, battery runtime to remain on essential equipment and automatically power down non-priority equipment during an extended power outage. This feature is also used for remote reboot and the sequential start of servers to restrict inrush currents. 3.4.3.2.1 Status It reflects the current outlet status.
-
Page 49: Schedule
Controls 3.4.3.3.1 For other access rights For other access rights, see the Information>>>Access rights per profiles section. 3.4.3.4 Troubleshooting Action not allowed in Control/Schedule/Power outage policy Symptom Below message is displayed when you access the Control, Schedule or Power outage policy page. This action is not allowed by the UPS. - Page 50 Controls 3.4.4.1 Scheduled shutdown table The table displays the scheduled shutdowns and includes the following details: • Recurrence – Once/Every day/Every week • Load segment – Primary/Group 1/Group 2 • Shutdown time – Date/Time • Restart time – Date/Time • Status – Active/Inactive 3.4.4.2 Actions 3.4.4.2.1 New Press the New button to create a scheduled shutdown.
- Page 51 Controls 3.4.4.4 Save and Restore SRR section Settings Possible values Scheduled shutdown schedule enabled true/false scheduler 1: Primary 2: Group 1 3: Group 2 recurrence 0: once 1: every day 2: every week shutdownTimeStamp [timestamp (unix)] restartTimeStamp [timestamp (unix)] 3.4.4.4.1 Additional information For details on Save and Restore, see the Save and Restore section.
-
Page 52: Protection
After automatic acceptance, make sure that all listed agents belong to your infrastructure. If not, access may be revoked using the Delete button. For maximum security, Eaton recommend following one of the two methods on the certificate settings page: • Import client certificates manually. - Page 53 Protection b Stop Stops the pairing window. 3.5.1.2 Agents list table The table displays the IPP agent list that is connected to the Network Module and includes the following details: • Name • Address • Version of the Agent • Power source (Powering strategy) •...
- Page 54 Protection 3.5.1.5 Troubleshooting Card wrong timestamp leads to "Full acquisition has failed" error message on Software Symptoms: IPP/IPM shows the error message "The full data acquisition has failed" even if the credentials are correct. Possible cause: The Network module timestamp is not correct. Probably the MQTT certificate is not valid at Network module date.
- Page 55 *.0 that (are) located folder Eaton\IntelligentPowerProtector\configs\tls. Client server is not restarting Symptom Utility power has been restored, the UPS and its load segments are powered on, but the Client server does not restart. Possible Cause The “Automatic Power ON” server setup setting might be disabled.
-
Page 56: Agent Shutdown Sequencing
Protection 3.5.2 Agent shutdown sequencing 3.5.2.1 Agent shutdown sequence timing Contextual help of the web interface – 56... - Page 57 Protection All agents that are connected to the Network Module are displayed in tables by power sources. • Primary • Group 1 • Group 2 The 'local agent' setting is used for setting for example a minimum shutdown duration, or a power down delay for a load segment that has no registered shutdown agents.
- Page 58 Protection 3.5.2.3.1 Example #1 → Shutdown time: 210s + 10s = 220s → Immediate shutdown time: 120s + 10s = 130s Contextual help of the web interface – 58...
- Page 59 Protection 3.5.2.3.2 Example #2 → Shutdown time: 180s + 10s = 190s → Immediate shutdown time: 180s +10s = 190s The trigger in the diagram is the moment when the shutdown sequence starts, and it is defined in the Contextual help>>>Protection>>>Scheduled shutdown or the Contextual help>>>Protection>>>Shutdown on power outage sections for each power source.
-
Page 60: Shutdown On Power Outage
Protection 3.5.2.4 Access rights per profiles Administrator Operator Viewer Protection/Agent settings 3.5.2.4.1 For other access rights For other access rights, see the Information>>>Access rights per profiles section. 3.5.3 Shutdown on power outage These setting are in conjunction with the shutdown agents and control how the network module directs the shutdown of protected servers and appliances. - Page 61 Protection Shutdown criteria are set per power source (outlet groups) if they are present in the UPS. By default, shutdown criterias are set to Maximize availability. 3.5.3.1.1 Shutdown criteria selection The available criteria for shutdown are listed below: a Maximize availability (default) To end the shutdown sequence 30s before the end of backup time.
- Page 62 Protection Example c Custom Several conditions can be set to define shutdown criteria: • To initiate the shutdown sequence when on battery for 10 seconds. • To initiate the sequence when the battery reaches the set capacity in (%) • To initiate or end the shutdown sequence after the set time in (s) before the end of backup time.
- Page 63 Protection Example 2: Immediate OFF Contextual help of the web interface – 63...
- Page 64 Protection Example 4: Custom Settings #1 Contextual help of the web interface – 64...
- Page 65 Protection Settings #2 3.5.3.1.2 On low battery warning In some cases, like a renewed power failure or failed battery, the capacity is much lower than anticipated. The UPS gives a Low battery warning when there is 2 - 3 minutes of estimated runtime left, depending on the UPS and its settings. This time is typically enough for shutting down a server but does not allow sophisticated sequential shutdown schemes.
- Page 66 Protection 3.5.3.1.3 When utility comes back Note: When utility comes back settings cannot be altered for three phase UPS units and will remain at their defaults. These settings define the restart sequence when utility comes back. For example, this allows sequential startup of the IT system so that network and storage devices are connected to 'Primary' and start up immediately.
- Page 67 Protection Shutdown on power outage powerOutagePolicy/Settings panicShutdownTrigger onLowStateOfCharge true/false restart enabled true/false powerOutagePolicy/ 1: Primary suppliersSettings 2: Group 1 3: Group 2 settings localShutdownDuration [time in seconds] shutdownTriggers/ enabled true/false powerOutage capacityLessThan [percentage] afterBackupTime [time in seconds] startShutdownBeforeEndOf [time in seconds] Backup endShutdownBeforeEndOfB [time in seconds]...
-
Page 68: Environment
Environment Client server is not restarting Symptom Utility power has been restored, the UPS and its load segments are powered on, but the Client server does not restart. Possible Cause The “Automatic Power ON” server setup setting might be disabled. Action In the server system BIOS, change the setting for Automatic Power ON to "Enabled". - Page 69 Environment 3.6.1.2.2 Discover At first the table is empty, press the Discover button to launch the sensor discovery process. If sensors are discovered, the table is populated accordingly 3.6.1.2.3 Delete Select a sensor and press the Delete button to delete the sensor. When a sensor is deleted, all the commissioning information are deleted. 3.6.1.2.4 Define offsets 1.
- Page 70 Environment 3.6.1.2.5 Edit Press the pen logo to edit sensor communication information: You will get access to the following information and settings: • Product reference • Part number • Serial number • Name • Location • Temperature and humidity – Active (Yes, No) •...
- Page 71 Environment Press Save after modifications. Deactivated dry contacts are not displayed and replaced by this icon: 3.6.1.3 Note: If the UPS provides temperature compensated battery charging option, see the Servicing the EMP>>>Using the section. EMP for temperature compensated battery charging 3.6.1.4 Access rights per profiles Administrator Operator Viewer...
- Page 72 Environment Action #1-3 1- Reboot the Network module. 2- Launch the discovery. EMP detection fails at discovery stage In the Network Module, in Contextual help>>>Environment>>>Commissioning/Status , EMPs are missing in the Sensor commissioning table. Symptom #1 The EMPs green RJ45 LED (FROM DEVICE) is not ON. Possible causes The EMPs are not powered by the Network module.
-
Page 73: Alarm Configuration
Environment Action #2-2 1- Reboot the Network module. Refer to the section Contextual help>>>Maintenance>>>Services>>>Reboot 2- Launch the discovery. 3.6.1.5.1 For other issues For details on other issues, see the Troubleshooting section. 3.6.2 Alarm configuration Humidity, temperatures or dry contacts deactivated during commissioning are not displayed. Gauge color code: •... - Page 74 Environment b Set alarm threshold Enable the alarm first and then change the setting in the table and then Save. When a warning threshold is reached, an alarm will be sent with a warning level. When a critical threshold is reached, an alarm will be sent with a critical level. c Set Hysteresis Enable the alarm first and change the setting in the table and then Save.
- Page 75 Environment 3.6.2.3 Dry contacts The table shows the following settings for each dry contact: • Name • Location • Enabled – yes/no • Alarm severity – Info/Warning/Critical 3.6.2.3.1 Actions a Set Enabled Enable the alarm first and then change the setting in the table and then Save. When disabled, no alarm will be sent.
- Page 76 Environment Humidity Enabled — No Enabled — No/Yes Low critical – 10% 0%<low critical<low warning<high warning<high critical<100% Low warning – 20% High warning – 80% High critical – 90% Dry contacts Enabled — No Enabled — No/Yes Alarm severity – Warning Alarm severity – Info/Warning/Critical 3.6.2.4.1 For other settings For other settings, see the Information>>>Default settings parameters ...
- Page 77 Environment • Physical name • Vendor • Part number • Firmware version • UUID • Serial number • Location 3.6.3.1 Access rights per profiles Administrator Operator Viewer Environment/Information 3.6.3.1.1 For other access rights For other access rights, see the Information>>>Access rights per profiles ...
-
Page 78: Settings
Settings 3.7 Settings 3.7.1 General 3.7.1.1 System details 3.7.1.1.1 Location Text field that is used to provide the card location information. Card system information is updated to show the defined location. 3.7.1.1.2 Contact Text field that is used to provide the contact name information. Card system information is updated to show the contact name. - Page 79 Settings 3.7.1.2 Date & Time The current date and time appears at the top of the screen. You can set the time either manually or automatically. 3.7.1.2.1 Manual mode: Manually entering the date and time 1. Select the time zone for your geographic area. 2.
- Page 80 Settings 3.7.1.2.2 Dynamic (NTP): Synchronizing the date and time with an NTP server 1. Select the time zone for your geographic area. 2. Enter the IP address or host name of the NTP servers in the NTP server fields (up to 5 servers). 3.
- Page 81 Settings DST is managed based on the time zone. 3.7.1.3 Email notification settings For examples on email sending configuration see the Servicing the Network Management Module>>>Subscribing to a set of alarms for email notification section. 3.7.1.3.1 Email sending configuration table The table shows all the email sending configuration and includes the following details: •...
- Page 82 Settings c Edit Press the pen icon to edit email sending configuration: You will get access to the following settings: • Custom name • Email address • Status – Active/Inactive • Hide the IP address from the email body – Disabled/Enabled This setting will be forced to Enabled if Enabled in the SMTP settings. •...
- Page 83 Settings 3.7.1.4 Help us improve program This feature helps us design and propose products that matters for you. You can participate and let us gather anonymous data on the product usage as soon as a user agreed to it. You can also disable this feature for all the users anytime, no matter what personal choices they made.
- Page 84 Settings 3.7.1.5 SMTP settings SMTP is an internet standard for electronic email transmission. The following SMTP settings are configurable: Contextual help of the web interface – 84...
- Page 85 Settings • Server IP/Hostname – Enter the host name or IP address of the SMTP server used to transfer email messages in the SMTP Server field. • Port • Default sender address • Hide the IP address from the email body – Disabled/Enabled If Enabled, it will force this setting to Enabled in the Email notification settings.
- Page 86 Settings Email notification settings No email 5 configurations maximum Custom name — 128 characters maximum Email address — 128 characters maximum Hide IP address from the email body — enable/disabled Status — Active/Inactive • Alarm notifications Active — No/Yes All card events – Subscribe/Attach logs Critical alarm –...
- Page 87 Settings 3.7.1.7.1 For other access rights For other access rights, see the Information>>>Access rights per profiles section. 3.7.1.8 CLI commands email-test Description mail-test sends test email to troubleshoot SMTP issues. Help Usage: email-test <command> ... Test SMTP configuration. Commands: email-test -h, --help, Display help page email-test -r, --recipient <recipient_address>...
- Page 88 Settings time -h Usage: time [OPTION]... Display time and date, change time and date. -h, --help display help page -p, --print display date and time in YYYYMMDDhhmmss format -s, --set <mode> Mode values: - set date and time (format YYYYMMDDhhmmss) manual <date and time> - set preferred and alternate NTP servers ntpmanual <preferred server> <alternate server> - automatically set date and time ntpauto Examples of usage: -> Set date 2017-11-08 and time 22:00 time --set manual 201711082200 -> Set preferred and alternate NTP servers time --set ntpmanual fr.pool.ntp.org de.pool.ntp.org Examples of usage ->...
- Page 89 Settings alternateServer timeZone Examples: Europe/Paris Africa/Johannesburg America/New_York Asia/Shanghai Email email notifyOnEvents enabled true/false cardEvents critical subscribe true/false attachEventsLog true/false warning subscribe true/false attachEventsLog true/false info subscribe true/false attachEventsLog true/false devicesEvents critical subscribe true/false attachEventsLog true/false attachMeasuresLog true/false warning subscribe true/false attachEventsLog true/false attachMeasuresLog...
- Page 90 Settings message sender String: refer to default settings and possible parameters for constraints. subject String: refer to default settings and possible parameters for constraints. hideIpAddress true/false SMTP smtp certificateData Certificate Authority of SMTP server port Number: refer to default settings and possible parameters for constraints.
-
Page 91: Local Users
Settings 3.7.2 Local users 3.7.2.1 Local users table The table shows all the supported local user accounts and includes the following details: • Username • Email • Profile • Status – Status could take following values – Inactive/Locked/Password expired/Active For the list of access rights per profile refer to the section Full documentation>>>Information>>>Access rights per profiles. - Page 92 Settings d Global settings Press Save after modifications. Password settings To set the password strength rules, apply the following restrictions: • Minimum length • Minimum upper case • Minimum lower case • Minimum digit • Special character Password expiration To set the password expiration rules, apply the following restrictions: Contextual help of the web interface – ...
- Page 93 Settings • Number of days until password expires • Main administrator password never expire Main administrator password never expires If this feature is disabled, the administrator account can be locked after the password expiration. If Enabled, the administrator password never expires, make sure it is changed regularly. Lock account •...
- Page 94 Settings Local users 1 user only: 20 users maximum: • Active — Yes • Active — Yes/No • Profile — Administrator • Profile — Administrator/Operator/Viewer • Username — admin • Username — 255 characters maximum • Full Name — blank • Full Name — 128 characters maximum • Email — blank • Email — 128 characters maximum • Phone — blank • Phone — 64 characters maximum •...
- Page 95 Settings Help logout <cr> logout the user 3.7.2.4.1 For other CLI commands See the CLI commands in the Information>>>CLI section. 3.7.2.5 Troubleshooting How do I log in if I forgot my password? Action • Ask your administrator for password initialization. • If you are the main administrator, your password can be reset manually by following steps described in the ...
-
Page 96: Remote Users
Settings Lock account lockoutRules lockoutRules enabled true/false threshold Number: refer to default settings an possible parameters for defaultAccountNeverBlocks constraints. true Account timeout sessionsService sessionTimeout Numbers: refer to default settings an possible parameters sessionLeaseTime for constraints. Local users PredefinedAccounts credentials enabled true/false username String: refer to default settings... - Page 97 Settings • Certificate • Status – Status could take following values – Unreachable/Active 3.7.3.1.1 Actions a Configure 1.Enable LDAP to be able to configure settings 2. Press Configure to access the following LDAP settings: • Connectivity • Security SSL – None/Start TLS/SSL Verify server certificate •...
- Page 98 Settings b Profile mapping For the list of access rights per profile refer to the section Full documentation>>>Information>>>Access rights per profiles. 1. Press Profile mapping to map remote groups to local profiles. 2. Click Save. c Users preferences All users preferences will apply to all remote users (LDAP, RADIUS). Contextual help of the web interface – ...
- Page 99 Settings 1. Press Users preferences to define preferences that will apply to all newly logged in LDAP users • Language • Temperature • Date format • Time format 2. Click Save. Contextual help of the web interface – 99...
- Page 100 Settings d LDAP Test 1. At the end of each LDAP primary or secondary configuration row you'll be able to launch a LDAP test by clicking on the button. 2. The LDAP test will give you a status ( ok / ko ) on below parameters to make it easier to troubleshoot •...
- Page 101 Settings The table shows all the supported severs and includes the following details: • Name - descriptive name for the RADIUS server • Address - hostname or IP address for the RADIUS server • Port - connection port of the RADIUS Server 3.7.3.2.1 Actions a Configure Enable Radius to be able to configure settings...
- Page 102 Settings • Address - hostname or IP address for the RADIUS server • UDP port - the UDP port for the RADIUS server (1812 by default) • Time out (s) - length of time the client waits for a response from the RADIUS server •...
- Page 103 Profile - the local profile you want users to be mapped Note: The default mapping is used for eaton-specific value : Attribute 28, Vendor 534, Value 1 and Profile administrator.Please refer to your RADIUS protocol provider documentation for further information.
- Page 104 Settings 3.7.3.3 Default settings and possible parameters - Remote users Default setting Possible parameters LDAP Configure Configure • Active – No • Active – No/yes • Security • Security SSL – SSL SSL – None/Start TLS/SSL Verify server certificate – enabled Verify server certificate –...
- Page 105 Settings RADIUS Configure Configure • Active – No • Active – Yes/No • Retry number – 0 • Retry number – 0 to 128 • Primary server • Primary server Name – blank Name – 128 characters maximum Secret – blank Address –...
- Page 106 Settings Help Usage: ldap-test <command> [OPTION]... Test LDAP configuration. Commands: ldap-test -h, --help, Display help page ldap-test --checkusername <username> [--primary|--secondary] [-v] Check if the user can be retrieve from the LDAP server <username> Remote username to test --primary Force the test to use primary server (optional) --secondary Force the test to use secondary server (optional) -v,--verbose...
- Page 107 Settings Help logout <cr> logout the user whoami Description whoami displays current user information: • Username • Profile • Realm 3.7.3.5.1 For other CLI commands See the CLI commands in the Information>>>CLI section. 3.7.3.6 Troubleshooting How do I log in if I forgot my password? Action •...
- Page 108 Settings 3.7.3.7 Save and Restore Sub section Sub section Sub section Settings Sub settings Possible values section section LDAP ldap settings enabled true/false connectivity primaryServ name String: refer to default settings an possible parameters for constraints. String: refer to default settings an possible parameters for constraints.
- Page 109 Settings security type 1: ssl 2: starttls 3: none verifyCertificate true/false mappings remoteGroup String: refer to default settings an possible parameters for constraints. profileName • administrators • viewers • operators preferences language String: refer to default settings an possible parameters for constraints.
- Page 110 Settings timeout Unsigned number retryCount Unsigned number secondarySe name String: refer to default rver settings an possible parameters for constraints. secret String: refer to default settings an possible parameters for constraints. String: refer to default settings an possible parameters for constraints.
-
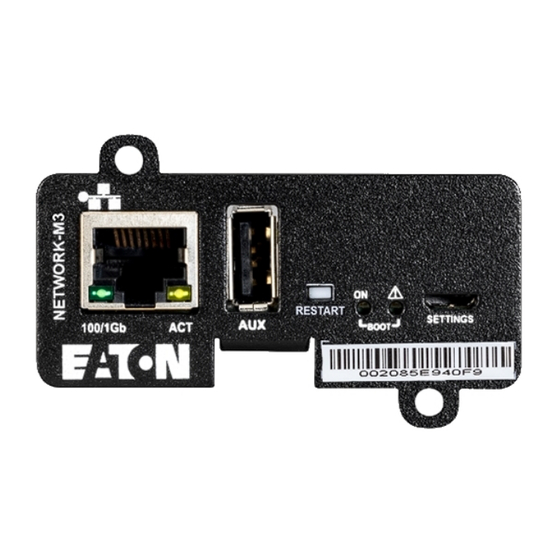
Page 111: Ports
For details on Save and Restore, see the Save and Restore section. 3.7.4 Ports 3.7.4.1 Ethernet port and interface settings Eaton screenshot missing 3.7.4.1.1 Edit port Allows to edit the link configuration of the selected port through The different options are listed below. • Auto negotiation •... -
Page 112: Tcp/Ip
Settings 3.7.5 TCP/IP 3.7.5.1 Hostname Text field to Enter the Network Module Hostname. 3.7.5.2 IPV4 Any modifications are applied after the Network Module reboots. The table shows includes the following details: • Interface name • Status • Mode • Address •... - Page 113 Settings Select either the Manual or DHCP settings option. a Manual Select Manual, and then enter the network settings if the network is not configured with a BootP or DHCP server. • Enter the IP Address. The Network Module must have a unique IP address for use on a TCP/IP network. •...
- Page 114 Settings • Mode • Addresses • Prefix • Gateway 3.7.5.3.1 IPV6 configuration After a mouse over on the table, click the edit icon to access settings and configure the network settings for a dedicated interface. Select either the Manual or Router settings option. a Manual Select Manual and enter below settings: •...
- Page 115 Settings 3.7.5.4 DNS The table shows includes the following details: • Interface name • Mode • FQDN • Primary DNS • Secondary DNS After a mouse over on the table, click the edit icon to access settings and configure the DNS settings for a dedicated interface.
- Page 116 Settings 3.7.5.4.2 DHCP Select DHCP and Save the configuration. 3.7.5.5 CLI commands netconf Description Tools to display or change the network configuration of the card. Help For Viewer and Operator profiles: netconf -h Usage: netconf [OPTION]... Display network information and change configuration. -h, --help display help page -l, --lan...
- Page 117 Settings Mode values: - set custom Network address, Netmask and Gateway manual <network> <mask> <gateway> - automatically set Network address, Netmask and Gateway dhcp -x, --set-ipv6 <status> Status values: - enable IPv6 enable - disable IPv6 disable -x, --set-ipv6 <mode> Mode values: - set custom Network address, Prefix and Gateway manual <network> <prefix> <gateway> - automatically set Network address, Prefix and Gateway router Examples of usage: -> Display Link status and MAC address netconf -l -> Set Auto negotiation to Link netconf --set-lan auto ->...
- Page 118 Settings Help ping The ping utility uses the ICMP protocol's mandatory ECHO_REQUEST datagram to elicit an ICMP ECHO_RESPONSE from a host or gateway. ECHO_REQUEST datagrams (``pings'') have an IP and ICMP header, followed by a ``struct timeval'' and then an arbitrary number of ``pad'' bytes used to fill out the packet.
-
Page 119: Firewall
Settings 3.7.5.5.1 For other CLI commands See the CLI commands in the Information>>>CLI section. 3.7.6 Firewall This page allows to set the firewall settings to filter incoming network packets by defining a set of rules based on network, IP addresses and ports combinations. Below settings can be done for each protocols: •... - Page 120 Settings 3.7.6.3 SSH 3.7.6.4 SNMP 3.7.6.5 MQTT Contextual help of the web interface – 120...
- Page 121 Settings 3.7.6.6 ICMP V4 3.7.6.7 ICMP V6 3.7.6.8 Default settings and possible parameters - Firewall Default setting Possible parameters Firewall - WEB State : Active Active / Inactive Port : 80 Integer Address Filter : Empty IP address Firewall - Secure WEB State : Active Active / Inactive Port : 443...
- Page 122 Settings Firewall - ICMP V4 State : Active Active / Inactive Address Filter : Empty IP address Firewall - ICMP V6 State : Active Active / Inactive Address Filter : Empty IP address 3.7.6.8.1 For other settings For other settings, see the Information>>>Default settings parameters ...
-
Page 123: Protocols
Settings address (White list) xx.xxx.xx.xx SNMP SNMP Enabled true/false port Number : refer to default settings an possible parameters for constraints. address (White list) xx.xxx.xx.xx MQTT MQTT Enabled true/false port Number : refer to default settings an possible parameters for constraints. - Page 124 Settings To configure the remote monitoring connection settings: 1- Enable the Remote monitoring services 2- Configure the Proxy if needed. 3- Configure Advanced settings if so advised by the service support and Save after modifications. 4- Save after modifications, a disclaimer will appear. Contextual help of the web interface – ...
- Page 125 Settings 3.7.7.1.1 Status Label Description Connected The Network Module is connected and registered to the Remote Monitoring Service. Data transmission is OK. Disabled The Remote Monitoring Services is disabled. To enable it, you must have a valid service contract. Please contact the local service team and enable the Remote Monitoring Services on the Network Module.
- Page 126 Settings Label Description Proxy error The Network Module connection to the Remote Monitoring Services has failed. • Proxy is not set correctly in the network module or the proxy service does not allow this connection. Items to check with your network administrator: •...
- Page 127 Settings 3.7.7.2 Syslog 3.7.7.2.1 Settings This screen allows an administrator to configure up to two syslog servers. To configure the syslog server settings: 1- Enable syslog. Press Save after modifications. 2- Configure the syslog server: • Click the edit icon to access settings. • Enter or change the server name.
- Page 128 Settings • Select the option Using Unicode BOM if needed. • Press Save after modifications. 3.7.7.3 Default settings parameters and limitations Default setting Possible parameters HTTPS Port — 443 Port — x-xxx Syslog Enable — disabled Enable — disable/enable • Server#1 • Server#1 Name –...
- Page 129 Settings Syslog Inactive Inactive/Active • Server#1 • Server#1 Name – Primary Name – 128 characters maximum Status – Disabled Status – Disabled/Enabled Hostname – empty Hostname – 128 characters maximum Port – 514 Port – x-xxx Protocol – UDP Protocol – UDP/TCP Message transfer method –...
- Page 130 Settings servers name String: refer to default settings an possible parameters for constraints. enabled true/false hostname String: refer to default settings an possible parameters for constraints. protocol 1: UDP 2: TCP port Number: refer to default settings an possible parameters for constraints.
-
Page 131: Snmp
Settings 3.7.8 SNMP This tab contains settings for SNMP protocols used for network management systems. Changes to authentication settings need to be confirmed by entering a valid password for the active user account. 3.7.8.1 SNMP tables The default port for SNMP is 161 and normally this should not be changed. Some organizations prefer to use non- standard ports due to cybersecurity, and this field allows that. ... - Page 132 Settings a Enable the SNMP agent In addition to this, v1/V2C and/or v3 must be enabled, along with appropriate communities and activated user accounts to allow SNMP communication. Press Save after modifications. b Configure the SNMP V1/V2C settings: 1. Click the edit icon on either Read Only or Read/Write account to access settings: 2.
- Page 133 Settings c Configure the SNMP V3 settings: 1. Click the edit icon on either Read Only or Read/Write account to access settings: 2. Edit the user name. 3. Select Active in the Enabled drop-down list to activate the account. 4. Select access level. •...
- Page 134 Settings 6. If Auth is selected on the communication security mechanism, select the Authentication algorithms. It is recommended to set SHA256/SHA384/SHA512 with the AES192/AES256 Privacy algorithms. • SHA— SHA1 is not recommended as it is not secured. • SHA256—fill in password and privacy keys. The password can be between 8 and 24 characters and use a combination of alphanumeric and the following special characters <>&@#%_=:;,./?|$*.
- Page 135 Settings 3.7.8.2.1 Actions a Add 1. Press the New button to create new trap receivers. 2. Set following settings: • Enabled – Yes/No • Application name • Hostname or IP address • Port • Protocol – V1/V2C/V3 • Trap community (V1/V2C) / User (V3) 3.
- Page 136 Settings d Test trap Press the Test trap button to send the trap test to all trap receivers. Separate window provides the test status with following values: • In progress • Request successfully sent • invalid type For details on SNMP trap codes, see the Information>>>SNMP traps section.
- Page 137 Settings Trap receivers No trap Enabled — No/Yes Application name — 128 characters maximum Hostname or IP address — 128 characters maximum Port — x-xxx Protocol — V1/V2C/V3 Trap community — 128 characters maximum 3.7.8.4.1 For other settings For other settings, see the Information>>>Default settings parameters ...
- Page 138 Settings Name String: refer to default settings an possible parameters for constraints. Enabled true/false enabled true users name String: refer to default settings an possible parameters for constraints. allowWrite true/false enabled true/false auth enabled true/false algorithm password plaintext String: refer to default settings an possible parameters for constraints.
-
Page 139: Certificate
Settings cyphered priv enabled true/false algorithm password plaintext String: refer to default settings an possible parameters for constraints. cyphered traps receivers name String: refer to default settings an possible parameters for constraints. host port Number: refer to default settings an possible parameters for constraints. - Page 140 Settings During the selected timeframe, new connections to the Network Module are automatically trusted and accepted. After automatic acceptance, make sure that all listed clients belong to your infrastructure. If not, access may be revoked using the Delete button. The use of this automatic acceptance should be restricted to a secured and trusted network. For maximum security, we recommend following one of the two methods on the certificate settings page: •...
- Page 141 Settings 3.7.9.2.1 Local certificates table The table shows the following information for each local certificate. • Used for • Issued by • Valid from • Expiration • Status — valid, expires soon, or expired 3.7.9.2.2 Actions a Revoke This action will take the selected certificate out of use. Select the certificate to revoke, and then press the Revoke button.
- Page 142 Settings • Common name (CN) • Country (C) • State or Province (ST) • City or Locality (L) • Organization name (O) • Organization unit (OU) • Contact email address Press Save button. Issuer configuration will be applied only after the revoke of the certificate. d Edit Press the pen logo: ...
- Page 143 Settings This may disconnect applications such as a Web browser, shutdown application, or monitoring application. This operation cannot be recovered. f Create new certificates: g CSR Press Generate Signing Request button in the in the certificate edition. The CSR is automatically downloaded. CSR must be signed with the CA, which is managed outside the card.
- Page 144 Settings b Revoke Select the certificate to revoke, and then press the Revoke button. A confirmation window appears, press Continue to proceed, this operation cannot be recovered. Export Exports the selected certificate on your OS browser window. c Edit Press the pen logo to access to the certificate summary: 3.7.9.4 Trusted remote certificates The table shows the following information for each trusted remote certificate.
- Page 145 State or Province — 38 State or Province — 64 characters maximum City or Locality — Grenoble City or Locality — 64 characters maximum Organization name — Eaton Organization name — 64 characters maximum Organization unit — Power quality Organization unit — 64 characters maximum Contact email address —...
- Page 146 Settings existing. <service_name>: mqtt/syslog/webserver Examples of usage From a linux host: print over SSH: sshpass -p $PASSWORD ssh $USER@$CARD_ADDRESS certificates local print $SERVICE_NAME revoke over SSH: sshpass -p $PASSWORD ssh $USER@$CARD_ADDRESS certificates local revoke $SERVICE_NAME export over SSH: sshpass -p $PASSWORD ssh $USER@$CARD_ADDRESS certificates local export $SERVICE_NAME import over SSH: cat $FILE sshpass...
- Page 147 During the selected timeframe, new agent connections to the Network Module are automatically trusted and accepted. STEP 4: Action on the agent ( IPP/IPM ) while the time to accepts new agents is running on the Network Module Remove the Network module certificate file(s) *.0 that (are) located folder Eaton\IntelligentPowerProtector\configs\tls. Contextual help of the web interface – 147...
- Page 148 Settings Card wrong timestamp leads to "Full acquisition has failed" error message on Software Symptoms: IPP/IPM shows the error message "The full data acquisition has failed" even if the credentials are correct. Possible cause: The Network module timestamp is not correct. Probably the MQTT certificate is not valid at Network module date.
-
Page 149: Device Details
Device details 3.7.9.9.1 Additional information For details on Save and Restore, see the Save and Restore section. 3.8 Device details 3.8.1 General On this tab, you can see a list of the device characteristics. Some UPS may support the download of their system logs. This may prove useful in case the support team needs it for debugging purposes. -
Page 150: Settings - Ups
Device details 3.8.2 Settings - UPS This section is only for the UPS device and contains all its settings. • Audible Alarms - To enable / disable the sound emitted by the UPS when an alarm is triggered ( Battery replacement alarm for instance or UPS technical fault ) •... -
Page 151: Settings - Ats
Device details 3.8.3 Settings - ATS This section is only for the ATS device and contains all its settings. • Audible alarm - To enable / disable the sound emitted by the UPS when an alarm is triggered ( Battery replacement alarm for instance or UPS technical fault ) •... -
Page 152: Power Modules
Maintenance 3.8.4 Power Modules This section is only for UPS supporting Uninterruptible Power Modules. Are shown any installed UPM on the device. 3.8.4.1 Installed Power Modules • Position - The slot in which the UPS is installed is tagged by a # and a number (e.g #2 ) •... - Page 153 Displays the associated firmware version and associated Sha. c Generated on Displays the release date of the firmware. For better performance, security, and optimized features, Eaton recommends to upgrade the Network Module regularly. d Installation on Displays when the firmware was installed in the Network Module.
- Page 154 Maintenance Do not close the web browser or interrupt the operation. Depending on your network configuration, the Network Module may restart with a different IP address. Refresh the browser after the Network module reboot time to get access to the login page. Press F5 or CTRL+F5 to empty the browser to get all the new features displayed on the Web user interface.
- Page 155 Maintenance 3.9.1.3.1 For other access rights For other access rights, see the Information>>>Access rights per profiles section. 3.9.1.4 CLI commands get release info Description Displays certain basic information related to the firmware release. Help get_release_info Get current release date Get current release sha1 Get current release time Get current release version number 3.9.1.4.1 For other CLI commands...
-
Page 156: Sessions
Maintenance Refer to Installing the Network Management Module>>>Accessing the Network Module>>>Finding and setting the IP address section. Web user interface is not up to date after a FW upgrade Symptom After an upgrade: • The Web interface is not up to date •... -
Page 157: Services
Maintenance c Service Displays on which service the session is going on (Web, SSH, Serial , etc...) d IP Address Displays the IP address of the active session. e Interface Displays the type of connection (Web, LAN, etc...) f Connected since Displays the last opened session time 3.9.2.2 Access rights per profiles Missing access rights for Sessions... - Page 158 Maintenance 3.9.3.1.2 Reboot Reboot means restarting the network module operating system. To reboot the Network Module: Click Reboot. A confirmation message displays, click Reboot to confirm, the reboot time will take approximately less than 2min. Depending on your network configuration, the Network Module may restart with a different IP address. Refresh the browser after the Network module reboot time to get access to the login page.
- Page 159 Maintenance 3.9.3.1.4 Save Below settings are not saved: Local users other than the main administratorSensor settings (commissioning, alarm configuration) To save the Network module settings: 1. Click on Save 2. Select to include the Network settings if needed. A passphrase need to be entered twice to cypher the sensitive data. 3.
- Page 160 Maintenance To restore the Network module settings: 1. Click on Restore 2. Select to include the Network settings if needed. 3. Enter the passphrase used when the file was saved. 4. Click on Choose file and select the JSON file 5. Click on Restore to confirm 6.
- Page 161 Maintenance 3.9.3.2.1 For other access rights For other access rights, see the Information>>>Access rights per profiles section. 3.9.3.3 CLI commands maintenance Description Creates a maintenance report file which may be handed to the technical support. Help maintenance <cr> Create maintenance report file. -h, --help Display help page Examples of usage Generate the maintenance report by running the "maintenance"...
- Page 162 Maintenance Help Usage: reboot [OPTION] <cr> Reboot the card --help Display help --withoutconfirmation Reboot the card without confirmation save_configuration | restore_configuration Description Save_configuration and restore_configuration are using JSON format to save and restore certain part of the configuration of the card. Help save_configuration -h save_configuration: print the card configuration in JSON format to standard output.
-
Page 163: Resources
Maintenance Description Sanitize command to return card to factory reset configuration. Access • Administrator Help sanitize -h, --help Display help page --withoutconfirmation Do factory reset of the card without confirmation <cr> Do factory reset of the card 3.9.3.3.1 For other CLI commands See the CLI commands in the Information>>>CLI ... - Page 164 Maintenance 3.9.4.2 Memory • Total size in MB • Available size in MB • Application size in MB • Temporary files size in MB 3.9.4.3 Storage • Total size in MB • Available size in MB • Used size in MB 3.9.4.4 Access rights per profiles Administrator Operator...
-
Page 165: System Logs
Maintenance 3.9.4.4.1 For other access rights For other access rights, see the Information>>>Access rights per profiles section. 3.9.4.5 CLI commands systeminfo_statistics Description Displays the following system information usage: usage : % upSince : date since the system started total: MB free: MB used: MB tmpfs: temporary files usage (MB) Flash... -
Page 166: System Information
Maintenance For the list of system logs, see the Information>>>System Logs codes section. 3.9.5.2 Access rights per profiles Administrator Operator Viewer System logs 3.9.5.2.1 For other access rights For other access rights, see the Information>>>Access rights per profiles section. 3.9.6 System information System information is an overview of the main Network Module information. -
Page 167: Alarms
Alarms • Installation date • Activation date • Bootloader version 3.9.6.3 Access rights per profiles Administrator Operator Viewer System information 3.9.6.3.1 For other access rights For other access rights, see the Information>>>Access rights per profiles section. 3.10 Alarms 3.10.1 Alarm sorting Alarms can be sorted by selecting: •... -
Page 168: Active Alarm Counter
Alarms 3.10.2 Active alarm counter Alarms with a severity set as Good are not taken into account into the counter of active alarms. 3.10.3 Alarm details All alarms are displayed and sorted by date, with alert level, time, description, and status. Info/Warning/Critical logo Alarm description text Active In color... -
Page 169: Access Rights Per Profiles
User profile • System log codes • UPS(HID) alarm log codes • UPS(XCP and COPI) alarm log codes • ATS alarm log codes • EMP alarm log codes • Network module alarm log codes 3.10.8 Access rights per profiles Administrator Operator Viewer Alarm list... -
Page 170: User Profile
User profile 3.11.2 User profile This page displays the current username with its realm (local, remote) and allows to Change passwords, Edit account and Log out. Contextual help of the web interface – 170... - Page 171 User profile 3.11.2.1 Account settings If you have the administrator's rights, you can click on Edit account to edit user profile and update the following information: Account details • Full name • Email • Phone • Organization Preferences • Language • Date format •...
- Page 172 User profile 3.11.2.2 Change password Click on Change password to change the password. In some cases, it is not possible to change the password if it has already been changed within a day period. Refer to the troubleshooting section. Contextual help of the web interface – 172...
-
Page 173: Legal Information
User profile 3.11.2.3 Log out Click Log out to close the session. 3.11.3 Legal information This Network Module includes software components that are either licensed under various open source license, or under a proprietary license. 3.11.4 Component All the open source components included in the Network Module are listed with their licenses. 3.11.5 Availability of source code Provides the way to obtain the source code of open source components that are made available by their licensors. -
Page 174: Default Settings And Possible Parameters - User Profile
User profile 3.11.7 Default settings and possible parameters - User profile Default setting Possible parameters Profile Account details: Account details: • Full name — Administrator • Full name — 128 characters maximum • Email — blank • Email — 128 characters maximum •... -
Page 175: Cli Commands
User profile 3.11.8.1 For other access rights For other access rights, see the Information>>>Access rights per profiles section. 3.11.9 CLI commands logout Description Logout the current user. Help logout <cr> logout the user whoami Description whoami displays current user information: •... -
Page 176: Save And Restore
User profile Possible cause The password has already been changed once within a day period. Action Let one day between your last password change and retry. 3.11.10.1 For other issues For details on other issues, see the Troubleshooting section. 3.11.11 Save and Restore SRR section Settings Possible values... -
Page 177: Documentation
Documentation dateFormat Y-m-d: YYYY-MM-DD d-m-Y: DD-MM-YYYY d.m.Y: DD.MM.YYYY d/m/Y: DD/MM/YYYY m/d/Y: MM/DD/YYYY d m Y: DD MM YYYY timeFormat 1: 24h 0: 12h temperatureUnit 1: °C 2: °F 3.11.11.1 Additional information For details on Save and Restore, see the Save and Restore section. -
Page 178: Access Rights Per Profiles
Documentation 3.12.2 Access rights per profiles Administrator Operator Viewer Contextual help Full documentation 3.12.2.1 For other access rights For other access rights, see the Information>>>Access rights per profiles section. Contextual help of the web interface – 178... -
Page 179: Servicing The Network Management Module
Configuring/Commissioning/Testing LDAP 4 Servicing the Network Management Module 4.1 Configuring/Commissioning/Testing LDAP 4.1.1 Commissioning Refer to the section Contextual help>>>Settings>>>Remote users>>>LDAP to get help on the configuration. 4.1.1.1 Configuring connection to LDAP database This step configures the LDAP client of the network module to request data from an LDAP base. Activate LDAP. -
Page 180: Testing Ldap Connection
Pairing agent to the Network Module If a user belongs to multiple LDAP groups mapped to different profiles, the behavior is undefined. 4.1.1.3 Define LDAP user's preferences This step configures the user's preferences to apply to all LDAP users. 4.1.2 Testing LDAP connection Click on Test icon right to Status column Enter the User credentials then click on Test. -
Page 181: Pairing With Manual Acceptance
Note: After that stage, the agent creates a client certificate. The power source could show a communication loss since the current client certificate is not trusted by the Network Module. 4. Copy the agent certificate file client.pem that is located in the folder Eaton\IntelligentPowerProtector\configs\tls.. STEP 2: Action on the Network Module 1. - Page 182 Powering down/up applications (examples) 4.3.1.2 Step 1: Installation setup 4.3.1.2.1 Objective Use load segmentation provided by the UPS to independently control the power supply of each IT equipment categories (Applications, Database servers, Storage). It also allows IT equipment to sequentially restart on utility recovery (Restart sequentially the IT equipment on utility recovery).
- Page 183 Powering down/up applications (examples) 4. Set the OS shutdown duration to the time needed for your server to shutdown gracefully. This will make sure IPP shutdowns your servers before the load segment is powered down. As a result, it will define the overall shutdown sequence duration for each load segments. 4.3.1.4 Step 3: Power outage policy settings 4.3.1.4.1 Objective Use load segment policies to define shutdown sequencing.
-
Page 184: Powering Down Non-Priority Equipment First
Powering down/up applications (examples) 4.3.2 Powering down non-priority equipment first 4.3.2.1 Target Powering down non-priority equipment first (immediately) and keep battery power for critical equipment. Powering down critical equipment 3min before the end of backup time. Servicing the Network Management Module – 184... - Page 185 Powering down/up applications (examples) 4.3.2.2 Step 1: Installation setup 4.3.2.2.1 Objective Use load segmentation provided by the UPS to independently control the power supply of each IT equipment categories (Applications, Database servers, Storage). Load segmentation also allows IT equipment to restart sequentially on utility recovery (Restart sequentially the IT equipment on utility recovery).
- Page 186 Powering down/up applications (examples) 4. Set the OS shutdown duration to the time needed for your server to shutdown gracefully. This will make sure IPP shutdowns your servers before the load segment is powered down. As a result, it will define the overall shutdown sequence duration for each load segments. 4.3.2.4 Step 3: Power outage policy settings 4.3.2.4.1 Objective Use load segment policies to define shutdown sequencing.
-
Page 187: Restart Sequentially The It Equipment On Utility Recovery
Powering down/up applications (examples) Critical equipment is the last one to power down, their availability will be maximized and their shutdown will end 180s before the end of backup time. 3. Set Group 2 to: Immediate off. Non-priority equipment immediately shuts down when on battery for 10s to keep battery power for critical equipment. 4.3.3 Restart sequentially the IT equipment on utility recovery 4.3.3.1 Target Restart the storage first (right after utility recovery), database servers next (2min after utility recovery) and applications last (3min... - Page 188 Powering down/up applications (examples) 4.3.3.2 Step 1: Installation setup 4.3.3.2.1 Objective Use load segmentation provided by the UPS to independently control the power supply of each IT equipment categories (Applications, Database servers, Storage). This will allow to restart sequentially the IT equipment on utility recovery. 4.3.3.2.2 Resulting setup UPS provides outlets (Group 1 and Group 2) and a primary output.
-
Page 189: Checking The Current Firmware Version Of The Network Module
4.5 Accessing to the latest Network Module firmware/driver/script Download the latest Network Module firmware, driver or script from the Eaton website www.eaton.com/downloads 4.6 Upgrading the card firmware (Web interface / shell script) For instructions on accessing to the latest firmware and script, refer to: Accessing to the latest firmware and script 4.6.1 Web interface... -
Page 190: Example
Upgrading the card firmware (Web interface / shell script) Debian/Ubuntu sudo apt-get install sshpass RedHat/Fedora/CentOS sudo install sshpass Make shell script executable: chmod 700 install_updatePackage.sh 4.6.2.2 Procedure To upgrade the Network module using: Open a shell terminal on your computer (Linux or cygwin; meaning real or emulated Linux operating system). Use the shell script install_updatePackage.sh Usage: 'install_updatePackage.sh'... -
Page 191: Changing The Rtc Battery Cell
Changing the RTC battery cell Rebooting... res: Y Update: 4.7 Changing the RTC battery cell 1. Access the Network Module, and then disconnect the Network cable, if needed. 2. Unscrew the Network Module and remove it from the slot. 3. Locate the RTC battery cell located on the back of the Network Module. 4. -
Page 192: Updating The Time Of The Network Module Precisely And Permanently (Ntp Server)
Updating the time of the Network Module precisely and permanently (ntp server) 4.8 Updating the time of the Network Module precisely and permanently (ntp server) For an accurate and quick update of the RTC for the Network Module, we recommend implementing a NTP server as time source for the Network Module. -
Page 193: Resetting Username And Password
Resetting username and password 4.11 Resetting username and password 4.11.1 As an admin for other users 1. Navigate to Contextual help>>>Settings>>>Local users. 2. Press the pen icon to edit user information: 3. Change username and save the changes. 4. Select Reset password and choose from the following options : •... -
Page 194: Switching To Static Ip (Manual) / Changing Ip Address Of The Network Module
Switching to static IP (Manual) / Changing IP address of the Network Module Peel off the protection : Change the position of switch number 3, this change is detected during next power ON and the sanitization will be applied : Case 1 : Case 2 : Changes of the switches 1, 2 or 4 has no effect. -
Page 195: Reading Device Information In A Simple Way
Reading device information in a simple way • Default Gateway Save the changes. 4.14 Reading device information in a simple way 4.14.1 Web page The product information is located in the , specifically with the button on the top of the diagram: 4.15 Subscribing to a set of alarms for email notification 4.15.1 Example #1: subscribing only to one alarm (load unprotected) Follow the steps below:... -
Page 196: Example #2: Subscribing To All Critical Alarms And Some Specific Warnings
Subscribing to a set of alarms for email notification Logs will be attached by default in that example even if there is no subscription on card or device events. 4. Press Save, the table will show the new configuration. 4.15.2 Example #2: subscribing to all Critical alarms and some specific Warnings Follow the steps below: 1. -
Page 197: Saving/Restoring/Duplicating Network Module Configuration Settings
Saving/Restoring/Duplicating Network module configuration settings 4. Press Save, the table will show the new configuration. 4.16 Saving/Restoring/Duplicating Network module configuration settings 4.16.1 Modifying the JSON configuration settings file 4.16.1.1 JSON file structure The JSON file is structured into 3 blocks: Servicing the Network Management Module – 197... - Page 198 Saving/Restoring/Duplicating Network module configuration settings 4.16.1.1.1 File block File block cannot be modified, this is the mandatory structure of the JSON file. 4.16.1.1.2 Feature block Feature block contains the full definition of a feature. If it is removed from the JSON file, this feature settings will not be updated/restored in the card. 4.16.1.1.3 Data block Data block contains all the feature settings values.
- Page 199 Saving/Restoring/Duplicating Network module configuration settings a Data block Data block cannot be modified, this is the mandatory structure of the JSON file. b Value block If some values inside the Value block need to be kept, Value block structure cannot be modified, this is the mandatory structure of the JSON file.
- Page 200 Saving/Restoring/Duplicating Network module configuration settings When restoring the file, the corresponding setting will not be set. This may lead to restoration failure if corresponding setting was not previously set with a valid value. 4.16.1.3 Modifying JSON file examples 4.16.1.3.1 Modifying sensitive data To change sensitive data, plain text must be filled with the new value and the Cyphered entry (if existing) must be removed: 4.16.1.3.2 Adding local users Adding or modifying local users is not yet available, only the predefined account (main administrator) can be modified.
- Page 201 Saving/Restoring/Duplicating Network module configuration settings Original file: Modified file: 4.16.1.3.4 Making a partial update/restoration a Example: Updating/Restoring only LDAP settings If you restore below JSON content, only LDAP settings will be updated/restored, everything else will remain unchanged. "version": "x.x", "features": { Servicing the Network Management Module – ...
-
Page 202: Saving/Restoring/Duplicating Settings Through The Cli
Saving/Restoring/Duplicating Network module configuration settings "ldap": { "data": { "version": "x.x", "certificateData": [], "dmeData": { "enabled": true, "baseAccess": { "security": {"ssl": 1,"verifyTlsCert": false}, "primary": {"name": "Primary","hostname": "xxxxxxxxx","port": xxxx}, "secondary": {"name": "xxxxxx","hostname": "xxxxxx","port": xxxx}, "credentials": { "anonymousSearchBind": false, "searchUserDN": "CN=xxxx,OU=xxxx,OU=xxxx,OU=xxxx,DC=xxxx,DC=xxxx", "password": {"plaintext": null}}, "searchBase": {"searchBaseDN": "DC=xxx,DC=xxx,DC=xxx"} "requestParameters": { "userBaseDN": "OU=xxxx,DC=xxxx",... -
Page 203: Securing The Network Management Module
5.1 Cybersecurity considerations for electrical distribution systems 5.1.1 Purpose The purpose of this section is to provide high-level guidance to help customers across industries and applications apply Eaton solutions for power management of electrical systems in accordance with current cybersecurity standards. -
Page 204: Defense In Depth
Cybersecurity considerations for electrical distribution systems 5.1.4.1 Paths to the control network The paths in above figure include: • External users accessing the network through the Internet • Misconfigured firewalls • Unsecure wireless routers and wired modems • Infected laptops located elsewhere that can access the network behind the firewall •... -
Page 205: Designing For The Threat Vectors
Cybersecurity considerations for electrical distribution systems 5.1.6 Designing for the threat vectors 5.1.6.1 Firewalls Firewalls provide the capability to add stringent and multifaceted rules for communication between various network segments and zones in an ICS network. They can be configured to block data from certain segments, while allowing the relevant and necessary data through. - Page 206 Cybersecurity considerations for electrical distribution systems 5.1.6.2.1 Three-tier architecture for a secure control network Above figure shows that the control networks are divided into layers or zones based on control functions, which are then connected by conduits (connections between the zones) that provide security controls to: •...
-
Page 207: Policies, Procedures, Standards, And Guidelines
Cybersecurity considerations for electrical distribution systems 5.1.6.3 Intrusion detection and prevention systems (IDPS) These are systems that are primarily focused on identifying possible incidents in an ICS network, logging the information about them, attempting to stop them, and reporting them to ICS security administrators. Because these systems are critical in an ICS network, they are regular targets for attacks and securing them is extremely important. - Page 208 Cybersecurity considerations for electrical distribution systems Existing (traditional) IT standards and policies may not apply (or have not been considered) for control systems. A gap analysis should be performed to determine which components are not covered (or not adequately covered) by existing policies. Relationships with existing policies and standards should be explicitly identified and new or supporting policies should be developed.
-
Page 209: Conclusion
Cybersecurity considerations for electrical distribution systems general IT components, while the Industrial Control Systems Cyber Emergency Response Team (ICS-CERT) publishes advisories specific to control systems. A regular patch deployment schedule should be established for each component in the environment. Depending on the component, this could range from a monthly schedule to an as-needed deployment, depending on the historical frequency of patch or vulnerability related issues for the component or the vendor. -
Page 210: References
Cybersecurity considerations for electrical distribution systems Intrusion Prevention Systems Information Technology National Vulnerability Database Open System Interconnection Programmable Logic Controller SCADA Supervisory Control and Data Acquisition SNMP Simple Network Management Protocol Secure Shell SIEM Security Information and Event Management Universal Serial Bus 5.1.11 References [1] Recommended Practice: Improving Industrial Control Systems Cybersecurity with Defense-In-Depth Strategies, October 2009 https://ics-cert.us-cert.gov/sites/default/files/FactSheets/NCCIC%20ICS_FactSheet_Defense_in_Depth_Strategies_S508C.pdf... -
Page 211: Cybersecurity Recommended Secure Hardening Guidelines
Eaton is committed to minimizing the cybersecurity risk in its products and deploying cybersecurity best practices in its products and solutions, making them more secure, reliable and competitive for customers. - Page 212 Cybersecurity recommended secure hardening guidelines • Serial number • Hardware version • Location • Contact Firmware information • Firmware version • Firmware SHA • Firmware date • Firmware installation date • Firmware activation date • Bootloader version 5.2.2.1.2 Communication settings It can be retrieved by navigating to ...
- Page 213 Cybersecurity recommended secure hardening guidelines 5.2.2.3 Risk Assessment Eaton recommends conducting a risk assessment to identify and assess reasonably foreseeable internal and external risks to the confidentiality, availability and integrity of the system | device and its environment. This exercise should be conducted in accordance with applicable technical and regulatory frameworks such as IEC 62443 and NERC-CIP. ...
- Page 214 Network module supports network communication with other devices in the environment. This capability can present risks if it’s not configured securely. Following are Eaton recommended best practices to help secure the network. Additional information about various network protection strategies is available in Eaton Cybersecurity Considerations for Electrical Distribution Systems [R1] .
- Page 215 | device and any data it processes. 5.2.2.11 Malware defenses Eaton recommends deploying adequate malware defenses to protect the product or the platforms used to run the Eaton product. 5.2.2.12 Secure Maintenance Troubleshooting information are available in the embedded help for diagnostic purposes.
- Page 216 Navigate in the help to Contextual help>>>Card>>>Administration to get information on how to upgrade the Network Module. • Eaton also has a robust vulnerability response process. In the event of any security vulnerability getting discovered in its products, Eaton patches the vulnerability and releases information bulletin through its cybersecurity web site - https:// eaton.com/cybersecurity and patch through www.eaton.com/downloads.
-
Page 217: References
• Embedded Flash Memory on Boards and Devices • Eaton recommends the following methods for disposing of motherboards, peripheral cards such as network adapters, or any other adapter containing non-volatile flash memory. • Clear: If supported by the device, reset the state to original factory settings. ... -
Page 218: Configuring User Permissions Through Profiles
Configuring user permissions through profiles [R5] NIST SP 800-88, Guidelines for Media Sanitization, September 2006: http://ws680.nist.gov/publication/get_pdf.cfm? pub_id=50819 [R6] Cybersecurity Best Practices Modern Vehicles NHTSA: https://www.nhtsa.gov/staticfiles/nvs/pdf/ 812333_CybersecurityForModernVehicles.pdf [R7] A Summary of Cybersecurity Best Practices - Homeland Security: https://www.hsdl.org/?view&did=806518 [R8] Characterization of Potential Security Threats in Modern Automobiles - NHTSA: https://www.nhtsa.gov/DOT/NHTSA/NVS/ Crash%20Avoidance/Technical%20Publications/2014/812074_Characterization_PotentialThreatsAutos(1).pdf [R9]... -
Page 219: Servicing The Emp
Description and features 6 Servicing the EMP 6.1 Description and features Unable to render include or excerpt-include. Could not retrieve page. The optional Environmental Monitoring Probe Unable to render include or excerpt-include. Could not retrieve page. enables you to collect temperature and humidity readings and monitor the environmental data remotely. You can also collect and retrieve the status of one or two dry contact devices (not included). -
Page 220: Installing The Emp
Installing the EMP 6.3 Installing the EMP 6.3.1 Defining EMPs address and termination 6.3.1.1 Manual addressing Address must be defined before the EMP power-up otherwise the changes won't be taken into account. o not set Modbus address to 0, otherwise the EMP will not be detected. Define different address for all the EMPs in the daisy-chain. - Page 221 Installing the EMP Bottom mounting capabilities: Side mounting: • magnets • keyholes • magnets • tie wraps • tie wraps • nylon fastener 6.3.2.1 Rack mounting with keyhole example To mount the EMP on the rack, use the supplied screw, washer and nut. Then, mount the EMP on the screw and tighten it.
- Page 222 Installing the EMP Bottom mounting Side mounting 6.3.2.3 Wall mounting with screws example To mount the EMP on the wall close to the rack, use the supplied screw and screw anchor. Then, mount the EMP on the screw and tighten it. 6.3.2.4 Wall mounting with nylon fastener example To mount the EMP within the enclosure environment, attach one nylon fastener to the EMP and the other nylon fastener to an enclosure rail post.
-
Page 223: Cabling The First Emp To The Device
Installing the EMP 6.3.3 Cabling the first EMP to the device 6.3.3.1 Available Devices Unable to render include or excerpt-include. Could not retrieve page. Unable to render include or excerpt-include. Could not retrieve page. 6.3.3.2 Connecting the EMP to the device Address must be defined before the EMP power-up otherwise the changes won't be taken into account. -
Page 224: Daisy Chaining Emps
Installing the EMP 6.3.4 Daisy chaining EMPs Address must be defined before EMP power-up; otherwise, the changes will not be applied. Do not set Modbus address to 0; otherwise, the EMP will not be detected. 6.3.4.1 Material needed: • First EMP connected to the device (refer to previous section) •... -
Page 225: Connecting An External Contact Device
Commissioning the EMP 6.3.5 Connecting an external contact device To connect an external device to the EMP: STEP 1 – Connect the external contact closure inputs to the terminal block on the EMP (see the table and the figure below): • External contact device 1. -
Page 226: Addressing The Emp
Using the EMP for temperature compensated battery charging 6.5.1 Addressing the EMP Set the address 31 to the sensor dedicated to the battery room temperature: • Set all the Modbus address switches to 1 to set the EMP to the address 31 as indicated on the picture below: 6.5.2 Commissioning the EMP Refer to the section Contextual... -
Page 227: Information
Front panel connectors and LED indicators 7 Information 7.1 Front panel connectors and LED indicators Name Description Network connector Ethernet port Network speed LED Flashing green sequences: • 1 flash — Port operating at 10Mbps • 2 flashes — Port operating at 100Mbps •... -
Page 228: Specifications/Technical Characteristics
Specifications/Technical characteristics Boot LEDs Solid green and flashing red — Network Module is starting boot sequence. Settings/UPS data Configuration port. connector Access to Network Module’s web interface through RNDIS (Emulated Network port). Access to the Network Module console through Serial (Emulated Serial port). 7.2 Specifications/Technical characteristics Physical characteristics Dimensions (wxdxh) -
Page 229: Default Settings And Possible Parameters
Default settings and possible parameters Settings (default values) Web interface access User name: admin | Password: admin control Settings/Device data USB RNDIS Apipa compatible | IP address: 169.254.0.1 | Subnet mask: 255.255.0.0 connector 7.3 Default settings and possible parameters 7.3.1 Meters Default settings and possible parameters - Meters Default setting Possible parameters... - Page 230 Default settings and possible parameters Email notification settings No email 5 configurations maximum Custom name — 128 characters maximum Email address — 128 characters maximum Hide IP address from the email body — enable/ disabled Status — Active/Inactive • Alarm notifications Active —...
- Page 231 Default settings and possible parameters Password settings Minimum length — enabled (8) Minimum length — enable (6-32)/disable Minimum upper case — enabled (1) Minimum upper case — enable (0-32)/disable Minimum lower case — enabled (1) Minimum lower case — enable (0-32)/disable Minimum digit —...
- Page 232 Default settings and possible parameters LDAP Configure Configure • Active – No • Active – No/yes • Security • Security SSL – SSL SSL – None/Start TLS/SSL Verify server certificate – enabled Verify server certificate – disabled/enabled • Primary server •...
- Page 233 Default settings and possible parameters RADIUS Configure Configure • Active – No • Active – Yes/No • Retry number – 0 • Retry number – 0 to 128 • Primary server • Primary server Name – blank Name – 128 characters maximum Secret –...
- Page 234 Default settings and possible parameters Syslog Inactive Inactive/Active • Server#1 • Server#1 Name – Primary Name – 128 characters maximum Status – Disabled Status – Disabled/Enabled Hostname – empty Hostname – 128 characters maximum Port – 514 Port – x-xxx Protocol –...
- Page 235 Default settings and possible parameters SNMP Activate SNMP — disabled Activate SNMP — disable/enable Port — 161 Port — x-xxx SNMP V1 — disabled SNMP V1 — disable/enable • Community #1 — public • Community #1 — 128 characters Enabled — Inactive maximum Access —...
-
Page 236: Sensors Alarm Configuration
State or Province — 38 City or Locality — 64 characters maximum City or Locality — Grenoble Organization name — 64 characters maximum Organization name — Eaton Organization unit — 64 characters maximum Organization unit — Power quality Contact email address — 64 characters maximum Contact email address —... - Page 237 Default settings and possible parameters Profile Account details: Account details: • Full name — Administrator • Full name — 128 characters maximum • Email — blank • Email — 128 characters maximum • Phone — blank • Phone — 64 characters maximum •...
-
Page 238: Access Rights Per Profiles
Access rights per profiles 7.4 Access rights per profiles 7.4.1 Home Administrator Operator Viewer Home 7.4.2 Meters Administrator Operator Viewer Meters Battery health: Launch test/Abort Logs configuration 7.4.3 Controls Administrator Operator Viewer Control 7.4.4 Protection Administrator Operator Viewer Protection/Scheduled shutdowns Administrator Operator Viewer... -
Page 239: Environment
Access rights per profiles Administrator Operator Viewer Protection/Sequence 7.4.5 Environment Administrator Operator Viewer Environment/Commissioning Environment/Status Administrator Operator Viewer Environment/Alarm configuration Administrator Operator Viewer Environment/Information 7.4.6 Settings Administrator Operator Viewer General Administrator Operator Viewer Local users Administrator Operator Viewer Remote users Administrator Operator Viewer... -
Page 240: Maintenance
Access rights per profiles Administrator Operator Viewer Certificate Administrator Operator Viewer 7.4.7 Maintenance Administrator Operator Viewer System information Administrator Operator Viewer Firmware Administrator Operator Viewer Services Administrator Operator Viewer Resources Administrator Operator Viewer System logs 7.4.8 Alarms Administrator Operator Viewer Alarm list Export Clear... -
Page 241: Contextual Help
Access rights per profiles Administrator Operator Viewer User profile Administrator Operator Viewer Legal information 7.4.10 Contextual help Administrator Operator Viewer Contextual help Full documentation 7.4.11 CLI commands Administrator Operator Viewer get release info Administrator Operator Viewer history Administrator Operator Viewer ldap-test Administrator Operator... - Page 242 Access rights per profiles Administrator Operator Viewer ping ping6 Administrator Operator Viewer reboot Administrator Operator Viewer save_configuration restore_configuration Administrator Operator Viewer sanitize Administrator Operator Viewer ssh-keygen Administrator Operator Viewer time (read-only) (read-only) Administrator Operator Viewer traceroute traceroute6 Administrator Operator Viewer whoami Administrator Operator...
-
Page 243: List Of Event Codes
List of event codes Administrator Operator Viewer systeminfo_statistics Administrator Operator Viewer certificates 7.5 List of event codes To get access to the Alarm log codes or the System log codes for email subscription, see sections below: 7.5.1 System log codes To retrieve System logs, navigate to Contextual help>>>Maintenance>>>System logs section and press the Download System logs button. - Page 244 List of event codes 0A00A00 Warning Network module bootloader upgrade failed <f/w: xx.yy.zzzz> logUpdate.csv 0B00500 Warning RTC battery cell low logSystem.csv 0E00200 Warning New [self/PKI] signed certificate [generated/imported] for <service> server logSystem.csv 0E00300 Warning The [self/PKI] signed certificate of the <service> server will expires in <X> days logSystem.csv 0800700 Warning...
- Page 245 List of event codes 7.5.1.3 Info Code Severity Log message File 0300D00 Notice User action - sanitization launched logSystem.csv 0A00500 Notice Network module sanitized logUpdate.csv 0A00900 Notice Network module bootloader upgrade success <f/w: xx.yy.zzzz> logUpdate.csv 0A00B00 Notice Network module bootloader upgrade started <f/w: xx.yy.zzzz> logUpdate.csv 0A00C00 Notice...
- Page 246 List of event codes 0900E00 Notice <user> disconnected from interactive CLI with session id XXXXXX logSession.csv 0900F00 Notice <user> doesn't have access to CLI - CLI session id XXXXXX logSession.csv 0901000 Notice <user> connected and executes remote command <command> into the CLI - CLI logSession.csv session id XXXXXX 0901100...
- Page 247 List of event codes 0301500 Notice Sanitization switch changed logSystem.csv 0A01600 Notice Major version downgrade logUpdate.csv 0D00800 Notice DHCP client script called with <script parameters> logSystem.csv 0D00900 Notice IPv4 configuration changed to <ipsv4_address> logSystem.csv 0D01000 Notice IPv6 configuration changed to <ipsv6_address> logSystem.csv 0E00100 Notice...
-
Page 248: Ups(Hid) Alarm Log Codes
List of event codes 7.5.2 UPS(HID) alarm log codes This table applies to all UPS except to the 9130 UPS. To retrieve Alarm logs, navigate to Contextual help>>>Alarms section and press the Download alarms button. Below codes are the one to be used to add "Exceptions on events notification" on email sending configurations. Some zeros maybe added in front of the code when displayed in emails or logs. - Page 249 List of event codes Critical Battery temperature low critical Battery temperature OK Check battery Critical Battery temperature high critical Battery temperature OK Check battery Critical Battery fault Battery OK Check battery Critical Inverter internal failure UPS OK Service required Critical Inverter overload No power overload Reduce output load Critical...
- Page 250 List of event codes Warning Building alarm (through dry Building alarm OK contact) Warning Building alarm (through Network Building alarm OK module) Warning Input AC unbalanced End of input AC unbalanced Warning Bypass phase out range Bypass phase in range Warning Bypass not available Bypass available...
- Page 251 List of event codes Warning Battery voltage too low Battery voltage OK Check battery Warning Communication with battery lost Communication with battery Check battery recovered Warning At least one breaker in battery is All battery breakers are closed Check battery open Warning Battery State Of Charge below...
- Page 252 List of event codes Warning Firmware watchdog reset Firmware watchdog OK Service required Warning Compatibility failure Compatibility OK Service required Warning Output over current No output over current Reduce output load Warning Output frequency out of range Output frequency in range Service required Warning Output voltage too high...
- Page 253 List of event codes 7.5.2.4 Good Alarms with a severity set as Good are not taken into account into the counter of active alarms. Code Severity Active message Non-active message Good On high efficiency / On ESS mode High efficiency disabled / ESS disabled Good Ready On normal mode...
-
Page 254: Ups(Xcp And Copi) Alarm Log Codes
List of event codes 7.5.3 UPS(XCP and COPI) alarm log codes Use this table for 9130, 9x55, 9395P, BladeUPS. To retrieve Alarm logs, navigate to Contextual help>>>Alarms section and press the Download alarms button. Below codes are the one to be used to add "Exceptions on events notification" on email sending configurations. Some zeros maybe added in front of the code when displayed in emails or logs. - Page 255 List of event codes 2070 Critical UPS power supply fault UPS power supply OK 2073 Critical Temperature too high Temperature OK 2075 Critical Rectifier overload Rectifier OK 2076 Critical Rectifier Offline due to Rectifier no longer tripped overtemperature 2077 Critical Input AC module failure Input AC module OK 2079...
- Page 256 List of event codes 2221 Critical Inverter output failure Inverter output OK 2223 Critical Rectifier over temperature Rectifier temperature OK 2229 Critical At least one critical alarm active No critical alarm active 2238 Critical Inverter phases out of sequence Inverter phases wired OK 2240 Critical External CAN network fault...
- Page 257 List of event codes 2003 Warning Bypass AC over voltage End of bypass AC over voltage 2004 Warning Bypass AC under voltage No Bypass AC under voltage 2005 Warning Bypass frequency out of range Bypass frequency in range 2006 Warning Input AC voltage out of range (+) Input AC voltage in range 2007...
- Page 258 List of event codes 2118 Warning Input phases out of sequence Input phases wired OK 2119 Warning Bypass phases out of sequence Bypass phases wired OK 2132 Warning Parallel UPS redundancy lost Parallel UPS redundancy OK 2137 Warning Output breaker open Output breaker closed 2142 Warning...
- Page 259 List of event codes 2306 Warning Bypass breaker open Bypass breaker closed 2309 Warning Output phases are rotated Output phases wired OK 2322 Warning Battery temperature too high Battery temperature OK 2326 Warning Bypass phase out range Bypass phase in range 2327 Warning Bypass voltage out of range...
- Page 260 List of event codes 2044 Info Input AC current sensor not Input AC current sensor calibrated calibrated 2045 Info Battery current sensor not Battery current sensor calibrated calibrated 2059 Info Utility AC not present Utility AC present 2063 Info Internal communication failure Internal communication OK 2121 Info...
-
Page 261: Ats Alarm Log Codes
List of event codes 7.5.4 ATS alarm log codes To retrieve Alarm logs, navigate to Contextual help>>>Alarms section and press the Download alarms button. Below codes are the one to be used to add "Exceptions on events notification" on email sending configurations. Some zeros maybe added in front of the code when displayed in emails or logs. - Page 262 List of event codes Warning Voltage out of range Voltage in range Warning Input waveform is not OK Input waveform is OK Warning Voltage out of range Voltage in range Warning On alternate source 7.5.4.3 Good Alarms with a severity set as Good are not taken into account into the counter of active alarms. Code Severity Active message...
-
Page 263: Emp Alarm Log Codes
List of event codes 7.5.5 EMP alarm log codes To retrieve Alarm logs, navigate to Contextual help>>>Alarms section and press the Download alarms button. Below codes are the one to be used to add "Exceptions on events notification" on email sending configurations. Some zeros maybe added in front of the code when displayed in emails or logs. -
Page 264: Network Module Alarm Log Codes
List of event codes 7.5.6 Network module alarm log codes To retrieve Alarm logs, navigate to Contextual help>>>Alarms section and press the Download alarms button. Below codes are the one to be used to add "Exceptions on events notification" on email sending configurations. Some zeros maybe added in front of the code when displayed in emails or logs. -
Page 265: Snmp Traps
SNMP traps 7.5.6.2.2 Communication Code Severity Active message Non-active message Advice 1300 Info Communication: No device connected Communication: Communication with the device is back - 1301 Info Communication: Device not supported Communication: Communication with the device is back - 7.5.6.2.3 Alarms Code Severity Active message... - Page 266 SNMP traps Alarm oid at : Description when trap 3 Description when trap 4 .1.3.6.1.2.1.33.1.6.3.x .1.3.6.1.2.1.33.1.6.3.8 Power overload No power overload .1.3.6.1.2.1.33.1.6.3.9 Bypass mode No more on bypass .1.3.6.1.2.1.33.1.6.3.10 Bypass not available Bypass available .1.3.6.1.2.1.33.1.6.3.13 Battery charger fault Battery charger OK .1.3.6.1.2.1.33.1.6.3.14 Not powered Powered (Protected or Not protected)
- Page 267 SNMP traps Trap oid : Trap message at Code HID (For UPS 5P, 5PX, 9SX, Code XCP (For UPS Blade, oid : 9PX, 9xPM, 9xE, 9xPS) 9395, 9395P, 9395C, 9x55) .1.3.6.1.4.1.534.1.11 .4.1.0.x .1.3.6.1.4.1.534.1.1 1.3.0 .1.3.6.1.4.1.534.1.11 Bypass mode 2169 .4.1.0.11 .1.3.6.1.4.1.534.1.11 Bypass not available 201 2105, 2003, 2004, 2142, 2005 .4.1.0.12...
-
Page 268: Ats Mib
SNMP traps Trap oid : Trap message at Code HID (For UPS 5P, 5PX, 9SX, Code XCP (For UPS Blade, oid : 9PX, 9xPM, 9xE, 9xPS) 9395, 9395P, 9395C, 9x55) .1.3.6.1.4.1.534.1.11 .4.1.0.x .1.3.6.1.4.1.534.1.1 1.3.0 .1.3.6.1.4.1.534.1.11 Sensor humidity is .4.1.0.43 below/above critical threshold .1.3.6.1.4.1.534.1.11 Maintenance... -
Page 269: Sensor Mib
Trap oid : Trap description .1.3.6.1.4.1.534.10.2.10.x .1.3.6.1.4.1.534.10.2.10.22 Remote temperature normal .1.3.6.1.4.1.534.10.2.10.23 Remote humidity low .1.3.6.1.4.1.534.10.2.10.24 Remote humidity high .1.3.6.1.4.1.534.10.2.10.25 Remote humidity normal .1.3.6.1.4.1.534.10.2.10.26 Contact 1 active .1.3.6.1.4.1.534.10.2.10.27 Contact 1 inactive .1.3.6.1.4.1.534.10.2.10.28 Contact 2 active .1.3.6.1.4.1.534.10.2.10.29 Contact 2 inactive 7.6.3 Sensor Mib 7.6.3.1 Sensor Mib traps This information is for reference only. -
Page 270: Contextual Help
7.7.2 Contextual help You can see this help anytime by typing in the CLI: help CONTEXT SENSITIVE HELP [?] - Display context sensitive help. This is either a list of possible command completions with summaries, or the full syntax of the current command. -
Page 271: History
Get current release sha1 Get current release time Get current release version number 7.7.3.3 Specifics 7.7.3.4 Access rights per profiles Administrator Operator Viewer get release info 7.7.4 history 7.7.4.1 Description Displays recent commands executed on the card. 7.7.4.2 Help history <cr> Display the current session's command line history(by default display last... -
Page 272: Maintenance
7.7.5.3 Specifics 7.7.5.4 Access rights per profiles Administrator Operator Viewer logout 7.7.6 maintenance 7.7.6.1 Description Creates a maintenance report file which may be handed to the technical support. 7.7.6.2 Help maintenance <cr> Create maintenance report file. -h, --help Display help page 7.7.6.3 Examples of usage Generate the maintenance report by running the "maintenance"... -
Page 273: Netconf
7.7.7 netconf 7.7.7.1 Description Tools to display or change the network configuration of the card. 7.7.7.2 Help For Viewer and Operator profiles: netconf -h Usage: netconf [OPTION]... Display network information and change configuration. -h, --help display help page -l, --lan display Link status and MAC address -4, --ipv4 display IPv4 Mode, Address, Netmask and Gateway... -
Page 274: Ping And Ping6
Status values: - enable IPv6 enable - disable IPv6 disable -x, --set-ipv6 <mode> Mode values: - set custom Network address, Prefix and Gateway manual <network> <prefix> <gateway> - automatically set Network address, Prefix and Gateway router Examples of usage: -> Display Link status and MAC address ... -
Page 275: Reboot
7.7.8.2 Help ping The ping utility uses the ICMP protocol's mandatory ECHO_REQUEST datagram to elicit an ICMP ECHO_RESPONSE from a host or gateway. ECHO_REQUEST datagrams (``pings'') have an IP and ICMP header, followed by a ``struct timeval'' and then an arbitrary number of ``pad'' bytes used to fill out the packet. -
Page 276: Rest List
7.7.9.3 Specifics 7.7.9.4 Access rights per profiles Administrator Operator Viewer reboot 7.7.10 rest list 7.7.10.1 Usage rest list <path> This command shall list the endpoints starting from <path> If no path provided, the command shall list all resources starting from "/" rest list ? This command print the help for the command. -
Page 277: Rest Set
7.7.11.3 Example rest get /managers/1/networkService/networkInterfaces/eth1/ipv4/address => 10.130.33.195 7.7.12 rest set 7.7.12.1 Usage rest set <path> <payload> This command sets the resource identified by <path> with the given <payload> rest set ? This command print the help for the command. 7.7.12.2 Example Set IPv4 address : rest set /managers/1/networkService/networkInterfaces/eth1/ipv4/settings/manual/address 192.168.47.136 Set a field to an empty value or reset a field :... -
Page 278: Sanitize
save_configuration: print the card configuration in JSON format to standard output. restore_configuration -h restore_configuration: restore the card configuration from a JSON-formatted standard input. 7.7.14.3 Examples of usage 7.7.14.3.1 From a linux host: Save over SSH: sshpass -p $PASSWORD ssh $USER@$CARD_ADDRESS save_configuration -p $PASSPHRASE> $FILE Restore over SSH: cat $FILE | sshpass -p $PASSWORD ssh $USER@$CARD_ADDRESS restore_configuration -p $PASSPHRASE 7.7.14.3.2 From a Windows host: Save over SSH: plink ... -
Page 279: Ssh-Keygen
7.7.15.4 Access rights per profiles Administrator Operator Viewer sanitize 7.7.16 ssh-keygen 7.7.16.1 Description Command used for generating the ssh keys. 7.7.16.2 Help ssh-keygen -h, --help Display help <cr> Renew SSH keys 7.7.16.3 Specifics 7.7.16.4 Access rights per profiles Administrator Operator Viewer ssh-keygen 7.7.17 time 7.7.17.1 Description... -
Page 280: Traceroute And Traceroute6
Usage: time [OPTION]... Display time and date, change time and date. -h, --help display help page -p, --print display date and time in YYYYMMDDhhmmss format -s, --set <mode> Mode values: - set date and time (format YYYYMMDDhhmmss) manual <date and time>... -
Page 281: Whoami
7.7.18.3 Specifics 7.7.18.4 Access rights per profiles Administrator Operator Viewer traceroute traceroute6 7.7.19 whoami 7.7.19.1 Description whoami displays current user information: • Username • Profile • Realm 7.7.19.2 Specifics 7.7.19.3 Access rights per profiles Administrator Operator Viewer whoami 7.7.20 email-test 7.7.20.1 Description mail-test sends test email to troubleshoot SMTP issues. -
Page 282: Systeminfo_Statistics
7.7.20.3 Specifics 7.7.20.4 Access rights per profiles Administrator Operator Viewer email-test 7.7.21 systeminfo_statistics 7.7.21.1 Description Displays the following system information usage: usage : % upSince : date since the system started total: MB free: MB used: MB tmpfs: temporary files usage (MB) Flash user data ... - Page 283 7.7.22.2 Help certificates <target> <action> <service_name> <target> : - local <action> : - print: provides a given certificate detailed information. - revoke: revokes a given certificate. - export: returns a given certificate contents. - import: upload a given certificate the server CSR. This will replace the CSR with the certificate given.
-
Page 284: Legal Information
Copyright © 2020 Eaton. This firmware is confidential and licensed under Eaton Proprietary License (EPL or EULA). This firmware is not authorized to be used, duplicated, or disclosed to anyone without the prior written permission of Eaton. Limitations, restrictions and exclusions of the Eaton applicable standard terms and conditions, such as its EPL and EULA, apply. -
Page 285: Acronyms And Abbreviations
Acronyms and abbreviations 7.9 Acronyms and abbreviations AC: Alternating current. ATS: Automatic transfer switch is an electrical switch that switches a load between two sources. AVR: Automatic Voltage Regulation provides stable voltage to keep equipment running in the optimal range. BMS: A Battery Management System is any electronic system that manages li-ion battery. bps: bit per second BOM: In Syslog, placing an encoded Byte Order Mark at the start of a text stream can indicates that the text is Unicode and identify the encoding scheme used. - Page 286 Acronyms and abbreviations MIB: A management information base is a database used for managing the entities in a communication network. Most often associated with the Simple Network Management Protocol (SNMP). NTP: Network Time Protocol is a networking protocol for clock synchronization between computer systems. PDU/ePDU: ...
- Page 287 Acronyms and abbreviations Information – 287...
-
Page 288: Troubleshooting
Action not allowed in Control/Schedule/Power outage policy 8 Troubleshooting 8.1 Action not allowed in Control/Schedule/Power outage policy 8.1.1 Symptom Below message is displayed when you access the Control, Schedule or Power outage policy page. This action is not allowed by the UPS. To enable it, please refer to the user manual of the UPS and its instructions on how to configure the UPS settings and allow remote commands. -
Page 289: Action
EMP communication status shows "Lost" 8.3.3 Action In the server system BIOS, change the setting for Automatic Power ON to "Enabled". 8.4 EMP communication status shows "Lost" In the Network Module, in Contextual help>>>Environment>>>Commissioning/Status , EMPs are missing in the Sensor commissioning table. 8.4.1 Symptom #1 The connection status of the sensor is "Lost"... -
Page 290: Symptom #2
How do I log in if I forgot my password? 8.5.1.3 Action #1-2 1- Check the EMPs connection and cables. Refer to the sections Servicing the EMP>>>Installing the EMP>>>Cabling the first EMP to the device and Servicing the EMP>>>Installing the EMP>>>Daisy chaining 3 EMPs. -
Page 291: Software Is Not Able To Communicate With The Network Module
Software is not able to communicate with the Network module 8.7 Software is not able to communicate with the Network module 8.7.1 Symptoms • In the Network Module, in Contextual help>>>Protection>>>Agent list>>>Agent list table, agent is showing "Lost" as a status. • In the Network Module, in Contextual help>>>Settings>>>Certificate>>>Trusted remote certificates, the status of... -
Page 292: Ldap Configuration/Commissioning Is Not Working
During the selected timeframe, new agent connections to the Network Module are automatically trusted and accepted. STEP 4: Action on the agent (IPP/IPM) while the time to accepts new agents is running on the Network Module Remove the Network module certificate file(s) *.0 that is (are) located in the folder Eaton\IntelligentPowerProtector\configs\tls. 8.8 LDAP configuration/commissioning is not working Refer to the section Servicing the Network Management Module>>>Commissioning/Testing... - Page 293 The Network Module fails to boot after upgrading the firmware 8.10.2.2 Get Alarm Log Backup: curl --location --request GET 'https://{{domain}}/rest/mbdetnrs/1.0/alarmService/actions/ downloadBackup' --header 'Authorization: Bearer {{access_token}}' 8.11 The Network Module fails to boot after upgrading the firmware 8.11.1 Possible Cause 1- The IP address has changed. 2- The Network module LED shows solid red after the upgrade.
Need help?
Do you have a question about the Network-M3 and is the answer not in the manual?
Questions and answers