RTS TIF-2000A User Manual
Digital hybrid telephone line interface
Hide thumbs
Also See for TIF-2000A:
- Manual (28 pages) ,
- Specification sheet (2 pages) ,
- User manual (15 pages)
Table of Contents

Related Manuals for RTS TIF-2000A


Summary of Contents for RTS TIF-2000A
- Page 1 Model TIF 2000A Digital Hybrid Telephone Line Interface 9350-7823-000 Rev C May/2007...
- Page 2 OTICE The product information and design disclosed herein were originated by and are the property of Telex Communications, Inc. Telex reserves all patent, proprietary design, manufacturing, reproduction, use and sales rights thereto, and to any article disclosed therein, except to the extent rights are expressly granted to others.
-
Page 3: Table Of Contents
Introduction and Description ...3 Description ...3 Front and Rear Panel Features ...4 Specifications ...4 Installation and Operation ...5 Installation ...5 Rear Panel DIP Switch (S201) ...5 Auto-Answer ...5 Generate Ring Signal ...5 Password Required ...5 Intercom Port Address ...5 Full Duplex Mode ...6 Internal DIP Switch (S202) ...7 Ring Count ...8 DTMF or Pulse Dial Selection ...8... -
Page 5: Introduction And Description
This manual describes the installation, programming, and operating procedures for the RTS Telephone Line Interface. Since TIF2000A functions as a keypanel, the user may also need to refer to the manuals and/or the AZedit online help files for information on configuring certain features. NOTE: Be sure to review any recently added supplemental information before proceeding. -
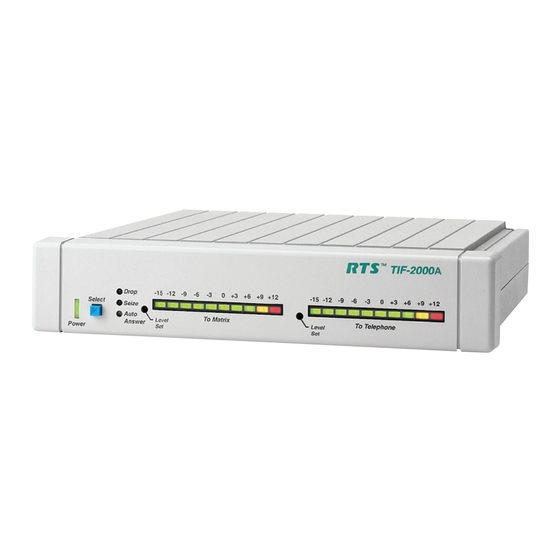
Page 6: Front And Rear Panel Features
Introduction and Description Front and Rear Panel Features Power Indicator Seizes & Drops Line Intercom Matrix Connections TIF2000A Reference View FIGURE 1. Specifications Matrix Input/Output: 0 dBu to ±20 dBu Telephone Input/Output: -30 dBu to +6 dBu Noise (200 Hz to 3.8 kHz): -40 dBu or less Harmonic Distortion (300 Hz to 3.8 kHz): Intercom Side: -30 dBu or less... -
Page 7: Installation And Operation
CHAPTER 1 Installation and Operation Installation Rear Panel DIP Switch (S201) The rear panel DIP switch contains switches to configure the most often changed options. These include: auto-answer ON/ OFF, ring signal ON/OFF, password ON/OFF, intercom port address, and full duplex method. Auto-Answer Turning ON the auto-answer option will set the unit to answer the phone automatically when it rings. -
Page 8: Full Duplex Mode
Installation and Operation To set the address for ADAM, ADAM CS, or Zeus systems, do the following: Determine the port number that will be used for the TIF2000A. Locate the port number and its corresponding address in Table 1. Determine the DIP switch settings by looking up the address determined in the previous step in Table 2 on page 7. Set the DIP switches on the back of the unit. -
Page 9: Internal Dip Switch (S202)
Installation Correspondence between address numbers and intercom port numbers for ADAM ADAM CS, and Zeus TABLE 1. Address DIP Switch Settings TABLE 2. DIP Switch Settings Logical Keypanel Number Down Down Down Down Down Down Down Down Down Down Down Down Down Down... -
Page 10: Ring Count
Installation and Operation Ring Count Switches 1 and 2 determine the number of rings before the unit answers. Note, the ring count is approximate. These switches have no effect unless switch 1 on the rear panel DIP switch bank is in the down position. To set the ring count, consult Table 3 on page 9. -
Page 11: Point-To-Point Seize
Installation Point-To-Point Seize Switch 4 turns ON and OFF the point-to-point seize feature. When the switch is in the OFF position, normal line seize operation (via a keypanel) is selected. When the switch is in the ON position, a line will be seized immediately upon the designated TIF200A’s talk key being pressed via the keypanel. -
Page 12: Rack Mounting
Installation and Operation Rack Mounting There are two options for rack mounting the TIF2000A. If a single unit is to be rack mounted, attach an MCP-2 rack mount kit. If two units are to be mounted side-by-side, attach an MCP-1 rack mount kit. See Figure 4, for a depiction of the two rack mount kits. -
Page 13: Power Supply
Installation There are two telephone connections provided on the rear of the TIF2000A. Plug the telephone line into the jack labeled “To Phone Line”. You may also plug a standard telephone into the jack labeled “Loop Thru” NOTE: The standard telephone plugged into the “Loop Thru” jack is disconnected when the TIF2000A switches the telephone line. -
Page 14: Setting Audio Levels
Installation and Operation Password Settings TABLE 5. 0,1,6,6 9,5,5,6 8,0,5,4 6,2,9,3 6,6,1,1 6,3,6,7 1,5,2,9 2,7,5,6 8,3,1,3 1,6,5,6 7,6,4,2 1,6,5,3 1,6,0,3 4,3,7,3 3,5,7,4 4,7,6,4 3,8,6,8 5,7,1,9 3,9,2,7 6,8,5,7 5,4,8,7 3,2,5,2 0,4,0,1 6,4,0,9 4,3,4,3 Setting Audio Levels Audio levels to the intercom matrix and to the telephone line can be adjusted via the trim pots located on the front panel. -
Page 15: Configuring For Country's Telephone System
Installation blade screwdriver or trim pot adjustment tool. Initially set the front panel level control for mid-range. Talk at your normal level and adjust the control for the best audio quality while avoiding going into the red section of the audio meter (to Telephone) located on the front panel. -
Page 16: Operation
Installation and Operation Operation Operation from a Keypanel The TIF2000A is operated from the intercom keypanels, and from the dial pad on the telephone at the remote end of the line. Any keypanel with a keypad may use a TIF2000A. All that is necessary is to program a key to talk to the TIF2000A, as if it were a keypanel. -
Page 17: Hanging Up
Operation Hanging Up The TIF2000A detects the caller at the far end has hung up, under most circumstances. It detects the hang up by either loop interrupt, battery reversal, or the presence of a dial tone or a busy signal. Some telephone systems do not provide any of the above, so it will be necessary to force a hang up. -
Page 18: Answering A Call
Installation and Operation A TIF2000A can have different numbers stored in it. Unlike the TIF951, the TIF2000A stores the numbers in non-volatile memory and therefore does not require a UPS to maintain stored speed dial numbers. Answering a call When a line is ringing, the alpha-numeric display or LED above the talk key which is programmed for that line will flash rapidly. -
Page 19: Manual Answer Mode
Operation key 8, in which case it will behave the same as keys 1-7. You may also program additional keypanels, PLs, IFBs, etc. on keys 9-15, and they will be activated simultaneously by the 8 button on the phone. Manual Answer Mode In Manual Answer Mode, the line will ring until it is answered from a keypanel. -
Page 20: Dtmf Codes
Installation and Operation up by pressing 0. When the call is complete the caller should enter *#, which will cause the TIF2000A to disconnect information. DTMF Codes Once programmed, the TIF2000A may be operated via the DTMF keypad on the telephone. The DTMF keys have the following functions: Normal Mode: Toggle ON and OFF talk and listen #1 to #7. - Page 21 Operation 01 nn # *K 02 nn # *K 03 nn # *K 04 nn # *K NOTE: 0-9 are the number keys, * and # are the star and pound keys. nnn is three digit for the panel number nn is two digit for an IFB, PL, Relay, Special List, or ISO K is a key which you are programming, just press the digit (1-7) *K is the key followed by a digit (1-7).
-
Page 22: Telephone Interface Requirements Form
Telex may have ringing and hang-up characteristics which differ from the design parameters used in the TIF2000A to the public telephone system. Telex handles these requirements on a case by case basis and may require a one-time engineering fee to adapt the TIF2000A for a specific telephone system or to obtain governmental approval. -
Page 23: Notes
Notes Notes...
Need help?
Do you have a question about the TIF-2000A and is the answer not in the manual?
Questions and answers