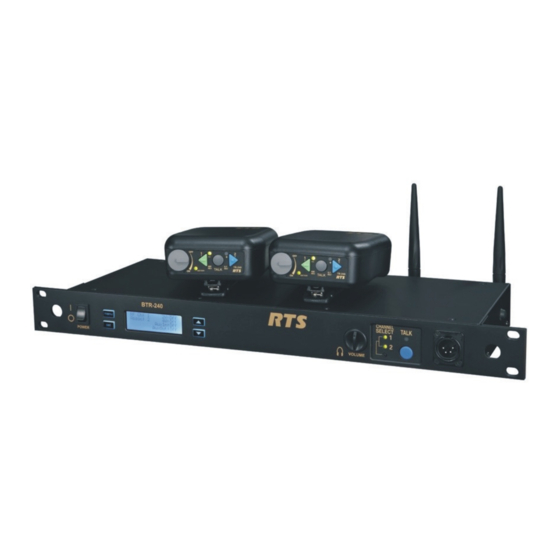
RTS BTR-240 Operating Manual
Wireless intercom system
Hide thumbs
Also See for BTR-240:
- Quick start manual (2 pages) ,
- Quick start quide (2 pages) ,
- User manual (9 pages)
Table of Contents
Advertisement
Quick Links
Advertisement
Table of Contents

Related Manuals for RTS BTR-240


Summary of Contents for RTS BTR-240
- Page 1 Operating Manual BTR-240 TR-240 Wireless Intercom System...
- Page 3 Thank you from Bosch We, at Bosch Security Systems, Inc, would like to take this opportunity to thank you for choosing the RTS BTR-240 Wireless Intercom System. Many of the features in this product are the result of years of development work with many of the features developed from customer feedback.
-
Page 4: Proprietary Notice
Bosch is prohibited. All other trademarks are property of their respective owners. Warranty and Service Information For warranty and service information, refer to the appropriate web site below: RTS Intercoms.......www.rtsintercoms.com/warranty • RTS Digital • RTS TW •... -
Page 5: Table Of Contents
BTR-240 Base Station ........ - Page 6 BTR-240 Menu Structure........
- Page 7 Section 8 User Configuration Options ........8-1 Computer Requirements .
- Page 8 Section 12 Troubleshooting..........12-1 Section 13 Regulatory Information .
-
Page 9: Section 1 Introduction
No FCC license required and no license required in most countries world-wide. Operating in the 2.4 GHz frequency band, the BTR-240 system • Multi-level wireless security and audio encryption. uses the widely adopted IEEE 802.11 technology and is approved for license free use in most countries. -
Page 10: Important Safety Instructions
• Do not expose the system components to rain or moisture. • Always connect the BTR-240 base station to a main socket outlet having a protective earth ground connection. • Ensure that the power cords are in a safe and secure place that is protected from being walked on or pinched. -
Page 11: Section 2 Btr-240 Base Station
Male XLR connector for Telex units, female 5. <UP> and <DOWN> buttons – used to navigate the XLR connector for RTS units. A dynamic or electret menu options on the LCD. headset microphone is automatically detected by the base station and a bias voltage is supplied if necessary. - Page 12 SPEAKER 10 26 INPUT IP: 192.168.1.1 OUTPUT Figure 2-2 BTR-240 Rear View Transmit Antenna – reverse “TNC” connector. Intercom Channel 2 Input/Output – interface to wired intercom system 2. Programming Input – RJ-45 jack used for wired 2-Wire – male and female 3-pin XLR connectors Ethernet connections, configuration, and to update wired in parallel.The connectors are...
-
Page 13: Local Headset
4-Wire Input / Output ......... . Level Adjustable (2 Vrms typical) RTS 2-Wire Intercom Input / Output ..Level Adjustable (0.775 Vrms typical), Line impedance 200 AudioCom 2-Wire Intercom Input / Output . - Page 14 [This page intentionally left blank]...
-
Page 15: Section 3 Tr-240 Beltpack
Section 3 - TR-240 Beltpack Controls and Connections - Top Panel 3 4 5 Figure 3-1 TR-240 Beltpack Top View On/Off & Volume Control – turns the beltpack power <TALK> Button – press to enable/disable the audio on/off and controls headset volume. path from the headset microphone. - Page 16 Accepts a 5.5mm x 2.5mm plug with the center positive. Must be supplied with a 12VDC regulated power supply connector for RTS units. A dynamic or electret microphone headset is automatically detected by the with at least a 400mA current capacity.
-
Page 17: Technical Specifications
Technical Specifications - TR-240 RF Technology ............IEEE 802.11b (Wi-Fi) FCC License . - Page 18 [This page intentionally left blank]...
-
Page 19: Section 4 Initial Equipment Setup
Unpacking The battery pack is designed to fit only one way in the TR-240 Unpack the RTS System and retrieve the Package Contents list. beltpack. Be certain that the gold contacts on the battery align Verify that all contents have been received according to the with the contacts on the beltpack. -
Page 20: Chg-240 Quick Charge
Antenna Placement Proper antenna placement has a significant effect on the overall performance of the RTS Wireless Intercom System. The following suggestions will help optimize system performance. Figure 4-4 Inserting Beltclip into TR-240 Beltpack NOTE: To avoid scratching the TR-240 case, lift the metal tab as the beltclip is inserted. -
Page 21: Btr-240 Base Station
NOTE: Antennas should never be mounted on, or next to metal, BTR-240 Base Station such as beams, walls with metal studs, equipment The supplied omni-directional antennas have a circular antenna racks, etc. This will “detune” the antennas, by altering pattern and radiate RF signals equally in all directions. When... -
Page 22: Tr-240 Beltpack
NOTE: The antennas listed in the “Accessories and Replacement Parts” section of this manual have been approved and authorized for use with the BTR-240 base station. Using an unauthorized antenna may be illegal. Figure 4-8 Beltpack on Hip... -
Page 23: System Quick Start Guide
System Quick Start Guide The following is a list to quickly get the BTR-240 base station and NOTE: Prir to use, the TR-240s should have their battery packs fully wireless TR-240 beltpacks operating. charged. Refer to the “Battery Charging Instructions” in this section. - Page 24 [This page intentionally left blank]...
-
Page 25: Section 5 Btr-240 Operation
Section 5 - BTR-240 Operation Powering the Base Station The BTR-240 base station is powered from an external 12 – 15 VDC supply. The base station accepts a 5.5 mm by 2.5 mm screw on plug. The source must supply at least 1.5 Amps. -
Page 26: Status Screen
Main Menu screen after this process is complete (return to Step 2). • Speaker Setting Indicator NOTE: The RF channel of operation is remembered and BTR-240 will continue to boot on the same channel until it is set differently by the user. Local Headset Interface Figure 5-3 Status Screen... -
Page 27: Microphone Gain And Sidetone Level
Steps to change the Microphone Gain and Sidetone Level: b. Use the <UP>/<DOWN> buttons and navigate to another selection to modify (return to Step 4). From the Status Screen, press <MENU> on the BTR-240 c. Press the <MENU> button to go back one menu screen front panel. -
Page 28: External Audio Interface Settings
When the desired level is flashing, press <SET> to select it. The cursor and number will stop blinking indicating that the The BTR-240 base station has the ability to interface to two, level has been set. 2-wire external audio intercom systems. As shown in Figure 5-12, these XLR jacks are designated as “Intercom 1”... - Page 29 Since RTS systems carry both channels of audio on one cable, the four intercom XLR connectors are connected in parallel when RTS is active. Thus, any one of the four intercom XLRs may be used for RTS input. As shown in Figure 5-14, looping thru of the...
- Page 30 The corresponding cursor and level number will begin CAUTION: flashing which indicates that the level can now be Do not switch between 2-wire types when the BTR-240 base modified. station is connected to a powered 2-wire system. The voltage differences between systems may cause damage to the f.
-
Page 31: Echo Cancellation
2-wire transmit signal is also present on the 2-wire receive signal which gets transmitted back to the The BTR-240 base station has the ability to interface to two, beltpack devices. For digital systems, echo cancellation is used to 4-wire external audio intercom systems. -
Page 32: Auxiliary Input / Output
The LCD will go back to the 4W Intercom menu (return Auxiliary Input/Output to Step 4). The BTR-240 base station can interface with external audio To modify the 4W Levels: devices via the auxiliary audio ports on the rear panel. As shown in Figure 5-27, the auxiliary input is a XLR and ¼"... - Page 33 Steps to change the Auxiliary Settings: will now flash indicating that they are ready to be modified. From the Status Screen, press <MENU> on the BTR-240 front panel. Using the <UP>/<DOWN> Buttons, navigate the cursor to the “Auxiliary Settings” menu option, then press <SET> to select the menu.
-
Page 34: Speaker Output
LCD will go back to the Auxiliary Menu Screen (return to Step 3). The BTR-240 also features a speaker port in which the intercom channels from the base station can be monitored. The speaker port To modify the Auxiliary Levels: outputs balanced audio with a maximum output of 1W into 8 Ohms. - Page 35 To modify the “Spk Settings”, continue with Step 3a. To f. From the Speaker Level Screen, the user has three modify the “Spk Level”, jump to Step 3c. options: i. Press <SET> again to re-adjust the level (return to To modify the Speaker Settings: Step 3e).
-
Page 36: Clearscan
Status indicated by a progress bar on the LCD. Screen. Contrast The contrast of the LCD screen can be adjusted after the BTR-240 has completely booted. Key Sequence: <UP> -or- <DOWN>... - Page 37 Figure 5-43 Reboot Screen System Restore Screen At this time, the BTR-240 must be powered off using the Use the <UP>/<DOWN> keys to navigate to the desired restore <POWER> switch and then turned back on. setting and press the <SET> button to initiate the restore.
-
Page 38: Btr-240 Menu Structure
Figure 5-47 BTR-240 Menu Structure 5-14... -
Page 39: Section 6 Tr-240 Operation
The TR-240 can be uniquely configured in one of three operating microphone path is enabled and the channel LED(s) are solid. A modes which allow it to work in conjunction with a BTR-240 beltpack is half-duplex, listen only, when the microphone path is base station or with other beltpacks in the absence of a base. -
Page 40: Volume
A base station could be a hold the <TALK> button down. Press and hold the <1> button to BTR-240 or a TR-240 in master wireless mode. One base station decrease the level or the < 2 > button to increase the level. There... -
Page 41: Master Wireless Mode
In the absence of an actual prompt is now active and the beltpack has resumed to BTR-240 base station, the beltpack itself can be configured to act normal master wireless operation. as an access point, but with mobile capabilities, and continue to provide coverage for up to 8 full-duplex wireless TR-240 beltpacks. -
Page 42: System Restore
System Restore The beltpack has the ability to restore all the settings and parameters back to the factory default state. The settings that are restored include the following: • Mode of Operation • Talk Mode • Microphone Gain • Sidetone Level •... -
Page 43: Section 7 System Operation
RF channel. Many more half-duplex beltpacks can be used. If a BTR-240 base station is loaded beyond its capacity limit, the usability becomes highly subjective. Users will begin to experience drop outs and potentially delays in the audio. -
Page 44: Wired Mode
For further details, refer to Network Interference in Section 10. Wireless and Wired Mixed-Mode Location A BTR-240 base station can also support a mixture of wired and wireless TR-240 beltpacks. Figure 7-3 shows an example of this type of configuration. Building... -
Page 45: Mixed-Mode Capacity Limit
Turn on the base station. If a BTR-240 base station is loaded beyond it’s capacity limit, the usability becomes highly subjective. The users will begin to •... -
Page 46: Set-Up
Set-up Tour Group Example A good example of a master wireless mode application is a tour Select one of the beltpacks to operate in master wireless group within a noisy manufacturing environment. mode and plug in a headset. Turn on the master-mode TR-240 beltpack. •... -
Page 47: Linking Multiple Base Stations
Channel Spacing and Utilization Many channels, overlapping and non-overlapping, can co-exist without noticeable interference if channel utilization, or amount of channel activity, is minimal. For example, a BTR-240 with 8 wireless full-duplex TR-240s is operating at maximum channel BTR-240 CHANNEL... -
Page 48: Separation Distance And Antenna Gain
Type of Environment When BTR-240 base stations are operating indoors and through walls, the interference will be greatly reduced and the separation distances required to keep them from interfering will also be reduced. -
Page 49: Btr-240S Linked Via Ethernet
The BTR-240 also features an AP-only mode where if the <TALK> button is disabled and all of the external audio interfaces are turned off, the BTR-240 will be placed into half-duplex and therefore will not occupy 1.7 full-duplex devices. -
Page 50: Btr-240S Linked Via 2-Wire
BTR-240s Linked via 4-Wire Linking base stations via 2-wire has several advantages. Since the Linking BTR-240 base stations via 4-wire has similar benefits 2-wire link is analog, there will be no extra overhead associated (capacity) and constraints (latency) as 2-wire. When used with a with multicast data transfer as in the Ethernet link. -
Page 51: Network Requirements
These network requirements apply to interconnect BTR-240 base stations and wired-mode TR-240 beltpacks. In general, the BTR-240 and the TR-240 follow the same rules as other Ethernet networked devices. These rules are: All BTR-240 base stations and TR-240 beltpacks must have a unique IP (internet protocol) address and cannot have the same IP address. - Page 52 [This page intentionally left blank] 7-10...
-
Page 53: Section 8 User Configuration Options
Section 8 - User Configuration Options User Configuration Options Network Configuration The BTR-240 base station and TR-240 beltpack both have Use the following instructions to properly configure the additional features that can be accessed by logging into the unit computers Ethernet adapter to communicate to the BTR-240 or from a personal computer. -
Page 54: Logging Into A Device
Logging into a Device Before continuing, ensure that all the steps have been successfully completed in the previous “Network Configuration” section. Ensure that the BTR-240 or TR-240 device is first powered off before connecting the Ethernet cable. Figure 8-2 Local Area Connection Properties NOTE: Only the device being logged into should be connected to the computer. -
Page 55: Software Version
Ethernet cable. NOTE: The password entry does not give user feedback to the screen. Turn on the BTR-240 or TR-240 device and allow it to boot completely. After a successful login, the User Menu Options will be displayed. -
Page 56: User Menu Options
TR-240 beltpack. When a TR-240 beltpack is in wireless mode combination of letters, numbers, punctuation, and spaces can be and is out of range from an access point (BTR-240 or TR-240 in used. For example, “This RTS BTR-240 System is great!” may be master mode) an alert tone will sound in the beltpack headset to used as the encryption key. -
Page 57: Display/Edit Ssid
By default, the WEP key is set to “bosch”. 13. Enable/Disable Beacon Broadcast CAUTION: In normal operation, an access point (BTR-240 or TR-240 in Write down the WEP key when changed. ALL wireless base master wireless mode) will broadcast its SSID. In doing so, it stations and beltpacks must have the same WEP key entered becomes visible to other nearby Wi-Fi enabled devices (i.e.,... -
Page 58: 14. Exit
NOTE: This feature was added in firmware version B(2.1.0) which was released in 07/2013. 14. Exit This menu option will exit the login and closes the Telnet connection to the BTR-240 or TR-240. If any changes were made, the unit must be rebooted before they take effect. -
Page 59: Section 9 Maintenance And Care
This is the typical battery capacity left after 4 – 6 hours of Temperature and Humidity full-duplex wireless usage. The BTR-240 system is robust and designed to work in a wide range of environmental conditions. When possible, the BTR-240s To place a BP-240 into long term storage: and TR-240s should be stored and used in an environment as close to indoor room temperature and humidity conditions as possible. - Page 60 [This page intentionally left blank]...
-
Page 61: Section 10 Rf Channels And Interference
(Channels 1, 6, and operate on any RF channel between 1 and 11. In Europe, China, and Japan, the BTR-240 system has the ability to operate on any 11). In Europe, China, and Japan, there are more non-overlapping RF channel between 1 and 13. -
Page 62: Non-Overlapping" Channels
Figure 10-4 downloading files. 802.11 Transmitter Spectral Mask at 2.4GHz For a real-time audio application, like the BTR-240 system, Figure 10-5 shows that the “non-overlapping” RF channels devices cannot simply wait for extended periods of time for the actually do overlap at lower signal levels. The reality is that even channel to become clear. -
Page 63: 802.11 Wireless / Rf Interference
802.11 Wireless / RF Interference BTR-240 Location and Antennas The BTR-240 system offers many benefits by operating in the 2.4GHz ISM frequency band. The main reason is that it allows • The omni-directional antennas supplied with the users to operate without a license requirement in most countries. -
Page 64: Wired / Network Interference
Wired / Network Interference The BTR-240 system allows both wireless and wired users to operate at the same time. Similar to wireless interference, wired users may experience performance degradation if operating over an existing Ethernet infrastructure that has a lot of traffic. -
Page 65: Section 11 Hardware Specifications
The 2-wire specifications and wiring diagrams will vary depending proper system operation. Refer to Figure 11-1 for the 3-pin XLR on which type of intercom is connected (RTS, AudioCom (Telex), wiring diagrams and specifications for each intercom type. or Clear-Com). -
Page 66: Local Headset
The local headset connector is a standard 4-pin XLR. A male The 4-wire intercoms use a standard 6-pin modular jack (RJ-11) XLR is used for Telex devices and a female XLR is used for RTS for connectivity. The 4-wire intercom uses two pairs of wires to devices. -
Page 67: Auxiliary Output
Auxiliary Output Program The auxiliary output jack is a 3-pin XLR. It outputs balanced The Program connector is a standard 8-pin modular jack (RJ-45). audio at line level. Refer to Figure 11-6 for the wiring diagram of This port is to be used with standard Ethernet cables of Category the auxiliary output. - Page 68 [This page intentionally left blank] 11-4...
-
Page 69: Section 12 Troubleshooting
When the BTR-240 base station power was • On boot, an error occurred and the unit • Turn off the power to the BTR-240, wait turned on, the LCD and button backlights could not finish the boot cycle. - Page 70 Problem Possible Cause Solution The “Assoc” number on the BTR-240 does not • The TR-240 did not boot in wireless mode. • Review Section 6 of this manual and the increment when a wireless TR-240 is booted sub-section titled “Wireless Mode” for and communication does not happen.
- Page 71 After changing the RF channel or running a • The beltpack(s) that did not re-associate RF channel. will need to be rebooted. Clear-Scan beltpack(s) longer communicate. The “Assoc” is incorrect on the BTR-240 Status Screen and the Out of Range alert is heard in the beltpack(s). 12-3...
- Page 72 [This page intentionally left blank] 12-4...
-
Page 73: Section 13 Regulatory Information
Section 13 - Regulatory Information FCC and Industry Canada The BTR-240 and TR-240 comply with Part 15 of FCC rules and Canada RSS-210. Le BTR-240 et TR-240 conforme à la Partie 15 des reglements de la FCC et Industrie Can ada RSS-210. -
Page 74: Eu Compliance Information
8 - 13 10mW Antenna Configurations The European version of the BTR-240 has a typical output power of the 50mW. The EiRP (Effective isotropic Radiated Power) limit for the European Union is 100mW, however, always check the regulations within the country of use. The standard, 3dB gain, Almost all EU and other European countries have made the 2.4... -
Page 75: China Compliance Information
For this purpose the China version of the BTR-240 has been approved for use with kits in Table 13-1. The kits contain an antenna, coaxial cable(s) of a... -
Page 76: Japan Compliance Information
Japan Compliance Information The Japanese version of the BTR-240 system complies with the RF limits as directed by the MIC (Ministry of Internal Affairs and Communications). These RF power limits are 10mW/MHz at the antenna port and up to a 12.14dBi external antenna may be placed on the base station. -
Page 77: Eu Declaration Of Conformity
Material No / CTN/ Description: F01U168688 / BTR-240, A4M-EU / Wireless Intercom Base Station with A4M Headset Connector F01U168689 / TR-240, A4M-EU / Wireless Intercom Beltpack with A4M Headset Connector F01U169595 / BTR-240, A4F-EU / Wireless Intercom Base Station with A4F Headset Connector F01U169596 / TR-240, A4F-EU / Wireless Intercom Beltpack with A4F Headset Connector Frequency Band: 2.412 - 2.472 GHz, IEEE 802.11 channels 1 - 13. - Page 78 [This page intentionally left blank] 13-6...
-
Page 79: Section 14 Accessories And Replacement Parts
Section 14 - Accessories and Replacement Parts Model Number Part Number Description TR-240 beltpack with 4-pin male XLR jack, F01U168687 North America rechargeable battery and charger/power supply. F01U168689 Euro F01U168691 China TR-240 F01U273854 Japan F01U273858 Korea TR-240 beltpack with 4-pin female XLR jack, F01U169594 North America rechargeable battery and charger/power supply. - Page 80 12VDC, 1.5A output, 5.5 x 2.5 screw on plug. AC power cord not included. North American Power Cord for BTR-240 F01U117972 Power Supply. EURO and Korea Power Cord for BTR-240 F01U117970 Power Supply. U.K. Power Cord for BTR-240 Power Supply. F01U117971 Japan Power Cord for BTR-240 Power Supply.
- Page 81 Model Number Part Number Description F01U118470 Telex Type 2-Wire Termination Load XLR Type F01U118472 RTS Type 2-Wire Termination Load XLR Type F01U148674 2 ft. (.61m) Single channel intercom cables with ME-2 XLR-3 M/F connectors F01U144090 6 ft. (1.83m) ME-6 F01U118903 25 ft. (7.6m) ME-25 F01U118904 50 ft.
- Page 82 [This page intentionally left blank] 14-4...
-
Page 83: Section 15 Glossary
(3) by having a device with the microphone path enabled without an attached headset; (4) by one user having their volume or microphone gain settings too high. AP-only Mode When a BTR-240 has all of it’s audio input interfaces disabled (local headset talk, 2-wire, 4-wire, auxiliary), it will be in half-duplex. Capacity The number of full-duplex TR-240s that can be associated with a specific access point for reliable and uninterrupted communications. - Page 84 TR-240’s in wired mode without a BTR-240 base station. Wireless Mode The TR-240’s radio is active and the Ethernet port is deactivated. A BTR-240 base station serves as the access point and provides wireless coverage for communication between the TR-240’s.
- Page 85 [This page intentionally left blank] 15-3...
- Page 86 Bosch Se cu rity Sys tem, Inc. 8601 East Cornhusker High way, Lin coln, NE 68507 Made in U.S.A. of Do mes tic & For eign Content 09/2013 PN F01U196141 Rev 03...
Need help?
Do you have a question about the BTR-240 and is the answer not in the manual?
Questions and answers