RTS BTR-240 Quick Start Manual
Wireless intercom
Hide thumbs
Also See for BTR-240:
- Operating manual (86 pages) ,
- Quick start quide (2 pages) ,
- User manual (9 pages)
Advertisement
Quick Links
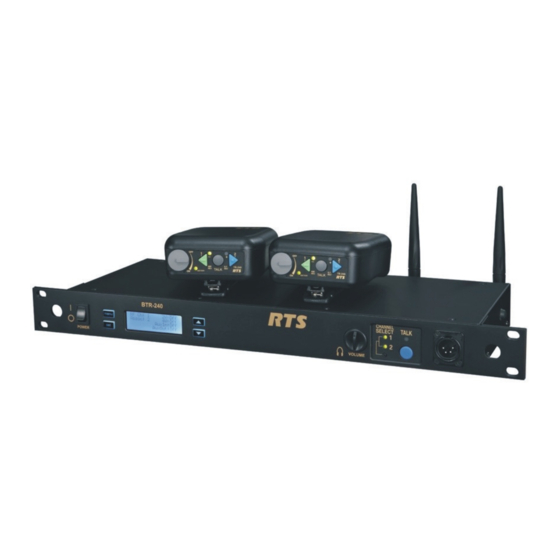
BTR-240 / TR-240
Wireless Intercom
NOTE: Prior to use, the BP-240 battery packs should be fully charged. Refer to the
battery charge instructions in the user manual.
Wireless Mode Setup
For a wireless mode configuration, a BTR-240 base station provides the wireless coverage
area for beltpacks configured in wireless mode.
Figure 1 - Example of Wireless Mode System
1. Select a location for the BTR-240 base station and connect the power cord and antennas.
• For omni-directional antennas, place the BTR-240 as close to the center of the coverage
area as possible.
2. Connect the base station to external audio interfaces. For example: local headset, 2-wire,
4-wire, auxiliary, speaker.
3. Turn on the base station.
• After approx. 25 seconds, the boot cycle will complete and Status Screen is displayed.
• Activate the connected audio interfaces by navigating the menu on the LCD screen.
4. Perform a ClearScan™.
• Press and hold the <MENU> + <SET> buttons simultaneously for approx. 3 seconds.
• ClearScan™ will find and select the optimal RF channel for operation.
5. Plug headsets into the TR-240 beltpacks and turn them on, one by one.
• If the beltpack has not been previously set to "wireless mode", press and hold the
<TALK> button while the beltpack boots.
• Allow a few seconds in-between each beltpack power on.
• After approx. 20 seconds, a voice prompt will announce "wireless" in the beltpack
headphones indicating that wireless communication has started.
Wired Mode Setup
For a wired mode configuration, TR-240 beltpacks are directly connected to each other via
Ethernet cable or through a building's Ethernet infrastructure. No base station is required for
a wired mode configuration.
Figure 2 - Example of Wired Mode System
F01U196143 Rev. DRAFT
Q U I C K S T A R T G U I D E
1. Connect the TR-240(s) to each other with Ethernet cables via the RJ-45 connectors.
• Use CAT-5e or better Ethernet cables that are wired to standards T-568A or T-568B.
• Do not use more than 100m (328ft) of Ethernet cable between devices.
• If desired, a wired-mode TR-240 into an AC outlet for prolonged usage.
2. Plug headsets into the TR-240 beltpacks and turn them on, one by one.
• If the beltpack has not been previously set to "wired mode", press and hold the <2>
button while the beltpack boots.
• Allow a few seconds in-between each beltpack power on.
• After approximately 20 seconds, a voice prompt will announce "wired" in the beltpack
headphones indicating that wireless communication has started.
Master Wireless Mode Setup
For a master wireless mode configuration, one TR-240 beltpack is configured as the "master"
and provides the wireless coverage for other "wireless" beltpacks. The "master" beltpack can
still be used for audio just as a "wireless" beltpack. No base station is required for a master
wireless mode configuration.
Figure 3 - Example of Master Wireless Mode System
1. Select one of the beltpacks to operate in master wireless mode and plug in a headset.
• If desired, the "master" beltpack can be plugged into an AC outlet for prolonged usage.
2. Turn on the "master" TR-240 beltapck.
• If the beltpack has not been previously set to master wireless mode, press and hold the
<1> button while the beltpack boots.
• After approximately 20 seconds, a voice prompt will announce "master wireless" in the
beltpack headphones.
• A second voice prompt will announce the current RF channel of operation, for
example, "Channel 1".
3. Perform a ClearScan™.
• Continue holding the <1> button until the voice prompt announce "RF Selection".
• Press <TALK> and the voice prompt will announce "ClearScan".
• ClearScan™ will find and select the optimal RF channel for operation.
• Release all the buttons for approx. 3 seconds and the ClearScan™ channel becomes
active.
4. Once the "master" TR-240 beltpack has booted and been configured, plug headsets into
the "wireless" beltpacks and turn them on, one by one.
• If the beltpack has not been previously set to "wireless mode", press and hold the
<TALK> button while the beltpack boots.
• Allow a few seconds in-between each beltpack power on.
• After approximately 20 seconds, a voice prompt will announce "wireless" in the
beltpack headphones indicating that wireless communication has started.
Bosch Security Systems, Inc.
Advertisement

Related Manuals for RTS BTR-240


Summary of Contents for RTS BTR-240
- Page 1 Figure 1 - Example of Wireless Mode System wireless mode configuration. 1. Select a location for the BTR-240 base station and connect the power cord and antennas. • For omni-directional antennas, place the BTR-240 as close to the center of the coverage area as possible.
-
Page 2: Special Key Sequences
GREEN Battery is charged. light will illuniate upon selection. Headset Connector – standard 4-pin XLR connector. Male XLR for Telex units, female XLR for RTS <TALK> button – press to enable/disable the audio path from the headset microphone. Channel units.
Need help?
Do you have a question about the BTR-240 and is the answer not in the manual?
Questions and answers