Advertisement
Quick Links
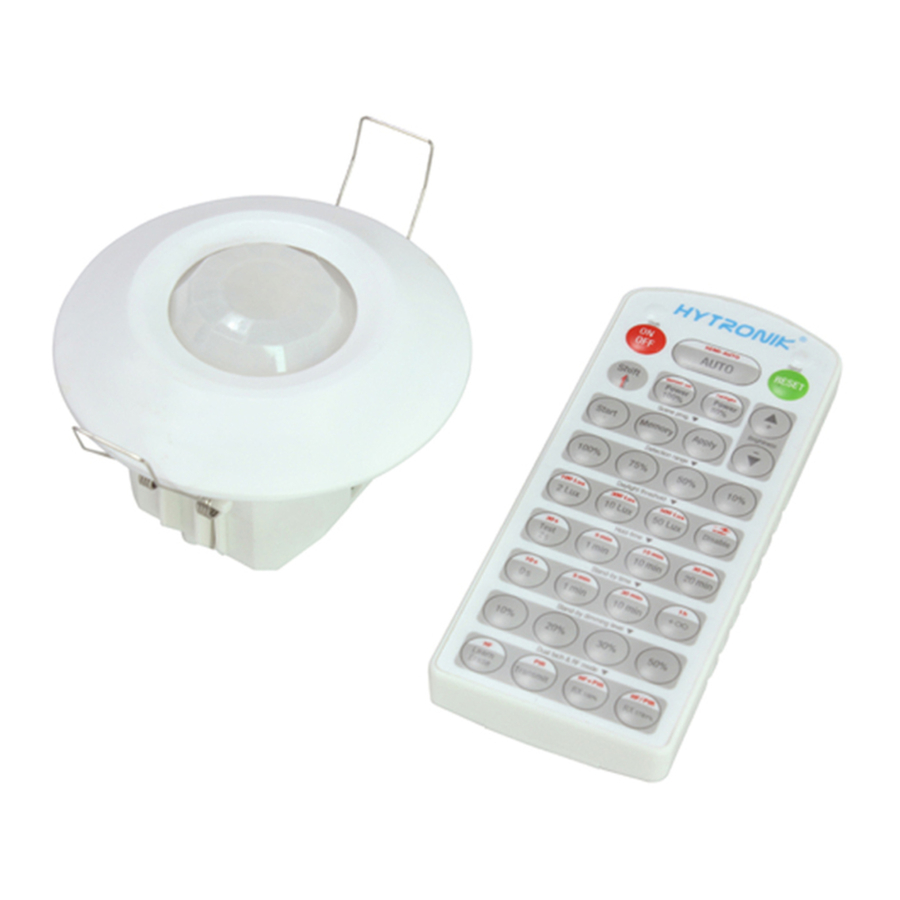
Flush Mount PIR Motion Sensor
HIR21
1-10V Dimming with Remote Control
Mechanical Structure
70mm
4
3
1
Infrared receiver
Rotary switch preset
2
Note1: the blinds are optional, they may be inserted behind the lens for focussing the detection range.
Note2:We recommend the mounting distance between sensor to sensor should be more than 2m to prevent sensors
from false-triggering.
Technical Data
Input Characteristics
Mains voltage
Stand-by power
Load ratings:
Capacitive
Resistive
Warming-up
Safety and EMC
EMC standard (EMC)
Safety standard (LVD)
Certi cation
Semko, CB, CE , EMC, LVD, RCM
Subject to change without notice.
PIR
64.7
(1) Sensor inset
(2) Lens pluggable
(3) Protection cover (covers the
Photocell
high-voltage terminals).
LED indicator
(4) Ceiling (drill hole
PIR
220~240VAC 50/60Hz
<0.5W
800VA
1600W
30s
EN55015, EN61000
EN60669-1, EN60669-2-1
Ø
70mm).
A
Blind
B
Blind
Sensor Data
Sensor principle
Detection range
Detection angle
Mounting height
Environment
Operation temperature
IP rating
Edition: 11 Aug. 2023
IP20
Intelligent
Photocell
Ambient daylight
One-Key
Rotary Switch
threshold
Commissioning
Programing
Detection Pattern
0
5
Loop in
Loop out
3
PIR detection
(O x H) 10m x 3m
360
O
5m (maximum)
Ta: -20
O
C ~ +50
O
C
IP20
Ver. A0
Page 1/6
Advertisement

Related Manuals for Hytronik HIR21


Summary of Contents for Hytronik HIR21
- Page 1 Flush Mount PIR Motion Sensor HIR21 IP20 1-10V Dimming with Remote Control Mechanical Structure 70mm 64.7 (1) Sensor inset (2) Lens pluggable (3) Protection cover (covers the Photocell high-voltage terminals). Infrared receiver LED indicator Ø (4) Ceiling (drill hole 70mm).
-
Page 2: Functions And Features
Tri-level Control (Corridor Function) Hytronik builds this function inside the motion sensor to achieve tri-level control, for some areas which require a light change notice before switch-off. The sensor offers 3 levels of light: 100%-->dimmed light (natural light is insuf cient) -->off; and 2 periods of selectable waiting time: motion hold-time and stand-by period;... -
Page 3: Detection Pattern
Radial movement 4m Tangential movement 10m Tangential movement 5m Tangential movement 10m Wiring Diagram LED+ L’ N N L LED - HIR21 1-10V 1-10V LED Driver Rotary Switch Preset A rotary switch is built inside the sensor for scene Detection Daylight... - Page 4 Settings (Remote Control HRC-11) Press button “ON/OFF” to select permanent ON or permanent OFF mode. * Press button “AUTO”/ “RESET” to exit this mode. Press button “RESET”, perform DIP Switch/Rotary Switch settings. *The default settings are: Detection range 100%; Hold-time 5min; Stand-by time +∞; Stand-by dimming level 30%;...
- Page 5 Sensitivity & More functions In AUTO /SEMI-AUTO modes, press buttons in zone “Detection range” to set 100% 75% detection range at 100%/75%/50%/10%. 50% 10% Tri-level This key is not appliable on this product. Harvest Master This key is not appliable on this product. Daylight threshold 2 Lux 100 Lux...
- Page 6 Additional Information / Documents 1. Regarding precautions for PIR sensor installation and operation, please kindly refer to www.hytronik.com/download ->knowledge ->PIR Sensors - Precautions for Product Installation and Operation 2. Regarding Hytronik standard guarantee policy, please refer to www.hytronik.com/download ->knowledge ->Hytronik Standard Guarantee Policy Subject to change without notice.
Need help?
Do you have a question about the HIR21 and is the answer not in the manual?
Questions and answers