Table of Contents
Advertisement
Available languages
Available languages
Quick Links
Betriebsanleitung Preisrechnende Waage
Operating manual Price calculating balance
Notice d'utilisation Balance calculant le prix
KERN RFC
Typ: RPB-DM
Version 1.3
2021-04
KERN & Sohn GmbH
Ziegelei 1
D-72336 Balingen
E-Mail: info@kern-sohn.com
Tel: +49-[0]7433- 9933-0
Fax: +49-[0]7433-9933-149
Internet: www.kern-sohn.com
RFC-BA-def-2113
Advertisement
Chapters
Table of Contents

Related Manuals for KERN RFC Series


Summary of Contents for KERN RFC Series
- Page 1 KERN & Sohn GmbH Ziegelei 1 Tel: +49-[0]7433- 9933-0 D-72336 Balingen Fax: +49-[0]7433-9933-149 E-Mail: info@kern-sohn.com Internet: www.kern-sohn.com Betriebsanleitung Preisrechnende Waage Operating manual Price calculating balance Notice d’utilisation Balance calculant le prix KERN RFC Typ: RPB-DM Version 1.3 2021-04 RFC-BA-def-2113...
- Page 2 Weitere Sprachversionen finden Sie online unter www.kern-sohn.com/manuals Más versiones de idiomas se encuentran online bajo www.kern-sohn.com/manuals Vous trouverez d’autres versions de langue online sous www.kern-sohn.com/manuals Further language versions you will find online under www.kern-sohn.com/manuals Trovate altre versioni di lingue online in www.kern-sohn.com/manuals...
-
Page 3: Table Of Contents
KERN RFC Version 1.3 2021-04 Betriebsanleitung Preisrechnende Waage Inhaltsverzeichnis Technische Daten ..................4 Abmessungen (mm) ........................8 Konformitätserklärung .................. 9 Geräteübersicht ................... 10 Anzeigenübersicht ........................11 Tastaturübersicht ........................13 Grundlegende Hinweise (Allgemeines) ............14 Bestimmungsgemäße Verwendung ..................14 Sachwidrige Verwendung ......................14 Gewährleistung ......................... - Page 4 11.2 AUTO CLEAR ........................... 30 11.3 Hinterleuchtung der Anzeige ....................31 Einheitenumschaltung von € / kg € / 100g ................31 11.4 11.5 Verwendung als Kasse ......................32 11.5.1 Vorbereitung ......................... 32 RS 232 Schnittstelle ..................34 12.1 Technische Daten: ........................34 12.2 Pinbelegung der Waagenausgangsbuchse ................
-
Page 5: Technische Daten
1 Technische Daten Modelle ohne Hochanzeige: KERN (Typ) TRFC 3K3M-A RFC 6K3M Modell RPB 3K3DM RPB 6K1DM Wägebereich (Max) 3 kg 3 kg / 6 kg Ablesbarkeit (d) 1 g / 2 g 1 g / 2 g Mindestlast (Min) - Page 6 KERN (Typ) RFC 15K3M RFC 30K3M Modell RPB 15K2DM RPB 30K5DM Wägebereich (Max) 6 kg / 15 kg 15 kg / 30 kg Ablesbarkeit (d) 2 g / 5 g 5 g / 10 g Mindestlast (Min) 40 g 100 g...
- Page 7 Modelle mit Hochanzeige: KERN (Typ) TRFC 3K3HM-A RFC 6K3HM Modell RPB 3K3DHM RPB 6K1DHM Wägebereich (Max) 3 kg 3 kg / 6 kg Ablesbarkeit (d) 1 g / 2 g 1 g / 2 g Mindestlast (Min) 20 g 20 g Eichwert (e) 0.5 g / 1 g...
- Page 8 KERN (Typ) RFC 15K3HM RFC 30K3HM Modell RPB 15K2DHM RPB 30K5DHM Wägebereich (Max) 6 kg / 15 kg 15 kg / 30 kg Ablesbarkeit (d) 2 g / 5 g 5 g / 10 g Mindestlast (Min) 40 g 100 g...
-
Page 9: Abmessungen (Mm)
1.1 Abmessungen (mm) Modelle ohne Hochanzeige: RFC-BA-d-2113... -
Page 10: Konformitätserklärung
Modelle mit Hochanzeige: 2 Konformitätserklärung Die aktuelle EG/EU-Konformitätserklärung finden Sie online unter: www.kern-sohn.com/ce RFC-BA-d-2113... -
Page 11: Geräteübersicht
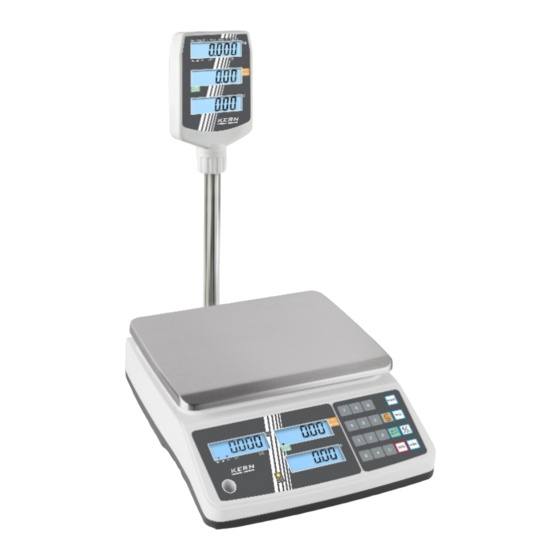
3 Geräteübersicht Modelle ohne Hochanzeige: Modelle mit Hochanzeige: 1. Wägeplatte 2. Libelle 3. Hochanzeige 4. Fußschrauben 5. Anschluss Netzadapter 6. Ein-/Ausschalter 7. RS 232-Schnittstelle 8. Akkufach 9. Justierschalter RFC-BA-d-2113... -
Page 12: Anzeigenübersicht
3.1 Anzeigenübersicht Bediener- und Zweitanzeige (rückseitig serienmäßig bei Modellen ohne Hoch- anzeige): Zusätzliche Hochanzeige bei Modellen mit Stativ: 1. Gewicht 2. Stückpreis 3. Verkaufspreis RFC-BA-d-2113... - Page 13 Anzeige Gewicht Hier wird das Gewicht des Wägeguts angezeigt. Der Indikator über dem Symbol zeigt an: Kapazität des Akkus bald erschöpft Nettogewicht Stabilitätsanzeige Nullstellanzeige Anzeige Stückpreis Stückpreis umschaltbar von € / kg oder € / 100 g. Der Indikator über dem Symbol zeigt an: €...
-
Page 14: Tastaturübersicht
3.2 Tastaturübersicht Auswahl Funktion • Numerische Tasten, PLU-Tasten • Im Menü: Parameter aufrufen • Löschen • Stückpreis speichern (langer Tastendruck), s. Kap. 10.2 • Stückpreis abrufen (kurzer Tastensdruck) , s. Kap. 10.2 • Einheit umschalten € / kg € / 100g •... -
Page 15: Grundlegende Hinweise (Allgemeines)
Art und den Umfang dieser Prüfung zu definieren. Informationen bezüglich der Prüfmittelüberwachung von Waagen sowie der hierfür notwendigen Prüfgewichte sind auf der KERN- Homepage (www.kern-sohn.com) verfügbar. In seinem akkreditierten DKD- Kalibrierlaboratorium können bei KERN schnell und kostengünstig Prüfgewichte und Waagen kalibriert werden (Rückführung auf das nationale Normal). -
Page 16: Grundlegende Sicherheitshinweise
5.1 Hinweise in der Betriebsanleitung beachten Lesen Sie diese Betriebsanleitung vor der Aufstellung und Inbetrieb- nahme sorgfältig durch, selbst dann, wenn Sie bereits über Erfahrungen mit KERN-Waagen verfügen. 5.2 Ausbildung des Personals Das Gerät darf nur von geschulten Mitarbeitern bedient und gepflegt werden. -
Page 17: Auspacken, Aufstellung Und Inbetriebnahme
7 Auspacken, Aufstellung und Inbetriebnahme 7.1 Aufstellort, Einsatzort Die Waagen sind so konstruiert, dass unter den üblichen Einsatzbedingungen zuver- lässige Wägeergebnisse erzielt werden. Exakt und schnell arbeiten Sie, wenn Sie den richtigen Standort für Ihre Waage wäh- len. Am Aufstellort folgendes beachten: •... -
Page 18: Aufstellen
7.3 Netzanschluss Die Stromversorgung erfolgt über das externe Netzgerät. Der aufgedruckte Span- nungswert muss mit der örtlichen Spannung übereinstimmen. Nur KERN- Originalnetzgeräte verwenden. Die Verwendung anderer Fabrikate be- darf der Zustimmung von KERN. 7.4 Akkubetrieb (Option) Der optionale Akku wird über das mitgelieferte Netzteil geladen. -
Page 19: Erstinbetriebnahme
7.5 Erstinbetriebnahme Um bei elektronischen Waagen genaue Wägeergebnisse zu erhalten, müssen die Waagen ihre Betriebstemperatur (siehe Anwärmzeit Kap. 1) erreicht haben. Die Waage muss für diese Anwärmzeit an die Stromversorgung (Netzanschluss, Akku o- der Batterie) angeschlossen sein. Die Genauigkeit der Waage ist abhängig von der örtlichen Fallbeschleunigung. Unbedingt die Hinweise im Kapitel Justierung beachten. - Page 20 Vorgehen bei der Justierung: Stabile Umgebungsbedingungen beachten. Eine Anwärmzeit (s. Kap. 1) zur Stabili- sierung ist erforderlich. Darauf achten, dass sich keine Gegenstände auf der Wäge- platte befinden. Justiergewicht bereitstellen, Details siehe Kap.1 „Techn. Daten“ Zum Einschalten Ein-/Ausschalter auf der rech- ten Unterseite der Waage nach rechts betätigen und kurz gedrückt halten.
- Page 21 Das angezeigte Justiergewicht mit einstellen. Justiergewicht aufstellen. Stabilitätsanzeige abwarten und danach drücken. PASS wird angezeigt. Justiergewicht entfernen. In der Anzeige erscheint erneut F0 CAL. Der Justiervorgang ist somit erfolgreich abgeschlossen. Mit zurück in den Wägemodus. Bei einem Justierfehler oder falschem Justiergewicht erscheint eine Fehler- meldung im Display, Justiervorgang wiederholen.
-
Page 22: Eichung
7.7 Eichung A llgemeines: Nach der EU-Richtlinie 2014/31/EU müssen Waagen geeicht sein, wenn sie wie folgt verwendet werden (gesetzlich geregelter Bereich): a) Im geschäftlichen Verkehr, wenn der Preis einer Ware durch Wägung bestimmt wird. b) Bei der Herstellung von Arzneimitteln in Apotheken sowie bei Analysen im me- dizinischen und pharmazeutischen Labor. -
Page 23: Justierschalter Und Siegelmarken
Für die Justierung muss die Waage in den Servicemode umgeschaltet werden. Im Servicemode können Parameter der Waage verändert werden. Ist dies versehentlich geschehen, bitte mit KERN Kontakt aufnehmen. Bei geeichten Waagen ist der Servicemode per Schalter gesperrt. Um die Zu- griffsperre aufzuheben, muss die Siegelmarke zerstört und der Schalter betätigt wer-... -
Page 24: Das Menü
8 Das Menü 8.1 Einstieg ins Menü: Zum Einschalten Ein-/Ausschalter auf der rech- ten Unterseite der Waage nach rechts betätigen und kurz gedrückt halten. Während des Selbst- tests drücken und gedrückt halten, bis die Passwortabfrage „P in“ erscheint. Mit der numerischen Taste Standard-Passwort „0000“... -
Page 25: Menü-Übersicht
8.3 Menü-Übersicht: Beschreibung Funktion Einstellungen oder oder Justierfunktion Auflösung Justierschalter drücken rES dUAL-i rES dUAL-r 3000 6000 Wägebereich (Max) 30KG 15KG PdECi Dezimalpunkt Preis PdSL 0.00 PdSL 0.000 PdSL 0.0000 PdSL 0 PdESC Dezimalpunkt - 2 Funktionen PdESC Fix Der Dezimalpunkt bleibt immer „fix“ stehen (entsprechend der Einstellun- gen in „F3 PdECi“) und muss bei der Preiseingabe NICHT über die Tasta-... - Page 26 Min Coin Teilungsschritte Währung Coin 1 Coin Coin 2 Coin Coin 5 Coin Coin 10 Coin SCSiUE tArE Multi-Tare-Funktion S tArE oFF S tArE on Interner Wert iSnxxxxx Gravität GrA x.xxxxx rESEt Zurück auf Werkseinstellung rS232 Schnittstelle RS232 ModE Schnittstelle RS232 deaktivieren RS232-Schnittstelle auf Kommunikati- onsmodus (Einstellung des Ausgabe- protokolls unter Menüpunkt „Prot“...
-
Page 27: Betrieb
9 Betrieb 9.1 Ein-/Ausschalten Zum Einschalten Ein-/Ausschalter auf der rechten Unterseite der Waage nach rechts betätigen und kurz gedrückt halten. Die Waage führt einen Selbsttest durch. Sobald die Gewichtsanzeige „0" in allen drei Anzeigefenstern erscheint, ist die Waage wägebereit. Zum Ausschalten Ein-/Ausschalter auf der rech- ten Unterseite der Waage kurz nach rechts betäti- gen. -
Page 28: 10 Wägen Mit Preisermittlung
10 Wägen mit Preisermittlung Nach Auflegen des Wägegutes und der Einstellung des Stückpreises, wird der Preis automatisch berechnet und im entsprechenden Anzeigefeld dargestellt. 10.1 Stückpreis-Eingabe über Tastatur Wägegut auflegen, Stabilitätsanzeige abwarten. (Beispiel) Stückpreis über die numerischen Tasten eingeben. Der Verkaufspreis wird automatisch berechnet und angezeigt. -
Page 29: Speicher Für Stückpreise (Plu = Price Look Up)
10.2 Speicher für Stückpreise (PLU = Price look up) Die Waage verfügt über 10 Speicherplätze, die mit Hilfe der numerischen Tasten hinterlegt werden können. Speichern: Sicherstellen, dass sich kein Wägegut auf der Wägeplatte befindet und die Waage auf 0 steht. Mit den numerischen Tasten Stückpreis eingeben. - Page 30 Wägegut auflegen, der gespeicherte Stückpreis und daraus ermittelte Verkaufspreis wird angezeigt. Bevor eine weitere PLU abgerufen werden kann, muss der angezeigte Stück- preis mit gelöscht werden. RFC-BA-d-2113...
-
Page 31: Weitere Nützliche Funktionen
11 Weitere nützliche Funktionen 11.1 Stückpreis eingeben und Gesamtpreis berechnen (ohne Wägung) Stückpreis eingeben: Mit den numerischen Tasten Stückpreis einge- ben, im Beispiel 12.00. drücken. (Beispiel) Gesamtpreis berechnen: Mit den numerischen Tasten Stückzahl eingeben, der Gesamtpreis (z. B. 24.00) wird berechnet und angezeigt. -
Page 32: Hinterleuchtung Der Anzeige
11.3 Hinterleuchtung der Anzeige Im Wägemodus drücken und gedrückt hal- ten, bis die zuletzt eingestellte Hinterleuchtungs- (z.B. bLSET modE Auto) angezeigt wird. zwischen den Einstellungen Auto, On und Off wechseln. gewünschte Einstellung speichern. Die gewünschte Hinterleuchtungsart ist nun eingestellt. Die Waage wechselt danach automatisch in den Wägemodus. Hinterleuchtung eingeschaltet Hinterleuchtung ausgeschaltet Auto... -
Page 33: Verwendung Als Kasse
11.5 Verwendung als Kasse Die geeichte preisrechnende Waage KERN RFC unterstützt das Checkout-Protokoll Dialog 06 = „DLG-06“. Es besteht dabei die Möglichkeit, das Gerät ausschließlich als Kasse zu verwenden (Einstellung Protokoll = „DLG-06“). Hierbei sind Eingaben an die Waage unzulässig und teilweise gesperrt, wie zum Bei- spiel die Einheitenumschaltung von €... - Page 34 rS232 Schnittstelle RS232 ModE Schnittstelle RS232 deaktivieren RS232-Schnittstelle auf Kommunikations- modus (Einstellung des Ausgabeproto- kolls unter Menüpunkt „Prot“ wird verwen- det) RS232-Schnittstelle auf Druckmodus stel- Prot Cont Kontinuierliche Datenausgabe Protokoll Typ 1: Einfache Wägebefehle Protokoll Typ 2: KCP DLG-06 Protokoll Typ 3: DLG-06 Print tPuP Ausdruck durch Drücken von...
-
Page 35: Rs 232 Schnittstelle
12 RS 232 Schnittstelle 12.1 Technische Daten: RS-232-Anschluß zur Ausgabe der Wägedaten ASCII Code Baudrate 1200 - 115200 8 Datenbits Keine Parität 12.2 Pinbelegung der Waagenausgangsbuchse Pin 2 Input Receiving data Pin 3 Output Transmission data ― Pin 5 Signal ground 9pin D Connector: Waage Computer... -
Page 36: Beschreibung Des Datentransfers
12.4 Beschreibung des Datentransfers CR LF Header 1 Header 2 -WEIGHT DATA- WEIGHT TERMINA- UNIT HEADER 1: ST=STABLE, US=UNSTABLE HEADER 2: NT=NET, GS=GROSS 12.5 Druckerbetrieb können die Wägedaten über einen angeschlossenen Drucker ausgegeben werden: Ausdruckbeispiele: Ausdruck 1: 0,583 3.33 EUR/kg 1.94 Ausdruck 2: 0,583... -
Page 37: Wartung, Instandhaltung, Entsorgung
Lose Probenreste/Pulver können vorsichtig mit einem Pinsel oder Handstaubsauger entfernt werden. Verschüttetes Wägegut sofort entfernen. 13.2 Wartung, Instandhaltung Das Gerät darf nur von geschulten und von KERN autorisierten Servicetechnikern ge- öffnet werden. Vor dem Öffnen vom Netz trennen. 13.3 Entsorgung Die Entsorgung von Verpackung und Gerät ist vom Betreiber nach gültigem nationa-... -
Page 38: Kleine Pannenhilfe
14 Kleine Pannenhilfe Bei einer Störung im Programmablauf sollte die Waage kurz ausgeschaltet und vom Netz getrennt werden. Der Wägevorgang muss dann wieder von vorne begonnen werden. Störung Mögliche Ursache • Die Waage ist nicht eingeschaltet. Die Gewichtsanzeige leuchtet nicht. •... -
Page 39: Fehlermeldungen
14.1 Fehlermeldungen -------- Lastbereich überschritten – Last entfernen oder reduzieren Err 4 Nullstellbereich überschritten Err 5 Ungültige Eingabe Err 6 Beschädigte Elektronik Err 8 Justierfehler; Justiergewicht überprüfen Err 9 Instabil; Umgebungsbedingungen prüfen Err 19 Nullpunktdrift; Zusätzliche Vorlasten (Gefäße) von der Waage entfernen und Waage justieren --oL-- Überlast;... - Page 40 Hinweis gemäß Batterieverordnung – BattV Nur gültig für Deutschland! Im Zusammenhang mit dem Vertrieb von Batterien und Akkus sind wir als Händler gemäß Batterieverordnung verpflichtet, Endverbraucher auf folgendes hinzuweisen: Endverbraucher sind zur Rückgabe gebrauchter Batterien/Akkus gesetzlich ver- pflichtet. Batterien/Akkus können nach Gebrauch in kommunalen Sammelstellen o- der im Handel zurückgegeben werden.
- Page 42 KERN RFC Version 1.3 2021-04 Operating manual Price calculating balance Contents Technical data ....................4 Dimensions (mm) ........................8 Declaration of conformity ................9 Appliance overview ..................10 Overview of display ........................11 Keyboard overview ........................13 Basic Information (General) ................ 14 Proper use ..........................
- Page 43 11.2 AUTO CLEAR ........................... 30 11.3 Display background illumination ....................31 Units switch-over from € / kg € / 100g .................. 31 11.4 11.5 When used as a checkout ......................32 11.5.1 Preparation ........................... 32 RS 232 interface ................... 34 12.1 Technical data ..........................
-
Page 44: Technical Data
1 Technical data Models without vertical display: KERN (Typ) TRFC 3K3M-A RFC 6K3M Model RPB 3K3DM RPB 6K1DM Weighing range (max) 3 kg 3 kg / 6 kg Readability (d) 1 g / 2 g 1 g / 2 g... - Page 45 KERN (Typ) RFC 15K3M RFC 30K3M Model RPB 15K2DM RPB 30K5DM Weighing range (max) 6 kg / 15 kg 15 kg / 30 kg Readability (d) 2 g / 5 g 5 g / 10 g Minimum load (Min) 40 g...
- Page 46 Models with post-mounted display: KERN (Typ) TRFC 3K3HM-A RFC 6K3HM Model RPB 3K3DHM RPB 6K1DHM Weighing range (max) 3 kg 3 kg / 6 kg Readability (d) 1 g / 2 g 1 g / 2 g Minimum load (Min)
- Page 47 KERN (Typ) RFC 15K3HM RFC 30K3HM Model RPB 15K2DHM RPB 30K5DHM Weighing range (max) 6 kg / 15 kg 15 kg / 30 kg Readability (d) 2 g / 5 g 5 g / 10 g Minimum load (Min) 40 g...
-
Page 48: Dimensions (Mm)
1.1 Dimensions (mm) Models without vertical display: RFC-BA-e-2113... -
Page 49: Declaration Of Conformity
Models with post-mounted display: 2 Declaration of conformity The current EC/EU Conformity declaration can be found online in: www.kern-sohn.com/ce RFC-BA-e-2113... -
Page 50: Appliance Overview
3 Appliance overview Models without vertical display: Models with post-mounted display: 1. Weighing pan 2. Bubble level 3. Post-mounted display 4. Footscrews 5. Mains adapter connection 6. ON/OFF switch 7. RS 232 interface 8. Battery compartment 9. Adjustment switch RFC-BA-e-2113... -
Page 51: Overview Of Display
3.1 Overview of display Operator and secondary display (standard on the backside of models without post-mounted display): Additional post-mounted display for models with tripod: 1. Weight 2. Piece price 3. Sales price RFC-BA-e-2113... - Page 52 Display weight Here, the weight of your goods is displayed. Indicator next to symbol displays: Rechargeable battery very low Net weight Stability display Zeroing display Display piece price Piece price, can be switched over from € / kg or € / 100 g. Indicator ...
-
Page 53: Keyboard Overview
3.2 Keyboard overview Selection Function • Numerical keys, PLU-keys • In menu: Invoke parameter • Delete • Save piece price (press key for a long time), see chap. 10.2 • Call-up piece price (press and hold key for a short time), see chap. -
Page 54: Basic Information (General)
In KERN's accredited DKD calibration laboratory test weights and balances may be calibrated (return to the national standard) fast and at moderate cost. RFC-BA-e-2113... -
Page 55: Basic Safety Precautions
5.1 Pay attention to the instructions in the Operation Manual Carefully read this operation manual before setup and commissioning, even if you are already familiar with KERN balances. 5.2 Personnel training The appliance may only be operated and maintained by trained personnel. -
Page 56: Unpacking, Setup And Commissioning
7 Unpacking, Setup and Commissioning 7.1 Installation Site, Location of Use The balances are designed in a way that reliable weighing results are achieved in common conditions of use. You will work accurately and fast, if you select the right location for your balance. On the installation site observe the following: •... -
Page 57: Placing
7.3 Mains connection Power is supplied via the external mains adapter. The stated voltage value must be the same as the local voltage. Only use KERN original mains adapter. Using other makes requires consent by KERN. 7.4 Storage battery operation (optional) The optionally supplied battery is charged with the supplied power supply. -
Page 58: Initial Commissioning
7.5 Initial Commissioning In order to obtain exact results with the electronic balances, your balance must have reached the operating temperature (see warming up time chap. During this warming up time the balance must be connected to the power supply (mains, accumulator or battery). - Page 59 Procedure when adjusting: Observe stable environmental conditions. A warming up time (see chapter 1) is required for stabilization. Ensure that there are no objects on the weighing pan. Arrange adjustment weight, details see chap.1 „Techn. data“ To turn on/off operate the on/off switch at the underneath side on the right of the scale and keep pressed for a little while.
- Page 60 Set the displayed adjustment weight with the help . Place the adjustment weight. Wait for the stability display appears, then press . PASS will be displayed. Remove the adjustment weight. F0 CAL appears on the display. Now the process of adjustment is successfully completed.
-
Page 61: Verification
7.7 Verification G eneral hints: According to EU directive 2014/31/EU balances must be officially verified if they are used as follows (legally controlled area): a) For commercial transactions if the price of goods is determined by weighing. b) For the production of medicines in pharmacies as well as for analyses in the medical and pharmaceutical laboratory. -
Page 62: Adjustment Switch And Seals
For the adjustment, the balance must be switched over to service mode. In the service mode the parameters of the balance can be modified. If this happened accidentally, please contact KERN. In verified scales the service mode is locked individually for each switch. To disable the access lock, destroy the seal and actuate the switch. -
Page 63: The Menu
8 The menu 8.1 Access to menu To turn on/off operate the on/off switch at the underneath side on the right of the scale and keep pressed for a little while. During the selftest press and keep pressed until the password inquiry "P in"... -
Page 64: Menu Overview
8.3 Menu overview Description Function Settings Adjustment function Resolution Press adjustment switch rES dUAL-i rES dUAL-r 3000 6000 Weighing range (max) 30KG 15KG PdECi Decimal point price PdSL 0.00 PdSL 0.000 PdSL 0.0000 PdSL 0 PdESC Decimal point — 2 functions The decimal point is always fixed (according to the settings of “F3 PdECi“... - Page 65 Min Coin Interval size currency Coin 1 Coin Coin 2 Coin Coin 5 Coin Coin 10 Coin SCSiUE tArE Multi-Tare function S tArE oFF S tArE on Internal value iSnxxxxx Gravity GrA x.xxxxx rESEt Back to factory setting rS232 Interface RS232 ModE RS232 function disable Set RS232 interface to serial...
-
Page 66: Operation
9 Operation 9.1 Turn on/off To turn on/off operate the on/off switch at the underneath side on the right of the scale and keep pressed for a little while. The balance will carry out a self-test As soon as the weight display shows "0" in all the three display windows your balance is ready to weigh. -
Page 67: Weighing With Price Determination
10 Weighing with price determination As soon as the goods to be weighed are placed on the balance and the piece price has been set the price is calculated automatically and displayed in the provided field. 10.1 Piece price entry via keyboard Place the weighing good, wait for stability display. -
Page 68: Memory For Piece Price (Plu = Price Look Up)
10.2 Memory for piece price (PLU = Price look up) The scale has 10 memory locations, which can be stored using the numeric keys Save: Make sure that no weighing good is on the weighing plate and the scale stands on 0. Enter piece price via the numeric keys (example) Press... - Page 69 Put items to be weighed, the sales price calculated from the saved piece price is displayed. Before calling-up another PLU, the displayed piece price has to be deleted by RFC-BA-e-2113...
-
Page 70: Additional Useful Functions
11 Additional useful functions 11.1 Enter piece price and calculate the total price (without weighing) Enter piece price: Use the numeric keys to enter the piece price, in the example press 12.00. (example) Calculate the total price: Use the numeric keys to enter the number of pieces, the total price (e.g. -
Page 71: Display Background Illumination
11.3 Display background illumination In weighing mode press and keep pressed, until the background illumination type which has been set as last (p.ex. bLSET modE Auto) is displayed. to change between the settings Auto, On and Off. To save the desired setting, press . -
Page 72: When Used As A Checkout
11.5 When used as a checkout Verified calculation scale KERN RFC supports Checkout Dialog 06 = “DLG-06” pro- tocol. The device can be used as a checkout (protocol setting = “DLG-06”). When set in this way, data input in the scale is prohibited and partially blocked, e.g. - Page 73 rS232 RS232 function disable ModE RS232 function disable Set RS232 interface to serial communication mode (Setting of the output protocol under menu item "Prot" is used) Set RS232 interface fuction to print Prot Cont Continues data transmission Protocol Type 1: Simple weighing commands Protocol Type 2: KCP DLG-06...
-
Page 74: Rs 232 Interface
12 RS 232 interface 12.1 Technical data RS 232 connection to output of weighing data ASCII code Baud rate 1200 - 115200 8 data bits No parity 12.2 Pin allocation of balance output bushing: Pin 2 Input Receiving data Pin 3 Output Transmission data ―... -
Page 75: Explanation Of The Data Transfer
12.4 Explanation of the data transfer Header 1 Header 2 -WEIGHT DATA- WEIGHT TERMINATOR UNIT HEADER 1: ST=STABLE, US=UNSTABLE HEADER 2: NT=NET, GS=GROSS 12.5 Print Press to output the weighing data via a connected printer: Printout example: Printout 1: 0,583 3.33 EUR/kg 1.94... -
Page 76: Servicing, Maintenance, Disposal
Spilled weighing goods must be removed immediately. 13.2 Servicing, maintenance The appliance may only be opened by trained service technicians who are authorized by KERN. Before opening, disconnect from power supply. 13.3 Disposal Disposal of packaging and appliance must be carried out by operator according to valid national or regional law of the location where the appliance is used. -
Page 77: Instant Help
14 Instant help In case of an error in the program process, briefly turn off the balance and disconnect from power supply. The weighing process must then be restarted from the beginning. Fault Possible cause • The balance is not switched on. The displayed weight does not glow. -
Page 78: Error Messages
14.1 Error messages -------- Load range exceeded – remove or reduce load Err 4 Zero range exceeded Err 5 Invalid entry Err 6 Damaged electronics Err 8 Adjustment error, check adjustment weight Err 9 Instable; check environmental conditions Err 19 Zero point drift;... - Page 80 KERN RFC Version 1.3 2021-04 Notice d’utilisation Balance calculant le prix Table des matières Caractéristiques techniques ................. 4 Dimensions [mm] ........................8 Déclaration de conformité ................9 Aperçu de l’appareil ..................10 Vue d’ensemble des affichages ....................11 Vue d’ensemble du clavier ....................... 13 Indications fondamentales (généralités) ...........
- Page 81 11.2 AUTO CLEAR ........................... 30 11.3 Eclairage du fond de l’écran d’affichage .................. 31 Commutation d'unité de € / kg € / 100g ................31 11.4 11.5 Utiliser en tant que caisse enregistreuse ................. 32 11.5.1 Préparation ........................... 32 Interface RS 232 ...................
-
Page 82: Caractéristiques Techniques
1 Caractéristiques techniques Modèles sans écran d'affichage supérieur: KERN (Type) TRFC 3K3M-A RFC 6K3M Modèle RPB 3K3DM RPB 6K1DM Plage de pesée (max) 3 kg 3 kg/6 kg Lisibilité (d) 1 g / 2 g 1 g/2 g Charge minimale (Min) - Page 83 KERN (Type) RFC 15K3M RFC 30K3M Modèle RPB 15K2DM RPB 30K5DM Plage de pesée (max) 6 kg / 15 kg 15 kg / 30 kg Lisibilité (d) 2 g / 5 g 5 g / 10 g Charge minimale (Min)
- Page 84 Modèles avec écran d’affichage supérieur: KERN (Type) TRFC 3K3HM-A RFC 6K3HM Modèle RPB 3K3DHM RPB 6K1DHM Plage de pesée (max) 3 kg 3 kg / 6 kg Lisibilité (d) 1 g / 2 g 1 g / 2 g Charge minimale (Min)
- Page 85 KERN (Type) RFC 15K3HM RFC 30K3HM Modèle RPB 15K2DHM RPB 30K5DHM Plage de pesée (max) 6 kg / 15 kg 15 kg / 30 kg Lisibilité (d) 2 g / 5 g 5 g / 10 g Charge minimale (Min)
-
Page 86: Dimensions [Mm]
1.1 Dimensions [mm] Modèles sans écran d'affichage supérieur: RFC-BA-f-2113... -
Page 87: Déclaration De Conformité
Modèles avec écran d’affichage supérieur: 2 Déclaration de conformité Vous pouvez trouver la déclaration UE/CE en ligne sur: www.kern-sohn.com/ce RFC-BA-f-2113... -
Page 88: Aperçu De L'appareil
3 Aperçu de l’appareil Modèles sans écran d'affichage Modèles avec écran d’affichage supérieur: supérieur: 1. Plateau de pesée 2. Bulle d’air 3. Affichage haut 4. Pieds à vis 5. Raccord adaptateur secteur 6. Interrupteur marche / arrêt 7. Interface RS 232 8. -
Page 89: Vue D'ensemble Des Affichages
3.1 Vue d’ensemble des affichages Affichage de l’opérateur et affichage secondaire (agencé au dos en série dans des modèles sans statif): Ecran d’affichage supérieur additionnel sur les modèles avec statif: 1. Poids 2. Prix de pièce 3. Prix de vente RFC-BA-f-2113... - Page 90 Affichage poids Ici s’affichera le poids du produit pesé. L’indicateur au-dessus du symbole affiche: La capacité de la pile rechargeable sera bientôt épuisée Poids net Affichage de la stabilité Affichage de la position zéro Affichage prix de pièce Le prix de pièce peut être affiché en € / kg ou € / 100 g. L’indicateur ...
-
Page 91: Vue D'ensemble Du Clavier
3.2 Vue d’ensemble du clavier Sélection Fonction • Touches numériques, touches PLU • Dans le menu: Appeler le paramètre • Effacer • Enregistrer le prix de pièce (pression prolongée sur la touche), voir chap. 10.2 • Appeler le prix de pièce (pression brève sur la touche), voir chap. -
Page 92: Indications Fondamentales (Généralités)
à cette opération sont disponibles sur le site KERN (www.kern-sohn.com). Grâce à son laboratoire de calibrage accrédité DKD, KERN propose un calibrage rapide et économique pour les poids d´ajustage et les balances (sur la base du standard national). -
Page 93: Indications De Sécurité Générales
Lisez attentivement la totalité de cette notice d’utilisation avant l´installation et la mise en service de la balance, et ce même si vous avez déjà utilisé des balances KERN. 5.2 Formation du personnel L´appareil ne doit être utilisé et entretenu que par des collaborateurs formés à cette fin. -
Page 94: Déballage, Installation Et Mise En Service
7 Déballage, installation et mise en service 7.1 Lieu d´installation, lieu d´utilisation La balance a été construite de manière à pouvoir obtenir des résultats de pesée fiables dans les conditions d´utilisation d´usage. Vous pouvez travailler rapidement et avec précision à condition d´installer votre balance à... -
Page 95: Implantation
L´alimentation en courant s´effectue au moyen du bloc externe d´alimentation secteur. La valeur de tension imprimée sur l´appareil doit concorder avec la tension locale. N’utiliser que des bloc d'alimentation de courant KERN d’origine. L´utilisation d´autres marques n´est possible qu´avec l´autorisation de KERN. -
Page 96: Première Mise En Service
7.5 Première mise en service Pour obtenir des résultats exacts de pesée avec les balances électroniques, les balances doivent avoir atteint sa température de service (voir temps d’échauffement au chap. 1). Pour ce temps de chauffe, la balance doit être branchée à l’alimentation de courant (secteur, pile rechargeable ou pile). - Page 97 Procédure à suivre pour l’ajustage: Veillez à avoir des conditions environnementales stables. Un temps de préchauffage (voir au chap. 1) est nécessaire pour la stabilisation. Aucun objet ne doit se trouver sur le plateau de pesage. Mettre à disposition le poids d’ajustage, détails voir chap.1 „Données techniques“ Pour la mise en marche basculez l’interrupteur de marche / arrêt à...
- Page 98 Régler le poids d'ajustage affiché sur Mettre en place le poids d’ajustage. Attendre l’affichage de la stabilité, puis appuyer . „PASS“ est affiché. Retirer le poids d’ajustage. Sur l'affichage apparaît de nouveau F0 CAL. Le processus d’ajustage alors est fini avec succès.
-
Page 99: Etalonnage
7.7 Etalonnage G énéralités: D'après la directive UE 2014/31/EU, les balances doivent faire l'objet d'un étalonnage officiel lorsqu'elles sont utilisées tel qu'indiqué ci-dessous (domaine régi par la loi): a) Dans le cadre de relations commerciales, lorsque le prix d´une marchandise est déterminé... -
Page 100: Interrupteur D'ajustage Et Marque Scellée
Dans le mode de service, tous les paramètres de la balance se peuvent modifier. Si cela est survenu par inadvertence, prendre contact avec KERN. Sur les balances étalonnées le mode de SAV est bloqué par l‘interrupteur. Afin d’enlever le blocage de l‘accès, il faut briser le cachet et actionner l‘interrupteur. -
Page 101: Le Menu
8 Le menu 8.1 Entrée au menu: Pour la mise en marche basculez l’interrupteur de marche / arrêt à droite au bas de la balance vers la droite et maintenez-le brièvement enclenché. Pendant le test automatique appuyer sur tenir enfoncé, jusqu'à ce que la demande du mot de passe "P in"... -
Page 102: Aperçu Des Menus
8.3 Aperçu des menus: Description Fonction Réglages Fonction d’ajustage Résolution Appuyez sur l’interrupteur rES dUAL-i d’ajustage rES dUAL-r 3000 6000 Plage de pesée (max) 30KG 15KG PdECi Point décimal prix PdSL 0.00 PdSL 0.000 PdSL 0.0000 PdSL 0 PdESC Virgule décimale - 2 fonctions La virgule décimale est toujours «... - Page 103 Min Coin Graduations monnaie Coin 1 Coin Coin 2 Coin Coin 5 Coin Coin 10 Coin SCSiUE tArE Fonction Multi-Tare S tArE oFF S tArE on Valeur interne iSnxxxxx Gravité GrA x.xxxxx rESEt Retour au réglage d'usine rS232 Interface RS232 ModE Désactiver l'interface RS232 Interface RS232 en mode de...
-
Page 104: Fonctionnement
9 Fonctionnement 9.1 Mise en marche / arrêt Pour la mise en marche basculez l’interrupteur de marche / arrêt à droite au bas de la balance vers la droite et maintenez-le brièvement enclenché. La balance effectue un contrôle automatique. Dès que les trois fenêtres d’affichage affichent la valeur „0", votre balance est prête à... -
Page 105: Pesée Avec Détermination Du Prix
10 Pesée avec détermination du prix Après dépôt du produit à peser et réglage du prix de pièce, le prix est automatiquement calculé et il s'affiche au niveau de l´écran respectif. 10.1 Saisie du prix de pièce sur le clavier Mettre en place le produit à... -
Page 106: Mémoire Pour Prix De Pièce (Plu = Price Look Up)
10.2 Mémoire pour prix de pièce (PLU = Price look up) La balance dispose de 10 espaces de mémoire, qui peuvent être enregistrés à l'aide des touches numériques à Enregistrer: S'assurer qu'aucun matériau à peser ne se trouve sur le plateau de pesée et la balance est sur 0. Saisir le prix de pièce sur les touches numériques à... - Page 107 Déposer la matière à peser, le prix de pièce enregistré et le prix de vente déterminé du prix de pièce est affiché. Avant de pouvoir appeler une autre PLU, le prix de pièce affiché doit être effacé à l’aide de RFC-BA-f-2113...
-
Page 108: Autres Fonctions Utiles
11 Autres fonctions utiles 11.1 Saisir le prix de pièce et calculer le prix de pièce (sans pesée) Saisir le prix de pièce: Saisir le prix de pièce sur les touches numériques, dans cet exemple 12.00. appuyer sur (exemple) Calculer le prix total: Sur les touches numériques saisir le nombre de pièces, le prix total (p.ex. -
Page 109: Eclairage Du Fond De L'écran D'affichage
11.3 Eclairage du fond de l’écran d’affichage En mode de pesée appuyer sur et tenir enfoncée jusqu'à ce que le type d'éclairage du fond (p.ex. bLSET modE Auto) est affiché. changer entre les réglages Auto, On et Off. Mémoriser sur le réglage voulu. -
Page 110: Utiliser En Tant Que Caisse Enregistreuse
11.5 Utiliser en tant que caisse enregistreuse La balance calculant le prix KERN RFC vérifiée prend en charge le protocole Checkout Dialog 06 = "DLG-06". D'ailleurs, il est possible de n'utiliser l'appareil qu'en tant que caisse enregistreuse (paramètre de protocole = "DLG-06"). -
Page 111: Interface Rs 232
rS232 Interface RS232 ModE Désactiver l'interface RS232 Interface RS232 en mode de communication (le réglage du protocole de sortie sous le point de menu "Prot" est utilisé) Régler l'interface RS232 en mode d'impression Prot Cont Production continue de données Protocole de type 1 : Des commandes de pesée simples Protocole de type 2: KCP DLG-06... -
Page 112: Caractéristiques Techniques
12 Interface RS 232 12.1 Caractéristiques techniques : Branchement RS-232 pour éditer les données de pesage Code ASCII Vitesse de transmission en Baud 1200 - 115200 8 données bits Aucune parité 12.2 Attribution des broches de la douille de sortie de la balance Pin 2 Input Receiving data... -
Page 113: Description Du Transfert Des Données
12.4 Description du transfert des données CR LF Header 1 Header 2 -WEIGHT DATA- WEIGHT TERMINA UNIT HEADER 1: ST=STABLE, US=UNSTABLE HEADER 2: NT=NET, GS=GROSS 12.5 Imprimer Appuyez sur cette touche pour sortir les données de pesage via une imprimante connectée : Exemple d'impression: Imprimer 1: 0,583... -
Page 114: Maintenance, Entretien, Élimination
Retirer immédiatement les matières à peser renversées sur la balance. 13.2 Maintenance, entretien L´appareil ne doit être ouvert que par des dépanneurs formés à cette fin et ayant reçu l´autorisation de KERN. Avant d´ouvrir l´appareil, couper ce dernier du secteur. 13.3 Mise au rebut L´élimination de l´emballage et de l´appareil doit être effectuée par l´utilisateur selon... -
Page 115: Aide Succincte En Cas De Panne
14 Aide succincte en cas de panne En cas d´anomalie dans le déroulement du programme, la balance doit être arrêtée pendant un court laps de temps et coupée du secteur. Le processus de pesée doit alors être recommencé depuis le début. Panne Cause possible •... -
Page 116: Messages D'erreur
14.1 Messages d’erreur -------- Gamme de charge dépassée – enlever ou réduire la charge Err 4 La plage de réglage du zéro est dépassée Err 5 Saisie non valable Err 6 Système électronique endommagé Err 8 Erreur d'ajustage; contrôler le poids d'ajustage Err 9 Instable;...
Need help?
Do you have a question about the RFC Series and is the answer not in the manual?
Questions and answers