Table of Contents

Related Manuals for KERN RFC


Summary of Contents for KERN RFC
- Page 1 KERN & Sohn GmbH Ziegelei 1 Tel: +49-[0]7433- 9933-0 D-72336 Balingen Fax: +49-[0]7433-9933-149 E-Mail: info@kern-sohn.com Internet: www.kern-sohn.com Service Manual Price calculating balance KERN RFC Version 1.0 02/2018 RFC-SH-e-1810...
-
Page 2: Table Of Contents
KERN RFC Price calculating balance Version 1.0 03/2018 Service manual Content Basic Information ..................4 Introdution ..................... 4 Appliance overview ..................5 Overview of display ......................6 Display weight ........................7 Display basic price ......................7 Display sale price ....................... 7 Battery loading status display .................. - Page 3 AC Power ........................... 30 17.8 Adaptor Voltage ........................ 30 17.9 PCB Input Voltage ......................30 17.10 Check Battery Voltage and Charging Voltage ............31 17.11 Replace Main Board ..................... 31 17.12 Replace Load Cell ......................31 17.13 Replace Battery ......................32 RFC-SH-e-1810...
-
Page 4: Basic Information
After successful repair the balance will have to be reverified before it can be used again in a statutorily regulated field. 2 Introdution This service manual covers the RFC series and is edited for the authorized servicing personnel. Note all rights are reserved. Copying any part of this manual is prohibited without our permission. -
Page 5: Appliance Overview
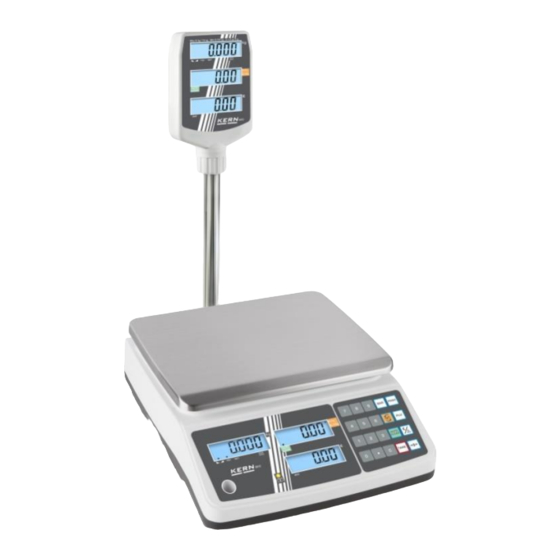
3 Appliance overview Models without vertical display: Models with post-mounted display: 1. Weighing pan 2. Bubble level 3. Post-mounted display 4. Footscrews 5. Mains adapter connection 6. ON/OFF switch 7. RS 232 interface 8. Battery compartment 9. Adjustment switch RFC-SH-e-1810... -
Page 6: Overview Of Display
3.1 Overview of display Operator and secondary display (standard on the backside of models without post-mounted display): Additional post-mounted display for models with tripod: RFC-SH-e-1810... -
Page 7: Display Weight
3.4 Display sale price Here the sales price is displayed in Euro [€]. Indicator next to symbol displays: Calculating the change (see chap. 10.3) 3.5 Battery loading status display Charging storage battery green Rechargeable battery completely reloaded RFC-SH-e-1810... -
Page 8: Keyboard Overview
In menu: Storing settings For activated function, the set basic price is automatically deleted when the balance is unloaded. Enter basic price per piece (without weighing) Zeroing In menu: Back to weighing mode Decimal point RFC-SH-e-1810... -
Page 9: Basic Information (General)
(www.kern-sohn.com with regard to the monitoring of balance test substances and the test weights required for this. In KERN's accredited DKD calibration laboratory test weights and balances may be calibrated (return to the national standard) fast and at moderate cost. -
Page 10: Basic Safety Precautions
5.1 Pay attention to the instructions in the Operation Manual Carefully read this operation manual before setup and commissioning, even if you are already familiar with KERN balances. 5.2 Personnel training The appliance may only be operated and maintained by trained personnel. -
Page 11: Unpacking, Setup And Commissioning
If electro-magnetic fields or static charge occur, or if the power supply is unstable major deviations on the display (incorrect weighing results) are possible.In that case, the location must be changed. 7.2 Unpacking Carefully remove the balance from the packaging, remove plastic cover and setup balance at the intended workstation. RFC-SH-e-1810... -
Page 12: Placing
Power is supplied via the external mains adapter. The stated voltage value must be the same as the local voltage. Only use KERN original mains adapter. Using other makes requires consent by KERN. 8.3 Storage battery operation (optional) The optionally supplied battery is charged with the supplied power supply. -
Page 13: Adjustment
F0 CAL will be displayed. Press adjustment switch on the lower side of the balance. Press , UnLoAd will be displayed. Ensure that there are no objects on the weighing pan. Press again, CAP LOADxx will be displayed. (example) RFC-SH-e-1810... - Page 14 CAL appears on the display.Now the process of adjustment is successfully completed.Return to weighing mode using In case of an adjustment error or incorrect adjustment weight, the display will show an error message (FAKLH), then repeat adjustment process. RFC-SH-e-1810...
-
Page 15: Verification
The weighing result of the balance is outside the error limit.Therefore, in regular intervals load balance with known test weight (ca. 1/3 of the max. load) and compare with displayed value. The reverification deadline has been exceeded. RFC-SH-e-1810... -
Page 16: Adjustment Switch And Seals
For the adjustment, the balance must be switched over to service mode. In the service mode the parameters of the balance can be modified. If this happened accidentally, please contact KERN. In verified scales the service mode is locked individually for each switch. To disable the access lock, destroy the seal and actuate the switch. -
Page 17: The Menu
Confirm selected function by pressing . Select desired setting with and acknowledge by Exit menu: Press the button as often as necessary until the zero display appears. The balance is now again in weighing mode. RFC-SH-e-1810... -
Page 18: Menu Overview
PdESC Fix PdESC FLoAt SPEEd A/D converter SLow MEdiuM FASt Min Coin Interval size currency Coin 1 Coin Coin 2 Coin Coin 5 Coin Coin 10 Coin SCSiUE tArE Multi-Tare function S tArE oFF S tArE on Internal value iSnxxxxx RFC-SH-e-1810... - Page 19 Printout by pressing not documented bAUd Baud rate 9600 19200 38400 115200 1200 2400 4800 8 data bits, no parity, 1 stop bit 7 data bits, even parity, 1 stop bit 7 data bits, odd parity, 1 stop bit RFC-SH-e-1810...
-
Page 20: Instant Help
The balance is on an uneven surface. Great fluctuations in temperature. Electromagnetic fields / static charging (choose different location/switch off interfering device if possible) Should other error messages occur, switch balance off and then on again. If the error message remains inform manufacturer. RFC-SH-e-1810... -
Page 21: Error Messages
Tare out of range Minus weight or overload. Remove the load and restart scale again. Err 18 Pre-tare error Check the pre-tare value Err19 Initialize zero error Calibration the scale. Err P Printer error Check the printer settings or connections RFC-SH-e-1810... - Page 22 Minus weight, check the platform and restart or calibrate. Calibration Error Fai l h / Check the test weights & Re fai l l / calibrate fai l Ba lo / Battery low Re charge battery, check the lo ba voltages. RFC-SH-e-1810...
-
Page 23: Drawing
14 Drawing 14.1 without pole RFC-SH-e-1810... -
Page 24: With Pole
14.2 with pole RFC-SH-e-1810... -
Page 25: Circuit Diagram
15 Circuit diagram 15.1 MCU RFC-SH-e-1810... -
Page 26: Power
15.2 Power 15.3 Display board RFC-SH-e-1810... -
Page 27: Trouble Shooting
If linearity can be set by the user Balance not level it will be described in the user incorrect Obstruction between sample and manual. cover Check pan is installed correctly. Wrong unit of weight displayed Verify installation is acceptable. RFC-SH-e-1810... - Page 28 Overload Stops not correct shipping screws, and verify pan Load Cell damaged error installation. Mains voltage not present or too Verify the batteries are Battery will rechargeable types. Charging circuit failure Check power supply voltage is charge Battery Failure correct. RFC-SH-e-1810...
-
Page 29: Maintanace
• Remove power from the system, and disconnect the PCB from the Load cell. • Check the moisture, or foreign material inside. • Make sure all leads are connected and correctly. • Check load cell for proper input and output resistances RFC-SH-e-1810... -
Page 30: Load Cell Connections
17.8 Adaptor Voltage Check the adaptor output cable connecter voltage • Voltage must be minimum 9VDC and maximum 15VDC 17.9 PCB Input Voltage Check the PCB input power connecter voltage • Voltage must be minimum 9VDC in to the pin AD+ RFC-SH-e-1810... -
Page 31: Check Battery Voltage And Charging Voltage
17.10 Check Battery Voltage and Charging Voltage 1. Check the Battery Voltage, • Voltage must be minimum 6VDC. If below the 6VDC connect the adaptor for charging • The battery voltage below the 5.5VDC, replace the battery and install new 6V/3.2Ah battery. -
Page 32: Replace Battery
(Attention: red line to positive electrode, black line to minus electrode), after check anything, plug the connector for power and try to turn on the power, if scale work correctly, replace battery completely. RFC-SH-e-1810...
Need help?
Do you have a question about the RFC and is the answer not in the manual?
Questions and answers