
Related Manuals for BODYMAX CTX5


Summary of Contents for BODYMAX CTX5
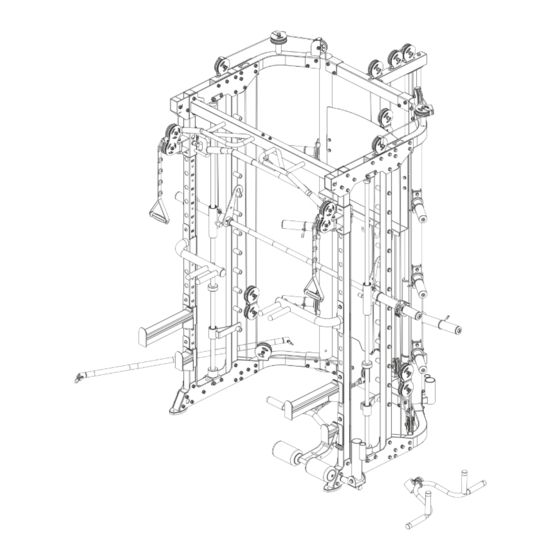
- Page 1 Assembly and Operating Instructions ~ 300 Min. 199 kg L 148 | W 202 | H 224 SEBR2720.01.01 SKU: SEBR2720 BodyMax CTX5...
- Page 2 CTX5...
-
Page 3: Table Of Contents
Content GENERAL INFORMATION Technical Data Personal Safety Set-Up Place ASSEMBLY General Instructions Scope of Delivery Assembly Optional Leg Press Plate 2.4.1 Scope of Delivery - Leg Press Plate 2.4.2 Assembly - Leg Press Plate STORAGE AND TRANSPORT General Instructions TROUBLESHOOTING, CARE AND MAINTENANCE General Instructions Faults and Fault Diagnosis Maintenance and Inspection Calendar... - Page 4 CTX5...
- Page 5 Dear customer, Thank you for choosing training equipment from BodyMax. BodyMax is your reliable partner for home and commercial gym equipment. We are specialized in cardio and strength training machines for home and commercial use. Our products are not only strong, durable, and affordable but also designed to fit your personal needs.
- Page 6 This notice indicates potentially hazardous situations which, if not avoided, will result in death or serious injuries! NOTICE This notice indicates further useful information. Retain these instructions in a safe place for future reference, maintenance or when ordering replacement parts. CTX5...
-
Page 7: General Information
GENERAL INFORMATION Technical Data Weight and Dimensions Packaging dimensions (L x W x H) approx.: 221 cm x 95 cm x 38 cm Set-up dimensions (L x W x H) approx.: 148 cm x 202 cm x 224 cm Article weight (gross, incl. packaging) approx.: 219 kg/482 lbs Article weight (net, excl. -
Page 8: Personal Safety
Make sure that nobody is within the range of motion of the equipment during training so as not to endanger you or other persons. ࣑ ATTENTION Do not insert any objects of any kind into the openings of the device. CTX5... -
Page 9: Set-Up Place
Set-Up Place WARNING ⚠ Do not place the equipment in main corridors or escape routes. ⚠ CAUTION Choose a location in which to place the equipment such that there is enough free space/ clearance to the front, the rear and to the sides of the equipment. The training room should be well ventilated during training and not be exposed to any draughts. -
Page 10: Assembly
In the event of complaints, the contractual partner must be contacted directly. CAUTION ⚠ If parts of the scope of delivery are missing or damaged, the assembly must not be carried out. CTX5... - Page 11 (8) Upper bending tube left (1) Connection tube (17) Tube with hole left (2) Upright frame left (12) Chin up bar (18) Tube with hole right (3) Upright frame right (13) Upper plate 4x (19) Lower plate 4x (4) Bending tube left (20) Sliding tube right (14) Pulley frame tube right (5) Bending tube right...
- Page 12 (44) Upper connection tube short (56) Wire - 2745mm 2x (31) Safety hook right (57) Pulley - 95mm 25x (45) Lower connection tube (32) Safety hook left (58) Pulley plate 6x (35) End cap 2x (46) Big sliding sleeve CTX5...
- Page 13 (68) Pulley spacer sleeve 16x (61) Weight 2x (79) Core trainer (69) Pulley frame (62) Wire - 4740mm (80) Powder metallurgy sleeve 2x (70) Wire - 1705mm (63) Hanging pulley frame 3x (71) 5section chain with snap hooks (81) Barbell rod cup (64) Short bar (83) Dip bar left (72) Wire - 9715mm...
- Page 14 (91) Ship rod (87) Barbell rod holder short left (92) Hand belt 2x (88) Barbell rod holder short right (89) Barbell clamp collar 2x (93) Pull lift device (94) T-shaped pin (90) Long bar (95) Leg curl tube CTX5...
-
Page 15: Assembly
Assembly Before assembly, take a close look at the individual assembly steps shown and carry out the assembly in the order given. NOTICE First loosely screw all parts together and check that they fit properly. Tighten the screws using the tool only when you are instructed to do so. If you have difficulty recognising the graphics, we recommend that you open and/or download the PDF instructions stored in the webshop on your end device (e.g. - Page 16 Attach the left upper bending tube (8) to the top of the left upright frame (2) with two bolts (9), four washers (11) and two nuts (10). Attach the right upper bending tube (7) to the top of the right upright frame (3) with two bolts (9), four washers (11) and two nuts (10). Tighten bolts and nuts. CTX5...
- Page 17 explosion dra...
- Page 18 Repeat the steps 1 to 7 on the left side. NOTICE For the left side, use the left pulley frame tube (15), left sliding tube (21) and left tube with holes (18). Do not tighten bolts and nuts yet. Fig. B CTX5...
- Page 19 Assembly step(2)explosion drawing Fig. C Fig. D...
- Page 20 Attach the chin up bar (12) to the inner side of the upper plates (13) and to the left and right tubes with holes (18 & 17) with a total of six bolts (24), twelve washers (11) and six nuts (10). Now tighten all bolts and nuts. Assembly step(2)explosion drawing CTX5...
- Page 21 Assembly step(2)explosion drawing...
- Page 22 (41). 11. Attach one end cap (35) to each pipe (37) with one bolt (38), one spring washer (39) and one washer (40). 12. Slide one barbell collar (89) onto each pipe (37). CTX5...
- Page 23 explosion drawing 39 40 35 40 39 38...
- Page 24 Attach the guide rods (47) to the short upper connection tube (44) with two bolts (50) and two washers (11). Attach the back barbell plate holders (55) to the big sliding sleeve (46) with one set screw (34) each. Tighten the bolts and nuts. CTX5...
- Page 25 Assembly step(4)explosion drawing...
- Page 26 Attach the loop end of the wire (56) to the outside of the sliding sleeve (29) with one bolt (49), two washers (11) and one nut (10). Repeat the steps 1 to 5 on the left side of the machine with the second wire (56). CTX5...
- Page 27 11 11 Assembly step(5)explosion drawing 11 11...
- Page 28 Attach the footplate (65) to the connection tube (1) with two bolts (49) and two washers (11). Attach the chain (66) to the ball end of the wire (62) with one of the snap hooks. Attach the short bar (64) to the other snap hook of the chain (66). CTX5...
- Page 29 )explosion drawing Bolt end Ball end Bolt end...
- Page 30 Attach the loop end of the wire (67) to the right upper bending tube (7; D-1) with one bolt (49), two washers (11) and one nut (10). Repeat the steps 1 to 4 on the left side of the machine with the second wire (67). CTX5...
- Page 31 Assembly step(7)explosion drawing...
- Page 32 Assembly step(8)explosion drawing the hanging pulley frame (63) with one bolt (59), two washers (11) and one nut (10). Attach the chain (71) to the end of the wire (70) and to the lower connection tube (45). Assembly step(8)explosion drawing CTX5...
- Page 34 (K-1) with one bolt (24), two washers (11), two pulley spacer sleeves (68) and one nut (10). 13. Attach the end of the wire (72) to the left sliding tube (21) with one bolt (49), two washers (11) and one nut (10). CTX5...
- Page 35 Assembly step(9) Start Start...
- Page 36 Attach the shield (74) to the left and right upright frames (2 & 3) with four bolts (76), eight washers (77) and four nuts (78). Attach a total of six barbell plate holders (75) to the left and right upright frames (2 & 3) with two bolts (76) and two washers (77) each. CTX5...
- Page 37 Step 11: Assembly of the Core Trainer and the Barbell Rod Cup Assembly step(11)explosion drawing Attach the barbell rod cup (81) to the right upright frame (3) with two bolts (76) and two washers (77). Attach the core trainer (79) to the lower plates (19) with one bolt (49), one washer (82) and two powder sleeves (80).
- Page 38 Step 12: Accessories The CTX5 complete training system comes with a variety of attachments that can be used interchangeably like shown below. The following accessories are included in the scope of delivery: dip bar left dip bar right barbell rod holder right...
-
Page 40: Optional Leg Press Plate
Optional Leg Press Plate NOTICE The leg press plate is an optional accessory for the CTX5 complete training system and is not included in the scope of delivery of the Smith machine itself. The leg press plate must be purchased separately. -
Page 41: Storage And Transport
STORAGE AND TRANSPORT General Instructions ⚠ WARNING The storage location should be chosen so that improper use by third parties or children can be prevented. If your equipment does not have transportation wheels, the equipment must be disassembled before transportation. ࣑... -
Page 42: Troubleshooting, Care And Maintenance
Check cable routing Uneven ground Align unit Unit wobbles Loose screw connections Tighten screw connections Weight holders/guide Lubricate guide rods* rods too dry Heavy draught Check cable routing Faulty cable routing * With a grease-free silicone oil or silicone spray. CTX5... -
Page 43: Maintenance And Inspection Calendar
Maintenance and Inspection Calendar To avoid damage from body sweat, the equipment must be cleaned with a damp towel (no solvents!) after each training session. The following routine tasks must be performed at the specified intervals: Part Weekly Monthly Quarterly Cables Screw connections Pulleys and cable routing... -
Page 44: Recommended Accessories
We will be happy to advise you! chest strap floor mat tricep and curl bar triceps rope CTX5... -
Page 45: Ordering Spare Parts
Enter the serial number in the appropriate field. Serial number: Brand / Category: BodyMax / smith machine Model Name: CTX5 Complete Training System / CTX5/MS-PRO Leg Press Plate SKU: SEBR2720 / SEBR2725... -
Page 46: Parts List
M10*80 lower base upper base guide rod Φ25*1850 lock sleeve sliding sleeve rubber pad with groove Φ60*Φ26*45 safety hook right CTX5... - Page 47 safety hook left hexagon bolt M10*90 socket set screw M8*10 end cap Φ51*Φ 42.5*36.6L check ring Φ60*Φ48.5*27L pipe Φ50*310*T0.5 button head socket screw M12*40 spring washer Φ12 washer Φ12 barbell rod inner pipe Φ48*298*2.5T rubber pad upper connection tube short lower connection tube big sliding sleeve guide rod hollow...
- Page 48 T shape pin Φ10*100 leg curl tube CTX5...
-
Page 49: Exploded Drawing
Exploded Drawing... -
Page 50: Warranty
WARRANTY Training equipment from BodyMax® is subject to strict quality control. However, if a fitness equipment purchased from us does not work perfectly, we take it very seriously and ask you to contact our customer service as indicated. We are happy to help you by phone via our service hotline. - Page 51 Warranty Service Within the warranty period, equipment which develops faults as a result of material or manufacturing defects, will be repaired or replaced at our discretion. Ownership of equipment or parts of equipment which have been replaced is transferred to us. The warranty period is not extended nor does a new warranty period begin following repair or replacement under the warranty.
-
Page 52: Contact
Öffnungszeiten entnehmen Öffnungszeiten entnehmen Sie unserer Homepage. Sie unserer Homepage. Please find a detailed overview including address and opening hours for all stores of Powerhouse Fitness in the UK on the following website: www.powerhouse-fitness.co.uk/storelocator CTX5... - Page 53 LIVE FITNESS WEBSHOP AND SOCIAL MEDIA The Sport-Tiedje Group is Europe’s largest http://www.powerhouse-fitness.co.uk/ specialist for home fitness equipment with www.powerhouse-fitness.co.uk/blog/ currently 70 stores and one of the world’s most renowned online mail order companies for fitness equipment. https://www.facebook.com/powerhousefitness.co.uk Powerhouse Fitness is part of the Sport-Tiedje Group.
- Page 54 Notes CTX5...
- Page 56 CTX5...
Need help?
Do you have a question about the CTX5 and is the answer not in the manual?
Questions and answers