Chapters
Table of Contents

Related Manuals for saro GTK 370


Summary of Contents for saro GTK 370
- Page 1 Seite 1 von 30 Betriebsanleitung Kühlschrank Modell GTK 370 GTK 700 SD GTK 1065 GTK 370 Art.-Nr.: 453-1004 GTK 700 SD Art.-Nr.: 453-10075 GTK 1065 Art.-Nr.: 453-1019 09/23 SvN...
-
Page 2: Table Of Contents
Seite 2 von 30 INHALT Lieferumfang ..............................3 Normen und Richtlinien ..........................3 Technische Übersicht ..........................3/4 Symbolerklärungen ............................4 Allgemeine Hinweise............................... 5 Sicherheitshinweise ............................... 6 Geräteaufstellung ..............................7 Geräteanschluss ............................7 Struktur und Teile ............................8 Erste Inbetriebnahme ............................. 8 Bedienung –... -
Page 3: Lieferumfang
Seite 3 von 30 Sehr geehrter Kunde, wir gratulieren Ihnen zu Ihrem neuen SARO-Kühlschrank Modell GTK 370 / GTK 700 SD / GTK 1065. Der von Ihnen erworbene Artikel wurde für die gewerbliche Nutzung in Restaurants, Hotels, Cafés, Kantinen und Supermärkten entwickelt. Besonders eignet sich der Kühlschrank für die Lagerung und den Verkauf von Lebensmitteln und Getränken. -
Page 4: Symbolerklärungen
GTK 1065: 58 dB Kühlungsart Statische Kühlung mit Umluftventilator Automatische Abtauung Füße/Rollen GTK 370 + GTK 700 SD: 4 Rollen, vorne gebremst, hinten nicht gebremst GTK 1065: 8 Rollen, vorne gebremst, hinten nicht gebremst Geeignet für Klimaklasse 4 Temperaturbereich Gilt für alle Modelle: -1 / + 10 °C... -
Page 5: Allgemeine Hinweise
Seite 5 von 30 ALLGEMEINE HINWEISE • Bewahren Sie diese Betriebsanleitung griffbereit in der Nähe des Gerätes auf. • Der Hersteller/Händler kann nicht verantwortlich gemacht werden für Schäden, die durch Nichtbeachtung dieser Bedienungsanleitung entstehen. • Bei Nichtbeachtung dieser Bedienungsanleitung ist die Sicherheit des Gerätes nicht mehr gewährleistet. •... -
Page 6: Sicherheitshinweise
Seite 6 von 30 SICHERHEITSHINWEISE • Falsche Bedienung und unsachgemäße Behandlung können zu Störungen am Gerät und zu Verletzungen des Benutzers führen. • Das Gerät ist weder geeignet noch vorgesehen für die Lagerung von Medikamenten oder leicht entzündlichen, brenn- baren oder explosiven Stoffen. •... -
Page 7: Geräteaufstellung
Seite 7 von 30 GERÄTEAUFSTELLUNG Stellen Sie das Gerät in einem trockenen und ausreichend belüfteten Raum auf. Sorgen Sie dabei für einen sicheren Stand auf einem trockenen und rutschfesten Untergrund. Stellen Sie das Gerät mit der Rückseite mindestens 10 cm von der Wand entfernt auf, um jederzeit für genügend Luftzirkulation zu sorgen. -
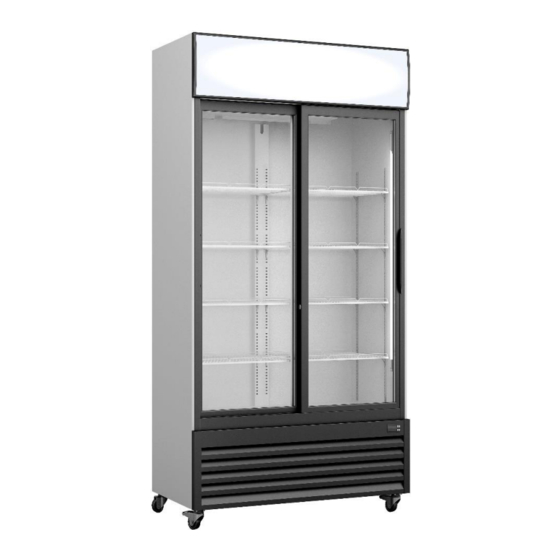
Page 8: Struktur Und Teile
Seite 8 von 30 STRUKTUR UND TEILE (Modellbeispiel GTK 370) ERSTE INBETRIEBNAHME Vor der ersten Nutzung: Packen Sie das Gerät aus, überprüfen es auf Vollständigkeit und stellen Sie es auf (Siehe Geräteaufstellung). Säubern Sie das Gerät (siehe Reinigung). Schließen Sie das gesäuberte Kühlgerät (Siehe Geräteanschluss) an eine 230 V Steckdose an. -
Page 9: Reinigung
Seite 9 von 30 Einschalten - Stecken Sie den Netzstecker in Steckdose. Das Gerät schaltet sich ein. Bedienung über das Display 1. Temperatur einstellen: Drücken Sie die SET-Taste und die eingestellte Temperatur wird angezeigt. Drücken Sie für 4 Sekunden die SET-Taste, das °C fängt an zu blinken. -
Page 10: Fehlersuche Und -Behebung
Das Rauschen des Kältemittels ist zu hören, wenn das Kühlgerät arbeitet. Das ist normal, da das Kältemittel im System zirkuliert. In der nassen Jahreszeit kann sich an der Außenseite des Gerätes Kondenswasser niederschlagen. Dies ist keine Störung, die Ursache ist eine zu hohe Luftfeuchtigkeit. Verwenden Sie einfach ein Tuch, um das Kondenswasser abzuwischen. STROMLAUFPLAN GTK 370 09/23 SvN... - Page 11 Seite 11 von 30 GTK 700 SD GTK 1065 Übersetzung Stromlaufplan: Switch Schalter LED power LED-Treiber Lamp Lampe Top Lamp Obere Canopy Lampe Fan motor Ventilatormotor Controller Steuerung 09/23 SvN...
-
Page 12: Explosionszeichnungen Mit Legende
Seite 12 von 30 EXPLOSIONSZEICHNUNG: GTK 370 EXPLOSIONSZEICHNUNG – Legende GTK 360 Front grill Vordere Abdeckung Glass door Glastüre Door handle Türgriff Door gasket Türdichtung Canopy cover Abdeckung Canopy frame Rahmen LED driver LED-Treiber P shaped LED light LED-Beleuchtung (innen) - Page 13 Seite 13 von 30 Digital thermostat Digitales Thermostat Castor without brake left/right Rolle ohne Bremse links/rechts Castor with brake left/right Rolle mit Bremse links/rechts Condenser Kondensator Power cable Netzstecker Condenser fan blade Lüfterflügel f. Kondensator Condensor fan motor Motor für Kondensatorlüfter Compressor Kompressor Dry filter...
- Page 14 Seite 14 von 30 LEDCanopy light LED Canopy Licht Evaporator fan blade Lüfterflügel für Verdampfer Evaporator Verdampfer Digital thermostat Digitales Thermostat Evaporator fan motor Lüftermotor für Verdampfer Power cable Netzstecker Castor with brake left/right Rolle mit Bremsen links/rechts Castor without brake left/right Rolle ohne Bremse links/rechts LED driver LED-Treiber...
-
Page 15: Verpackungs-Entsorgung
Seite 15 von 30 EXPLOSIONSZEICHNUNG – Legende GTK 1065 Door gasket Türdichtung Front grill Vordere Abdeckung Glass door left and right Glastüre links und rechts Canopy Abdeckung Abdeckung Canopy Frame Rahmen Shelf left side and right side Rost links und rechts K-Clip K-Clip LED left and right... -
Page 16: Geräte-Entsorgung
Falls vorhanden (Name des Händlers) E-Mail-Adresse des Verkäufers Eventuell Weitere Notizen Name des Verkäufers Made in P.R.C for: SARO Gastro-Products GmbH Sandbahn 6, 46446 Emmerich am Rhein, Germany Tel. +49 (0) 2822 9258-0 +49 (0) 2822 18192 E-Mail info@saro.de www.saro.de Hinweis: Technische- / Design- / Modelländerungen und Irrtümer vorbehalten. - Page 17 Seite 17 von 30 Operating instructions Refrigerator model GTK 370 GTK 700 SD GTK 1065 GTK 370 item no.: 453-1004 GTK 700 SD item no.: 453-10075 GTK 1065 item no.: 453-1019 09/23 SvN...
- Page 18 Seite 18 von 30 CONTENTS Scope of delivery ............................19 Standards and guidelines ..........................19 Technical overview ..........................19/20 General notes ............................... 21 Safety instructions ............................21/22 Installation ................................22 Connection ..............................23 Structure and parts ............................23 First commissioning ............................23 Operation –...
-
Page 19: Scope Of Delivery
Seite 19 von 30 Dear Customer, Congratulations on your new SARO refrigerator model GTK 370 / GTK 700 SD / GTK 1065. The item you have purchased is designed for commercial use in restaurants, hotels, cafés, canteens and supermarkets. The refrigerator is particularly suitable for the storage and sale of food and beverages. - Page 20 58 dB Cooling type Static cooling with recirculation fan Automatic defrost Feet/castors GTK 370 + GTK 700 SD: 4 castors, front braked, rear not braked GTK 1065: 8 castors, front braked, rear not braked Suitable for Climate class 4 Temperature range Applies to all models: -1 / + 10 °C...
-
Page 21: General Notes
Seite 21 von 30 GENERAL NOTES • Keep these operating instructions within easy reach near the unit. • The manufacturer/dealer cannot be held responsible for damage caused by failure to observe these operating instructions. • If these operating instructions are not observed, the safety of the unit can no longer be guaranteed. •... -
Page 22: Installation
Seite 22 von 30 • Do not tilt the unit more than 45 degrees. • Before connecting to your mains, check that the type of current and mains voltage correspond to the specifications on the type plate. Commissioning is only possible if they match in order to avoid accidents/defects. •... -
Page 23: Connection
If the unit is restarted immediately after it has been switched off, the fuse may blow and interrupt the flow of electricity. In addition, the compressor may be overloaded and damaged. STRUCTURE AND PARTS (model example GTK 370) FIRST COMMISSIONING Before first use: Unpack the unit, check it for completeness and set it up (see Setting up the unit). -
Page 24: Operation - (Display) Settings
Seite 24 von 30 OPERATION - SETTINGS Digital temperature controller: Switch on - Insert the mains plug into the socket. The appliance switches on. Operation via the display 1. Set temperature: Press the SET key and the set temperature is displayed. Press the SET key for 4 seconds, the °C starts flashing. Press the ▲-key or the ▼-key to change the displayed value. -
Page 25: Troubleshooting
In the wet season, condensation may form on the outside of the unit. This is not a malfunction, the cause is excessive humidity. Simply use a cloth to wipe off the condensation. CIRCUIT DIAGRAM GTK 370 09/23 SvN... - Page 26 Seite 26 von 30 GTK 700 SD GTK 1065 09/23 SvN...
-
Page 27: Exploded View With Legend
Seite 27 von 30 EXPLODED VIEW: GTK 370 EXPLODED - LEGEND GTK 360 Front grill Evaporator fan blade Glass door Evaporator fan motor Door handle Evaporator Door gasket Digital thermostat Canopy cover Castor without brake left/right Canopy frame Castor with brake left/right... - Page 28 Seite 28 von 30 EXPLODED VIEW: Model: GTK 700 SD EXPLODED - LEGEND GTK 700 SD Front grill Digital thermostat Sliding door right and left Evaporator fan motor Door handle Power cable Door gasket Castor with brake left/right Canopy cover Castor without brake left/right Canopy frame LED driver...
- Page 29 Seite 29 von 30 EXPLODED VIEW: GTK 1065 EXPLODED - LEGEND GTK 1065 Door gasket Digital thermostat Front grill Light switch Glass door left and right Power cable Canopy cover Castor without brake Canopy Frame Castor with brake left/middle/right Shelf left side and right side Door handle K-Clip LED driver...
-
Page 30: Packaging Disposal
E-mail address of the seller Optionally More notes Name of the seller Made in P.R.C for: SARO Gastro-Products GmbH Sandbahn 6, 46446 Emmerich am Rhein, G e r m a n y Tel. +49 (0) 2822 9258-0 +49 (0) 2822 18192 E-mail info@saro.de...
Need help?
Do you have a question about the GTK 370 and is the answer not in the manual?
Questions and answers