Table of Contents
Advertisement
Quick Links
1
.
Overview
1.1
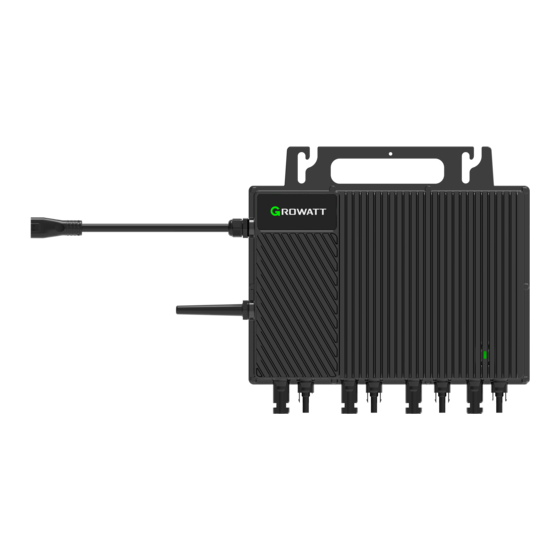
Microinverter Overview
A
B
C
Note:
1.This document is intended for use as a quick installation guide. For details, please refer to the User Manual.
2.Growatt shall not be liable for any damage caused by improper operations.
1.2
System Overview
PV
Module
WiFi Booster
Welink
WiFi Router
Accessories
1.3
I
D
E
F
Monitoring System
Smart Phone
G
H
Solar Panel
1.The NEO series Microinverters support RF communication or
communication via WiFi connection.
2.For remote monitoring, the Microinverter with integrated RF
module should be connected to ShineWeLink.
NOTE:
1.If the WiFi signal is weak, please install a WiFi booster at a
suitable place between the microinverter and the router.
2. Position the ShineWeLink next to the router, but maintain a
minimum distance of 0.5m to avoid distortion resulting from the
excessively strong signal.
Item
A
B
C
D
E
F
G
H
H
I
NOTE:
All accessories listed above are not included in the
package and should be purchased separately.
NEO 1200-2000M-X Microinverter
Quick installation Guide
Item
Description
A
AC branch wire
B
C
D
PV terminal
E
F
G
Grounding hole
H
Distribution Panel
Microinverter
AC Junction Box
Description
PV Extension Cable
AC Bus Cable(AWG 12/10)
AC Trunk Connector
AC Trunk End Cap
AC Trunk Port Cap
AC Trunk Connector Unlock Tool
AC Sub Connector Removal Tool
Grounding screw (M4*6)
M8*25 mounting screws (Prepared by the installer)
Antenna
Heat sink
LED
Back plate
Handle
Advertisement
Table of Contents

Subscribe to Our Youtube Channel
Related Manuals for Growatt NEO 1200-2000M-X


Summary of Contents for Growatt NEO 1200-2000M-X
- Page 1 Grounding hole Handle Note: 1.This document is intended for use as a quick installation guide. For details, please refer to the User Manual. 2.Growatt shall not be liable for any damage caused by improper operations. System Overview Solar Panel Distribution Panel...
- Page 2 Installation Procedures NOTE: 1.The sequence can be changed based on your installation plan. 2.When crimping the AC trunk cable, a hexagonal wire crimper must be used. Step 1. Install the Microinverter a.Mark the position of each Microinverter on the rack, according to the PV module layout. b.Mount one Microinverter at each of these locations using accessories recommended by your module racking vendor.
- Page 3 Step 4. Complete the AC Connection a.Push the Microin verter AC Sub Connector to the AC Trunk Connector. Make sure to hear the "click" as proof of a robust connection. Click Click b.Connect the AC end cable to the distribution panel, and wire it to the local grid network. Click c.Please plug the AC Trunk Port Cap in any vacant AC Trunk Port to prevent from water and dust.
- Page 4 Installation map The installation map is completed Monitor The monitoring system is working properly Service and contact Shenzhen Growatt New Energy Co., Ltd 4-13/F, Building A, Sino-German(Europe) Industrial Park, Hangcheng Ave, Bao’an District, Shenzhen, China +86 755 2747 1942 service@ginverter.com www.ginverter.com...
Need help?
Do you have a question about the NEO 1200-2000M-X and is the answer not in the manual?
Questions and answers