
Subscribe to Our Youtube Channel
Related Manuals for Metos SP-30HA-F


Summary of Contents for Metos SP-30HA-F
- Page 1 Mixer with removable safety guard Metos Marine SP-30HA-F, SP-30HA-Y 400/3/50 Hz , 440/3/60 Hz 4025036, 4025038 Instruction manual 31.05.2012...
-
Page 2: Table Of Contents
SAFETY INSTRUCTIONS .....................3 OVERALL VIEW OF THE MIXER ..................4 Control Panel ........................4 INSTALLATION INSTRUCTIONS ..................5 Installation ........................5 Electrical connection ....................5 OPERATING INSTRUCTIONS ..................6 Before using the mixer ....................6 Safety at work ......................6 Correct use of the mixer ....................7 Tool selection .......................7 Fitting the bowl ......................8 Fitting the mixer tool ....................8 Bowl lift &... -
Page 3: Safety Instructions
31.05.2012 4025036, 4025038 SAFETY INSTRUCTIONS CAUTION Read before you operate the machine It is important to read this manual and following the instructions before operate the machines. This mixer is designed as a safe and effi cient food processing product as long as the machine is used in accordance with the instructions in this manual and is properly maintained. -
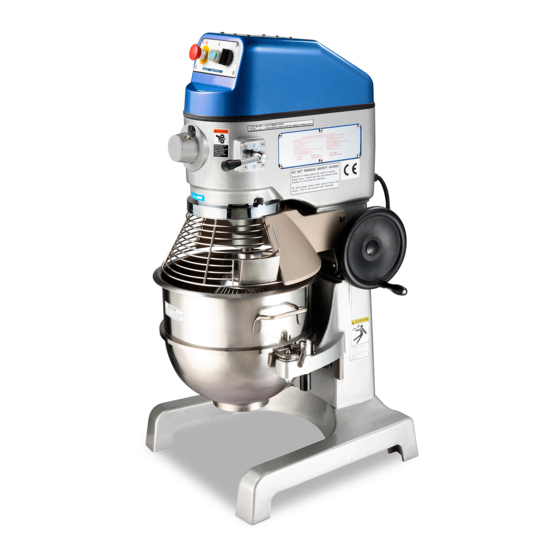
Page 4: Overall View Of The Mixer
31.05.2012 4025036, 4025038 OVERALL VIEW OF THE MIXER A) Bowl B) Removable Bowl Guard C) Planetary Hub E) Control Panel F) Gear lever G) Addition Chute H) Bowl lift Wheel I) Bowl Cradle Control Panel A) Emergency Stop B) Start C) Timer... -
Page 5: Installation Instructions
31.05.2012 4025036, 4025038 INSTALLATION INSTRUCTIONS Installation The machine is supplied factory lubricated and ready to run. It should be positioned on any solid, level and non-skid work surface that is nonfl ammable. Install in work area with adequate light and space. •... -
Page 6: Operating Instructions
31.05.2012 4025036, 4025038 The mixer should be plugged into a switched socket which isolates all poles and has a minimum contact clearance of 3mm and located close to the mixer for use in an emergency and to facilitate servicing. The machine must be incorporated into a potential equalization system. The leakage current for this appliance is no greater than 1 mA/KW. -
Page 7: Correct Use Of The Mixer
31.05.2012 4025036, 4025038 Correct use of the mixer • It is the responsibility of the operators to use the mixer correctly within the re- commended limitations. Always follow the instructions on the side of the machine when changing gear. If the motor labors, please stop the machine and reduce the size of the mix immediately. -
Page 8: Fitting The Bowl
31.05.2012 4025036, 4025038 Fitting the bowl With the bowl cradle lowered, place the chosen mixing tool in the bowl and position the bowl on the cradle. There are three location points when fi tting the bowl. (1) The locking pin at the rear of the bowl should locate in the hole of the cradle. -
Page 9: Removing And Attaching The Bowl Guard
31.05.2012 4025036, 4025038 To close the bowl guard, rotating counterclockwise until the bowl guard is in the locked position. (See Figure B) NOTE: When the guard is open or not properly installed, the mixer will not operate. Fig. B Removing and Attaching the Bowl Guard NOTE: Before removing or attaching the bowl guard, make sure the bowl is in the down/lower position and the agitator is taking off the shaft. -
Page 10: Untimed Operation
31.05.2012 4025036, 4025038 Untimed operation If you wish to manually control a mix, select the untimed mode by moving the Timer Knob anti-clockwise until it stops. CAPACITY Please refer to Page 15. The table shows the recommended capacities of fi nished weights of regular mixes. -
Page 11: Attachments
31.05.2012 4025036, 4025038 ATTACHMENTS NOTE: Attachment Hub is optional. The ranges of attachments that can be operated from the Attachment Hub are listed below. When using an attachment, lubricate the Drive Stud (D) using a food quality grease or oil. To fi... -
Page 12: Cleaning Instructions
31.05.2012 4025036, 4025038 CLEANING INSTRUCTIONS Care of your mixer CAUTION: ALWAYS DISCONNECT OR UNPLUG THE ELECTRICAL POWER FROM THE MIXER BEFORE CLEANING. The mixer is designed for simple maintenance carried out by operators. It may be necessary from time to time to apply a little Vaseline and oil to the rods on which the bowl cradle slides. -
Page 13: On An Anual Basis
31.05.2012 4025036, 4025038 On an anual basis • Check that all bolts are tight and bowl guard secure. • Carry out on a more frequent basis if machine is arduously used. • After replacing the parts by technicians, please screw back tightly with anti-leaking coat to avoid the gear oil leaking after replacement. -
Page 14: Troubleshooting
31.05.2012 4025036, 4025038 TROUBLESHOOTING FAULT CHECK POSSIBLE REASON AND ACTION REQUIRED No power to mixer 1. Check plug socket 1. Mixer not plugged into a live socket or not switched on 2. Check wiring in plug 2. Plug incorrectly wired – rewire correctly 3. -
Page 15: Capacity
31.05.2012 4025036, 4025038 It is recommended that any servicing or maintenance work must be carried out by a trained technician or electrician. Isolate the mixer from the electricity supply by removing the plug from the socket before cleaning or servicing. Isolate the mixer from the electricity supply by removing the plug from the socket after long period of no use. -
Page 16: Technical Specifications
31.05.2012 4025036, 4025038 TECHNICAL SPECIFICATIONS STAND AND DIMENTIONS... - Page 17 31.05.2012 4025036, 4025038...
-
Page 19: Electrical Diagram And Spare Parts
ELECTRICAL DIAGRAM AND SPARE PARTS...
Need help?
Do you have a question about the SP-30HA-F and is the answer not in the manual?
Questions and answers