Table of Contents
Advertisement
Quick Links
Advertisement
Table of Contents

Subscribe to Our Youtube Channel
Related Manuals for Metos PL 6


Summary of Contents for Metos PL 6
- Page 1 POTATO PEELERS PL,PV,PC User manual rev 2.0...
-
Page 2: Dear Customer
Congratulations on deciding to choose a Metos appliance for your kitchen activities. You made an excellent choice. We will do our best to make you a satisfi ed Metos customer like thousands of cus- tomers we have around the world. -
Page 3: Table Of Contents
04.08.2005 rev 2.0 Contents 1 GENERAL ......................6 1.2 Symbols used in the manual ....................6 1.3 Symbols used on the appliance ...................6 1.4 Checking the relationship of the appliance and the manual ..........6 2 SAFETY ......................7 2.1 General warnings ........................7 2.2 Safety plates ..........................8 3.Functional description ..................9 3.1 IDENTIFICATION OF THE .....................9 COMPONENTS ..........................9... - Page 4 04.08.2005 rev 2.0...
-
Page 5: General
04.08.2005 rev 2.0 General 1 GENERAL Carefully read the instructions in this manual as they contain important informa- tion regarding proper, effi cient and safe installation, use and maintenance of the appliance. Keep this manual in a safe place for eventual use by other operators of the ap- pliance. -
Page 6: Safety
04.08.2005 rev 2.0 2 SAFETY 2.1 General warnings Before installing the machine make sure that the used area is compatible with the dimensions and the weight of the machine. For the installation or removal of any machine part, the used lifting and handling devices should be suitable to the weight and geometrical characteristics of the part to be lifted or handled. -
Page 7: Safety Plates
04.08.2005 rev 2.0 Do not use your hands or other tools to stop any moving parts. Do not use matches, lighters or fl ames near the machine. YOUR BEST ATTENTION SHOULD BE PAID TO THE WARNING PLATES LO- CATED ON THE MACHINE BEFORE DOING ANY WORK ON THE MACHINE OR NEAR THE MACHINE. -
Page 8: Functional Description
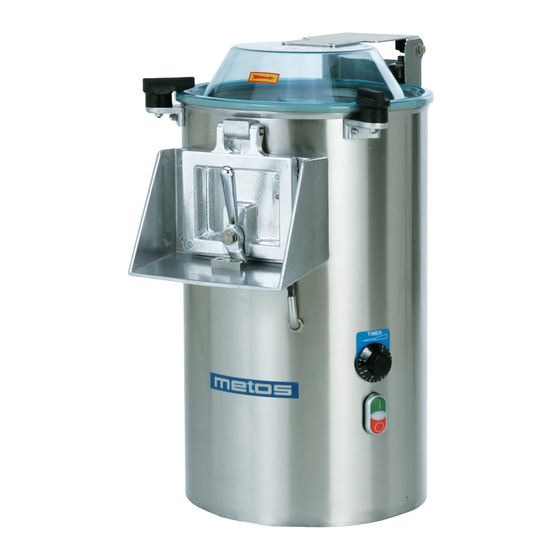
04.08.2005 rev 2.0 3.Functional description 3.1 IDENTIFICATION OF THE 3.2 IDENTIFICATION OF THE COMPONENTS MACHINE 1. Control panel 2. Cover The serial number and identifi cation data of the 3. Cover opening handle (NOT in PL6/PC3) machine are punched on a plate (10) fastened 4. -
Page 9: Applications, Intended Use
04.08.2005 rev 2.0 3.3 APPLICATIONS, INTENDED USE The PL / PV and PC versions are professional machines for modern cooking where 30 to 700 place settings are needed. PL version of machine has been designed to peel potatoes of all kinds, carrots and onions. PV version of machine is a multipurpose one, it has been designed to peel potatoes of all kinds, carrots and onions;... -
Page 10: Operator Areas
04.08.2005 rev 2.0 3.5 Operator areas The operator, during loading and unloading of food, can stay either in front or beside the machine. For a complete description of allowed working positions, check positions (O). For maintenance works the engineer is allowed to stay on the back of the machine (T). -
Page 11: Operation Instructions
04.08.2005 rev 2.0 4.Operation instructions 4.1 - FUNCTIONING 4.1.1 Food preparation For potatoes carrots, fruits and vegetables, mussels and seafood no special preparation is required, whereas onions require the carrying out of the following operations. Onions preparation: Before introducing the onions in the machine it is necessary to remove the upper and lower parts as well as the dry leaves around the onion in order to avoid clogging of the discharge. -
Page 12: Setting Of The Machine And Start
As soon as the preset time has expired the machine will stop. For models PL 6/PC3 close the tap (11) , for the other models the water fl ow will stop automatically as soon as the preset time has expired. - Page 13 04.08.2005 rev 2.0 Put a container under the food unloading door (6), open the door and at the same time push the button “ “ (12) until the food has been completely unloaded. Warning for use of PV models These models allow choice between two different speeds, choice of speed depends on the type of pro- cessing and food.
-
Page 14: Optional
04.08.2005 rev 2.0 4.1.3 Optional The following optional are available on the different models: Disc for Onions Disc for cleaning and brushing fruits and vegetables Disc for cleaning mussels and similar seafood Centrifugation basket Side abrasive... -
Page 15: Installation Of Optional Accessories
S i d e a b r a - and potatoes onions and vegeta- and similar sea- basket sive bles food PL 6 PL 10 PL 15 PL 23 PL 32 PV 10 PV 15 PV 23 PV 32 PC 3... -
Page 16: After Use
(buttons, timer, and so on.) • Open the lid (1) operating the handle (2), for model PL 6 you should also move the locks (3). • Remove the peeling disc (4) and any optional tool installed. -
Page 17: Cleaning Of Electro Magnetic Valve Fi Lter (Except For Mod. Pl6/Pc3)
04.08.2005 rev 2.0 6.2 Cleaning of electro magnetic valve fi lter (except for Mod. PL6/PC3) • Check that the water supply tap is correctly closed. • Move to the back of the machine and unscrew the water supply hose (1). •... -
Page 18: Installation
04.08.2005 rev 2.0 7. Installation 7.1 Unpacking To remove the packing from the machine proceed as follows: • Cut the straps (1) that tie up the carton. • Open the carton (2), by removing the metallic clips. • Remove the cardboard packaging (2). •... -
Page 19: Machine Lifting
04.08.2005 rev 2.0 7.2 -MACHINE LIFTING Lifting of the machine shall be carried out by two people seizing it from the base and then lifting it. ATTENTION Use protection gloves for lifting the machine. Lifting point Lifting point 7.3 - ASSEMBLING THE FEET For a greater ease of transportation the machines are shipped with the adjustable feet not assembled. -
Page 20: Machine Installation
04.08.2005 rev 2.0 7.4 - MACHINE INSTALLATION 7.4.1 Installation on bench (PL6/PC3 only) DANGER Make sure that the bolster is suitable to support the loads reported in the “SPECIFICATIONS” chapter, that it is smooth and uniform and that it is suffi ciently high to grant proper use of the machine. -
Page 21: Water Connections
fi lter is not available it is possible to purchase an (optional) fi lter that for models PL and PV 10 - 32 and models PC 6 – 8 shall be positioned below, while for models PL 6/PC3 it must be positioned behind. -
Page 22: Electrical Connection
04.08.2005 rev 2.0 7.6 ELECTRICAL CONNECTION • The power feed line should be provided with a suitable omnipolar DISCONNECTING SWITCH (automatic thermomagnetic switch or differential) placed before the control unit main switch, with a minimum contact opening of 3 mm. •... -
Page 23: First Start
7.7 FIRST START • Set the main switch upstream of the machine to “ON”, open the water supply; for model PL 6 open the tap (1). • Set the timer (2). • Press push button (3) , [in PL and PC models: the light (4) will switch on] •... -
Page 24: Troubleshooting
04.08.2005 rev 2.0 8. Troubleshooting The machine doesn’t start: - check the electric connection. - make sure that no foreign bodies are inside the machine and stop the rotation. - check that both the food unloading door and the upper lid are correctly closed. High percentage of waste and discard in potato cleaning : - caused by deformed or unevenly sized potatoes Disc for mussels and similar seafood;... - Page 25 4.8.2005 rev 2.0 Spareparts...
-
Page 26: Technical Information
01.06.2005 rev 2.0 TECHNICAL INFORMATION Wiring diagrams PC-PL Installation drawing Technical Specifi cations... - Page 27 Wiring digram PC-PL Models...
- Page 28 Wiring diagram PV Mod.
- Page 29 1085 PV10 1105 PV15 1015 1175 PV23 1175 1015 PV32 1085 PL10 1105 945 PL15 1175 1015 PL23 1175 1015 PL32 1085 925 1105 945 Installation drawing...
Need help?
Do you have a question about the PL 6 and is the answer not in the manual?
Questions and answers