
Related Manuals for AMP StoutPro PAR36 G2 Brass Black Flood Light


Summary of Contents for AMP StoutPro PAR36 G2 Brass Black Flood Light
- Page 1 INSTALLATION & MAINTENANCE GUIDE LOW VOLTAGE LANDSCAPE LIGHTING ® AMP® StoutPro PAR36 G2 Brass Black Flood Light (Lamp Ready) ITEM: AFL-4015 1-813-978-3900 • Mon-Fri 9am-6pm (EST) - 1 -...
- Page 2 INSTALLATION & MAINTENANCE GUIDE AMP® StoutPro PAR36 G2 Brass Black Flood Light (Lamp Ready) IMPORTANT SAFETY INSTRUCTIONS: READ BEFORE INSTALLATION This luminaire is intended for installation in accordance with local codes and the National Electric Code (NEC). Failure to adhere to these codes and instructions may result in serious injury, property damage and void the warranty.
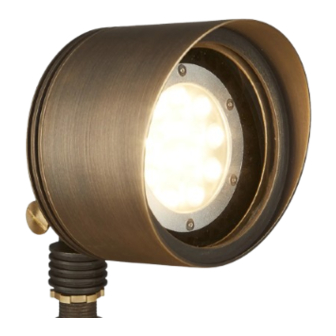
- Page 3 PACKAGE CONTENTS A. (1) Fixture Parts Required (sold separately) A. (1) PAR36 Bulb B. (1) Mounting Accessory PRODUCT DIMENSIONS 4.25” 4.65” 2.3” Remove Glare Guard Rotate the glare guard ROTATE counter clockwise and remove it from the fixture. Then remove the bulb holder.
- Page 4 INSTALLATION & MAINTENANCE GUIDE AMP® StoutPro PAR36 G2 Brass Black Flood Light (Lamp-Ready) Install PAR36 Bulb Use a PAR36 bulb (sold Par36 Bub separately), with the correct Supply Wire wattage and type as marked on luminaire label. Connect the supply wires using the...
- Page 5 Install Stake Determine the desired Board location for mounting the stake. Hammer the stake into the ground until flange of stake is flush to grade. To avoid damage to the stake, place a board on top of the Stake stake while hammering. Note: If the ground is hard Ground and the stake is difficult to...
- Page 6 INSTALLATION & MAINTENANCE GUIDE AMP® StoutPro PAR36 G2 Brass Black Flood Light (Lamp-Ready) Wire Connections Wire Connections Main Supply Cable Pigtail Strip both leads from the fixture pigtail. Using two UL listed wire connectors (sold separately), connect the leads from the fixture to the main supply cable leads.
- Page 7 INSTALL/REPLACE LAMP Reverse Step 1 - Step 3 to expose the PAR36 bulb and replace it with correct wattage and type marked on luminaire label. Reinstall glare guard. IMPORTANT: Halogen lamps must be protected from moisture and dust at all times. Always reinstall glare guard when removed. 813.978.3900 •...
- Page 8 1-813-978-3700 • Mon-Fri 9am-6pm (EST) Specifications and product details subject to change without notice. © Copyright 2023, AMP® Lighting, Lutz FL USA 33549 • All rights reserved. customersupport@amplighting.com • amplighting.com...
Need help?
Do you have a question about the StoutPro PAR36 G2 Brass Black Flood Light and is the answer not in the manual?
Questions and answers