Advertisement
Vision-ADJUSTABLE HEIGHT DESK WITH RETURN
Install Instructions
Tools Required
•
5MM Allen Wrench
•
Tape Measure
•
Screw Driver
•
Level (Minimum 4' )
Hardware Included
•
(12) #8 x 3/4 Pan Phillips
•
(11) Cams and Post
•
(24) #10 X 7/8 Pan Head Phillips
•
(3) Flat Bracket 13 GA X 2" X 5"
•
(24) #8 X 3/4 Pan Head Philips
•
40" Wire manager (Protum)
•
Hardware Bag
•
(6) U-Brackets
Installation
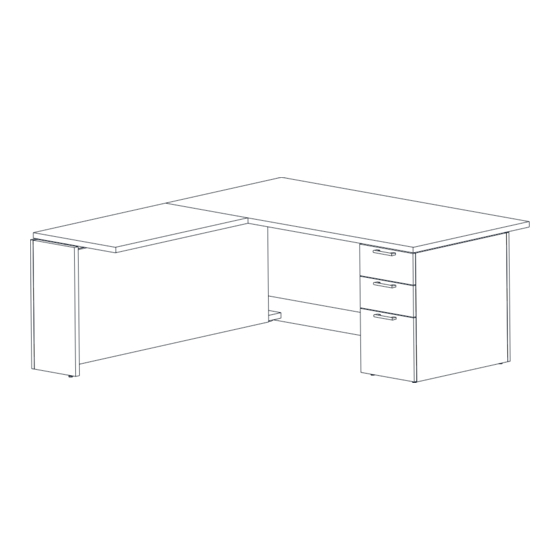
RETURN TOP
(6) U-BRACKETS
RETURN PEDESTAL
8/26/2022
(2) TOP STIFFNERS
BOX/BOX/FILE PEDESTAL
Right Unit shown Left opposite
Figure A
Figure B
Form No. INST-VS0013
DESK TOP
MODESTY PANEL
ADJUSTABLE HEIGHT
MODESTY PANEL
1
Advertisement
Table of Contents

Related Manuals for JSI Vision-ADJUSTABLE HEIGHT DESK WITH RETURN


Summary of Contents for JSI Vision-ADJUSTABLE HEIGHT DESK WITH RETURN
- Page 1 Vision-ADJUSTABLE HEIGHT DESK WITH RETURN Install Instructions Figure A Tools Required • 5MM Allen Wrench • Tape Measure • Screw Driver • Level (Minimum 4’ ) Hardware Included • (12) #8 x 3/4 Pan Phillips • (11) Cams and Post •...
- Page 2 Installation (Modesty Panel) Insert cams into back panel (6) places. (Figure C) Figure C (6) CAM POST MODESTY PANEL Installation (Top and Return Top) Determine right or left top per unit set up. Attach (3) Flat Brackets to underneath side of top using #8 x 3/4 PHP screws. Note holes to outside of return top.
- Page 3 Unit Top Installation Set unit up per order. Drawer pedestal on one side and Return pedestal on opposite side. Slide the (2) top stretcher bar in place, do not lock in place. Remove the drawers from the Drawer pedestal notice where each drawer is located . Align the Return pedestal and Drawer pedestal with Modesty panel, lock cam and post (turn Clockwise) (6) places.
- Page 4 Installation (Cabinet and Top) Attach electrical components to each leg, check length of cords, longest core to run from Return side. Connect power cord, leg electrical, and control switch to Control box. Secure Control box between top support rails. Plug in power cord to source. Must re-set power box by holding down both the up and down button at the same time till top lowers and re-sets.
Need help?
Do you have a question about the Vision-ADJUSTABLE HEIGHT DESK WITH RETURN and is the answer not in the manual?
Questions and answers