Table of Contents
Advertisement
Dear Loyal Customer:
First, thank you for purchasing the Zaurus K-PDA and
welcome to the Zaurus family. We are sure you will soon
find that your new assistant will change your life and the
way you do business. We would briefly like to share with
you our vision.
Your Zaurus exists today thanks to an incredible amount of
effort and determination from our entire Zaurus team (not to
mention numerous pots of black coffee). Our team at Sharp
has a dream to change the way we all do business. As a
business person, you already know that access to
information and people anytime, anywhere is the key to
gaining a competitive edge in this fast-paced information
age. We feel Zaurus is the tool that can deliver this to you. It
is simple to use, has months of battery life, and fits in your
pocket.
How did we come up with the idea for Zaurus? Many of us
found that we were lugging around notebook computers to
take notes, generate summaries, and report back to our
office and clients. We also found that we had a lot of "down
time" that could be put to better use; sitting on trains and
planes, waiting for clients, and even in meetings. Now that
we are using the Zaurus, we travel lighter, work smarter,
and stay more in touch with our contacts and each other.
Best of all, we have very little "down time" as our "Zauri" are
always with us. Now you know why we say that "Zaurus
means business anytime, anywhere".
We need your help to spread the word. Show a friend or
someone at work how you use your Zaurus and what it can
do for them. As more and more people start using the
Zaurus, we can spend even more resources on developing
new accessories, add-on software programs, and new
versions of the Zaurus. Better yet, if you have a mobile staff
or sales force that you would like to equip with Zauri, give us
a call at 800-BE-SHARP. We'll show you how you can
improve their efficiency and productivity as well as enable
them to better keep in touch with their clients and each
other.
Finally, let us know how you feel about your Zaurus. We
look forward to getting letters from our users about how you
use it and improvements you would like to see. We cannot
promise to answer every letter, but you can be sure we read
all of the suggestions you send us. We value feedback from
our customers and try to incorporate as many requests as
we can in our new products. Each of us takes an incredible
amount of personal pride in our work and the Zaurus. We
are all Zaurus users. We believe this makes a difference in
the products we create. After using the Zaurus, we think
you'll agree.
Thanks again for purchasing the Zaurus and sharing our
dream. We look forward to shaping the future of the
information age with you.
Sincerely,
The Z Team
1
Advertisement
Chapters
Table of Contents
Troubleshooting

Related Manuals for Sharp Zaurus ZR-5700


Summary of Contents for Sharp Zaurus ZR-5700
- Page 1 Your Zaurus exists today thanks to an incredible amount of effort and determination from our entire Zaurus team (not to mention numerous pots of black coffee). Our team at Sharp has a dream to change the way we all do business. As a...
- Page 2 Sharp strongly recommends that you keep separate written records of all important data. • Sharp assumes no responsibility for data lost or altered as a result of improper use, repairs, defects, battery replacement/failures or any other cause.
-
Page 3: Table Of Contents
Contents Quick Start ... 9 Important things to do ... 9 Installing the batteries ... 10 Initializing ... 11 Adjust LCD contrast ... 12 Adjusting the touch panel ... 13 Setting the time and date ... 14 Setting the start-up display ... 15 Making your first entry ... - Page 4 Detail View and Index View ... 54 Tool bar ... 54 Help Function ... 55 Key Sound ... 55 Save Battery Life ... 56 Sleep function ... 56 External power supply ... 56 Backlight Function ... 56 CHAPTER 2 Desk Accessories ... 57 Calculator ...
- Page 5 Clock ... 91 Daylight Saving Time ... 91 World City ... 91 User's City ... 92 Setting daily alarms ... 93 Disabling alarm sound ... 94 MORE ... 95 Spreadsheets ... 95 CHAPTER 3 General Operations ... 97 Opening Applications and Accessories ... 97 Tool Bar Functions ...
- Page 6 CHAPTER 4 Time Management ... 119 Calendar views ... 119 Calendar view format ... 119 Changing Activities Setup ... 120 Calendar views ... 120 Accessing entries using calendar views ... 124 Selecting a date ... 124 Appointments ... 125 Making new Appointment entries ... 125 Making an Appointment entry ...
- Page 7 Link To function ... 153 Jump To function ... 154 Breaking Links ... 155 Editing Contacts and Data Files entries ... 155 Deleting Groups of entries ... 156 Picture fields ... 156 Adding a picture to an entry ... 157 Editing contents of picture fields ...
- Page 8 Quick transfer ... 220 Unit to Unit transfer ... 220 Data Transfer with Other Computers ... 223 PC Link ... 223 Organizer Link software for Other Sharp Products ... 224 Special Communications Applications ... 226 Remote Link ... 226 Terminal Mode ... 226 Message ...
-
Page 9: Quick Start
Quick Start his section should be read and all neces- sary operations performed before you start using your unit. Important things to do Complete and send in the registration card. This registers your purchase and allows us to notify you of new developments and products as they become available. -
Page 10: Installing The Batteries
Installing the batteries Before operation you will need to install the two operating batteries. The memory backup battery (CR2032) is installed at the factory and should last five years if operating batteries are replaced as required. 1. Set the battery replacement switch on the back to "REPLACE BATTERIES"... -
Page 11: Initializing
Initializing Your unit must be initialized the first time it is used. Open 1. Press the lock button and open the display. Press 2. Remove the touch pen. 3. While holding down the key, push the RESET button on the back with the touch pen. 4. -
Page 12: Adjust Lcd Contrast
Adjust LCD contrast LCD contrast may sometimes need adjustment to suit certain lighting conditions. 1. Touch at the left of the display. TOOLS 2. Touch (under Preferences) twice. 3. To adjust LCD contrast, touch 4. When you are satisfied with the setting, touch If LCD contrast is too light or dark to see the display, you can adjust the contrast directly. -
Page 13: Adjusting The Touch Panel
Adjusting the touch panel Each person holds a pen differently. The touch panel can be adjusted to respond correctly to your individual style of writing, drawing and selecting touch buttons. 1. Touch TOOLS 2. Touch (under Preferences) twice. 3. Touch Press the key. -
Page 14: Setting The Time And Date
Setting the time and date For time-based functions to be effective, the built-in clock must be set to the correct Home City time and date. 1. Touch and then touch TOOLS 2. To select a different Home city, touch the Home City name. -
Page 15: Setting The Start-Up Display
Setting the start-up display Each time the unit is turned on, it can display your name, telephone number and address on one of two graphic backgrounds. 1. Touch and then touch TOOLS 2. Select the required setting in each field. Select User's Picture when you want to use your own original start-up picture. -
Page 16: Making Your First Entry
Making your first entry Your first entry will be a Contacts entry. The procedures described below can be used with other applications. To make a new Contact 1 entry: 1. Touch at the right of the display. CONTACTS 2. Touch and select "New Business(1)". -
Page 17: Entering An Appointment
Entering an appointment 1. Touch at the right of the display. ACTIVITIES Touch again if the Day view has not been ACTIVITIES displayed. 2. Touch and drag the pen across the start and end times of the appointment on the time bar. When you lift the pen, a new appointment will appear. -
Page 18: Entering A To Do Item
Entering a To Do item To Do lets you organize tasks and objectives. 1. Touch at the right of the display. ACTIVITIES 2. Touch and select "New To Do". 3. Touch the date box and then use due date (if the To Do item has one). You can assign up to five labels to a task, then later use these to filter the item in a To Do list. -
Page 19: Using The Calendar Views
Using the Calendar Views Activities has five different calendar views: Day (initial default view), Week, Weekly Graph, Month and Year. These calendar views can be used to show Appointment, Birthday/Ann, Holiday and To Do entries. To use the calendar views: 1. -
Page 20: Taking Notes
Taking notes Notes is an electronic writing pad that lets you make handwritten notes during meetings and appointments. 1. Touch at the right of the display. NOTES 2. Touch and select "New Note". 3. Use the touch pen to make your Notes entry. The entire keyboard including disabled when entering Notes, so operations like CANCEL... -
Page 21: Making A Letter
Making a letter The "Make a Letter" feature converts an unformatted Documents entry into a professional looking business letter. 1. Touch at the right of the display. DOCUMENTS For details on making a Documents entry, see Docu- ments on p. 165. 2. -
Page 22: Searching For Information
Searching for information The search function lets you search for a keyword in the entries of selected applications. 1. Touch at the left of the display. SEARCH 2. Enter a keyword in the "Only Entries Containing" field. Select "Limit by Date Range" as required. 3. -
Page 23: Finding An Entry From The Index View
Finding an entry from the Index view Keyword search lets you search for entries containing any word in Activities, Contacts, Data Files, Notes, Outline and Documents. 1. Select the application and go to the Index View. 2. Press then 3. Enter the first few letters of the keyword (the word you are searching for). -
Page 24: Editing An Entry
Editing an entry Entries can be edited quickly and easily. 1. Display the entry you wish to edit in Detail View. 2. Make any necessary changes. Use the scroll bars and cursor keys to move within the display, use new entries from the keyboard. You can also drag the pen over text to select it, then cut the text and paste it elsewhere, or just delete it. -
Page 25: Deleting Entries
Deleting entries You can delete single entries or specific groups of entries. To delete a single entry: 1. Select the entry that you wish to delete in Index View or display it in Detail View. 2. Touch and select "Delete Entry". ("Delete Note"... -
Page 26: Assigning An Entry To Filer Folders
Assigning an entry to Filer folders Filer allows you to group entries into folders. Filer entries are not copied or moved to the folder, they are just assigned to the folder. 1. Display the entry you wish to assign to a folder in Index or Detail View. -
Page 27: Using Filer
Using Filer Filer allows you to manage information by subject instead of by entry type. Filer entries can be accessed and changed using the original application. 1. Touch at the left of the display. FILER 2. Touch a folder tab twice to view entries assigned to that folder. -
Page 28: Sending A Fax
Sending a fax With the optional CE-FM4 Fax/Modem connected to your unit, you can fax Filer, Documents, Notes or Scrapbook entries to a remote facsimile machine. 1. Connect your unit and the CE-FM4 Fax/Modem. Make sure the Fax/Modem is plugged into a wall jack. -
Page 29: Copying And Pasting Text
Copying and pasting text You can copy text from one place to another. 1. Display the entry you want to copy text from in Detail View. 2. Drag the touch pen over a word or sentence. The text will be displayed in reverse (white on black) to indicate it is selected. -
Page 30: Tools
Tools provides a range of utilities that let you customize your unit to your personal taste. Tools is also used to set up communi- cations and peripheral operations. Exchange data with a personal computer or use PC Link for the Sharp Electronic Organ- izer (OZ-7000/OZ-8000/YO-600/ZQ-5000 series). - Page 31 Turn key and alarm sounds on and off. Set the start-up display. Set the sleep interval. Show/hide secret entries. Stores commonly used words or phrases. Select the data source for applications. Control duration of the ZR-5800's Backlight.
-
Page 32: Drawing Pictures
Drawing pictures Scrapbook lets you make quick handwritten notes, drawings and maps directly on the display. 1. Touch at the left of the display. SCRAP BOOK 2. Touch and select "New Entry". You can also just start drawing. 3. Write whatever you like directly on the display with the touch pen. -
Page 33: Using The Calculator
Using the Calculator Calculator works as a standard 10-digit calculator. 1. Touch at the left of the display. CALC 2. Enter calculations by touching the key pad. 3. Touch when finished. -
Page 35: Commonly Asked Questions & Answers
Commonly asked Questions & Answers I currently also own a Sharp Wizard and would like to move my information from my Sharp Wizard to the ZR-5700/ZR-5800. How can I do it? If you own an OZ-5000/OZ-6000/OZ-9000 series you can use wireless infrared transfer to move the information over: •... - Page 36 SRAM cards (they require no backup battery). Communication cards, etc.: Sharp has provided a number of drivers for many of the input/output cards. Note that certain high power cards require that you use the EA-23E AC adaptor in conjunction with these cards in order to prevent excessive battery consumption.
- Page 37 ZR-5700/ZR-5800 PC-Link cable (see registration card special offer) or an infrared adaptor (such as CE-IR4). Note that if you own either the cable or an infrared adaptor for one of Sharp's various Wizards, it will also work. To download an Add-on software program simply start the installation program included on the computer floppy disk.
- Page 38 It is important to always have a back-up of your important electronic information. Here are some ways to do this: • You can print out a hard copy using the Sharp CE-IR1 infrared adaptor for printing. You will also need a PC-compatible printer (see page 192 for details).
- Page 39 Why should I send in the registration card? This is your way of registering your product with Sharp, and allows us to keep you informed about new products and software available for your unit. It also gives us valuable information about our users so that we can design products that continue to meet your needs.
- Page 40 I would like to use the Filer feature but I am afraid of using up memory. How does the Filer work? Does it make a copy of each entry? When you assign an entry to a folder in the Filer, it uses only a negligible amount of extra memory.
-
Page 41: What Your Unit Can Do
What your unit can do Your new ZR-5700/ZR-5800 is a full-featured, pocket- sized information manager, designed to enhance any information-based task, whether in the home, at the office or on the road. Its large, easy-to-read screen and graphical user interface makes it very easy to use for novices and experienced users alike. -
Page 42: About This Manual
Fax & Information Exchange Your unit allows you to send and receive informa- tion via a wide range of popular data methods and information services, including: • Fax • AT&T Mail • CompuServe • Pager • Other systems and networks Utilities The unit offers additional utilities to manage and access your data easily:... - Page 43 General Operations: Introduces operations that are common to all of the built-in applications. These operations are accessed through the tool bar at the top of the display and change to suit the application. Time Management: Explores Activities operations: Appointment; Birthday/Ann; Holiday; To Do; and the Calendar views.
-
Page 44: Conventions Used
Conventions used The following keyboard and symbol conventions are used in this manual: • ACTIVITIES, CALC, SEARCH, ON, MENU, ENTER Done, Cancel and other bold notations indicate buttons on the display that are touched with the touch pen, or keys on the keyboard that are pressed with a finger. -
Page 45: Caring For Your Unit
Bending the body can damage the circuitry. Do not use extreme force when pressing the display or keys. • Do not use sharp, pointed objects or your fingernails to touch the display screen. We recommend you use only the supplied touch pen to touch or write on the screen. -
Page 47: Chapter 1 Getting Started
CHAPTER 1 Getting Started A major feature of the unit is its graphical user interface (GUI) which makes operation easy to understand through a combination of graphic images and text. The GUI is easy to use and provides a great deal of versatility. Operations can be entered using the touch pen on the display, pressing keys on the keyboard, or a combination of both. -
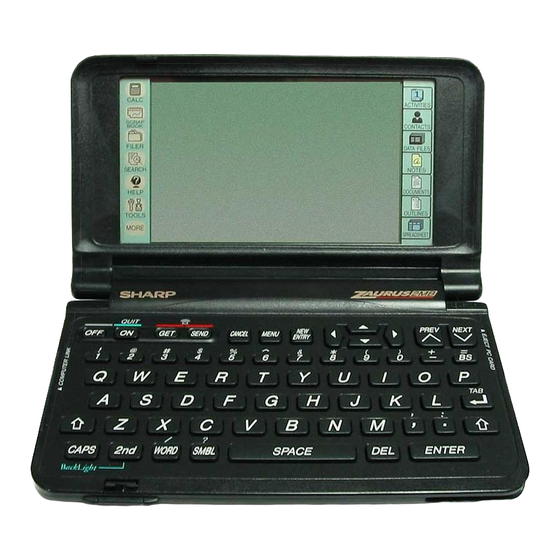
Page 48: Part Names And Functions
Part Names and Functions CALC SCRAP BOOK FILER SEARCH HELP TOOLS MORE QUIT CANCEL SEND MENU WORD SPACE CAPS SMBL BackLight ACTIVITIES CONTACTS DATA FILES NOTES DOCUMENTS OUTLINES SPREADSHEET ADAPTOR PREV NEXT ENTRY & ENTER Accessory buttons Touch to select the accessory. Display Shows information and also functions as a "touch panel"... - Page 49 Memory back-up battery compartment Holds memory back-up battery: CR2032 x 1 Reset button Press to reset and initialize the unit. Battery replacement switch Allows access to the battery compartment. Operating battery compartment Holds operating batteries: LR6(AA) x 2 Infrared port For wireless infrared communications with other units (including ZR-5700/ZR-5800, ZR-5000, OZ-9000/OZ-6000/OZ-5000 series) and optional...
-
Page 50: Touch Pen
Caution: Use only the supplied touch pen to operate the display. Do not use pens, pencils or other sharp, pointed objects. Keep the touch pen and display clean to avoid scratches and damage to the display. -
Page 51: Gui Operations
GUI operations A key feature of the graphical user interface (GUI) is its system of displays and menus which can be used to quickly execute commands and perform operations. • Insertion mode is used for all text input except time and dates. -
Page 52: Display Layout
Display layout The display layout has the following features: • The touch buttons at the left of the display provide access to accessories and utilities. TOOLS provides access to communications utilities and user settings. MORE provides access to optional Add-on software (if installed) in either the main memory or in a PC card. -
Page 53: Display Symbols
Display symbols The following display symbols appear at the top right of the display to indicate various conditions: XX:XX Real time and date display. Touch to toggle between time and date display. BATT Operating batteries are weak and need replacing. CARD A PC card (RAM card) is currently selected as the data source. -
Page 54: Detail View And Index View
Detail View and Index View The application tool bar across the top of the display normally offers a choice of either Detail View or Index View for examining unit entries. For a particular applica- tion, Detail View lets you examine the detailed contents of an entry, and Index View lets you examine a list of entry titles. -
Page 55: Help Function
Help Function The built-in Help feature is a convenient, topic-specific, on-line reference source. You can view Help at any time by touching HELP at the left of the display. Messages are also displayed during normal operations for your guidance. Key Sound A sound (beep) is made each time a key or button is pressed or the display is touched. -
Page 56: Save Battery Life
Save Battery Life Sleep function To conserve battery power, the Sleep function turns your unit off if it is not used for a set time period (the default setting is 15 minutes). • Sleep is disabled when communicating with other devices to avoid interrupting data transfers. -
Page 57: Chapter 2 Desk Accessories
CHAPTER 2 Desk Accessories he desk accessories along the left side of the display are handy utilities that round off the Application suite: • Calculator can perform calculations on numbers entered from the display, keyboard, or from other entries. • Scrapbook lets you make quick handwritten notes and drawings directly on the display. -
Page 58: Movable Window Display
• M on the display indicates a number is stored in memory. Touch R•CM twice to clear the memory. • Press to erase the last digit entered. • E on the display indicates an error. Touch C•CE to clear errors. •... - Page 59 Enter the calculation. • marks the starting entry. • The value on the key pad display is the value just entered or the final calculation result (indicated by ENTRY or ANSWER shown above the value). Touch " " to get the result. Using intermediate results: Touch PREV or NEXT until you reach the calculation line you want to check.
-
Page 60: Date Calculations
Deleting a line: Move to the line you want to delete using PREV or NEXT. Press DEL. Press ENTER to get the new result. Date calculations Calculator can calculate the period of time (in days) between two specified dates. It can also calculate the date a specified number of days before or after a set start date. - Page 61 Calculating the date from the number of days: Touch DATE to switch to the date calculator. The current date is the default start date. Touch CANCEL to clear the current date and enter a different start date, if desired. • Prefix single-digit months or dates with 0. •...
-
Page 62: Data From Other Entries
Data from other entries You can perform calculations on numbers con- tained in other entries. You can also transfer calculated values into another entry. From another entry to Calculator: Select the entry with the data you want to calculate. Drag the touch pen to highlight the calculation data. -
Page 63: Scrapbook
Scrapbook Scrapbook lets you make quick hand-written notes, sketches and maps directly on the display. The stamp function lets you add built-in images of buildings, intersections and railways to make your maps more accurate and clear. Scrapbook entries can be added to Contacts and Data Files entries as part of those databases, or can be included in Documents entries. -
Page 64: Drawing Tools
Drawing tools The Scrapbook drawing tools add versatility to creating graphics. The pencil tool is the default selection when you first touch the display with the touch pen. [Pencil] Draws freehand lines. [Ruler] Draws straight lines. [Grid] Draws the lines vertically or holizontally. -
Page 65: Selecting An Area
Selecting an area The area tool lets you select a Scrapbook area for copying, deleting and other operations. To select an area: Display the entry you want to revise and select the area tool ( ). Area tool Drag the touch pen from the upper left to the lower right of the area you wish to select. -
Page 66: Adding Text Strings To Scrapbook
Touch EDIT and select "Paste". Deleting sections of graphic entries: Use the area tool to select the area to be deleted. Press DEL to delete the selection. Adding text strings to Scrapbook You can import text into Scrapbook from other application entries. -
Page 67: The Stamps Tool
Select the area where you want to place the text. Touch EDIT and select "Paste". Text is pasted to fit the area you specify, and it is split over several lines if necessary. If the area is not large enough, only part of the text is pasted. The Stamps tool You can use the Stamp tool to add one of the 64 built-in stamps to your Scrapbook entry. - Page 68 Touch the stamp you desire to select. To scroll the stamp menu, touch PREV or NEXT). Touch the location where you want the stamp inserted. • The stamp can be dragged to any location until the pen is lifted from the display. Once the pen is lifted, the stamp is set and cannot be moved.
-
Page 69: Deleting Scrapbook Entries
Deleting Scrapbook entries Deleting a single Scrapbook entry: Display the Scrapbook entry you want to delete. Touch EDIT and select "Delete Entry". Press DEL. Touch Yes to confirm the deletion. Deleting all Scrapbook entries: Touch SCRAPBOOK. Touch EDIT and select "Delete Group". Touch Delete. -
Page 70: Collect Related Entries To One Folder
Collect related entries to one folder The Collect function is used to assign entries linked by a common keyword to a specified folder. You can select the applications that are searched for the keyword. To collect related entries to one folder: Touch FILER. - Page 71 • Touch the Only Secret Entries check box to collect only secret entries (not displayed if the unit is locked.) The keyword is optional in this case. All applications are selected by default. Deselect any applications you do not need. Touch Collect.
-
Page 72: Viewing Entries Via Filer
Naming or renaming folders: In Filer Drawer, touch a tab to select the folder (except IN folder) that you want to name (or rename). Touch EDIT and select "Folder Name". Enter any folder name of up to ten characters using letters, numbers and symbols. Touch OK to save the folder name. -
Page 73: Editing Folder Entries
Editing folder entries Once an entry is assigned to a Filer folder (or folders), any changes made to the entry in its source application will be reflected in all related folders. The entry is edited in the entry mode of the source application. -
Page 74: Delete An Entry From Filer
When you complete the entry, press ENTER. The new entry appears in the Index of the selected application and the entry is automatically assigned to the folder. Touch FILER to see the new entry in the Filer Index. Delete an entry from Filer Folder entries can be deleted directly from the Filer Index. -
Page 75: Empty A Folder
Empty a folder You can empty a folder. This will remove (unassign) all entries from the folder. Removed entries are not deleted from the original applica- tion. To empty a folder: In Filer Drawer, select the folder you want to empty. -
Page 76: Sending Folders
Select the second (destination) folder that will be merged, and touch Merge. The contents of the first folder will be appended to the destination folder. • The name of the destination folder has priority. • If the folder contains duplicate entries, the duplicates will be removed. -
Page 77: Generate A Report
Generate a Report Generate a Report makes a new Documents based on the contents of a Filer folder. This makes a new Document entry containing information on entries assigned to a particular folder. For example, you might want to fax a report on your activities for a specified week. -
Page 78: Search
Search The Search function lets you locate entries containing a specific keyword, even if you do not know the entry title or the application it was created in. The search can be limited to a specific date range for Appointments and To Do entries, or limited to secret entries. -
Page 79: Help
Help The built-in Help feature is a convenient, on-line help and reference source. You can access Help at any time by touching the HELP button on the left of the display. To use Help: Touch HELP. Select an application or accessory from the top list. -
Page 80: Tools
Tools Touching the Tools accessory produces the following display: Utilities The communications utilities ensure your unit is much more than just a hand-held personal infor- mation manager. They make your unit a powerful management and communications tool that links you to your busy world through PC links, terminal mode, data transfers, backups, faxes, messages, etc. -
Page 81: Memory
Touch Sign to enter your signature for use with the Make a Letter function in Documents. For more information on the signature function, see p. 179. When you complete your Personal entry, touch OK. Memory The memory in your unit (ZR-5700: 1MB; ZR- 5800: 2MB) provides you with a certain amount (ZR-5700: approx. -
Page 82: Display
Display The Tools Display accessory can be used to: • Adjust the contrast of the LCD display • Adjust the touch panel display for best touch pen operation. LCD contrast The LCD contrast may sometimes require adjust- ment. For example, a setting that is good indoors may not be adequate when outside. -
Page 83: Start-Up
Start-up Start-up lets you configure the start-up display to suit your own requirements. The Start-up display can be used to set the following: • Start-up: Can be set to On, Off. • Picture: Globe is the default picture graphics. You can also touch User's Picture to make a graphic entry or load an entry through Scrapbook. -
Page 84: Sleep
Check the Show box, then touch the Owner's Information button. Select the owner's information to be shown at start-up. When you complete your selection, touch OK. • Selecting the owner's information is only useful if you first use Tools Personal to enter your per- sonal information. -
Page 85: Secret
Secret The Secret function keeps your information secure (hidden) requiring a password that you specify. Entries marked as secret are hidden until the password is entered. Individual entries can be marked as secret, or you can simply prevent access to the entire machine by requiring a password each time the unit is turned on. - Page 86 If your unit is locked to hide secret entries, an entry which has just been marked as secret will still be displayed until you select another entry. Once you leave the entry marked as secret, it will be hidden with all other secret entries. Accessing secret entries Entries marked as secret are not shown in any application Index, and they cannot be accessed by...
- Page 87 Changing the password To register a new password, you must first enter the current password, then enter the new pass- word. To delete the current password, leave the new password field blank. To change your password: Touch TOOLS and touch Personal twice. Touch Password.
-
Page 88: Word List
RAM cards and the Secret function If you use a RAM card in your unit, that card is also protected by your password. If you remove a RAM card and change your password, or register a password for the first time, you will not be able to use the card in your unit unless you re-register the original password, or delete your current pass- word. - Page 89 Enter a word, phrase or numbers (up to 32 characters) you want to recall with the WORD key. Touch OK. Repeat steps 2 and 3 to make other Word list entries. The entries are registered and sorted alphabeti- cally. When you complete your entries, touch Close.
-
Page 90: Ram Card
RAM Card When a RAM card is installed in the unit, you can select the RAM card or main unit to save and retrieve data. Touch TOOLS and touch RAM Card twice. Select Main Unit or PC Card. Touch OK. Backlight set-up You can specify how you want the Backlight of your ZR-5800 to operate. -
Page 91: Clock
Clock Clock is a built-in, dual-display clock that shows the current time and date in your Home City and the time and date in another World City. When Clock is selected from Tools, the clock remains displayed until another application is selected. You can choose from a built-in list of 212 cities. -
Page 92: User's City
Select your World City. If the city you want is not on the list, touch More Cities and another list will appear. The first three cities are User's Cities you can specify. The rest of the list is in alphabetical order by country and by city. -
Page 93: Setting Daily Alarms
To enter User's Cities: Touch TOOLS and then touch Clock twice. Touch USER'S at the top of the Clock display. New York, USA is set as the default User's City 1. Enter User's City names, countries and GMT values from the keyboard. •... -
Page 94: Disabling Alarm Sound
When you complete your daily alarm settings, touch OK. appears at the top right of the display to show that alarms will sound at the set alarm times. When an alarm sounds: • Press ON to stop the alarm. • After turning off the alarm, press CANCEL to go back to the previous screen. -
Page 95: More
MORE You can install and manage add-on software and load PC files received via data transfer by touching MORE. For example, you could install some new software located on your PC card, use it for a while, then delete it if you decide not to use it anymore. -
Page 97: Chapter 3 General Operations
CHAPTER 3 General Operations his section describes general operations that can be used with your unit. Contacts and Scrapbook are normally used for examples of these operations. However, the operations described can be applied to most applications and accessories (which are described in detail elsewhere in this manual). -
Page 98: Tool Bar Functions
Tool Bar Functions The tool bar across the top of the display has many common functions as follows: VIEWS/INDEX FILTER SHOW LINKS SET UP EDIT LINK TO FILE IT SEND A small pointer (" ") on the upper right of a tool bar item indicates a menu will be displayed if touched. -
Page 99: To Change Index/Detail View
To change Index/Detail View To change the display mode for Activities: Touch ACTIVITIES. Touch VIEWS in the tool bar at the top of the display. Use the touch pen to select the Detail View from the list in the menu. For example, select "Weekly Graph". -
Page 100: Filter
Filter The Filter function lets you focus on entries that contain specific information. For example, you could recall all entries related to a particular company name. The Filter function does this by hiding all entries that do not match the filter criteria. - Page 101 If Filtering is on and a new entry is made or an entry is transferred from another device, the entry is displayed even if it does not match the filter criteria. To filter the new entry, you must turn the Filter off and then back on.
-
Page 102: Show
Show The Show function is available with Activities, Documents, Outlines, Spreadsheets and Scrapbook. Show has the following special functions: • Activities: Today, A Specific Date, Labels • Documents: Show/Hide Ruler, Show/Hide Special Symbols, Print Preview, Header, Footer • Outlines: Show 1 Line Topics/Full Topics, Expand/Collapse Subtopics (2nd E), Expand Family, Collapse All •... -
Page 103: Edit
Contacts/Data Files Use Set Up to select the following: File Name Enter the file name and number of fields Field Name View and change field names and field types (Text or Picture). Note that if you change a field type, current field data will be permanently deleted. -
Page 104: Link To
Revert to Saved Revert to Saved cancels all changes and reverts to the original saved copy of an entry. Delete Entry/Group Described later in this section, see p. 113. Cut/Copy/Paste Described later in this section, see p. 114. Secret/Normal Entry The Secret/Normal function is used to designate an entry as Secret or Normal. -
Page 105: File It
File It The File It function is used to file an entry with Filer. This allows the entry to be sorted by subject instead of by entry type. For more information, see Filer in Section 2 Desk Accessories. Send The Send function is used to send entries to other units or devices such as printers. -
Page 106: Resume
Resume While you are creating an entry, if you move to another application or turn the unit off before the entry is stored, your data will not be lost. When you return to the application previously used, or turn the unit back on, operation resumes at its most recent state. -
Page 107: Moving Around The Display
Moving around the display When working in an entry, the easiest way to move the cursor on the display is to touch the location with the touch pen. The cursor will immediately move to the selected position. You can also move the cursor around the display with the cursor keys: , , , . -
Page 108: Blocks Of Text
Blocks of text Working with blocks of text is easy. The first step is to select the text to work with: • Position the touch pen at the beginning of the required text and drag it to select and highlight (reverse) the text. -
Page 109: Finding Specific Entries
Detail View Scroll display one line up. Scroll display one line down. Scroll up display page. Scroll display by dragging. Scroll down display page. Change display font size (Zoom). Display previous entry. Display next entry. Finding Specific Entries There are many ways to locate entries and information: •... -
Page 110: Keyword Search
Keyword Search Keyword search lets you search for entries containing a particular keyword. The keyword does not distinguish between uppercase and lowercase, and can contain up to 16 characters (letters, numbers and symbols). You cannot search for entries in the Spreadsheets application using keyword search. -
Page 111: Global Search
You can change the search criteria during a search by touching "Search for" and changing the keyword. The search window is movable. To move the window, touch the top left corner and drag it to the new location. Touch Done to close the keyword search. Global Search The global Search function lets you search any or all applications for a keyword. -
Page 112: Using Filer
Using Filer Filer lets you group entries by subject. For exam- ple, all entries relating to a particular project could be assigned to a single Filer folder, making it easy to open one or more of the entries when neces- sary. -
Page 113: Deleting Single Entries
Deleting single entries The EDIT Delete Entry function in the tool bar can be used to delete single entries. To delete single entries: Open the required application. Select the entry in Index View or display it in Detail View. Touch EDIT and select "Delete Entry". The EDIT menu may also offer Delete Note, Delete Document, Delete Outline or Delete Worksheet. -
Page 114: Cut, Copy And Paste
Cut, Copy and Paste The Cut, Copy and Paste functions are available under EDIT in the tool bar. These functions let you move or copy blocks of text or completed entries: Moves the selected text or entry to the clip- board. -
Page 115: Copying Or Moving Entries
Copying or moving entries The Cut, Copy and Paste functions also provide a convenient way to copy or move entire entries to other applications, including those stored on a RAM Card. The entries do not have to be in the same file or the same application. -
Page 116: Time Stamp And Date Stamp
Time Stamp and Date Stamp The Time Stamp and Date Stamp functions let you insert the current time and/or date into your data so that in the future you can verify when important events occurred. • Time Stamp can be used by pressing 2nd T. •... - Page 117 Select the symbol you require from the menu and touch it twice. The symbol menu closes and the selected character is entered at the cursor position. If the symbol you selected is an accent mark ( `, ´, ¨, ˆ, , or _ ), type the letter you want to enter with that accent mark.
-
Page 119: Chapter 4 Time Management
CHAPTER 4 Time Management he Activities application helps you to structure and manage your busy schedule. There are four activity types; Appointment, Birthday/Ann, Holiday and To Do. Activities has five different calendar views, each with a convenient, easy-to-use form. This chapter shows you how to make the time management features work best for you. -
Page 120: Changing Activities Setup
• Month Format Sunday-Saturday is the initial default month format. Select from: Sunday-Saturday or Mon- day-Sunday. This setting is used for calendar views. Changing Activities Setup To change the Activities Setup: In Activities, touch SETUP in the tool bar. Make any desired changes. When you complete your set up, touch OK. - Page 121 • You can step through days by pressing PREV and NEXT. • To record an appointment, drag the pen over the time bar (from start time to end time). When you lift the pen, a new appointment entry is opened with start and end times filled.
- Page 122 • If you touch the Monthly Goal list (if displayed), the To Do Index is displayed. • You can step sequentially through different months by pressing PREV or NEXT. • The drawing tools (pencil, eraser, and clear all) at the left of the Month calendar let you make handwritten comments directly on the calendar.
- Page 123 Week view Week view shows your Activities events over a one-week period. To open the Week view, touch VIEWS and select "Week". Selected date is highlighted. • Press PREV or NEXT to display the preceding or following weeks. • You can go to the Day view by touching a date twice.
-
Page 124: Accessing Entries Using Calendar Views
Accessing entries using calendar views Appointment, Birthday/Ann, Holiday and To Do entries can be accessed from the Day view. • Overdue (due date has passed) To Do entries are always shown on Today's date. • Monthly goals can only be accessed from the Month view. -
Page 125: Appointments
Appointments Appointments lets you enter meetings, conferences, parties and other important events. You can also set alarms to warn you of an impending appointment. This makes it easy to organize your day and always get to appointments on time. Appointment entries are indicated in the Month view by a dot to the right of the date. -
Page 126: Finding Entries
Set the Alarm as required. Check the Alarm box and the start time is selected as the default alarm time. Set the alarm time to 815 AM. Enter Staff meeting as a description. To complete your entry, press ENTER. Note that you can also create a new entry from the Day or Weekly Graph view by dragging the pen across the time bar. -
Page 127: Editing Appointment Entries
Touch the entry twice to view the details. Pressing NEXT or PREV steps through entries in Detail View. Using keyword search If you cannot remember the date of an Appoint- ment entry, but you know a word that appears in the Description, you can locate the entry with a keyword search. -
Page 128: Deleting A Single Entry
Deleting a single entry You can delete a single Appointment entry or groups of entries. For an explanation of deleting filtered entries, see p. 101. Deleting a single entry: Select the entry in Index View or in Day view. (Alternatively, display the entry in Detail View.) Touch EDIT and select "Delete Entry". -
Page 129: Making Entries For Recurring Or Extended Events
Touch Yes to confirm the deletion. You cannot delete groups of entries if your unit is locked, see p. 86. You can delete Appointment entries by selecting them in any calendar view and pressing DEL. Making entries for recurring or extended events The Appointment REPEAT function lets you copy entries to other dates without having to make new... -
Page 130: Using The Appointment Repeat Function
Using the Appointment Repeat function Example: Enter a five-day vacation from March 5, 1996. To use the Repeat function to enter a vacation: From any calendar view, select the initial date for the entry (March 5, 1996). Touch EDIT and select "New Appointment". Enter Vacation as a description. -
Page 131: Appointment Alarms
Appointment alarms Alarms can be set to remind you of appointments. • You can set an alarm for any Appointment entry that has a start time set. • If the unit is off when an alarm is due, the alarm will still sound. -
Page 132: Birthday/Anniversary
Birthday/Anniversary Birthday/Ann helps you keep track of annual events, such as anniversaries and birthdays. Birthday/Ann entries are indicated in the Month calendar view by . Reminder function The Reminder function can be set to remind you of a birthday or anniversary. To set the Reminder function, check the Remind box and select On That Day or 7 Days before. -
Page 133: Finding Birthday/Ann Entries
Finding Birthday/Ann entries Birthday/Ann entries are stored in chronological order. You can find a Birthday/Ann entry using the calendar views, the Index View, or a keyword search. Use the same procedure described in "Finding Appointment entries". Editing and deleting entries Editing Birthday/Ann entries You can easily change the date or description of a Birthday/Ann entry. -
Page 134: Holiday
Holiday Holiday helps you keep track of annual holidays. Holi- days are indicated in calendar views by . Making new entries There are two types of Holiday entries, those like New Year's Day that occur on a specific date every year (Yearly by Date), and those like Mother's Day that occur on a specific day (Yearly by Day). -
Page 135: Finding Holiday Entries
Touch the Date boxes, then use 520 (Month/Week/Day of week). Day of week: SUN=0, MON=1, TUE=2, WED=3, THU=4, FRI=5, SAT=6 If "5" is entered for week, the last week (4th or 5th) is always selected. "Last" is displayed in Index View. Enter Mother's Day as the description. -
Page 136: To Do
Deleting all Holiday entries: In Index or Detail View, touch EDIT and select "Delete Group". Select Delete "Holiday", and "All", "in Holiday by Date" or "in Holiday by Day" from the pop-up menus. Touch Delete. Touch Yes to confirm the deletion. You cannot delete groups of entries if the unit is locked, see p. -
Page 137: Making A New To Do Entry
Priority levels You can enter a number (0-9) or a letter (A-Z) in the priority field to indicate the task importance. • Numbers have higher priority than letters. • Do not use symbols or accented characters. • Even though a lowercase letter has been en- tered, it will be saved as uppercase. -
Page 138: Entering A Monthly Goal
Entering a Monthly Goal If you enter only the month and year for the Due Date (with no day), the entry becomes a Monthly Goal and is displayed in the Monthly Goal list of the Month calendar view. Example: You must read a manuscript by the end of February. -
Page 139: Checking Off Completed Entries
Using keywords You can use a keyword search for any field, including Date and Priority, to directly access an entry. For more information, see General Operation. Checking off completed entries Once you achieve a target or goal, it is important to check off that entry as done so that you can focus on tasks that are still outstanding. -
Page 140: Using Labels
Using Labels Labels are fields you can specify that contain up to 12 characters. Labels are assigned to To Do entries and used to manage information by grouping tasks by project, personnel or other criteria. • Up to 32 labels can be defined, and each To Do entry can have up to five labels assigned to it. - Page 141 Touch an empty label twice. Enter Alpha Pro and touch OK to register this label. Touch another empty label twice. Enter Phone Calls and touch OK to register the label. To select these two labels, check the box to the left of Alpha Pro and Phone Calls so a cross appears.
-
Page 142: Reviewing The To Do List By Labels
Reviewing the To Do list by Labels You can check the entries assigned to a specific label. To review To Do entries by label: Touch VIEWS and select "To Do Index". Touch the ) tab at the bottom of the To Do Index to display the Label tabs. - Page 143 Frequency can be selected from: Daily, Daily (Work Days Only), Every Week, Every Other Week, Every Month (by Date) or Every Month (by Day of Week). Every Month is only available for Monthly Goal. Check the Last Day of Each Month box to repeat the entry on the last day of each month.
-
Page 144: Editing And Deleting To Do Entries
Editing and deleting To Do entries Editing To Do entries You can easily change the due date, priority or description of a To Do entry. Use the same procedure described in "Editing Appointment entries". Deleting single To Do entries: Select the entry in the To Do Index View or in Day view. -
Page 145: Chapter 5 Databases
CHAPTER 5 Databases his section describes the use of Contacts and Data Files. These are personal database applications and they both have similar functions. The only difference between them is that they have different default file and field names for different types of information. These two applications are very flexible so you can manage a wide variety of personal information, from simple address books to a restaurant guide or a listing of... -
Page 146: Selecting A File
Selecting a file Before beginning a particular database operation, you must first select the file you want to work with. To select a Contacts file: Touch CONTACTS at the right of the display. If Detail View is displayed, touch INDEX at the top left to select Index View. -
Page 147: Finding Entries
Example: Enter Jonathan Smith of Brown Corpora- tion in the Business (Contact 1) file. To make the Business entry: Touch CONTACTS. Touch EDIT and select "New Business(1)". Enter the required information into each field. Select the Name field and enter Smith, Jonathan . -
Page 148: Keyword Search
Touch the "S" tab to find the required entry - Smith. If you cannot see the entry, use the scroll bars to move further through the list. Select the entry, then touch VIEW to see the details. You can also touch the entry twice to see the details. -
Page 149: Direct Search
Direct search In the Contacts or Data Files Index View, you can enter the first or the first few letters of the name to find the desired entry. Select the Contacts Index View. Enter the keyword Smi directly from the keyboard. -
Page 150: Link Function
Link function The Link function is a powerful feature that lets you link related information. Any entry or document can be linked to any Contacts or Data Files entry. This allows you to do the following: • You can jump directly to a Contacts or Data Files entry from a linked entry. -
Page 151: Link By Searching
Touch LINKS and select "New Linked Entry". Press 2nd then NEW ENTRY. Select BIRTHDAY and then touch New. Complete the Birthday entry and press ENTER. The new Birthday entry is shown in Index View. Then touch Birthday entry. If the entry is linked to only one Contacts entry, touch displayed. -
Page 152: Viewing Linked Entries
Touch LINKS and select "Link by Searching". Enter the search keyword. • Search function does not distinguish between uppercase and lowercase letters. • You can limit the search to secret entries by checking the Only Secret Entries box. As a default, all applications are selected for the search. -
Page 153: Link To Function
• In the Contacts Detail View, pressing 2nd and W toggles the screen between Show Linked Entries and Hide Linked Entries. Link To function The Link To function provides a method of linking entries from any application to Contacts or Data Files entries. -
Page 154: Jump To Function
Jump To function The Jump To function lets you move from entries in other applications to linked Contacts or Data Files entries. • If the entry in the other application has links to Contacts, you will see • If the entry has links to Data Files, you will see •... -
Page 155: Breaking Links
If there is more than one link, select the required entry and then touch Jump. Otherwise, you will jump directly to the linked entry. The linked Contacts (or Data Files) entry is shown in Detail View. Breaking Links You may want to break links you have made. For example, you may have made an incorrect link and want to break that link before making the correct link. -
Page 156: Deleting Groups Of Entries
Deleting Groups of entries You can use EDIT Delete Group to delete groups of Contacts or Data Files entries. Select group deletion from: All entries; all in Contact 1; all in Contact 2; or all in Contact 3. For more informa- tion, see p. -
Page 157: Adding A Picture To An Entry
Select the Field Name tab at the bottom. Move to the field that you want to change, and then select Picture. Touch and edit the field name as desired. When you complete your changes, touch OK. Touch Yes to confirm the changes. Check your changes in Contacts Detail View. -
Page 158: Editing Contents Of Picture Fields
Touch EDIT and select "Paste" (or press 2nd V) to paste the picture into the field. The message in the field changes from "Empty picture field" to "Touch to view picture." Touch the field to view or edit the picture. In step 2, to save memory you can cut the drawing. -
Page 159: Setup For Contacts And Data Files
Setup for Contacts and Data Files You can customize Contacts or Data Files in the follow- ing three ways: • File names: Each file can have a new name of up to 10 characters. • Fields: You can change field names (up to 12 characters), field type (text or picture), and the number of fields that each entry can have (up to 16). -
Page 160: Fax Number Field
The field type for Field 1 is fixed as text. You can specify the field type as picture or text for any of the remaining 15 fields. Note that pictures use more space than text and memory is limited. Touch the Index Form tab to select it. Touch the First Field: button and select the First Field name from the pop-up menu. -
Page 161: Chapter 6 Writing And Letters
CHAPTER 6 Writing and Letters his section explains the features of the powerful writing tools. These tools include: Notes, which lets you take handwritten notes and comments at meetings; Documents, a built-in word processor; and Outlines, a simple but powerful outline package for structuring your thoughts and ideas. - Page 162 To make a Notes entry: Touch NOTES. Touch EDIT and select "New Note". Use the touch pen to write your notes directly on the display. When you complete your Notes entry, touch KEYS to unlock the keyboard then press ENTER. Selects a drawing.
-
Page 163: Notes Window
Notes window If you touch VIEWS and select "Window", Notes changes to a moveable window. You can still see the Notes window while you open and use other applications. This is very convenient because it allows you to transcribe Notes contents to other applications. -
Page 164: Review Notes
• Will be reduced by 50% and then selected. • Will be reduced to fit between grid lines but will not be selected. • If "will be selected" is selected, your last drawing will be automatically selected with the area tool so you can move it or delete it. -
Page 165: Edit Notes
Touch to change to other pages. Touch to change to other entries. In Review Notes, touch the area to be edited and the display changes to Take Notes view. When you complete your changes, press ENTER. Edit Notes • Use Delete Note to delete single entries. •... -
Page 166: Making A New Entry Based On An Existing Entry
When you complete your entry, press ENTER. The new entry is shown in Index View as Untitled. To edit a Document title: Display the Documents entry in Detail View. Touch EDIT and select "Document Title". Touch the title displayed at bottom left. Edit the title. -
Page 167: Finding Entries
Finding entries There are three ways to find an entry: • Using Index View • Using Keyword search • Using the Search function Using Index View to find a Documents entry: Select the Documents Index View. To select the sort method, touch the Sort by: button, then select Date (shown in reverse chronological order by creation date) or Title (alphabetically) from the pop-up menu. -
Page 168: Changing Display Character Size
Changing display character size In Documents Detail View, you can change the size of display characters by touching bottom right. Each time you touch cycles from 9 pt (default) to 12 pt to 7 pt and back to 9 pt. Large characters may go off the display. -
Page 169: Text Styles
To continue searching, repeat steps 1 and 3 above. • Find Text will continue from the last match. • The same text string can be used for many searches. • A message indicates if no matching text is found. Text styles Text styles add variety and emphasis to Docu- ments entries. -
Page 170: Tabs And Indents
To change the text style for a Documents entry: Open a Documents entry in Detail View. Move the cursor to the desired location. Touch STYLE and select the text style. For example, touch Bold. Make your text entry. The text is displayed in the selected style. Changing the style for existing text To change the style of existing text, select the text by dragging the pen across it, then choose the text... - Page 171 Setting tabs and indents Tabs and indents are set using the ruler across the top of the display. The ruler is a standard feature with many word processors. The ruler is enabled with Show Ruler from the SHOW menu. Tab markers First line indent marker Left indent marker...
- Page 172 Indent settings No Indent is the default setting. You can set different indents for individual paragraphs (which are preceded by a [ To change indent settings: To see the ruler, touch SHOW and select "Show Ruler". Left indent marker First line indent marker 6-2-12 Place the cursor in the paragraph you want...
-
Page 173: Word Wrap
To change indent settings: Position the cursor in the paragraph (which is preceded by a [ ]) where you want the change to take effect. Touch the desired indent markers and drag them to the new positions. That paragraph and following text will assume the new layout. New indent settings only start from a new para- graph (which is preceded by a [ Show/Hide Special Symbols... -
Page 174: Page Setup
Page Setup You can use UTILS Page Setup to set the follow- ing: • Page size Select a page size to suit your printer. If neces- sary, consult your printer manual. You can select from three standard page sizes: 21 cm x 29.7 cm Letter: 8.5 inch x 11 inch (21.6 cm x 27.9 cm) -
Page 175: Inserting A Page Break
Margin settings can be changed by touching a field and entering the new value directly from the keyboard. Margin Margin marker You can also change the margin settings by dragging the markers on the Page Setup display to new positions. The margin line and field value will change. -
Page 176: Print Preview
Print Preview You can use the Print Preview function to check that text is formatting properly when working with full-size pages. While you cannot read the text with this function, it is useful for indicating the full page layout. To use Print Preview: In Detail View, touch SHOW and select "Print Preview". -
Page 177: Make A Letter Function
Touch Change, Ignore, Ignore All or Suggest as needed. When you complete your spelling check, touch Close. Make a Letter function The Make a Letter function helps you format a Documents entry as a letter that is automatically dated, addressed and closed with your signature. The addressee can be selected from any file in Contacts and Data Files, or entered from the keyboard. - Page 178 Touch the "To:" button to open the Mail Directory. Touch Setup in the Letter to display. Set up the directory to suit your requirements. • Memory can be selected from Main unit or PC card. • Mail Directory can be selected from any file in Contacts or Data Files.
- Page 179 11. Touch the "From:" button. Check the boxes as required for Owner's Name, Position, Company, etc. This enters the owner's information saved in the TOOLS Personal display. You can also select use of the owner's signature saved in the Personal display. For more informa- tion, see section 2, Desk Accessories.
-
Page 180: Documents With Pictures
Documents with pictures Documents entries can also contain pictures created with the Pictures function (similar to Scrapbook). • The picture can be moved by touching it and dragging it to the new location. • To make changes to the picture, touch it, and then touch [PICT]. -
Page 181: Exchange Documents With Pc Files
To add a header: Create the body text of your document. Touch SHOW and select "Header". Touch the icons to select the header information. [PAGE] Inserts the page number [DATE] Inserts the current date [TIME] Inserts the current time Other characters and symbols, such as "-" can be inserted in headers and footers. -
Page 182: Outlines
Touch OK. To replace a Documents entry with PC Files: Select the Documents entry you want to replace with a PC File in Index View. Touch SEND and select "Replace with PC Files". Select "Main Unit" or "PC Card", to indicate the memory location of the PC File. -
Page 183: Example Outline
Example outline Below is an example of an Outlines entry in Detail View. • Each individual topic heading is marked with a diamond. • Each single topic can have more than one line and can contain up to 2,048 characters. Creating an Outlines entry A new Outlines entry can be created by entering the title and adding the different levels of topics... -
Page 184: Finding Outlines
Enter a title on the first line and press ENTER. Enter the first topic. To enter subsequent lines for any topic, press [ ]. When you complete all subsequent lines, press ENTER. Second and subsequent lines of the topic are hidden and a flashing diamond prompts entry of a new topic. -
Page 185: Revising Outlines
To display Full Topics: Display the outline in Detail View. Touch SHOW and select "Full Topics". All subsequent lines of all topics are displayed. Use the scroll bar to see topics off the display. Changing the Show settings for an outline does not affect other outlines. - Page 186 Adding topics As your plans and ideas grow, you may want to add topics to an existing outline. To insert a new topic in an outline: Display the outline entry in Detail View. Touch the topic below which you will add the new topic (or use the cursor keys).
- Page 187 Joining two topics You can join a selected topic to the topic above it. If the entry is in 1 Line Topics mode, change to Full Topics first. To join two topics: In Detail View, select the topic you want to join to the one above it.
-
Page 188: Outline Deletion
Outline deletion Deleting topics: In Detail View, select the topic you want to delete. Press DEL. Touch Yes to confirm the deletion. If you select a topic for deletion, all subtopics below it will also be deleted. You may want to rearrange an outline beforehand to prevent this. -
Page 189: Expanding And Collapsing
• Each subtopic belongs to the topic above it. • Subtopics are created by pressing before entering the topic text. (Press to promote a subtopic). • A subtopic can also have its own subtopics, and these can continue for 15 levels below the title. •... - Page 190 Restructuring families You can move, delete, join and divide families just as you can topics. However, these operations affect the entire family (even if the topic is col- lapsed and subtopics are not visible), so proceed with caution. Restrictions when working with families: You may not be able to change the level of a collapsed family in some situations.
-
Page 191: Chapter 7 Optional Accessories
CHAPTER 7 Optional Accessories his is a powerful pocket-size computer with many features that let you accomplish a broad range of tasks. Tools Utilities allow you to connect and transfer data to personal computers, and public information and message systems. You can log in to CompuServe, a popular on-line information service, and even send and receive messages via AT&T Mail and radio pager. -
Page 192: Printing
Hewlett Packerd Printers. A printer is connected to your unit via the optional Sharp CE-IR1 wireless interface: • Printer Path is set to Wireless as a default setting. • It is possible to change Printer Path to Cable (via a direct cable). -
Page 193: Printing Restrictions
Printing restrictions Text should always print, but printing of graphic images is determined by your particular printer's capabilities. Data may not print exactly as shown in your entry if the printer does not support the text styles used (italics, bold, etc.). Also, because of the way in which data sent by the unit is converted to characters on the printer, the final printed copy may not appear exactly the same as on your unit. -
Page 194: Printing The Current Display
Select Printer Path from Wireless or Cable. When using A4-size paper instead of the default Letter-size, press the A key. To return to Letter-size, press the L key. A small A appears at the top of the Print display when A4-size is selected. -
Page 195: Faxes
• All four pages of the Notes will be printed even if you have only drawn on one of them. Faxes With the optional Sharp CE-FM4 Fax/Modem connected to your unit, you can fax single Notes, Documents or Scrapbook entries, or an entire Filer folder. See the next section for more information about using PC card Fax/ Modems. -
Page 196: Fax Directory
Turn your unit on. Fax Directory Any of the three files in Contacts or Data Files can be designated as the fax directory. Each time you send a fax, the unit will allow you to select the fax recipient from the fax directory. Once selected, the unit will automatically use that person’s fax number and extract other information for the cover sheet, etc. -
Page 197: Setting Fax Options
When you complete your directory set up, touch OK. Fax dialing address information can be entered manually without using the fax directory. Setting fax options To send faxes, the following Fax/Modem options must be configured correctly. If you use the CE- FM4 Fax/Modem, you can send faxes with the default settings. -
Page 198: Cover Sheets And Headers
To change the fax options, touch Options. Set all fax options as required. To cancel the new settings and return to the default settings, touch Restore. When you complete your settings, touch OK. Cover sheets and headers You can set up cover sheets and headers so that your name and phone number appear on each fax page. -
Page 199: Speed Buttons
Touch the “From:” button. 7-2-6 Select the owner’s information to be used with the fax cover sheet. As an alternative to step 4, enter “From” information in the text box. For more information, see p. 80. When you complete your selection, touch OK. Check the Use Cover Sheet Graphic box as required. -
Page 200: Sending A Fax
Select any of the six speed button fields in the list. You can now edit the name (6 characters) and enter a fax number in the Number fields below. Speed Button numbers can be made secret. They are then displayed as asterisks so the digits cannot be read. - Page 201 Check that the fax number is correct and has hyphens in the appropriate places. Check that the Use Cover Sheet box as required. If you check this box, Preview appears at the top of the display. Touch Preview. The recipient's information from the Send Fax display is automatically entered into the cover sheet.
-
Page 202: Manual Fax Dialing
Manual fax dialing You may sometimes want to dial a fax number manually so that you can hear dial tone and other sounds. Manually dialing a fax number with your unit is similar to using the speaker on a conven- tional fax machine when dialing. -
Page 203: Conditions For Sending Faxes
About fax numbers You may sometimes find a fax number dials too quickly for a connection to be made. Dialing can be slowed by inserting commas in the fax number field (for example, after an area code) for that entry. Each comma inserts a one-half second dialing pause. - Page 204 Push the eject button again so the protection card pops out. Pull the protection card out. Protection card Hold the card so its back faces the bottom of the unit. Insert the card fully into the card slot. Be sure to insert the card to this point, if possible.
-
Page 205: Using Pc Cards
Using PC cards The ZR-5700/ZR-5800 are extremely powerful and flexible products due in part to their industry standard PC card (formally "PCMCIA") Type II slot. This allows you to use cards such as; • SRAM memory cards • FLASH memory cards •... -
Page 206: Sram And Flash Memory Cards
• Be sure to turn the unit off before removing or inserting any cards or you may lose memory in either the unit or the card. Store the protection card in a safe place and replace it in your unit when there is no other card installed. -
Page 207: Sram Cards
Notes about Memory cards FLASH cards are ideal for backing up your ZR- 5700/ZR-5800. They require no back-up battery and will back up everything in the main unit. FLASH cards require more power than SRAM cards when being written to. When creating a backup or especially when installing Add-on software programs onto a FLASH card, try to use an external power supply such as the AC Adaptor... - Page 208 To initialize a new SRAM card: Install the card. Press ON. A message telling you this card needs to be initialized will appear. Touch Initialize. Touch Yes to confirm. To initialize a previously used SRAM card: Install the card. Hold down ON while pressing and releasing the RESET switch.
- Page 209 To view and store data on an SRAM card: Install the card and then turn the unit on. Touch TOOLS and select RAM Card. Select PC Card in the Set Data Source screen and touch OK. CARD will appear at the top of the display to indicate you are now accessing the SRAM memory.
-
Page 210: Flash Cards
FLASH cards Additional Add-on software programs and multiple backup (archive) files of your main unit can be stored on a FLASH card. FLASH cards cannot be used to provide additional memory for the built-in application as SRAM cards can. You cannot view backup (archive) files, just restore them to the main unit if necessary. - Page 211 To backup your main unit data to a FLASH Memory card: Make sure your unit is unlocked. Touch TOOLS and then touch Backup twice. Touch Archive. Name this backup file. Touch OK. Note that the unit will take a few seconds to re- start after this operation.
-
Page 212: Fax/Modem Cards
To restore your main unit data from an archive file: Note that this will delete ALL information stored in the main memory including Add-on software programs and their data. First be sure your unit is unlocked. Touch TOOLS and then touch Backup twice. Select the Backup file you want to use to restore your main unit data and touch "Restore". -
Page 213: More
Add-on software programs add functionality to your ZR-5700/ZR-5800. These programs are especially written for your ZR-5700/ZR-5800 by Sharp and independent software developers. You cannot run PC software on your ZR-5700/ZR- 5800. Once installed, you can access and run these software programs from the MORE area by simply touching them twice. - Page 214 612-397-8601 • Go to the ZAURUS forum on CompuServe and download the appropriate files from the Zaurus library. • Call 800-BE-SHARP and request a free bro- chure. The MORE tool bar: [PC FILES] Changes to the PC Files Index...
-
Page 215: Pc Files
Deleting add-on software programs Using the delete tool, you can delete either all installed programs or the last installed program (farthest down and to the right in the MORE display). You cannot simply delete any individual program so be sure to install your program in order of importance when possible. - Page 216 • You can install Add-on software programs from here (such as a program downloaded from a CompuServe Forum) to the main memory or to a memory card (SRAM or FLASH). • You can beam files stored here to another ZR- 5000 series.
-
Page 217: Data Exchange
• Features and capabilities may vary depending upon the Sharp or third party software used. • Sleep function is disabled in all transfer modes. • Information about Printer, Fax, RAM card and Flash Memory card, are described in previous sections. - Page 218 None for infrared transfer; CE-315L for cable transfer. Software plus: * CE-IR4 or CE-137T+ Single file null model cable or Link cable CE-FM4 PC card modem * Recom- mended tasks Exchange data with Sharp Organizers File transfer with other personal computers...
-
Page 219: Data Transfer Between Zr-5700/Zr-5800S Or With Zr-5000
Data Transfer with Other Sharp Devices Your unit can transfer data with other Sharp Devices as follows: • ZR-5700/ZR-5800 to ZR-5700/ZR-5800 via infrared transfer or cable. • To/From ZR-5000 via infrared transfer or cable. • To/From OZ-5000/OZ-6000/OZ-9000 series units via infrared transfer or cable. -
Page 220: Quick Transfer
• Keep the infrared port clean with a soft, dry cloth. Dust on the port restricts data transfer. • Avoid direct sunlight. • Infrared transfer is simple, but it is easily affected by ambient conditions such as external light, distance, transfer angle, etc. Received data should be confirmed after the transfer. - Page 221 • Check the orientation of the cable when it is connected. • Disconnect the cable as soon as the transfer is completed to conserve battery power. • If Wireless is selected, correctly align the two units so that their infrared ports face each other and are less than 50 cm (20 inches) apart.
- Page 222 Corresponding applications When transferring data from your unit to OZ-5000/ OZ-6000/OZ-9000 series, the following applica- tions correspond: Schedule - Appointment To Do - To Do ANN 1 - Holiday (Yearly by date) ANN 2 - Holiday (Yearly by day) Tel 1 - Contact 1 Tel 2 - Contact 2 Tel 3 - Contact 3 User File 1 - Data File 1...
-
Page 223: Data Transfer With Other Computers
Data Transfer with Other Computers Your unit can exchange data with personal computers (PCs) and other computers. PC Link Using Sharp’s optional PC Link software and hardware package (or third party software pack- ages), you can exchange data with a personal computer. -
Page 224: Organizer Link Software For Other Sharp Products
To exchange data with a OZ-5000/OZ-6000/OZ- 9000 series unit, use the wireless transfer method (see p. 219) or Unit to Unit transfer method (see p. 220). Organizer Link software for Other Sharp Products To use Organizer Link software (designed for OZ- 7000/OZ-8000/YO-600/ZQ-5000 series), the following conditions apply. - Page 225 When using OZ-8000 series Organizer Link: • You cannot transfer the following data: DAILY ALARM, TEL FILE NAME, TEL/BUSINESS CARD (corresponds to Data File 1) FREE FIELD NAME and USER’S DICTIONARY (corresponds to Word key). If you attempt these transfers, no error messages are displayed, but the data is not transferred.
-
Page 226: Special Communications Applications
• You can also attach messages when sending and receiving Filer folders and PC Files. • For details, see the Zaurus Mail software manual. • Call 800-BE-SHARP regarding availability of Zaurus Mail software for your PC. -
Page 227: Compuserve Access
CompuServe Access CompuServe Access allows you on-line access to CompuServe using your unit. Simply select CompuServe from Tools, connect to a telephone or cellular phone using a modem or PC card, and you're ready to get on-line! Now you no longer need to carry around a bulky PC just to stay in touch on the road. -
Page 228: Zr-Pager
ZR-Pager ZR-Pager allows you to send pager messages from your unit, wherever you are. Using ZR-Pager you can create pager messages and send them via telephone or cellular phone using the optional fax modem or PC card modem. And with the optional Pager Card, you can even receive, view and store incoming pager messages using your unit. -
Page 229: Appendices
Appendices A. Key Notations B. Reset C. Troubleshooting D. Battery Replacement E. Specifications A. Key Notations Representation in text Function ACTIVITIES Opens the Activities application. ACTIVITIES CONTACTS Opens the Contacts application. Press again to switch between CONTACTS Contact 1, 2 and 3. DATA FILES Opens the Data Files application. - Page 230 Representation in text Function FILER Opens the Filer. FILER SEARCH Initiates the Search function. SEARCH HELP Calls the on-line help feature. HELP TOOLS Opens utilities and user prefer- ences. TOOLS MORE Accesses installed PC cards or MORE Add-on software. QUIT Turns the unit on.
- Page 231 Representation in text Function Moves the cursor down one line. Scrolls the display down. Moves the cursor to the end of a field, or moves the cursor to last line of a field. Moves the cursor one character to the right. In Outlines, demotes a topic one level (to the right).
- Page 232 Representation in text Function 2nd I Sets the text style to italics in Documents and Spreadsheet. 2nd O Sets the text style to bold in Documents and Spreadsheet. Enters PM in a time field. 2nd P Prints the current display (with printer connected).
- Page 233 Representation in text Function Switches letters between uppercase and lowercase when held. Enters symbol above a key when held while the key is pressed. Enters a comma. 2nd , Enters a double quotation mark. Enters a quotation mark. Enters a period. For Calculator, a keyboard period acts as a decimal point.
-
Page 234: Reset
Conditions that make the unit inoperative may also erase part or all of the data stored in memory. Do not use sharp objects or objects with break- able tips to press the RESET switch. All Reset operation... -
Page 235: Troubleshooting
C. Troubleshooting When the unit is not functioning properly, refer to the list below for solutions before contacting your Sharp dealer. Solution Problem The display remains • Make sure the battery replacement switch is in blank after pressing the NORMAL OPERATION position. -
Page 236: Battery Replacement
D. Battery Replacement General guidelines Your unit uses the following battery types: Type Alkaline Operations batteries Lithium Memory battery backup Important points to remember when installing new batteries: • Be certain to use alkaline batteries with your unit under normal conditions. We also recommend that you use High Energy Lithium batteries L91 (size AA) or an external power supply (such as the EA-23E AC adaptor or the CE-BK1 recharge-... -
Page 237: Replacing Operating Batteries
Replacing operating batteries When using the unit, if BATT appears at the top of the display, the operating batteries may need to be replaced. To confirm this, turn the unit off and then on again. The unit will display a message if the operating batteries need to be replaced. -
Page 238: Replacing The Memory Backup Battery
Replacing the memory backup battery The memory backup battery has an expected lifetime of about five years under normal conditions (temperature extremes can shorten this lifetime). Replace the memory backup battery every five years. WARNING: When the operating batteries are depleted, replace them promptly with new batteries. - Page 239 Use a ballpoint pen or a similar object to remove the old memory backup battery. Insert a new CR2032 battery, positive (+) side Replace the backup battery cover and secure it with the screw. Set the battery replacement switch to the "NORMAL OPERATION"...
-
Page 240: Specifications
E. Specifications Model: ZR-5700 Display: 320 x 240 dot matrix liquid crystal display Model: ZR-5800 Display: 320 x 240 dot matrix liquid crystal display with Backlight function Electronic unit Applications: Activities, Contacts, Data Files, Notes, Documents, Outlines, Spreadsheets Desk accessories: Calculator, Scrapbook, Filer, Search, Help, Tools and More Memory capacity: ZR-5700... - Page 241 9600 bps to 115 Kbps using IrDA- compatible protocol. • 50 cm (20 inches) maximum at speeds of 9600 bps to 19.2 Kbps using Sharp IR (ASK) protocol. • IR distance may change depending on the system used.
- Page 242 General Power: Battery ( The EA-23E AC Adaptor and CE-BK1 battery pack are optional.) Operating: 3 V DC alkaline batteries (LR6 x 2) Be certain not to use manga- nese or nickel cadmium batteries. These may be easily mistaken for alkaline or lithium batteries.
- Page 243 Memory backup: • 1 month approx. (with depleted operating batteries) • 5 years approx. (with replacement of depleted operating batteries). Operating temperature: 32 to 104 F (0 to 40 C) Dimensions: Open: 170(W) x 191(D) x 18(H) mm (6-11/16(W) x 7-17/32(D) x 23/32(H) inch) Closed: 170(W) x 100(D) x 25.4(H)
-
Page 245: Index
Index AC Adaptor 56 Accessing Entries using calendar views 124 Secret entries 86 Accessories 57, 97, 191 Activities 119 Appointment 125 Birthday/Ann 132 Calendar 119 Changing type 144 Holiday 134 To Do 136 Adding Labels 140 Picture to an entry 157, 180 Text to graphic entries 66 Topics 186 User's Cities 93... - Page 246 Backing up data 38, 206, 207, 210 Backlight 56 Setting 90 Battery Installing 10 Lifetime 37, 56, 242 Memory backup 236 Operating 236 Pack 56 Replacing memory backup 238 Replacing operating 236 Before use 47 Birthdays 132 Blocks of text Copying/moving 114 Working with 108 Calculator 33, 57...
- Page 247 Checking off To Do entries 139 Clock 14, 91 Collapsing 189 Communications applications 226 CompuServe Access 227 Connecting Fax/Modem 195 Contacts Finding 147 Making an entry 16, 146 Selecting a file 146 Setup 159 Conventions 44 Copying Blocks of text 29, 108, 114 Entries 115 Documents to PC files 181 Graphics to picture fields 157...
- Page 248 Scrapbook entries 69 Single entries 25, 113, 155 Text 107 To Do entries 144 Topics 188 Using tool bar 113 Desk accessories Detail View 54, 98 Display Adjust LCD contrast 12 Adjust touch panel 13 Detail View 98 Index View 98 Layout 52 Symbols 53 Time/date 53...
- Page 249 Families 188 Collapsing 189 Expanding 189 Restructuring 190 Fax 195 Cover sheets/headers 198 Directory 196 Log 202 Number field 160 Send 28, 200 Speed buttons 199 Fax/modem 36, 195 Fields 105 Moving between 107 Picture 156 File It 105 Filer 27, 40, 69 Drawer 70 Report 77 Filter 100...
- Page 250 Generate a Report 77 General operations 97 Getting started 47 GUI operation 51 Headers Documents 180 Fax 198 Help function 55, 79 Holidays 134 Home City 14, 91 Import 223 Important points 9 IN folder 220, 222 Indents 170 Changing/Canceling 172 Setting 172 Index View 54, 98 Infrared transfer 219...
- Page 251 Link function 104, 150 Breaking links 155 Link by searching 151 Link To 104, 153 Making linked entries 150 Locking your unit 86 Make a Letter 177 Manual dialing 202 Margins 174 Making secret entries 85 Memory cards 36, 207 Memory check 81 Memory expansion 207 Messages 226...
- Page 252 Page break 175 Paper Size 174 Source 192 Paperless printer calculator 58 Part names and functions 48 Password Deleting/changing 87 Forgotten 87 Registering 80, 85 Paste 29, 114, 115 PC Files 215 PC Link 223 PC cards 36, 203, 205 Personal 80 Picture Adding to an entry 157, 180...
- Page 253 Remote Link 226 Replacing Memory backup battery 238 Operating batteries 237 Restoring data 209, 212 Review Notes 164 Ruler 171 Scrapbook 32, 63 Scroll bars 51, 108 Search 22, 78, 109 (see also Finding entries) By Date 112 For information 22 Global Search 111 Keyword Search 110, 127, 139, 148, 167...
- Page 254 Adjusting 13 Transferring data 219 Between two ZR-5700/5800s 219 Filer folders 76 Quick transfer 220 Wireless infrared 219 With other Sharp devices 222 With personal computer 38, 223 Troubleshooting 235 Turning on/off Daily alarms 93, 94 Key sound 55 ON/OFF keys 48...
- Page 255 User's City 92 Utilities 80, 191 Weekly Graph view 123 Week view 123 Window display 58, 163 Wireless infrared transfer 192, 219, 220 Wizard (Sharp OZ-9000 series) 35 Word List 88 Editing/deleting words 89 Registering words 88 Using 89 Word wrap 173...
- Page 256 Contents General ... 1 Disclaimer and warnings ... 1 Trademarks and copyrights ... 1 About this manual ... 1 Important things to do ... 2 Manual conventions ... 2 Spreadsheet Quick Start ... 5 Starting PenCell ... 5 Creating a worksheet... 6 Saving a worksheet ...
- Page 257 How formulas work with the data in your worksheet ... 35 Types of formulas ... 37 About built-in functions ... 37 Editing a worksheet ... 40 Guidelines for editing data or formulas ... 40 Moving around a worksheet ... 41 Going to a specific cell ...
- Page 258 Appendix E: File Compatibility ... 102 Communication Applications Before you start ... 105 Connecting to a modem ... 105 Connecting to the SHARP CE-FM4 Fax/Modem ... 105 Connecting to a PC Card modem ... 106 – CompuServe – Quick Start ... 109 Starting CompuServe Access Software ...
- Page 259 Starting CompuServe Access Software ... 117 Setting up your modem ... 118 Setting up connections ... 119 Connecting to CompuServe ... 120 Mail ... 121 Creating mail ... 121 Sending mail messages ... 123 Getting mail messages ... 124 Reading mail messages off-line ... 125 Forums ...
- Page 260 Reading incoming messages ... 153 Searching messages ... 153 Commonly Asked Questions & Answers... 154 Introduction ... 157 What is Pager Access? ... 157 Starting ZAURUS Pager Access ... 158 Obtaining a Pager Card and paging service ... 159 Setting up a paging service ... 159 Modifying an existing paging service ...
- Page 261 – AT&T Mail – Quick Start ... 189 Starting AT&T Mail Access ... 189 Setting up AT&T Mail Access ... 190 Creating a new message ... 191 Sending messages ... 192 Receiving messages ... 193 Commonly Asked Questions & Answers... 194 Introduction ...
- Page 262 Appendix C:AT&T Mail login scripts ... 239 AT&T Mail Direct ... 239 REDI-ACCESS Packet (X.25) ... 239 LAS – Local Access Service ... 240 DATAPAC – DataPac in Canada ... 240 Login Script Commands ... 241 – Terminal – Introduction ... 245 About Terminal ...
- Page 263 viii...
-
Page 264: General
Data may be lost or altered in virtually any electronic memory product under certain circumstances. Therefore, SHARP assumes no responsibility for data lost or otherwise rendered unusable as a result of improper use, repairs, defects, software error, or any other causes. -
Page 265: Important Things To Do
The indexes for these chapters are listed, separately, at the back of this manual. Important things to do Read through the Quick Start section of each chapter. It will quickly get you up and run- ning. Refer to the rest of the chapter for more details about particular operations. -
Page 266: Spreadsheet
ZR-5700/ZR-5800. If you already own an older version of the Data Exchange Utility, check on CompuServe (GO ZAURUS) or America Online (Keyword: PDA) for a free patch to version 1.1. Quick Start ... 5 Commonly Asked Questions & Answers ... 15 Introduction ... -
Page 268: Quick Start
Quick Start his section is a quick start to setting up ® and running PenCell application. On your unit, PenCell is referred to as SPREADSHEETS and indicated by icon. Starting PenCell , a spreadsheet Turn on the unit. Touch... -
Page 269: Creating A Worksheet
Creating a worksheet Press NEW ENTRY. A new, blank worksheet appears in the display. The worksheet has the name [Untitled] until you save it and give it a name of your choice (20 characters or less). The worksheet name Saving a worksheet Touch EDIT, then select “Save as...”... -
Page 270: Entering Data In Worksheet Cells
Entering data in worksheet cells A cell is referred to by its column letter and row number (for example, cell B4). When you select a cell by touching it, its reference appears in the cell indicator. To enter data in a worksheet cell: Touch cell B4 to select it. -
Page 271: Entering Formulas
Entering formulas To enter a formula in a worksheet cell: Touch cell E4. Enter B 4 + C 4 + D 4. Touch another cell (or press ENTER). By default, formulas are automatically calcu- lated and the results are displayed in the cell. When you select a cell that contains a formula, the formula appears in the edit bar. -
Page 272: Using Built-In Functions
Using built-in functions Built-in functions make it easier to enter complex formulas. The following example use the MAX function to determine the maximum value from data in a specified range of cells. Touch cell F4. Touch to use a built-in function. Touch the up and down scroll arrows or the scroll bar beneath the arrows until the function you want to use is visible. -
Page 273: Creating A Worksheet From A Template
Creating a worksheet from a template To create a new worksheet using a template: While in the Index mode, touch the Templates tab to see the list of available templates. Touch the template you want to use to high- light it. Touch the highlighted template. -
Page 274: Selecting Cells And Ranges
Selecting cells and ranges To select cells: • Touch a cell to select it. • Touch a column heading to select all cells in the column. • Touch a row heading to select all cells in the row. • Touch All to select all cells in the worksheet. •... -
Page 275: Moving And Copying Data
Moving and copying data To move the contents of a cell or range: Select a cell or range. Touch and hold the pen within the selection and drag the selected cell or range to a new location. This is the new location where the highlighted data will be moved to. -
Page 276: Navigating The Worksheet
Navigating the worksheet Below are some guidelines for moving around the worksheet: • Touch the up or down arrow in the scroll bar to display cells in rows above or below those in the display. • Touch the left or right arrows in the scroll bar to display cells in columns left or right of those in the display. -
Page 277: Creating A Chart
Creating a chart To create a chart: In the Worksheet mode, select the cells containing the data you want to chart. Select a range of cells to create a chart. Touch EDIT, then select “New Chart.” Chart legend To change the chart format Touch PIE, LINE, COLUMN, or STACK. -
Page 278: Commonly Asked Questions & Answers
Commonly Asked Questions & Answers I want to print or Fax a worksheet. Is there any way to accomplish this? Yes. You have three options although PenCell does not support Print or Fax directly as other applications do. 1) You may use the 2nd P (PRINT SCREEN) key. This sends the screen image to a printer that is connected to your unit using the optional cable or infrared adapter. - Page 279 Is there a shortcut for moving and copying cells? Yes. You can “drag and drop” selected cells to move them anywhere in the worksheet. To copy the selected cells, press 2nd before you drag and drop. PenCell automati- cally maintains the cell references and dependencies that the moved or copied cells contain.
-
Page 280: Introduction
Introduction his section gives you general information about the unit's Spreadsheets operations. Starting PenCell Turn on your unit. Touch When you start the application, you enter the Worksheet mode and see a display like this: The display you see when you enter the application is the same display that had been present when you last used the application. -
Page 281: Selecting Display Modes
Selecting display modes Once in PenCell, you can move between three display modes: Index, Worksheet, and Charts. Each mode has its own appearance and purpose. To change to another mode, touch VIEWS and select the appropriate mode. Index mode The Index mode shows you a list of templates and a list of the worksheets you have named and saved. -
Page 282: Worksheet Mode
Worksheet mode The Worksheet mode lets you create and edit one worksheet at a time. By default: • Calculated results of formulas are automatically displayed in the worksheet cells. • New results are automatically calculated and dis- played if you change data or formulas in the worksheet. -
Page 283: Getting To Know Pencell
Getting to know PenCell PenCell operates like other applications on your unit, except that it does not directly support printing or faxing. You must use the Copy Image command to paste into Scrapbook or Documents. You may then print or fax from Scrapbook or Documents. - Page 284 The pop-up menu In the worksheet mode, the popup menu is available for quick access to frequently used operations. Press 2nd MENU to display the pop-up menu. Keyboard shortcuts Many operations in PenCell have keyboard equivalents. Refer to Appendix D, “ Keyboard Reference ” for a summary of keyboard operations.
-
Page 286: Creating A Worksheet
Creating a Worksheet his section describes ways to create and work with worksheets Three ways to start a worksheet You can start a worksheet in any of the following three ways: • Create a new, blank worksheet. • Create a new worksheet using a template. •... -
Page 287: Starting With A Template
Saving a worksheet Name and save a worksheet in the worksheet mode, as follows: Touch EDIT and select “Save as...” Type a worksheet name. The name must be 20 characters or less and can include letters or numbers. Touch OK. In the worksheet mode, the worksheet name appears at the bottom of the worksheet. -
Page 288: Starting With An Existing Worksheet
Touch the highlighted template or press ENTER. A new worksheet based on the template opens so that you can modify it, if necessary, or add data. Touch EDIT and select “Save as...” to name and save the worksheet. Starting with an existing worksheet Another way to create a new worksheet is to open an existing one, save it with a different name, and use the copy as a starting point for a new worksheet. -
Page 289: Entering Data
Press ENTER, or touch the selected worksheet, or touch VIEWS and select “Worksheet.” The selected worksheet opens in the worksheet mode. Touch EDIT and select “Save as...” Type a new worksheet name. Touch OK. Entering data To enter data in a worksheet: Touch a cell to select it. -
Page 290: Entering Numbers
Type the data you want the cell to contain. The maximum number of characters in a cell is 255, excluding the “quotes” that PenCell adds around text labels. By default, all the cells in the worksheet have the General cell type so they can contain numbers, labels, or formulas. -
Page 291: Entering Labels
Entering data with the 10-Key Pad PenCell includes a 10-key Pad that allows you to enter numeric data with the pen in a cell. To use the 10-Key Pad: Touch SHOW and select “Show 10-Key Pad.” The 10-key pad appears in the display. You can move it around the display by dragging the top left corner of it. -
Page 292: Selecting Cells
Entering labels from the Word list The WORD key provides a quick alternative to typing words that you use frequently, such as your company name or logo. Refer to the other Operation Manual for information about storing words or phrases using the WORD key. -
Page 293: Entering Formulas
To select a column or row: Touch the column or row heading. To select multiple adjacent columns or rows: Drag through column or row headings. To select an entire worksheet: Touch the top left corner cell labeled All. NOTE • All refers to all cells that are above and to the left of the last cell actually used in the worksheet. - Page 294 Wnen the cursor blinks in the edit bar, you can edit your formula using copy, cut and paste operations, and you can move the cursor using the arrow keys. Touch EDIT and select “Undo” if you enter something by mistake. Undo returns the worksheet to its status prior to the last operation.
-
Page 295: Guidelines For Entering Formulas
To control performance, you can specify the number of iterations: Choose Recalc Options... in the UTILS menu. The greater the number you enter for itera- tions, the more accurate the result of circular computations will be, but the longer it will take to arrive at that result. - Page 296 Two ways to enter cell and range references in formulas As you enter a formula, you have two ways to insert a cell or range reference: • Type the reference, such as B2:E5, using the key- board. • If the blinking edit cursor is at a position to the right of an arithmetic operator (like “+”...
- Page 297 Touch Insert to add the selected function and its argument place holder to the formula in the edit bar. Functions that require a specific type of argument include a place holder to remind you what argument to add. (See “Syntax of funcitons,”...
-
Page 298: How Formulas Work With The Data In Your Worksheet
How formulas work with the data in your worksheet A worksheet formula can be a simple arithmetic operation, such as 5 + 2, or a complicated operation, such as determining the net present value of a series of future cash flows based on data present in worksheet cells. - Page 299 Ranges A range is a rectangular block of adjacent cells in the worksheet. A range can be one or more rows, one or more columns, or a group of cells in adjacent rows and columns. Use ranges in commands and formulas to perform operations on more than one cell at the same time.
-
Page 300: Types Of Formulas
Types of formulas There are three types of formulas: numeric, logical, and date. Numeric formulas Numeric formulas perform calculations with numbers, using one or more of the arithmetic operators +, -, * , /, ^, or related built-in functions. Two examples of numeric formulas are 3 * B20 and SUM(B20:B25)/4. - Page 301 Financial Calculate annuities, loan payments, cash flows, and so on. These include: DDB, FV, IRR, NPER, NPV, PMT, PV, RATE, SLN, SYD. Logical Compute the results of conditional formulas. These include: AND, FALSE, IF, NOT, OR, TRUE. Relational Operators Perform mathematical comparisons. These include: <, <=, <>, =, >, >=.
- Page 302 Functions and their arguments Supply the information PenCell needs to carry out a function. For example, when PenCell comes across the function SUM(A4:A20), the argument A4:A20 tells PenCell to add the values in the range extending from A4 to A20. The number and type of arguments required varies by function.
-
Page 303: Editing A Worksheet
Editing a worksheet To edit the contents of a cell: Select the cell that you want to change. The cell contents appears in the edit bar. Touch within the edit bar (or press ENTER) to obtain the blinking edit cursor that indicates you are ready to edit. -
Page 304: Moving Around A Worksheet
Moving around a worksheet Your unit displays a portion of the cells in a worksheet at one time. There are several methods to display other parts of the worksheet. You can move around the worksheet in the following ways: • Touch the scroll arrows to move the worksheet one row or column at a time in the direction the arrow points. -
Page 305: Finding Cell Contents
Finding cell contents Another way to move the worksheet display is to find specific cell contents. You can find a value, label, or formula. Note, however, that the search is not case- sensitive. To find cell contents: Touch UTILS, then select “Find...,” or press 2nd F. Type all or part of the value, label, or formula and choose either forward or backward search. - Page 306 A white outline appears around the selected cell or range. Drag the outline to the new location. If you want to move the cell contents to a location that is not in the current display, just drag it in the direction you want to go, hold the pen past the edge of the worksheet, and the worksheet will scroll in the direction you drag.
- Page 307 NOTE If you copied or cut a single cell, but selected a range of cells prior to pasting, the cell's contents are repeated throughout the range. If you cut or copy a range and select a range of a different size prior to pasting, an error message is displayed unless the new range size is a multiple of the range you cut or copied.
-
Page 308: Copying Formulas
Copying and annotating a worksheet To copy the current worksheet as an image that you can paste in the Scrapbook or Documents application: Select the cells you want to copy. Touch EDIT, then select “Copy Image.” Touch your unit's SCRAPBOOK or DOCU- MENTS application. -
Page 309: Clearing Data
Clearing data You can clear the contents of a cell or range without by: • Using the Clear command or DEL. • Using the Cut command or 2nd X. To remove data from your worksheet: Select the cell or range that contains data you want to remove. -
Page 310: Inserting And Deleting Cells
Select your sorting criteria by touching your choices in the Sort window. For example, if you choose rows, ascending, and D5, the data in the selected range, C4:E7, are rearranged with the data in cells D4 through D7 in increasing order. Touch Sort. -
Page 311: Formatting A Worksheet
To delete cells from your worksheet: Select the cell or range that you want to delete. Touch CELLS, then select “Delete...” If the range is not a row or column, then the following dialog box appears. Decide whether to shift the selected cells up or to the left after deletion. - Page 312 Worksheet Default Setting Characteristic Hide or display gridlines Gridlines displayed Display values or formulas Values displayed Display or hide Displayed Column/Row Labels Show full screen Set Worksheet Protection On or Off Set Title On or Off Number of calculation iterations Automatic or manual Automatic recalculation...
- Page 313 If the formula is too long to fit in a cell, you only see the part that fits in the cell (unless the adjacent cell is empty). Any change in this setting will affect only this worksheet. If you want to see the formula in one cell without reformatting the entire worksheet, touch the cell to select it.
- Page 314 Displaying or hiding column/row labels Touch SHOW, then select “Hide Column/Row Labels.” To redisplay them, touch SHOW and select “Show Column/Row Labels.” Setting title Use Set Title to create stationary table headings. This enables you to scroll through multiple pages of data while the appropriate row or column labels remain stationary and visible.
- Page 315 Rows above and columns to the left of the selected cell are indicated by dark lines that divide the display into panes. When you scroll up and down, column labels appear on each page and when you scroll left and right, row labels appear on each page.
-
Page 316: Cell Characteristics
When you activate the protection status of the worksheet, the undo and redo operations are cleared from the memory. That means you will not be able to undo or redo operations you performed prior to activat- ing worksheet protection. In addition, when the worksheet protection status is active, you cannot move cells. - Page 317 Select the cell or range you want to format. (To change the default setting of worksheet, select All instead.) Touch FORMAT, then select “Format...” Choose a cell type, then touch OK. If you select the Number or Date/Time cell type, you also need to choose a format option from the pop-up menu.
- Page 318 Cell Type Description Date/Time Displays cell content in one of the selected date/time format. Date/time formats are: Format Example DD-MMM-YY 28-Dec-96 DD-MMM 28-Dec MMM-YY Dec-96 HH:MM:SS (AM/PM) 02:34:51 AM HH:MM (AM/PM) 02:34 AM MM/DD/YY 12/28/96 MM/DD 12/28 HH:MM:SS 02:34:51 (24 hour) HH:MM 02:34 (24 hour) General...
- Page 319 To reverse a format change, touch EDIT, then select “Undo.” Decimals When a cell has the number cell type, you control the decimal points displayed in the cell from the Format dialog. To specify decimal points for the NUMBER cell type: Select a cell or range.
- Page 320 Alignment Alignment determines where cell contents appear relative to the edges of the cell. General alignment is the default. With General alignment, numbers, dates and times are right justified, and labels are left justified. To change the alignment for a cell or range: Select the cell or range you want to change.
- Page 321 Drawing borders You can add borders to one or more cells in a worksheet. Select the cell or range you want to change. Touch FORMAT, then select “Borders...” Touch one or more of the checkboxes, as required. Touch OK. NOTE •...
- Page 322 Adjusting column and row size You can easily change the column width or row height in a worksheet. Select a column or row heading. Touch CELLS then select “Set Column/Row Size.” If necesary, you can drag the dialog box to a different location. Touch and hold the pen tip in the center of any selected column or row heading.
-
Page 324: Working With Charts
Working With Charts harts are a visually compelling way of presenting many kinds of worksheet information. Creating a chart You can create and save one or more charts for your worksheet. To create a new chart, you need to start in the Worksheet mode: Select the range of cells containing data you want to chart. -
Page 325: Formatting A Chart
Touch EDIT, then select “New Chart.” The number of bars comes from the number of rows in the selected range. The chart legend comes from the column to the left of the selected range. When you create a chart, the cells immendiately above or left of the selection (if any) contain labels for one of the axes in your chart. -
Page 326: Pie Charts
Pie charts A pie chart shows the data from one column in the selected range as percentages of a whole. Line charts A line chart shows the individual values of selected data connected by a line. Column charts A column chart displays all the data for each row or column in the worksheet as a single column, with each category of data distinguished by its pattern. -
Page 327: Chart Titles
Chart titles You can add a chart title to enhance your chart, as follows: Touch EDIT, then select “Chart Title...” Type a chart title, up to 25 characters. Touch OK. To show the title, touch SHOW, then select “Show Title.” Displaying gridlines Gridlines can aid in the visual comparison of data. -
Page 328: Viewing Saved Charts
If the chart does not have a title yet, the following window appears. Type a chart title and then touch OK. A prompt will indicate the chart has been saved to the current worksheet. The name of the worksheet in which the chart is saved does not appear in the Chart mode. -
Page 329: Deleting A Chart
Duplicating a chart You can make a new chart by duplicating an existing one, then change its content, for example. While viewing a chart, touch EDIT, then select “Duplicate Chart...” Charge the suggested chart title, if neces- sary. Then touch OK. Deleting a chart To delete a chart: Touch EDIT, then select “Delete Chart.”... -
Page 330: Entering The Index Mode
Managing Worksheets ndex mode includes file management operations, as well as operations for importing and exporting worksheet files, creating a new file from a template, and opening saved worksheets. Index mode operations Index mode provides you with tools for managing worksheet files. -
Page 331: Managing Worksheets
Managing worksheets The Index tab mode provides you with worksheet management operations. Some operations require that a worksheet be selected. Touch a worksheet to select it. Duplicating a worksheet Select the worksheet you want to duplicate. Touch EDIT and select “Duplicate Worksheet...”... -
Page 332: Deleting Worksheets
Deleting worksheets To delete a worksheet: Select the worksheet you want to delete. Touch EDIT, then select “Delete Worksheet.” Touch Yes to confirm that you want to perma- nently delete the worksheet. NOTE Secret worksheets are hidden from the Worksheets tab index if your unit is locked. -
Page 333: Making A Secret Worksheet
Making a secret worksheet You can turn a normal worksheet into a secret worksheet, or vice versa. When your unit is locked, secret worksheets are not shown in the Index mode and cannot be opened, viewed, deleted, copied, renamed, or set to Normal. To turn a worksheet secret: While viewing the Worksheets tab in the Index mode, select the desired worksheet. -
Page 334: Copying A Worksheet To A Pc File
Set the Unit to Unit Path on both units to the correct option. Touch OK on both units. To quit during the transfer, press [ON]. The data is transferred as PenCell data (but not assigned to Filer’s IN folder). To transfer a worksheet via the infrared port, you can also use the following simpler method: Make sure you are either in the Worksheet mode, or if you are in the Index mode you... -
Page 335: Getting A Worksheet From A Pc File
Getting a worksheet from a PC File While in the Worksheet mode or the Index mode, touch SEND, then select “Get from PC Files...” If the worksheet has not been saved, you will be prompted to do so; otherwise the following dialog box appears. -
Page 336: Replacing With A Pc File
Replacing with a PC File Make sure you are either in the Worksheet mode, or if you are in the Index mode you have selected a worksheet from the Worksheets tab. Touch SEND, then select “Replace with PC File...” Select data sorce, Main Unit or PC Card. Select the PC file. -
Page 337: Linking A Worksheet
Linking a worksheet Linking with Contacts or Data Files entries You can link a worksheet. When linked, the entry in the Worksheets tab of the Index mode contains the follow- ing icons: Contacts only Data files only Contacts and Data files Make sure you are either in the Worksheet mode, or if you are in the Index mode you have selected a worksheet from the... -
Page 338: Setting The Workspace Size
Setting the workspace size By default, PenCell has 128KB of workspace size. You can add more to the workspace size so that you can work with larger worksheets. To set the workspace size: While in the Index mode, touch SETUP and select “Workspace Size...”... -
Page 340: Troubleshooting
Troubleshooting his section answers questions you may have when using PenCell. Troubleshooting checklist A formula entered into a cell remains as text and no calculation is performed. • Make sure the cell has not been formatted to label. • Touch SHOW, then select “Hide Formulas” if it appears on the list. - Page 341 A formula does not calculate as expected. • Make sure the order of precedence is correct. If necessary, use parentheses to overwrite the normal order of precedence. • Touch UTILS, then select “Recalc Options...” Then see if Auto Recalculation is checked. If Auto Recalcu- lation is not checked, you can perform calculation manually by touching UTILS and then selecting “Calculate Now!.”...
-
Page 342: Appendixes
Appendixes Appendix A: Menu Functions Appendix B: Function Reference Appendix C: Spreadsheet Limits Appendix D: Keyboard Reference Appendix E: File Compatibility Appendix A: Menu Functions Menus and functions are available depending on which mode you are in: Index, Worksheet, or Charts. In Index mode VIEWS menu Index... - Page 343 EDIT menu New Worksheet Creates new worksheet. See page 23. Worksheet Title... Changes the worksheet title. See page 68. Duplicate Worksheet... Makes a copy of the current worksheet. See page 68. Delete Worksheet Deletes the current worksheet. See page 69. Delete Group...
-
Page 344: In Worksheet Mode
In Worksheet mode VIEWS menu Index Use the Index mode to manage worksheets and templates. See page Worksheet Use the Worksheet mode to work on the contents of a worksheet. See page 19. Charts... Use the Charts mode to create and manage charts. - Page 345 Set Column/Row Size Changes column or row size. See page 59. Sort... Sorts the selected cells. See page 46. UTILS menu Find... Finds desired data in the worksheet. See page 42. Go to... Jumps to the desired location in a worksheet.
-
Page 346: In Charts Mode
Secret Entry Turns the worksheet secret. See page Normal Entry Turns the worksheet normal. See page 70. LINK TO menu Contacts... Links the current worksheet to a Contacts entry. See page 74. Data Files... Links the current worksheet to a Data Files entry. -
Page 347: Appendix B: Function Reference
EDIT menu New Worksheet Opens a new worksheet. See page Chart Title... Changes the chart title. See page Duplicate Chart... Makes a copy of the current chart. See page 66. Delete Chart Deletes the current chart. See page Delete Group... Deletes group of charts. - Page 348 ABS( value ) Returns the absolute value of value . Example: ABS(54) returns 54. ABS(-54) returns 54. EXP( value ) Returns e raised to the power of value . e is a constant equal to approximately 2.718281828459045. Example: EXP(4) returns the approximate value of 54.5982.
-
Page 349: Date/Time Functions
SUM ( values... ) Returns the sum of all the values in list of arguments. Example: SUM (23,293,-97,63) returns 282. SUM (A1:A4) returns the sum of values in cells A1 to A4. Date/time functions All time functions use a 24-hour clock. The spreadsheets represent date and time information in cells as “serial numbers.”... - Page 350 TIME ( hour , minute , second ) Returns the fractional value of a particular time, where hour is a value from 0 to 24, minute is a value from 0 to 60, second is a value from 0 to 60. Example: TIME (15,32,39) returns 0.647674 which is the fractional number representing 15 hours, 32...
- Page 351 Extracting information from date and time represen- tations There are six functions for extracting information from date and time representations: DAY( date ) Returns the value of the day in date , which is an integer in the range 1 to Example: DAY(DATE(96,9,11)) returns 11.
-
Page 352: Financial Functions
Computing with date and time representations You can use date and time representations in arithmetic expressions. For example: date_representation + days Returns a new date plus a given number of days ( days ). date_representation - days Returns a new date minus a given number of days ( days ). - Page 353 IRR(range, guess ) Calculates the internal rate of return for a range of values that occur at equal and regular intervals. guess is a starting approximation to the expected result, or assumed to be 0.1 (10%) if omitted. Example: IRR(C9:G9) returns -2.12% where C9:G9 contains (-70000, 12000, 15000, 18000, 21000).
- Page 354 PV(rate, nper, pmt, fv , type ) Computes the present value for a fixed payment pmt made for the number of periods nper, at a fixed interest rate. It assumes the future value to be 0 if fv is omitted, assumes the payments are made at the end of the periods if type is 0 or omitted, and at the beginning of the month if type is 1.
-
Page 355: Logical Functions
Logical functions Logical functions let you use conditions in building formulas. Use them when you want the outcome of a computation or a returned value to determine some other value assignment or to control the sequence of operations. You can also use logical functions to determine values and control operations when error conditions occur and when special input types are used. -
Page 356: Miscellaneous Functions
Miscellaneous functions CHOOSE(index, values ...) Chooses a value from a list. If index evaluates to 1, the first value is returned; if it evaluates to 2, the second value is returned and so on. Example: CHOOSE(4, “mon”, “tue”, “wed”, “thur”, “fri”) returns “thur”. - Page 357 ISNA(value) Returns TRUE if value is the error value NA (Not Available), and FALSE, otherwise. Example: ISNA( NA() ) returns TRUE. ISNUMBER(value) Returns TRUE if the value is a number, and FALSE, otherwise. Example: ISNUMBER(D21) returns TRUE where D21 has the value 298. NA() Returns the error value NA (Not Available).
-
Page 358: Relational Functions
Relational functions Relational functions operate on numeric values, references to numeric values, and labels. value1 < value2 Returns TRUE if value1 is less than value2, FALSE otherwise. Example: 5<7 returns TRUE. value1 <= value2 Returns TRUE if value1 is less than or equal to value2, FALSE otherwise. -
Page 359: Trigonometric Functions
MAX(values...) Returns the largest value in the argument list. Example: MAX(12, 29, 8, -39) returns MIN (values...) Returns the smallest value in the argument list. Example: MIN(-5, 29, 32, 7) returns STDEVP(values...) Calculates standard deviation of the population as given. Example: STDEVP(45, 68, 22, 70, 50, 39) returns 16.5731. - Page 360 COS (value) Returns the cosine of a value which is an angle. Example: COS(1.047) returns 0.500171. SIN (value) Returns the sine of a value which is an angle. Example: SIN(PI()/2) returns 1. TAN (value) Returns the tangent of a value which is an angle.
-
Page 361: Appendix C: Spreadsheet Limits
Appendix C: Spreadsheet Limits The following table summarizes the spreadsheet limits: Description Minimum Number of columns Number of rows Charts saved in worksheet Rows in a chart Columns in a chart Nesting level of parentheses in a formula Number of arguments in a function var-arg function like SUM(),... -
Page 362: Appendix D: Keyboard Reference
Appendix D: Keyboard Reference The following table summarizes the keys for use in the three modes: • Index mode (Worksheets tab, Templates tab) • Worksheet mode • Charts mode Index Mode (Worksheets tab) ENTER View worksheet Delete worksheet CANCEL/ON/QUIT RETURN NEW ENTRY New worksheet PREV... - Page 363 Index Mode (Worksheets tab) SHIFT+UP £ £ SHIFT+DOWN SHIFT+RIGHT SHIFT+LEFT Unit to Unit Get operation SEND Unit to Unit Send operation MENU Open VIEWS menu 2nd MENU Open VIEWS menu Touch Select entry Drag 2nd + Touch 2nd + Drag Index Mode Worksheet Mode (Template tab)
- Page 364 Index Mode (Worksheets tab) 2nd + X 2nd + C 2nd + V 2nd + Z 2nd + A 2nd + P Print screen 2nd + Y 2nd + U 2nd + I 2nd + O 2nd + F Index Mode Worksheet Mode (Template tab) (When Editbar inactive)
-
Page 365: Appendix E: File Compatibility
Appendix E: File Compatibility PenCell can read Excel 3.0 and Excel 4.0 files. It writes to Excel 4.0 files. Only a subset of Excel’s features and functions are supported in PenCell. Unsupported functions, after being imported into PenCell, evaluate to error value and are displayed in edit bar with the prefix XL_ (such as XL_DMAX(...)). -
Page 366: Communication Applications
Communication Applications... -
Page 368: Before You Start
Before you start he unit must be connected to a modem in order to use a communication software. You can use either the SHARP CE-FM4 Fax/Modem or a PC Card modem. Connecting to a modem Connecting to the SHARP CE-FM4 Fax/ Modem Make sure the unit is turned off. -
Page 369: Connecting To A Pc Card Modem
If you are not sure whether a particular modem is compatible, consult your SHARP dealer. You also need the modular telephone cable supplied with the modem to complete the steps below. -
Page 370: Compuserve
CompuServe Quick Start ... 109 Commonly Asked Questions & Answers ... 115 Introduction ... 117 Mail ... 121 Forums ... 126 Executive News Service ... 133 Other Functions ... 135 Troubleshooting ... 139 Appendix ... 141... -
Page 372: Quick Start
Quick Start his section is a quick start to setting up and running CompuServe Access Software. This section assumes you have already joined CompuServe. Starting CompuServe Access Software Touch TOOLS. * The contents of the TOOLS screen may differ depending on the version for your country. Touch the CompuServe icon twice. -
Page 373: Setting Up Your Modem
Setting up your modem From the main screen, touch Setup, then touch the Modem Setup tab. Make any necessary changes to these settings. Touch OK to save the changes. Setting up connections You can connect to CompuServe from different places or via different networks, as follows: From the main screen, touch the Setup button. -
Page 374: Connecting To Compuserve
Connecting to CompuServe After you have set your modem and connection prefer- ences, you are ready to connect to CompuServe. From the main screen, use the Connection pop-up menu to select a connection. Touch the icon then OK to connect to CompuServe. -
Page 375: Creating Mail
Creating Mail If necessary, touch MAIN to go back to the main screen, then touch the OUT tray. From the Mail index view, touch EDIT, then select “Create Mail” Touch To: to display the following screen. Use the Type: pop-up menu if the recipient is on a network other than CompuServe. -
Page 376: Sending Mail
Sending Mail While in the Mail index view of the OUT tray, tag entries you want to send by touching their checkbox. Touch SEND, then select “Send Mail...” Select the current message only, all tagged messages, or all messages. Touch OK to send (connect to CompuServe). Getting Mail From the main screen, touch the New Mail icon. -
Page 377: Reading Mail Off-Line
Reading Mail off-line If necessary, touch MAIN to go back to the main, then touch the IN tray. From the index view, touch a mail message entry twice to read it. To reply While reading a message (or from the Mail index view of the IN tray), touch EDIT, then select “Reply.”... -
Page 378: Commonly Asked Questions & Answers
Commonly Asked Questions & Answers What do I need to use CompuServe Access Software? First, you must join CompuServe and get an account number and password. If you don't already have one, call CompuServe and they will send you PC or Macintosh disks that will allow you to sign up using your personal computer (and your personal computer's modem). -
Page 380: Introduction
Introduction his section gives you general information about CompuServe Access Software application in your unit. Starting CompuServe Access Software Touch TOOLS. * The contents of the TOOLS screen may differ depending on the version for your country. Touch the CompuServe icon twice. If the unit is locked, you need to further enter the password. -
Page 381: Setting Up Your Modem
Setting up your modem You need to set up your modem, as follows: Make sure the unit is not connected to CompuServe. From the main screen, touch Setup, then touch the Modem Setup tab. Make any necessary changes to these settings. -
Page 382: Setting Up Connections
Setting up connections You can connect to CompuServe from different places or via different networks, as follows: Make sure the unit is not connected to CompuServe. From the Setup screen, touch the Connection tab. Touch Add and enter a new connection name. -
Page 383: Connecting To Compuserve
Connecting to CompuServe After you have set your modem, connection, and preferences you are ready to connect to CompuServe. From the main screen, use the Connection pop-up menu to select a connection point. Touch the icon to connect to CompuServe. To disconnect To disconnect, touch NOTE... -
Page 384: Creating Mail
Mail ou can create, send, get, and read mail. Creating mail Create a mail message as follow: If necessary, touch MAIN to go back to the main screen, then touch the OUT tray. From the Mail index view, touch EDIT, then select “Create Mail.”... - Page 385 Touch To: to display the following screen. Use the Type: pop-up menu if the recipient is on a network other than CompuServe. Select a name from the Address Book list, then touch To:, Cc:, or Bcc: to put the name onto the Recipient list.
-
Page 386: Sending Mail Messages
To attach data While composing a message, you can touch ATTACH to attach Filer or PC File data to the message. (only one file allowed) Touch Attach. Select the attachment type, then touch OK to select the data. Select a Folder or a PC File, then touch Attach. -
Page 387: Getting Mail Messages
Specify to send the current message only, all tagged messages, or all messages. Also decide if you want to disconnect after send- ing by touching the checkbox. Depending on the settings in the Prefer- ences, the sent mails may be deleted auto- matically or moved to the SENT tray. -
Page 388: Reading Mail Messages Off-Line
Reading mail messages off-line If necessary, touch MAIN to go back to the main, then touch the IN tray. While in the Mail index view, touch a mail message twice to read it. To reply While reading a message (or from the Mail index view of the IN tray), touch EDIT, then select “Reply.”... -
Page 389: Forums
Forums n CompuServe, each forum consists of two major areas; messages and libraries: the software provides two tabs to corre- spond to the two groups. The message group is divided into sections. The number of sections vary from forum to forum, and are pre-set by the forum system operator (Sysop). -
Page 390: Reading A Forum Message On-Line
Reading a forum message on-line While in the section view of a forum, touch a section of interest twice (or touch INDEX, or press ENTER). Touch a topic of interest twice (or touch VIEW, or press ENTER). If you want to go to a different section, use the Section pop-up menu. -
Page 391: Downloading Forum Messages
Downloading forum messages While in the section view of a forum, touch a section of interest twice. To download all messages related to a topic, tag the topic. If you only want to download selected messages, touch the topic twice to go into each message and check each one individu- ally. -
Page 392: Downloading Library Files
Downloading library files You can download files from CompuServe (but not upload files), as follows: Select the Library tab, then touch a section name twice. If required, touch FILTER and select “Forum Library...” to set a filter. Touch a file twice to see its description. To download, tag the files of interest, then touch SEND and select “Save to IN...”... -
Page 393: Creating A New Forum Message Off-Line
Creating a new forum message off-line From the main screen, touch the OUT tray icon and touch the Forum M tab. Touch EDIT, then select “Create Forum Message.” Use the Forum pop-up menu to specify a forum, and the Section pop-up menu to specify a section. -
Page 394: Posting Messages To A Forum On-Line
Posting messages to a forum on-line When you are in the desired section of a forum, go to the OUT tray. If necessary, tag the messages you want to send. Then touch SEND and select “Send Forum Messages...” In the Send Messages dialog, set the Send option, then touch OK. -
Page 396: Troubleshooting
Troubleshooting f you are having difficulty using CompuServe Access Software, check the following list for possible solutions before contacting your SHARP dealer. Troubleshooting checklist The modem cannot dial. • Make sure the modem is correctly and securely connected to the unit. - Page 397 Attachment cannot be sent out. • Make sure the attachment is Filer or PC File data. All other type of data cannot be attached to a message. Some of the messages no longer appear on the unit. • Make sure there is no filter active.
-
Page 398: Appendix
Appendix he appendix lists all menu functions you can use in the application. Menu functions VIEW/ INDEX (There are no menu items.) This button toggles between the details of a selected message (View) and a list of the current messages in the selected tab (Index). MAIN Go to the main screen. - Page 399 SETUP Connection / Modem... Set up connections and your modem. See page 118. Preferences... Customize the unit to the way you prefer. See page 135. Address Book... Enter recipients of your mes- sages. See page 136. ENS Personal Set up personal folders for news Folders...
- Page 400 FILTER Filter (Off-Line)... Turn on the filter. See page 129. Mail... Specify filter keyword so that only filtered mail messages can be viewed and deleted. See page 124. Waiting Messages... If there are any messages waiting for you in the forum, they will be selected and displayed.
-
Page 402: Pager Access
Pager Access Quick Start ... 147 Commonly Asked Questions & Answers ... 154 Introduction ... 157 Using Pager Access ... 164 Troubleshooting ... 183 Appendix ... 185... -
Page 404: Quick Start
Quick Start his section is a quick start to setting up and running Pager Access. Starting Pager Access Touch TOOLS. * The contents of the TOOLS screen may differ depending on the version for your country. Touch ZR-Pager twice. -
Page 405: System Diagram
System diagram Pager Access Send Pager Messages from your unit AnyTime, Anywhere. Use Pager Access software with CE-FM4 Fax/Modem Or PC Card and cellular phone Send to user with a Pager Card Paging Service Send to a text-based alphanumeric Pager... - Page 406 Receive information to your unit and Pager Card E-mail users can send messages to your unit and Pager Card Internet CompuServe America Online Forward Mail messages to your unit and Pager Card * Contact your Paging Service Carrier for more information Paging Service provides information to your unit * –...
-
Page 407: Setting Up A Paging Service
Setting up a paging service In order to send a message to a full text/alphanumeric pager, you must obtain the following information: • Name of the paging services for the users to whom you will be sending messages. • Maximum message size (Message Limit) supported by each paging service. -
Page 408: Composing A Message
Composing a message Press NEW ENTRY. Or, touch EDIT, then select “New Message”. Select a paging service (Paging Network in this example) from the Name: pop-up menu for this message, then touch OK. Touch To:. In the Address Message screen, select a name from the Address Book and the name will appear in the Name: field. -
Page 409: Sending Messages
Sending messages Touch PAGER, then select “Send Mes- sages...”. Select Current Message, Tagged Messages, or All Messages to send, then touch OK. Touch OK. After making the connection, the Now Send- ing status box appears and the messages are sent. When there are no more messages to send, Pager Access disconnects and the SENT folder appears. -
Page 410: Reading Incoming Messages
Reading incoming messages From the IN folder, touch the message you want to read twice. Read the message using the scroll bar, if necessary, to see the rest of the message. If the ATTACH button is visible, you can touch the button to view and save the attachment. -
Page 411: Commonly Asked Questions & Answers
Commonly Asked Questions & Answers How does Pager Access work? It uses the CE-FM4 Fax/Modem or PC Card modem to send out messages through paging services, and reads messages from your Pager Card. Do I need to subscribe to the paging service which I want to send messages to? No. - Page 412 Is there an automatic way to put my name into every new message I compose? Touch SETUP and select “Preferences.” Then type your name into the box below the Contents of From: Field, or touch the Use Owner's Name: button to copy the Owner's Name registered in Personal within the TOOLS area.
-
Page 414: Introduction
Introduction his section gives you general information about Pager Access. What is Pager Access? You can compose a message, name one or more recipients, then dial the paging service of the recipients. Your message is sent via a modem to the pagers of the recipients. -
Page 415: Starting Zaurus Pager Access
Starting ZAURUS Pager Access Touch TOOLS. * The contents of the TOOLS screen may differ depending on the version for your country. Touch ZR-Pager twice. About the password screen If you have entered a secret password into the unit, then regardless of whether the unit is locked or unlocked, the following screen appears when you select ZR-Pager. -
Page 416: Obtaining A Pager Card And Paging Service
® Pager Access works with a Motorola NewsCard (Pager Card). For more information about where to obtain one, please check with your SHARP dealer or call: 800-BE-Sharp In addition, you can call our automated Fax-on-Demand service at: 612-397-8601... -
Page 417: Modifying An Existing Paging Service
Select the paging service from the Name list. If it is not on the list, you must touch Delete to delete one or more paging services you're not going to use from the Name list. Touch New to enter a new paging service. The following screen appears. -
Page 418: Deleting An Existing Paging Service
Deleting an existing paging service From the Paging Service screen, select the paging service you want to delete. Touch Delete. When prompted, touch Yes to confirm. If this paging service is referenced in any messages in the OUT or SENT folders, an alert box appears. - Page 419 Modem settings Port Specify if communication with the modem is via the 15-pin connector or the PC Card slot. Line type Specify whether your telephone system uses tone or pulse dialing. If you are not sure, check with your local telephone company. Redial Specify the number of times the unit should redial if it cannot connect successfully (due to a...
- Page 420 Fax/Modem initialization strings for paging service Manufacturer Model No. Sharp CE-FM4 None AT&T Paradyne Keep ln Touch &F0B1C1\C2\N1%C0S7=100S10=100%B1200 &F0B1C1\C2\N1%C0S7=100S10=100%B1200 3762 (1200 baud) &F0B1C1\C2\N1%C0S7=100S10=100%B2400 &F0B1C1\C2\N1%C0S7=100S10=100%B2400 (2400 baud) Megahertz XJ1144 None XJ2144 None CC4144 None Motorola Lifestyle None Power None CELLect 14.4...
-
Page 421: Using Pager Access
Using Pager Access his sections explains in details how to use Pager Access to communicate with a paging service in order to send or get messages. Looking at the Message screen The Message screen is where you handle all of your messages. -
Page 422: Message Folders
Message folders IN folder The IN folder stores messages read from your Pager Card. From: Sender of this message Subject: Subject for this message Message: Details of the message ATTACH If ATTACH is visible, additional data is attached to this message. Touch ATTACH to see and save the attachment. -
Page 423: Sent Folder
SENT folder The SENT folder stores all messages which have been successfully sent out. Composing a message Press NEW ENTRY. Or, touch EDIT, and then select “New Message”. Select a paging service (Paging Network in this example) from the Name: pop-up menu for this message, then touch OK. -
Page 424: Selecting Recipients Of A Message
In the Subject: field, type the subject of this message, up to 30 characters. In the Message: field, type in your message. Note that you cannot create a new line. The Message field will stop accepting text if you reach the limit allowed by the paging service you are going to send the message to. -
Page 425: Attaching Data To A Message
If you want to remove a name from the Recipient list, select the name and touch REMOVE. Touch Done. Touching a selected name on the Recipients list displays the Send Status information as well as a date (current date if the send status is Queued or the transmission or failed transmission date otherwise) in the area above the Address Book. -
Page 426: Modifying A Message
Touch the desired folder, then touch Attach. From the Select Attachment screen, select the desired data to attach, then touch Attach. You can only attach Appointment or To Do data filed in a Filer folder. If an attachment already exists A prompt appears and you can replace it with the new attachment. -
Page 427: Setting Up An Address Book
Edit the message contents as required. You can touch ATTACH to view or change the attachment. You cannot edit the attachment, but you can change to another one. See “Attaching data to a message” on page 168 for more information. Press ENTER to save the modifications and return to the Message screen. -
Page 428: Sending Messages
Touch each list and select the appropriate information: Memory: Selects the memory location that contains the source information, either the main unit memory or PC Card memory. Extract From: Selects which Contact or Data File is to be used as the information source. Name Field: Select which field in the source information is assigned as the recipient name in the address... - Page 429 When Pager Access configures the modem, the following screen appears. Then Pager Access dials the access number of the paging service (Paging Network in this example). After making the connection, the Now Sending status box appears and the mes- sages are sent out. When there are no more messages to send, Pager Access disconnects and the SENT folder appears.
-
Page 430: Getting Messages From Your Pager Card
Getting messages from your Pager Card Make sure your Pager Card is inserted in the unit. If you have checked the Get new messages at start up box in the Preferences screen, Pager Access automati- cally gets messages from your Pager Card when it starts up. -
Page 431: Messages Containing Errors
Press ENTER or touch INDEX to return to index view. An opened envelope icon appears to indicate the message has been read. Messages containing errors If messages received in the Pager Card contain any errors, Access Pager indicates this in the message detail view. -
Page 432: Viewing And Saving Attachments
Viewing and saving attachments Some received messages may contain a Appointment or To Do attachment. You may view and save the attachment as follows: While you are reading the message, if the ATTACH button is bisible, touch the ATTACH button. To save the attachment, touch Save. -
Page 433: Deleting Messages In The Unit
Deleting messages in the unit Deleting a single message Select the message you want to delete. Press the DEL key (possible only in index view), or touch EDIT and select “Delete Message”. When the following message appears, touch Yes. Deleting a group of messages You can delete a group of messages from the IN, OUT or SENT folder, as follows: Touch EDIT, then select “Delete Group”. -
Page 434: Deleting Messages In Your Pager Card
Deleting messages in your Pager Card From time to time, you may want to delete old mes- sages from your Pager Card memory. If you have checked the Delete messages from pager after reading box in the Preferences screen, messages automatically deleted after copied into the IN folder. -
Page 435: Deactivating The Filter
Applying a filter to view selected messages This function lets you focus on messages that contain specific information. For example, you can view only entries related to a particular company name. The function does this by hiding all entries that do not match the filter criteria. -
Page 436: Searching Messages
Searching messages You can search for messages containing a text string in any or all of the IN, OUT, and SENT folders. Only the Subject and Message fields of each message are searched for the entered text string. Touch FIND. The Find Messages dialog appears. -
Page 437: Copying And Moving Text
Copying and moving text You can copy or move text using the clipboard. Display the message you want to copy or move, in View mode. Drag over a word or sentence to highlight it. For copying, press 2nd and C. Or, touch EDIT and select “Copy”. - Page 438 Contents of From: Field If you enter a name here, this name will appear in the message area when you create a new message, thus saving time in typing your name. You may also touch Use Owner's Name: to copy the Owner's Name registered in Personal under the TOOLS area.
-
Page 440: Troubleshooting
Troubleshooting f you have difficulty using Pager Access, check the following list for possible solutions before contacting your SHARP dealer. Troubleshooting checklist The modem cannot dial. • Make sure the modem is correctly and securely connected to your unit. • Make sure the modem settings in Pager Access are correct. - Page 441 Cannot send messages over a cellular phone. • Make sure the cellular phone works with Pager Access. • Check to ensure you are using the appropriate modem initialization string. • There may be strong interference. Move the cellular phone to another location and try again. Cannot receive any incoming messages.
-
Page 442: Appendix
Appendix he appendix contains a list of menu function. Menu functions VIEW/ INDEX (There are no menu items.) This button toggles between the details of a selected message (View) and a list of the current messages in the selected folder (Index). FILTER Filter Specify a filter keyword so that... - Page 443 EDIT New Message Compose a new message to send. See page 166. Delete Message Delete a single message. See page 176. Delete Group Delete a group of messages. See page 176. Cut the highlighted text into the clipboard.See page 180. Copy Copy the highlighted text into the clipboard.
-
Page 444: At&T Mail
AT&T Mail Quick Start ... 189 Commonly Asked Questions & Answers ... 194 Introduction ... 195 Mail Basic ... 203 Managing Your Messages ... 227 Troubleshooting ... 231 Appendixes ... 233... -
Page 446: Quick Start
Quick Start his section is a quick start to setting up and running AT&T Mail Access. Starting AT&T Mail Access Touch TOOLS. * The contents of the TOOLS screen may differ depending on the version for your country. Touch AT&T Mail twice. -
Page 447: Setting Up At&T Mail Access
Mail Setup display. Refer to your AT&T Mail Welcome Kit for this information. Touch the Modem Setup tab to configure your modem settings. If using a Sharp CE- FM4 Fax/Modem, touch RESTORE to use the default settings. You may need to change this information when using a PC card modem. -
Page 448: Creating A New Message
Creating a new message The first step in sending a message is to create the message. To create a message: Touch EDIT, then select New Message to get a blank message display. Type a brief subject that describes the nature of the message. -
Page 449: Sending Messages
Sending messages To send messages: If you have more than one message in your OUT folder you can tag selected messages that you want to send. Touch MAIL, then select Send Only or Send/Receive. Note that these selections are available only if the currently displayed folder is the OUT folder. -
Page 450: Receiving Messages
Receiving messages To receive messages: Touch MAIL, then select Turn on Receive Filter to use the receive filter. If the receive filter is turned off, then all new messages are received. Touch MAIL, then touch Receive Only or Send/Receive. You see the Receive Filter display if the receive filter is turned on. -
Page 451: Commonly Asked Questions & Answers
Commonly Asked Questions & Answers What do I need to use AT&T Mail Access? You need an AT&T Mail account which you must first obtain from AT&T. Is there any limit to the size of a message that I can create? Yes, the maximum length of the message body is approxi- mately 14.5K bytes. -
Page 452: Introduction
Introduction his section gives you general information about AT&T Mail Access. Obtaining an AT&T Mail account Before using AT&T Mail, you need to get a user name and password. To register with AT&T EasyLink Services, call 1-800-242-6005 (within the U.S.) and say Department Zaurus . -
Page 453: Setting Up At&T Mail Access
Setting up AT&T Mail Access AT&T Mail Access needs your AT&T Mail account and modem information to connect to the AT&T Mail service. Use E-Mail Setup to specify setup information for AT&T Mail, the modem, and the login script. You may need to change these settings if there is a change to your account, modem, or when connecting to AT&T Mail from different locations. - Page 454 XMODEM or YMODEM. Touch the Modem Setup tab, and enter the following information. If using a Sharp CE- FM4 Fax/Modem, touch Restore to use the default settings. You may need to change this information when using a PC card modem, particularly the modem string.
- Page 455 • Speed(bps), Port, Parity, Line Type, Data Bits, Stop Bits, MNP, Hardware Flow Control, Modem String Modem settings are based on the type of modem and connection. The default settings are as follows: Speed(bps) Port Parity Line Type Data Bits Stop Bits Hardware Flow Control Modem String...
- Page 456 Touch the Login Script tab, and select one of the following login scripts from the menu at the top of the display. You may need to change the login script when connecting to AT&T Mail from outside of the U.S. •...
-
Page 457: Setting Up The Address Book
Setting up the address book AT&T Mail Access uses the address information you have entered into other applications in your unit. This way you only have to maintain one address book for all applications. You can also enter a new address when you are creating a message, but it saves time to store frequently used addresses in the address book. - Page 458 Press ENTER to save the address. The Business (1) Index for that entry is displayed with the new entry listed. E-Mail Addresses The E-Mail ID in the address book can take many forms, depending on the type of system to which you are sending mail.
-
Page 460: Mail Basic
Mail Basic his section explains he basic operations about AT&T Mail Access that you can perform. Setting the date and time Messages that you create include the date and time. Therefore, you should adjust this information if it is not set correctly in your unit. -
Page 461: Mail Folders
Mail folders AT&T Mail Access has three mail folders for storing messages: • IN Folder: Lists the messages that you have received. • OUT Folder: Lists the messages that you will be sending. • SENT Folder: Lists messages that you have mailed. Touch the tab with the mail folder name to display that mail folder. -
Page 462: Creating A New Message
Creating a new message The first step in sending a message is to create the message. The size of a message is limited only by the amount of memory available in the unit. To create a message: Touch EDIT, then select New Message to get a blank message display. -
Page 463: Addressing Messages
Addressing messages Touch To: on the message display to add recipients to the message. An E-Mail Ad- dress display is shown. Select the type of address from the pop-up menu at the top of the display. This choice affects the address information and options that are available for the message. -
Page 464: Address Types
Touch one of the following buttons to add that person to the Recipients list: • To: Sends the message to a primary recipient. • Cc: Sends a courtesy copy to a recipient. • Bcc: Sends a blind courtesy copy to a recipient. - Page 465 AT&T Mail An AT&T Mail address needs the Name and Mail ID. AT&T Mail recipient options Touch AT&T OPTNS to select any of the following recipient options: • /cod: Sends the message cod (recipients pay the charge if the message is read). There is also a /nocod option.
- Page 466 Fax recipient options The following recipient options are available with a fax: • Logo: Specifies the public or private logo for the fax. • Nocoversheet: Sends the message without a cover sheet. • Landscape: Sends the message using an 8.5 x 11- inch horizontal format (132-character width).
-
Page 467: Selecting Message Options
Internet, CompuServe, SkyMail, Telex, & X.400 Each of these address types requires the Name and Mail ID. There are no recipient options. Selecting message options From the New Message display, touch OPTION to change the following message options: • Priority: Sets a normal or high priority for a message. -
Page 468: Attachments
Touch Done to return to the New Message display. Attachments You have the option of including the unit FILER folders or PC files directories with messages. These attach- ments are not included in the body of the message, but they are merely attached. The attachments retain their original format. -
Page 469: Editing A Message
Editing a message If you need to correct or add to a message in the OUT folder, you can edit it. Simply select the message and touch VIEW to display the message. You can then make any changes to the message in the same way as when creating new messages. - Page 470 To connect to the host: Touch MAIL, then select Send Only to send messages in the OUT folder or Send/ Receive to send and receive messages during the same session. Note that these selections are available only if the currently displayed folder is the OUT folder.
-
Page 471: Receiving Messages
After connecting to AT&T Mail, you see the following status display while it is sending messages. This status display shows a status bar to graphically show how much of the transfer is completed. You also see status messages when the message transfer is completed and when AT&T Mail Access is disconnecting from the host. - Page 472 To receive messages: Touch MAIL, then select Turn on Receive Filter to use the receive filter. If the receive filter is turned off, then all new messages are received. Touch MAIL, then touch Receive Only to receive messages into the IN folder or Send/ Receive to send and receive messages during the same session.
- Page 473 Select the Preview summaries option, if you want to see a list of messages that matches the filter criteria before they are downloaded. Touch OK to get the Connect to Host display. If you need to change the AT&T Mail or Modem setup before connecting, touch Setup.
- Page 474 Next, AT&T Mail Access builds the message summary display, listing the messages waiting to be received in the selected folder. This listing is similar to the other mail folder listings, with the sender, subject, and date displayed for each message. In addition, the listing shows the approximate size of the message.
- Page 475 11. Touch RECV to receive messages listed in the summary. You can receive the following groups of messages: • Current Message: The message that is currently highlighted. • Tagged Messages: The messages that are tagged with the check mark in the tag box at the left of the listing.
-
Page 476: Using At&T Mail As A Terminal
Using AT&T Mail as a terminal You can use AT&T Mail as a simple TTY (teletypewriter) computer terminal and connect directly to the AT&T Mail network. There are two ways to use AT&T Mail in terminal mode. The first method directly connects to AT&T Mail in terminal mode, while the second method connects via AT&T Mail Access and lets you preview mail summaries before entering terminal mode. - Page 477 Touch SETUP, then select Configuration to setup the terminal configuration. The configuration settings are on two pages. Touch the bottom right-hand corner of the display to switch between pages. Refer to the AT&T Mail User’s Guide for a list of commands that you can use in terminal mode.
-
Page 478: Viewing Received Messages
Viewing Received Messages The IN mail folder lists received messages. You can display all of the messages in the folder, or use the view filter to show selected messages. To view received messages: Touch the IN folder tab to view the index listing of messages in the IN folder. - Page 479 Touch To: to see all of the recipients of the message. Select a recipient to see their address at the top of the display. Touch Done to return to the message display. Press the NEXT or PREV keys, or touch the curled-up corner (below the scroll bar) to view the succeeding or preceding messages in the folder.
- Page 480 Select the criteria for filtering. You can use key words for filtering; it is not necessary to enter the entire name or subject. Touch Filter to activate the filter. The folder shows only the messages that match the set criteria. A box is displayed at the bottom of the folder to remind you that the view filter is activated and the folder is not displaying the full list of messages.
-
Page 481: Answering A Message
This display shows the following information: • Last Connected: Date and time of the last connection. • Last Transfer Status: Transfer status (such as Successful or Error) of the last connection. Refer to Troubleshooting for a list of possible problems and solutions. •... -
Page 482: Forwarding A Message
Touch OK to edit the new message. AT&T Mail Access automatically fills in the recipients and subject. Type in an additional message or add attachments, as when creating a new mes- sage. Press ENTER to save the message to the OUT folder. -
Page 484: Managing Your Messages
Managing Your Messages T&T Mail Access has a variety of functions that help you organize your messages. Finding messages If the mail folders contain many messages, you can use this feature to automatically search for a specific message. To find a message: Touch FIND to search for messages. -
Page 485: Deleting Messages
Touch Find to search for the message. The first message containing the string is opened, and the string is displayed in the Find String dialog box. Touch Next to search for the string in other messages. Touch Prev to return to previous messages with the string. -
Page 486: Converting Messages To Documents
Converting messages to Documents AT&T Mail Access lets you convert a message to a Document, so you can format and edit it or file a copy of it in Filer. To convert a message: In Index view, select a message or tag several messages that you want to convert to documents. - Page 487 Touch OK to convert the message into a document. You can now use the Documents application to view or change the document. The docu- ment contains the date and time, sender’s address, recipient’s address, subject, and message. If you convert a message with attachments and delete the original message, then AT&T Mail Access does not retain the attachments anywhere on the unit.
-
Page 488: Troubleshooting
Troubleshooting his section answers questions you may have when using AT&T Mail Access. Troubleshooting checklist Cannot find AT&T Mail Access on the unit. • Touch TOOLS. Incorrect date and time on the unit. • Touch TOOLS and then touch Clock twice. Touch ADJUST, and enter the correct date and time. -
Page 490: Appendixes
Appendixes his section contains AT&T EasyLink Services Global Alliance program member directory, AT&T Mail traveller's access number, and AT&T Mail login scripts. Appendix A: AT&T EasyLink Ser- vices Global Alliance program member directory Use the following international customerservice numbers to get information about registration, access numbers, or other questions about using AT&T Mail. -
Page 491: Europe, Africa, Middle East Region
EUROPE, AFRICA, MIDDLE EAST RE- GION European Regional Support Center (ERSC) Tel: 32-2-676-3737 15B Herman de Broux 1160 Brussels Belgium Egypt Comm Net Group Tel: 20-2-344-2085/39/64 6 Elbatal Medhat Abdel Hamid St. Fax: 20-2-344-2027 Cairo !commnet France Tel: 33-47-67-4776 AT&T EasyLink France Fax: 33-47-67-4775 52 Quai de Dion-Bouton !francehelp... -
Page 492: Asia, Pacific Region
ASIA, PACIFIC REGION Customer Service Center (CSC) Tel: 852-511-5828 4/F China Underwriters Center 88 Gloucester Road Wanchai, Hong Kong Australia, New Zealand AT&T ELS Australia Ltd. Tel: 61-2-911-1530 Level 8 Fax: 61-2-911-1555 15 Orion Rd !elauhelp Lane Cove, NSW Sydney Hong Kong, People’s Rep. -
Page 493: Americas Region
AMERICAS REGION Americas Regional Support Center (ARSC) Tel: (201) 331-4400 400 Interpace Parkway Fax: (201) 331-4513 Parsippany, NJ 07054 !arschelp Argentina EasyMail, S.A. Tel: 541-322-1024 Viamonte 611 Fax: 541-322-0160 9th Floor !agraizer 1053 Buenos Aires Bermuda Cable and Wireless Tel: 1-809-295-4777 20 Church Street Fax: 1-809-295-7909 P.O. - Page 494 Panama Fidanque hermanos e hijos,s.a. Tel: 507-64-2444 Calle 50 y Calle 59 Urbanizacion Obarrio Apartado Postal 721 Panama 1 Paraguay Netsystems Tel: 595-21-20-8290 Avenida Espana 1615 Fax: same as phone Asuncion !paraguayhelp Peru Limatel Tel: 5114-411319 Conquistadores 396 Fax: 5114-410830 OF.
-
Page 495: Appendix B: At&T Mail Traveler's Access Numbers
Appendix B: AT&T Mail traveler’s access numbers You will access AT&T Mail in the US and internationally from over 160 countries. To receive the detail interna- tional access numbers, call AT&T international customer service mentioned in Appendix A. Australia Country Wide Access Number: +61-13-1136 Charges:... -
Page 496: Appendix C:at&T Mail Login Scripts
Appendix C:AT&T Mail login scripts AT&T Mail Direct DELAY 10 SEND 0 "^M" DELAY 20 SEND 0 "^M" WAIT 450 "Name:" SEND 0 "$USERID^M" WAIT 300 "Password:" SEND 0 "$ATTPASS^M" WAIT 900 "word:" OR " ** " OR "ion:" IFGOT 2 SKIP 7 IFGOT 1 SKIP 4 IFTERMINAL SKIP 5 OR 0 SEND 0 "1^M"... -
Page 497: Las - Local Access Service
LAS – Local Access Service In the following script, substitute $A with the LAS ID and $C with the LAS password. DELAY 50 SEND 5 "^M^M^M" DELAY 50 SEND 0 "c^M" DELAY 50 SEND 0 "$A, $C ^M" WAIT 400 "Welcome" DELAY 10 SEND 0 "^M"... -
Page 498: Login Script Commands
Login Script Commands This section documents the scripting language sup- ported by AT&T Mail Access. Each line in a script file represents a command to be executed by AT&T Mail Access. The syntax and meaning of each command is as follows: BREAK [<h-seconds>] Sends a BREAK signal for <h-seconds>... - Page 500 Terminal Introduction ... 245 Using Terminal ... 251 Troubleshooting ... 258...
-
Page 502: Introduction
Introduction his section describes how to use the unit's Terminal to communicate with other computers. About Terminal Terminal is an application which lets you use communi- cations functions to link your unit to a remote computer or system (including a bulletin board service (BBS) or an on-line information service), and to transfer data via phone lines between your unit and a personal computer. -
Page 503: Setting Up Your Modem
Setting up your modem Turn your unit on. Touch TOOLS and touch Terminal twice. Touch SETUP and select “Modem Setting”. Touch and select any required settings. Use the numeric keys to enter the Redial value. When you complete your settings, touch OK. Modem settings The modem settings are as follows: Port:... -
Page 504: Making Terminal Dial Setting Entry
(unless start-up display has Ask Password set to On). There are other hard- ware and software requirements. For more information, contact your local Sharp dealer. Hardware Flow Control: Provides enhanced data flow control for high- speed (greater than 2400 bps) communications. - Page 505 Touch Name field and enter the entry’s name. Touch the Number field and enter the phone number for the remote system. • Include the area code if required. • If calling from a private PBX telephone system, you may need to dial 9 or some other number to get an outside line before dialing a required number.
-
Page 506: About Directory Settings
About directory settings Terminal connection parameters are set from the Dialing Directory Setting display. Each entry has its own settings, so that you can dial a number just by selecting the desired entry. • When off line, Dial Setting can be selected and Configuration is faded. -
Page 507: Changing Dial Settings
To shift to the Setting 2/3 display, touch the bottom right of the icon: Cursor Shape: Select cursor shape from Block/Underline. Cursor Translate: Number of vertical lines (range 1 - 24, default 8) or horizon tal characters (range 1 - 80, default 40) that key operations move the cursor. -
Page 508: Using Terminal
Using Terminal ou can make and receive a call, or perform other communications operation in Terminal. Making a call After setting up your unit with the modem, and making a dialing directory entry for the BBS, computer information service, or other remote computer, you are ready to communicate. -
Page 509: Hanging Up
Calling conditions • If you connect with a remote unit but the dis- played characters are garbled, try connecting again at a slower speed. • If your telephone line has a call waiting feature, you may receive data errors or garbled charac- ters when someone tries to call while you are connected to a remote computer. -
Page 510: Receiving A Call
Receiving a call In addition to making outgoing calls, your unit can also receive calls from other modems when set to “auto answer”. To receive a call: Touch TOOLS and touch Terminal twice. Select a blank entry field, touch SETUP and then select “Dial Setting”. -
Page 511: On-Line Operations
On-line operations When connected to another computer via modem, anything you enter on your keyboard is sent to the remote computer, and anything received appears on your display. Terminal mode commands add power and flexibility to the process. • To use ASCII control codes while your unit is on-line, touch UTILS, select "Use Control Code"... -
Page 512: Data Transfer
Data transfer Your unit can upload (send) Documents entries in either ASCII (text) format or using XMODEM file transfer protocol. It can also upload Filer folders and PC Files using XMODEM, and upload and download text and files using either ASCII or XMODEM. •... -
Page 513: Auto Log-On
Auto log-on When you call a BBS or information service, the log-on procedure (in which you enter your name, user number, and password), is often the same each time you connect. Your unit can automate your log-on, making it faster, cheaper and easier. Auto Log on Commands Auto log-on uses the character strings you normally enter manually (when logging onto the BBS or informa-... -
Page 514: Terminal Emulation
Terminal emulation There are two terminal emulation modes, TTY (teletype- writer) and the more advanced VT100 (VT stands for video terminal). In the dialing entry, select the terminal emulation mode the remote computer system supports. You can configure terminal parameters (Cursor Shape, Cursor Translate (Horizontal and Vertical), Tab, Auto Repeat and Wrap Around) to suit your requirements. -
Page 515: Troubleshooting
Troubleshooting his section answers questions you may have when using Terminal. Troubleshooting checklist Common communications problems and their solutions are listed below. Problem: Remote system answers, but no connection is made. User message: None, or NO CARRIER. Cause: Setting mismatch with remote system. - Page 516 Problem: Connection with remote system terminates unexpectedly. User message: None. Cause: Surge of line noise, user error, etc. Solution: Try again. Problem: Dialing terminated unexpectedly. User message: Problem during dialing, auto dialing was terminated. Cause: Incorrect phone number entered. Incorrect line type selected (tone or pulse).
-
Page 517: Ascii Control Codes
ASCII Control Codes To generate ASCII control code in Terminal mode, touch UTILS, select “Use Control Code” (or press NEW ENTRY), then press the key as shown in the table below. Hex Value H or BS I or M or ASCII Code Hex Value ASCII Code... -
Page 518: Index
Index Spreadsheet ... 263 CompuServe ... 266 Pager Access ... 268 AT&T Mail ... 270 Terminal ... 271... - Page 520 Index Spreadsheet Border ... 58 Drawing ... 58 Cells ... 11, 29 Alignment ... 53 Characteristics ... 53 Deleting ... 47 Finding cell contents ... 42 Going to ... 41 Inserting ... 47 Protecting ... 52 Range ... 36 Selecting ... 11, 29 Types ...
- Page 521 Display mode ... 18 Chart mode ... 19 Index mode ... 18 Selecting ... 18 Worksheet mode ... 19 Entering ... 7, 26, 27, 28, 30 Data ... 7, 26 Formulas ... 8, 30, 35, 37, 40 Labels ... 28 Numbers ...
- Page 522 Secret entry ... 70 Speadsheet limits ... 98 Starting PenCell ... 5, 17 Title Setting ... 51 Tool bar ... 20 Transferring worksheet ... 70 Copying to PC File ... 71 Getting from PC File ... 72 Replacing with PC File ... 73 Unit to unit ...
- Page 523 CompuServe Address book ... 112, 122, 136 Setting up ... 136 Using ... 112 Attachment ... 112, 115, 122 CompuServe ... 109, 111, 117 Connections ... 110, 119 On the road ... 119 Remove ... 119 Converting to Documents ... 134 Deleting ...
- Page 524 Menu functions ... 141 Modem ... 110, 118 Setting up ... 110, 118 Settings ... 118 OUT tray ... 112, 121, 122, 123, 130, 136 Preferences ... 135 Executive News Service ... 136 Forum ... 136 Mails ... 135 Questions & Answers ... 115 Quick Start ...
- Page 525 Pager Access Address book ... 170 Setting up ... 170 Addressing message ... 167 Attaching data to a message ... 168 Viewing and saving ... 175 Commonly Asked Questions & Answers ... 154 Converting messages to Documents ... 175 Copying and moving text ... 180 Customizing Pager Access ...
- Page 526 Pager Access ... 147 Customizing ... 180 Starting ... 147, 158 What is it ... 157 Pager Card ... 159 Paging service ... 159, 160, 161, 163 Fax/Modem initialization strings ... 163 Modifying ... 160 Setting up ... 159, 171 Password screen ...
- Page 527 AT&T Mail AT&T Mail ... 189, 208 Connecting to ... 212 Obtaining account ... 195 Recipient options ... 208 AT&T Mail Access ... 189 Setting up ... 190 Starting ... 189 Attachment ... 211 Internet ... 210 Login script ... 199 Mail basic ...
- Page 528 Terminal Auto log-on ... 256 Calls ... 251 Hanging up ... 252 Making ... 251 Receiving ... 253 Data transfer ... 255 Dial setting ... 247 Hanging up ... 252 Making a call ... 251 Modem ... 246 Setting up ... 246 Settings ...
Need help?
Do you have a question about the Zaurus ZR-5700 and is the answer not in the manual?
Questions and answers