
Subscribe to Our Youtube Channel
Related Manuals for Comfee MPPH-10CRN1-BI0


Summary of Contents for Comfee MPPH-10CRN1-BI0
- Page 1 PORTABLE AIR CONDITIONER model no. MPPH-06CRN1-BI0 Toll-free: 1-866-646-4332 IMPORTANT: Before using your air conditioner, please Instruction Manual read this manual carefully and keep it for future reference.
-
Page 2: Table Of Contents
model no. MPPH-06CRN1-BI0 | contact us: 1.866.646.4332 Safety Precautions Identification Of Parts Air Conditioner Features Operating Instructions Installation Instructions 9-13 Care And Maintenance Troubleshooting Tips Remote Control Instructio 16-26 Air Conditioner Limited Warranty... -
Page 3: Safety Precautions
Safet y rules To prevent injury to the user or other people and property damage, these instructions must be followed. Incorrect operation due to ignoring of instructions may cause harm or damage. Always do this Never do this Do not operate your air conditioner in a wet room such as a bathroom or laundry room. -
Page 4: Identification Of Parts
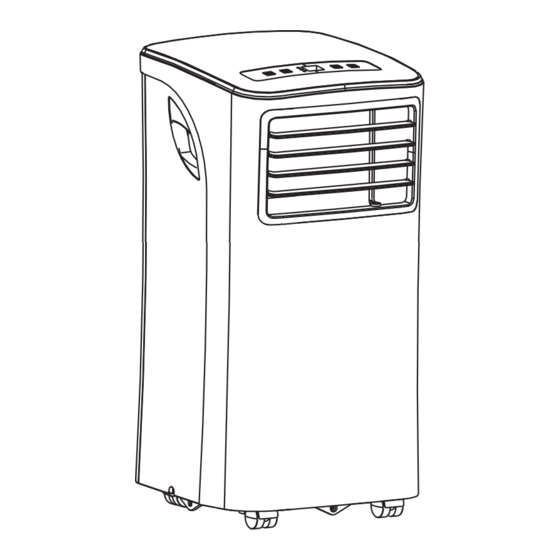
model no. MPPH-06CRN1-BI0 | contact us: 1.866.646.4332 Operating conditions The air conditioner must be operated within the temperature range indicated below: MODE OOM TEMPERATURE COOL Note: Perform ance may be reduc ed outside of these o perating t emperatu res. Accessories PARTS Exhaust hose , adapter (flat mouth) - Page 5 NAMES OF PARTS Front Operation Panel Remote Signal Receptor Horizontal Louver Control Lever (adjust manually) Vertical Louver Control Lever (adjust manually) Panel Fig.1 Carrying Handle (both sides) Rear Upper Air Filter (Behind the grille) Air Intake Air Outlet Lower Air Filter (Behind the grille) Air Intake Bottom tray drain outlet...
-
Page 6: Air Conditioner Features
model no. MPPH-06CRN1-BI0 | contact us: 1.866.646.4332 ELECTRONIC CONTROL OPERATING INSTRUCTIONS Before you begin, get fully familiar with the control panel and remote control and all their functions, then follow the symbol for the functions desired. The unit can be controlled by the unit control panel alone or with the remote control . NOTE: For instructions on how to use the remote control, please see page 15 of this manual. -
Page 7: Operating Instructions
MODE select button Operating Instructions Selects the appropriate operating mode. COOL operation Each time you press the button, a mode is selected in a sequence that alternates Press the "MODE" button until the "COOL" between COOL, FAN and DRY. The mode indicator light comes on. - Page 8 model no. MPPH-06CRN1-BI0 | contact us: 1.866.646.4332 Other features Auto-Restart If the unit turns off unexpectedly due to a power outage or interruption, it will restart automatically with its previous settings when the power resumes. Wait 3 minutes before resuming operation After the unit has stopped, it cannot be restarted in the first 3 minutes.
-
Page 9: Installation Instructions
INSTALLATION INSTRUCTIONS LOCATION The air conditioner should be placed on a firm foundation to minimize noise and vibration. For safe and secu re positioning, place the unit on a smooth, level flo or strong enough to support the unit. The unit has casters for easier placement, but it should only be rolled on smooth, flat surfaces. - Page 10 model no. MPPH-06CRN1-BI0 | contact us: 1.866.646.4332 Installation in a double-hung sash Foam seal A window (adhesive type) 1. Cut the foam seal (adhesive type) to the proper length and attach it to the windowsill. See Fig.8 Fig. 8 2. Attach the window slider kit to the windowsill. Adjust the length of the window slider kit according to the width of window, shorten the adjustable window kit if the width of window is less than 26.6 inches.
- Page 11 Installation in a sliding sash window Foam seal A (adhesive type) 1. Cut the foam seal A (adhesive type) to the proper length and attach it to the window frame. See Fig.12. Fig.12 2. Attach the window slider kit to the windowsill. Adjust the length of the window slider kit according Window to the width of window, shorten the adjustable window...
- Page 12 model no. MPPH-06CRN1-BI0 | contact us: 1.866.646.4332 Ex ha ust h os e inst a llat ion: The exhaust hose and adaptor must be installed or removed in accordance with the installation of the unit. Fig.16 COOL or AUTO mode Install Remove DEHUMIDIFY...
- Page 13 Water drainage: I n dehumidifying mode,remove the drain R emove the plug from the back of the unit. You may also drain plug connect a 3/4" (1.9cm) garden hose (sold separately) onto the 5/8" (1.58cm) drain connector on the unit. For models without a drain connector, just attach the drain hose to the hole.
-
Page 14: Care And Maintenance
model no. MPPH-06CRN1-BI0 | contact us: 1.866.646.4332 CARE AND MAINTENANCE IMPORTANT : 1) Be sure to unplug the unit before cleaning or servicing. 2) Do not use gasoline, thinner or other chemicals to clean Air filter the unit. 3) Do not wash the unit directly under a tap or using a hose. (take out) It may cause electrical shock. -
Page 15: Troubleshooting Tips
T R O U B L E S H O O T I N G TROUBLES POSSIBLE CAUSES SUGGEST REMEDIES 1. Uni t does not - P1 appears in the display window Drain the water in the bottom tray. start when pressing on/of f - Room temperature is lower than Reset the temperature. -
Page 16: Remote Control Instructio
model no. MPPH-06CRN1-BI0 | contact us: 1.866.646.4332 Specification Model RG09E/BGCE 3.0V(Dry batteries R03/LR03×2) Rated Voltage Lowest Voltage of 2.0V CPU Emitting Signal Transmission Distance 。 。 Environment -5 C 60 C(-41 F~140 F) - Page 17 Features of remote control ON/OFF Button: Push this button to start operation, push the button again to stop operation. MODE Select Button: Each time you push the button, a mode is selected in a sequence that goes from AUTO, COOL, DR Y and FAN, as the following figure indicates: AUTO COOL...
- Page 18 model no. MPPH-06CRN1-BI0 | contact us: 1.866.646.4332 Features of remote control(continued) temperature setting or to adjust the TIMER in a counter-clockwise direction. NOTE: Press and hold buttons together for 3 seconds will alternate the temperature display between the C & F scale. SLEEP Button: In SLEEP mode, Active/Disable sleep function.
- Page 19 Indicators on remote controller Transmission Indicator This transmission indicator lights when remote controller transmits signals to the indoor unit. Mode display Displays the current operation mode. Including ) , F AN AUTO( ), COOL( ), DRY( AUTO ONLY ( )and back to AUTO( AUTO ON/OFF display Displayed by pressing the ON/OFF button.
- Page 20 model no. MPPH-06CRN1-BI0 | contact us: 1. 866.646.4332 Handling the remote controller Location of the remote controller. Keep the remote controller where its signals can reach the receiver of the unit (a distance of 8m is allowed). When you select the timer operation, the remote controller automatically transmits a signal to the indoor unit at the specified time.
- Page 21 Setting the clock Before you start operating the air conditioner, set the clock of the remote controller using the procedures given in this section. The clock panel on the remote controller will display the time regardless of whether the air conditioner is in use or not. AUTO CLOCK SET TEMP.
- Page 22 model no. MPPH-06CRN1-BI0 | contact us: 1.866.646.4332 Automatic operation When you set the air conditioner in AUTO mode, it will automatically select cooling, or fan only operation depending on what temperature you have selected and the room temperature. Once you select the operating mode, the operating conditions are saved in the AUTO unit's microcomputer memory...
- Page 23 Cooling /Fan only operation Start Ensure unit is plugged and power is available. The OPERATION lamp on the display panel of the indoor unit starts flashing. 1. Mode select button (MODE) CLOCK SET TEMP. Press to select COOL, FAN ONLY FAN SPEED 2.
- Page 24 model no. MPPH-06CRN1-BI0 | contact us: 1.866.646.4332 Timer operation 1. TIMER button Press the TIMER button, the remote displays 0.0 alongside either the TIMER ON or TIMER OFF indicator, and will flash. SET TEMP. 2. TEMP/TIME button Press to set the desired time. FAN SPEED Forward Backward...
- Page 25 Example of timer setting TIMER ON (Timer Start Operation) The TIMER ON feature is useful when you want the unit to turn on automatically before say when you return home. The air conditioner will automatically start operating at the set time. IMPORTANT: The time will be registered Start within a 3 second period(after pressing...
- Page 26 model no. MPPH-06CRN1-BI0 | contact us: 1.866.646.4332 COMBINED TIMER etting both ON and OFF timers simultaneously) TIMER OFF → TIMER ON (On → Stop → Start operation) This feature is useful when you want to stop the air conditioner after you go to bed, and start it again in the morning when you wake up or when you return home.
-
Page 27: Air Conditioner Limited Warranty
Your product is protected by this Limited Warranty Warranty service must be obtained from Midea Consumer Services or an authorized Midea servicer. Warranty • One year full warranty from original purchase date. • Limited 2nd through 5th year sealed system warranty* Midea , through its authorized servicers will: •...
Need help?
Do you have a question about the MPPH-10CRN1-BI0 and is the answer not in the manual?
Questions and answers