
Subscribe to Our Youtube Channel
Related Manuals for Holy Stone HS600


Summary of Contents for Holy Stone HS600
- Page 1 Quick Start Guide V 1.0 HS600 usa@holystone.com (USA) +1(855)888-6699 eu@holystone.com (EU) www.holystone.com...
- Page 2 Scan the QR-code to..downlode the ... watch the ... view the Instru- HS FLY App Tutorial Video ctions For Use...
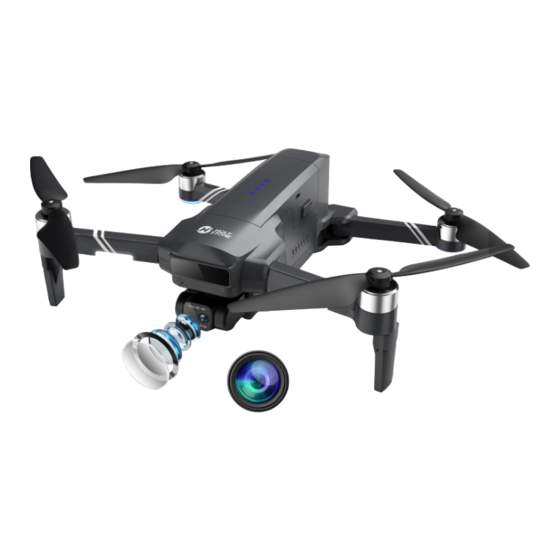
- Page 3 DIAGRAM OF THE DRONE Propeller B Propeller A Power Button Gimbal and Camera Power Indicator Propeller B Propeller A TF Card Slot Foldable Arms...
- Page 4 DIAGRAM OF THE TRANSMITTER Top: Front: Left Joystick Antennas Emergency Stop Speed Switch Phone Holder LCD Screen Right Joystick Return to Home(RTH) Power Button Foldable Handle Zoom Trigger(right: zoom in; left: zoom out) Take Photo Tilt Trigger(right: tilt down; left: tilt up) Record Video...
- Page 5 CHARGING Attach the USB charging cable to a USB Adapter (5V/3A), then link it with the charging port of the drone battery or transmitter. charging fully charged 5V/3A (Not included) charging fully charged GET THE DRONE READY...
- Page 6 (Not included)
- Page 7 GET THE TRANSMITTER READY...
- Page 8 PAIRING press twice Head auto-pairing The transmitter sends out a long beep when the pairing is done.
- Page 9 CONNECT TO WI-FI HolyStoneFPV-××× HS FLY...
-
Page 10: Calibrate The Compass
CALIBRATE THE COMPASS ×2 ~Di~ ~Di~ ×2 DO NOT calibrate the compass in locations with strong magnetic interference, such as near magnets, parking lots, or construction sites with underground reinforced concrete structures. -
Page 11: Unlock The Motors
CALIBRATE THE GYRO Be sure to perform gyro calibration on a level surface. UNLOCK THE MOTORS Please make sure that you only unlock and control the drone when GPS signal icon ( ) lights up(that is, the GPS signal is good). - Page 12 TAKE-OFF Please fly the drone in an open outdoor area free of surrounding obstructions. FLIGHT DIRECTION CONTROL The left joystick is responsible for controlling the drone's height and orientation in flight, whereas the right joystick dictates the movements in forward, backward, and lateral directions.
- Page 13 LANDING...
Need help?
Do you have a question about the HS600 and is the answer not in the manual?
Questions and answers
My holystone has 600D won't connect to the remotes