Holy Stone HS210 Instructions For Use Manual
Hide thumbs
Also See for HS210:
- User manual ,
- Instructions for use manual (32 pages) ,
- Instructions for use manual (14 pages)

Subscribe to Our Youtube Channel
Related Manuals for Holy Stone HS210


Summary of Contents for Holy Stone HS210
- Page 1 Instructions For Use V 6.0 HS210 +1(855) 888-6699 www.holystone.com eu@holystone.com (EU) usa@holystone.com (USA) jp@holystone.com (JP) ca@holystone.com (CA)
-
Page 3: Table Of Contents
Contents 1.0 Disclaimer & Warning ................. 2.0 Safety Guidelines .................. 3.0 Maintenance ..................4.0 Packing Contents .................. 5.0 Drone Details ..................6.0 Low Battery Warning ................. 7.0 Transmitter Functions ................. 8.0 Joystick Mode ..................9.0 Installation ..................10.0 Charging ....................11.0 Flight Pairing ...................... -
Page 4: Disclaimer & Warning
1.0 DISCLAIMER & WARNING 1. Please read this Disclaimer & Warning and Safety Guidelines carefully before using our product. This product is not recommended for people under the age of 14. By using this product, you hereby agree to this disclaimer and signify that you have read it fully. - Page 5 ④ Ensure to do a thorough check of the product before each use. Inspect the integrity of the parts, any signs of cracks and wear of the propeller, battery power and effectiveness of the indicator, etc. If after doing a complete check of the drone any problems are found, please refrain from using it until the problem has been resolved.
- Page 6 2.3 Operation Requirements ① DO NOT use this product to follow any moving vehicles. ② During the flight, turn off the motors only in case of an emergency. ③ Fly the drone back to you as soon as you are notified that the battery is running low.
- Page 7 please remove batteries to prevent potential damage from to the drone battery leakage. ⑦ Only use the USB charging cable that comes with the drone to charge the battery. ⑧ DO NOT connect the battery directly to wall outlets or car cigarette -lighter sockets as this will damage your battery as they are a different voltage.
-
Page 8: Maintenance
3.0 MAINTENANCE ① Clean the product after each use with a clean, soft cloth. ② Avoid prolonged exposure to direct sunlight and avoid buildup of heat on the drone or batteries. ③ This device is not waterproof and must not be submerged or subjected in water under any circumstance. -
Page 9: Packing Contents
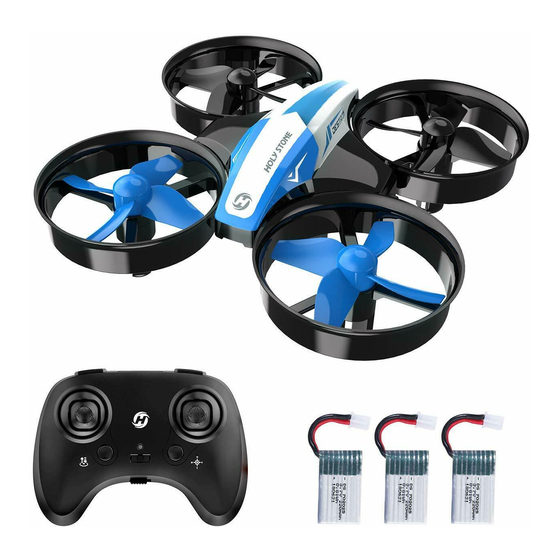
4.0 PACKAGE CONTENTS Drone Transmitter Drone Battery Screwdriver USB Charger Spare Propellers Instructions For Use V 6.0 HS210 +1(855) 888-6699 www.holystone.com usa@holystone.com (USA) eu@holystone.com (EU) ca@holystone.com (CA) jp@holystone.com (JP) Propellers Instructions For Spanner... -
Page 10: Drone Details
5.0 DRONE DETAILS Propeller A Propeller B TAIL HEAD Propeller A Propeller B 6.0 LOW BATTERY WARNING ① When the drone battery runs low, the indicator lights on the drone will blink continuously. About 1 minute or so the drone will automati- cally land on low electricity. -
Page 11: Transmitter Functions
7.0 TRANSMITTER FUNCTIONS Speed Switch 360°Flip Indicator Light (Short press) / (Short press)/ Circle Fly Auto-Rotation (Long press) (Long press) Right Joystick Left Joystick One Key Start/ Headless Mode Landing Turn ON/OFF Battery Cover Battery Compartment AAA Batteries included) (NOT If you want to install the batteries, please always pay close attention to battery polarity to make sure they are inserted correctly. -
Page 12: Joystick Mode
8.0 JOYSTICK MODE 8.1 MODE 2 (Default Setting) Left Joystick Right Joystick Forward Ascend Descend Down Backward Down Left Right Left Right Fly to Fly to Rotate Rotate Left Right Left Right 8.2 MODE 1 To enter MODE 1, turn on the transmitter while holding the “Speed Switch”... -
Page 13: Installation
9.0 INSTALLATION 9.1 Propeller HEAD See illustration above. An “A” “B” is printed on each propeller. Install the propeller to the motor shaft and press into place. Attention: The drone will not fly unless the correct propeller is installed on the correct motor shaft. Removal: Insert the propeller spanner between the propeller and the motor. -
Page 14: Charging
10.0 CHARGING USB Adapter (5V/2A) Charging Indicator USB Charger Power Bank Charging Port ① Connect the battery with the charger. ② Plug the charger into a USB charging port on power bank or USB adapter (5V/2A). ③ Charging time: about 40-60 minutes. ④... -
Page 15: Pairing
11.0 OPEARATION GUIDE All of the operations shown in this manual are demonstrated using MODE 2. 11.1 Pairing HEAD TAIL ① Connect the battery port access ② Place the drone on a flat and to the fuselage power port. l e v e l s u r f a c e w i t h t h e h e a d forward and the tail towards the pilot. -
Page 16: Calibrate The Gyro
11.2 Calibrate the Gyro As shown in the diagram above, push the left and right joystick simultaneously to the lower left corner to calibrate the gyro. The indicator lights on the drone will blink quickly and turn solid. When you hear 2 beeps from the transmitter that indicates the calibration is completed. -
Page 17: Auto Takeoff
11.3 Auto Takeoff There are two methods to take off the drone. Method 1: Press the One Key Start button, the propellers will start spinning, indicating this drone is ready to fly. Then push the left joystick up slowly to take off. The more the joystick is pushed away from the center position, the faster the drone will change elevation. -
Page 18: One Key Landing
11.4 One Key Landing Landing When in flight, you can press the One Key Landing button, the drone will lands automatically. 12.0 FUNCTIONS DETAILS 12.1 Altitude-Hold FunctionN The drone is designed with altitude-hold function so the drone can maintain its altitude after you release the left joystick ( the left joystick will automatically spring back to the middle ). -
Page 19: Trimmer
12.2 Trimmer F/B Sideward Fly Trim If the drone drifts forward, hold down the throttle joystick and do not release it while pushing the direction joystick down to balance the drone; If the drone drifts backwards, hold down the throttle joystick and do not release it while pushing the direction joystick up to balance the drone. -
Page 20: Speed Switch
12.3 Speed Switch This drone comes with 3 speed modes (Low/ Medium/ High). Press the Speed Switch button on the upper left of the transmitter to switch the speed. Increase or decrease one speed at a time. “Di” indicates Low speed, “DiDi” indicates Medium speed and “DiDiDi” indicates High speed. -
Page 21: 360° Flip
12.5 360° Flip 10 Feet When you get familiar with all the functions of the drone, you can try this amazing flip mode. When you fly the drone at least 10 feet, press the 360° Flip button on the upper right of the transmitter, then push the right joystick Forward/ Backward or Left/ Right, and the drone will do a flip towards the corresponding direction. -
Page 22: Circle Fly
12.6 Circle Fly Long press for 3 seconds Press and hold the Speed Switch button for about 3 seconds, the drone will enter the Circle Fly mode. Exit the Circle Fly mode by long pressing the same button again or pushing the direction joystick. 12.7 Auto-Rotating Long press for 3 seconds Press and hold the Flip button for about 3 seconds, the drone will enter... -
Page 23: Headless Mode
12.8 Headless Mode 1. After pairing/calibration, press the Headless Mode button on the transmitter. A beep will be heard from the transmitter, and the lights on the drone will keep blinking. The transmitter will beep slowly to indicate that drone is in Headless Mode. 2. -
Page 24: Specification
13.0 SPECIFICATIONS DRONE Model: HS210 Weight: 22g/0.77oz Max Flight Time: 7 minutes (per battery) Motor Model: 0615 Operating Temperature Range: 14°F to +104°F (-10°C to +40°C) Size: 80 x 80 x 30 mm FLIGHT BATTERY Capacity: 250mAh Voltage: 3.7V Battery Type: Lithium-ion polymer Battery Charging Temperature Range: 41°... -
Page 25: Contact Us
14.0 CONTACT US Please do not hesitate to contact us if you need further support. 4:00 PM ~ 7:00 AM (PST) usa@holystone.com (USA) ca@holystone.com (CA) eu@holystone.com (EU) jp@holystone.com (JP) +1(855) 888-6699 For online support, please scan this code with Live Chat -22-... -
Page 26: General Information
15.0 GENERAL INFORMATION FCC Notice: This device complies with Part 15 of the FCC Rules. Operation is subject to the following two conditions: (1) This device may not cause harmful interference, and (2) This device must accept any interference received, including interference that may cause undesired operation. - Page 27 WARNING: Changes or modifications not expressly approved by the party responsible for compliance could void the user's authority to operate the equipment. RF Exposure The equipment complies with FCC radiation exposure limits set forth for an uncontrolled environment. This device should be installed and operated with minimum distance 20cm between the radiator &...
- Page 28 CAN NMB-003 (B) RF Exposure Radiation Exposure Statement: This equipment complies with IC radiation exposure limits set forth for an uncontrolled environment. This equipment should be installed and operated with a minimum distance of 20cm between the radiator & your body. Déclaration d'exposition aux radiations: Cet équipement est conforme aux limites d'exposition aux rayonne- ments IC établies pour un environnement non contrôlé.
- Page 29 BATTERY WARNING: 1. Failure to follow all the instructions may result in serious injury, irreparable damage to the battery may cause a fire, smoke or explosion as well. 2. Always check the battery’s condition before charging or using it. 3. Please replace the battery if the battery is dropped or has any peculiar smell, overheating, discolouration, deformation or leakage happens.
- Page 30 11. Non-rechargeable batteries are not allowed to be recharged. Rechargeable batteries should be charged under adults’ supervision. 12. DO NOT mix different types of batteries including the new and used ones. 13. Batteries MUST be inserted with the correct polarity. 14.
- Page 31 Directive 2009/48/EC have been fully fulfilled on our product with indication below: Product Name: Remote control four axis series Model/Mark : HS210/HOLYSTONE The Statement of compliance is available at the following address: http://www.holystone.com/Download/CE/HS210_EU_DOC.pdf This product can be used among EU member states.
Need help?
Do you have a question about the HS210 and is the answer not in the manual?
Questions and answers