
Subscribe to Our Youtube Channel
Related Manuals for Holy Stone HS260


Summary of Contents for Holy Stone HS260
- Page 1 Instructions For Use Gebrauchsanweisung V 4.0 HS260 www.holystone.com +1(855) 888-6699 eu@holystone.com (EU) usa@holystone.com (USA) jp@holystone.com (JP) ca@holystone.com (CA)
- Page 3 English 01-31 32-55 日本語 Deutsch 56-84...
-
Page 4: Table Of Contents
Contents 1.0 Disclaimer & Warning ................2.0 Safety Guidelines ..................3.0 Maintenance ....................4.0 Package Contents ..................5.0 Drone Details ....................6.0 Transmitter Details ..................7.0 Mode Switch ....................8.0 Installation 8.1 Propellers ....................8.2 Drone Battery ..................9.0 Charging ....................... 10.0 Operation Guide 10.1 Download APP ................... - Page 5 11.5 Headless Mode ................... 11.6 Optical Flow Positioning ..............11.7 Altitude-Hold Function ..............12.0 Specifications ..................... 13.0 Trouble Shooting ..................14.0 Contact Us ....................15.0 General Information ................
-
Page 6: Disclaimer & Warning
1.0 DISCLAIMER & WARNING 1. Please read this Disclaimer & Warning and Safety Guidelines carefully before using our product. This product is not recommended for people under the age of 14. By using this product, you hereby agree to this disclaimer and signify that you have read it fully. - Page 7 ④ Please perform a thorough check of the product before each use. Inspect the integrity of the parts, any signs of cracks and wear of the propel- ler, battery power and effectiveness of the indicator, etc. If after doing a complete check of the drone any problems are found, please refrain from using it until the problem has been resolved.
- Page 8 2.3 Operation Requirements ① DO NOT use this product to follow any moving vehicles. ② During the flight, turn off the motors only in case of an emergency. ③ Fly the drone back to you as soon as you are notified that the battery is running low.
- Page 9 ⑥ If the device is not going to be used for an extended period of time, please remove batteries to prevent potential damage to the drone from battery leakage. ⑦ Only use the USB charging cable that comes with the drone to charge the battery.
-
Page 10: Maintenance
3.0 MAINTENANCE ① Clean the product after each use with a clean, soft cloth. ② Avoid prolonged exposure to direct sunlight and avoid buildup of heat on the drone or batteries. ③ This device is not waterproof and must not be submerged or subjected to water under any circumstance. -
Page 11: Package Contents
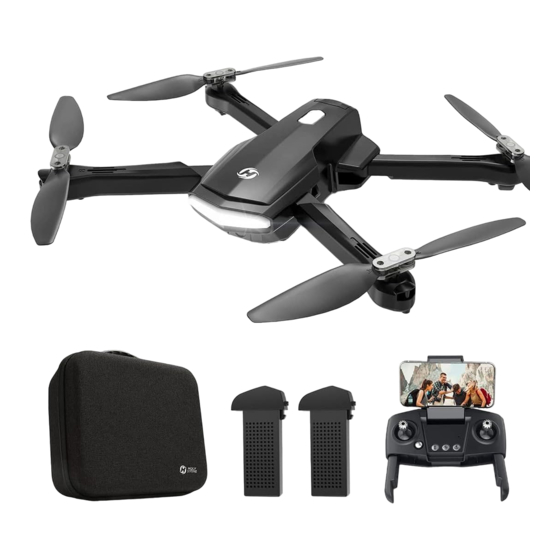
4.0 PACKAGE CONTENTS Drone Transmitter Drone Battery USB Charging Spare Propeller Screwdriver Cable Instructions For Use Gebrauchsanweisung V 4.0 HS260 +1(855) 888-6699 www.holystone.com usa@holystone.com (USA) eu@holystone.com (EU) ca@holystone.com (CA) jp@holystone.com (JP) Instructions For Use -06-... -
Page 12: Drone Details
5.0 DRONE DETAILS Propeller B Propeller A Propeller A Propeller B HD Camera Optical Flow Lens Drone Battery -07-... -
Page 13: Transmitter Details
6.0 TRANSMITTER DETAILS Phone Holder Take Photo Lens Up Lens Down Record Video Right Joystick Left Joystick Folded Handle Power Switch One Key Takeoff/ Headless Mode Landing Speed Switch Battery Cover 4×AAA Battery (Not included) Battery Compartment Open the battery cover on the back of the transmitter, insert the four AAA batteries (Not included) into the battery compartment, and close the battery cover to complete the installation. -
Page 14: Mode Switch
7.0 MODE SWITCH 7.1 MODE 2 (Left hand throttle MODE 2 will be default setting.) Left Joystick Right Joystick Forward Ascend Down Backward Descend Down Left Right Left Right Fly to Fly to Rotate Rotate Left Right Left Right - - - - - - - - - - - - - - - - - - - - - - - - - - - - - - - - - - - - - - - - - - - - - - - - - - - - - - - - - - - 7.2 MODE 1 To enter MODE 1, turn on the transmitter while holding the “Record Video”... -
Page 15: Installation
8.0 INSTALLATION 8.1 Propellers HEAD Connect each propeller to its corresponding motor shaft, either position “A/B” , then lock the propeller to the motor shaft with a screw. Attention: Pay attention to the “A” “B” printed on the each propel- ler. -
Page 16: Drone Battery
8.2 Drone Battery Installation: ① ② ① Please remove the black insulation gasket first. ② Push the battery correctly into the drone battery compartment. Make sure that you hear a click sound, which indicates that the battery is firmly installed. Attention: The battery should be installed firmly. -
Page 17: Charging
9.0 CHARGING USB Adapter (5V/2.0A) Power Bank 1) When the drone battery runs low, the indicator lights on the drone will flashes continuously. 2) Remove the battery and connect the USB charging cable to the battery charging interface. 3) Plug the USB charging cable into a USB charging port on power bank or USB adapter (5V/2.0A). -
Page 18: Operation Guide
10.0 OPERATION GUIDE 10.1 Download APP Android APP on Google play Scan the QR code, corresponding to either App Store™ or Google Play™ Store and download the HS FPV V4 app for free. Required Operating Systems: iOS 9.0 or later/Android 5.0 or later 10.2 Connect to Wi-Fi Connect your phone to the Wi-Fi network created by the drone. -
Page 19: Pairing
All of the operations shown in this manual are demonstrated using MODE 2. 10.3 Pairing ① Long press the power switch to turn on the drone and the indicator lights on the drone begin to flash. HEAD ② Place the drone on a flat and level surface with the head forward and the tail facing towards the pilot. -
Page 20: Calibrating The Gyro
10.4 Calibrating the Gyro Simultaneously push the left joystick and the right joystick to the bottom right corner to calibrate the gyro. The indicator light on the drone will blink and turn solid that indicates the calibration is completed. Tip: To ensure a stable flight, we suggest that the pilot calibrates the gyro every time after pairing the drone and after a crash. -
Page 21: One Key Takeoff/Landing
10.6 One Key Takeoff/Landing ① ② Landing Takeoff ① Unlock the motors, then short press the One Key Takeoff/Landing button, the drone will take off automatically and hover at 5 feet altitude. At this time, you can control this drone by using the joysticks. ②... -
Page 22: Functions Details
11.0 FUNCTION DETAILS 11.1 Emergency Stop The Emergency Stop function can be only used in case of emergen- cy during the flight to avoid any damage or injury. Press the Record Video button and the Lens Down button simultaneously, you will hear one beep from the transmitter, and the drone will fall down immediately. -
Page 23: Take Photo/Record Video
11.3 Take Photo/Record Video Take Photo: Short press the Photo button on the transmitter to take pictures. One beep can be heard from the transmitter, indicating the camera has successfully taken one photo. Record Video: Short press the Video button on the transmitter, two beeps from the transmitter will be heard. -
Page 24: Headless Mode
11.5 Headless Mode 1. After pairing/calibration, short press the Headless Mode Button to enter the Headless Mode. In Headless Mode, the indicator lights of the drone will flash continuously, and the transmitter will send out beeps continuously. 2. Short press the Headless Mode Button again, and you will hear a beep, the indicator lights on the drone will turn solid which indicates the drone exits the Headless Mode. -
Page 25: Optical Flow Positioning
11.6 Optical Flow Positioning Optical Flow Lens The Optical Flow Positioning System consists of optical flow lens modules, which acquires the position information of the drone through visual images to ensure precise positioning of the drone. - - - - - - - - - - - - - - - - - - - - - - - - - - - - - - - - - - - - - - - - - - - - - - - - - - - - - - - - - - - The Optical Flow Positioning System is typically used in indoor environment. - Page 26 1. Fly fast at an altitude below 0.5m. 2. Fly over monochrome surfaces (like pure black, pure red, pure red and pure green). 3. Fly over strong light reflective surfaces or surfaces prone to reflection. 4. Fly over water or transparent object surfaces. 5.
-
Page 27: Altitude-Hold Function
11.7 Altitude-Hold Function The drone is designed with altitude-hold function so the drone can maintain its altitude after you release the left joystick. (The left joystick will automatically spring back to the middle) -22-... -
Page 28: Specifications
12.0 SPECIFICATIONS DRONE Model: HS260 Weight: 145g/5.11oz Max Flight Time: 15 minutes (per battery) Operating Temperature Range: 32° to 104°F Size: 313 × 213 × 55 mm(Unfolded) 145 × 70 × 55 mm(Folded) - - - - - - - - - - - - - - - - - - - - - - - - - - - - - - - - - - - - - - - - - - - - - - - - - - - - - - - - - - -... - Page 29 CAMERA Operating Frequency: 2417 MHz Photo/Video Resolution: 1920×1080P Transmission Distance: 197~262feet/60~80m (outdoor and unobstructed) Lens Angle: 75° Adjustment Range: -90° to 0° Live View Quality: 25 fps Photo Formats: JPEG Video Formats: AVI/MP4 Operating Temperature Range: 32° to 104°F - - - - - - - - - - - - - - - - - - - - - - - - - - - - - - - - - - - - - - - - - - - - - - - - - - - - - - - - - - - USB CHARGING CABLE Input: 5V / 2A Rated Power: ≤10 W...
-
Page 30: Trouble Shooting
13.0 TROUBLE SHOOTING Problem Solution 1. Charge the drone battery. The drone does not respond. 2. Charge the transmitter battery. 1. Change the batteries. The drone’s response is intermit- 2. Move to a different area where tent. there is no interference. Place the drone on a flat, level The drone drifts to one side while surface and repeat the gyro calibra-... -
Page 31: General Information
15.0 GENERAL INFORMATION FCC Notice: This device complies with Part 15 of the FCC Rules. Operation is subject to the following two conditions: (1) This device may not cause harmful interference, and (2) This device must accept any interference received, including interfer- ence that may cause undesired operation. - Page 32 WARNING: Changes or modifications not expressly approved by the party responsible for compliance could void the user's authority to operate the equipment. RF Exposure The equipment complies with FCC radiation exposure limits set forth for an uncontrolled environment. This device should be installed and operated with a minimum distance of 20cm between the radiator &...
- Page 33 CAN NMB-003 (B) RF Exposure Radiation Exposure Statement: This equipment complies with IC radiation exposure limits set forth for an uncontrolled environment. This equipment should be installed and operat- ed with a minimum distance of 20cm between the radiator & your body. Déclaration d'exposition aux radiations: Cet équipement est conforme aux limites d'exposition aux rayonnements IC établies pour un environnement non contrôlé.
- Page 34 BATTERY WARNING: 1. Failure to follow all the instructions may result in serious injury, irreparable damage to the battery may cause a fire, smoke or explosion as well. 2. Always check the battery’s condition before charging or using it. 3. Please replace the battery if the battery is dropped or has any peculiar smell, overheating, discoloration, deformation or leakage happens.
- Page 35 13. Batteries MUST be inserted with the correct polarity. 14. The supply terminals MUST not to be short-circuited. Regular examina- tion of transformer or battery charger for any damage to their cords, plugs, enclosures and other parts MUST be done. If there is damage, they MUST not be used until the damage has been repaired.
- Page 36 Directive 2009/48/EC have been fully fulfilled on our product with indication below: Product Name: Remote control four axis series Model/Mark: HS260/HOLYSTONE The Statement of compliance is available at the following address: http://www.holystone.com/Download/CE/HS260_EU_DOC.pdf This product can be used among EU member states.
Need help?
Do you have a question about the HS260 and is the answer not in the manual?
Questions and answers