Table of Contents
Advertisement
Quick Links
Advertisement
Table of Contents

Subscribe to Our Youtube Channel
Related Manuals for Fieldmann FZV 4010 20E


Summary of Contents for Fieldmann FZV 4010 20E
- Page 1 FZV 4010 20E...
- Page 2 English ..........................................1 Čeština.......................................... 15 Slovenčina ........................................29 Magyarul ........................................43 Polski ..........................................57 FZV 4010 E...
-
Page 3: Table Of Contents
Table of Contents ELECTRIC SCARIFIER USER'S MANUAL Dear customer, thank you very much for the trust that you have expressed! Before putting this machine into operation, it is imperative to read this user's manual! In it, you will find all the instructions for normal operation and for achieving a long lifetime of the machine. -
Page 4: General Safety Instructions
General safety instruction / Symbols 1. GENERAL SAFETY INSTRUCTIONS Important safety notice Carefully unpack the product and take care not to throw away any part of the packaging before you find all the parts of the product. Store the product in a dry place out of reach of children. Read all warnings and instructions. - Page 5 Symbols Attention! Before putting into operation, carefully read the user's manual and the general safety instructions! Do not work in the rain or in unfavourable climatic conditions! Attention, the blade of the scarifier continues to rotate for some time after it is turned off! Keep a safe distance! Attention, rotating blades! Sharp blade/s.
-
Page 6: Safety Instructions
Safety Instructions 3. SAFETY INSTRUCTIONS Thank you for purchasing this garden scarifier. Before you start using it, please carefully read this user's manual and save it for possible future use. Checks before every use Check the electric scarifier before every use. Do not use the electric scarifier if the safety mechanisms (start lever, safety brake, rear lid or cover) are dam- aged or worn out. -
Page 7: Electrical Safety
Safety instructions / Purpose of use When you stop working, place the machine in a safe location. Unplug the power plug! If you stop working in order to move to a different work location, always turn the electric scarifier off while carrying it. Move the wear compensation lever into the transport position. -
Page 8: Description Of The Machine
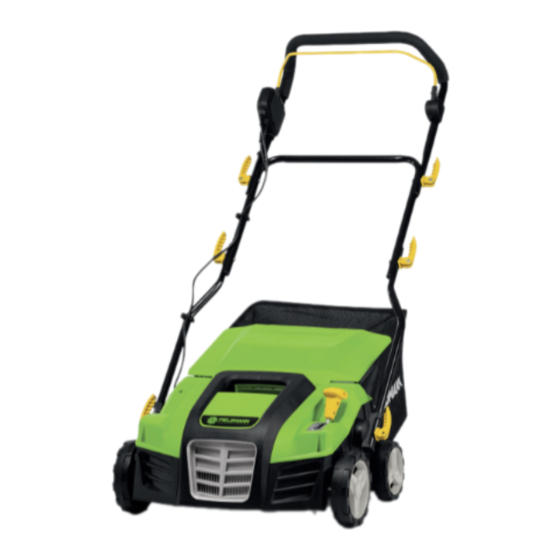
Description of the machine 5. DESCRIPTION OF THE MACHINE (FIG. 1) Basket Main switch Main switch safety lock Basket cover Power cord Grass catcher frame Power cord retainer hook Cable clip Top part of the handle qd & qf Quick-acting lever Middle part of the handle Handle screw Bottom part of the handle... -
Page 9: Assembling The Machine
Assembly of the machine 6. ASSEMBLING THE MACHINE Slide the cable fastening hook 1 on to the bottom part of the handle 2 (fig. 2). 2. Insert the bottom part of the handle 2 into the rotation unit 3. Then from the outside, screw the quick clamp lever 4 to the body of the scarifier (fig. - Page 10 Assembly of the machine 5. Place the steel frame 0 into the textile col- lection basket 9 and attach all fastener to the left, right and rear poles of the frame. Make sure that all fasteners are secured cor- rectly (fig. 6). 6.
-
Page 11: Replacing Blades
Blade replacement 7. REPLACING BLADES DANGER! The cylinders may cause injuries! Prior to replacement, disconnect the machine from the power grid and wait for the cylinder to come to a stop. When replacing, wear work gloves. Screw out the bolts 1 on the underside of the chassis (fig. -
Page 12: Setting Up The Scarifier
Setting up the scarifier | Putting into operation 8. SETTING UP THE SCARIFIER ATTENTION! The working depth with the scarification cylinder should be no more than 3 mm. The aeration cylinder with springs should copy the contour of the ground during operation. Setting an excessive working depth may even without visible wear on the blades/springs result in damage to the scarification cylinder or the overloading and destruction of the motor. -
Page 13: Maintenance
Maintenance / Scarification / Aeration 10. MAINTENANCE Cleaning the scarifier ATTENTION! Danger! A rotating blade may cause injuries. ATTENTION! Prior to maintenance, disconnect the machine from the power grid and wait for the scarifica- tion cylinder to come to a stop. ATTENTION! While performing maintenance use work gloves. -
Page 14: Technical Specifications
Technical specifications / Disposal 12. TECHNICAL SPECIFICATIONS Electric scarifier ................................FZV 4010-20E Rated power ....................................2000 W Working width ....................................40 cm Working depth .................................. +6 to –12 mm Collection basket capacity ................................55 l Weight ....................................... 12,8 kg Protection class ....................................IPX4 Cylinder operating speed .............................. -
Page 15: Declaration Of Conformity
EU DECLARATION OF CONFORMITY Product / brand: Electric Lawn Aerator/Scarifier / FIELDMANN Type / model: FZV 4010-20E as factory model WR 6017-2000Q AC 230 – 240 V, 50Hz, 2000W, cutting width 400 mm, Class II, IPX4 = 88,3 dB(A), L... - Page 16 FZV 4010 E...
- Page 18 Záruční podmínky Záručné podmienky Conditions of guarantee Prodávající poskytuje kupují c ímu na výrobek zá Predávajúci poskytuje kupujúcemu na výrobok This product is warranted for the period of 24 mon 24 mesiacov záruku od jeho prevzatia kupujúcim. ruku trvání 24 měsíců od převzetí výrobku kupu ths from the date of purchase to the end-user.
- Page 19 Jótállási jegy A termék gyártója: FAST ČR, a.s. (U Sanitasu elállásnak nincs helye. A fogyasztó a választott A 151/2003. (IX.22.) Korm.rendeletben meg- 1621, Říčany u Prahy 251 01, Csehország) jogáról másikra térhet át. Az áttéréssel okozott határozott tartós fogyasztási cikk meghibáso- A FAST Hungary Kft.
- Page 20 A kereskedő tölti ki Megnevezés:................................Típus:................ Gyártási szám: ……………………………………………. A termék azonosításra alkalmas részeinek meghatározása (ha alkalmazható):…………………………………… Vásárlást igazoló bizonylat száma:………………………………………………………………………………. A vásárlás (üzembe helyezés) időpontja: 20......hó.....nap. Kereskedő bélyegzője: Kereskedő aláírása: ………………………………… Kereskedő címe: ……………………………………………… Javítás esetén alkalmazandó A kereskedő vagy szerviznél történő közvetlen bejelentés esetén a szerviz tölti ki A jótállási igény bejelentésének időpontja: ……………………………………………………………………….
- Page 21 Garantijos taisyklés Warunki gwarancji Šiam gaminiui suteikiama 24 ménesi4 nuo isigi Produkt obj�ty jest 24 - miesi�cznij gwarancjij, po jimo datos garantija. Garantija apsiriboja žemiau czqwszy od daty zakupu przez klienta. Gwarancja jest pateikiamomis Sijlygomis. Garantija skirta tik ga ograniczona tylko do przedstawionych dalej warun ków.
- Page 22 COPYRIGHT © 2018, FAST ČR, A.S. REVISION 05/2018...
Need help?
Do you have a question about the FZV 4010 20E and is the answer not in the manual?
Questions and answers