Table of Contents
Advertisement
Quick Links
Advertisement
Table of Contents

Related Manuals for GYROZEN 1248R


Summary of Contents for GYROZEN 1248R
- Page 2 User Manual Manufacturer: GYROZEN Co., Ltd 1F & 5F, 15 Arayuk-ro, Gimpo-si, Gyeonggi-do, Republic of KOREA Tel: +82-2-3452-8966 Fax: +82-2-3471-8174 info@gyrozen.com http://www.gyrozen.com European Authorized Representative: OBELISS.A Boulevard GénéralWahis53, B-1030Brussels, BELGIUM UM-1248R/1580R(E)(Rev.5) 2022.12.27 1 | www.gyrozen.com...
-
Page 3: Table Of Contents
5.2 Setting the RPM / RCF value ..........................19 5.3 Setting the time value .............................. 20 5.3.1. Setting the AT SET SPEED mode ......................... 20 5.3.2. Setting the ‘MIN / HOUR’ value ........................20 5.4. Setting temperature and FASTCOOL ....................... 21 AS : 02-3452-8966/070-8620-5350/techsupport@gyrozen.com | 2... - Page 4 6.5. Movement of instrument ............................29 7. Trouble shooting ..........................30 7.1. Check List ..................................30 7.2. Error massage ................................31 8. Equipment Disposal ......................... 33 9. Rotor & Accessories ........................34 10. CE Declaration of Conformity ..................... 48 3 | www.gyrozen.com...
-
Page 5: Safety Warnings And Cautions
Refrigerated, Multi-purpose Centrifuges,1248R/1580R This user manual contains detailed instructions to operate the Centrifuge 1248R/1580R. For proper use and maintenance, be sure to read the instructions. 1. Safety warnings and cautions 1.1 Safety Label Labels attached to the main body provide usage and safety information. -
Page 6: Safety Precautions
14. The rotor should be cleaned and dried after every use for long life and safety. 15. Always disconnect the power supply during regular inspection and service to avoid electric 5 | www.gyrozen.com... -
Page 7: Lifting And Carrying
-Ambient Temperature: -10 ∼ 40℃ -Room Temperature: 5 ∼ 40 ℃ -Relative humidity: 10 ∼ 90 % -Relative humidity: 30 ∼ 85 % -Atmospheric pressure: 500 ∼ 1060 hPa -Atmospheric pressure: 500 ∼ 1060 hPa AS : 02-3452-8966/070-8620-5350/techsupport@gyrozen.com | 6... -
Page 8: Product Description
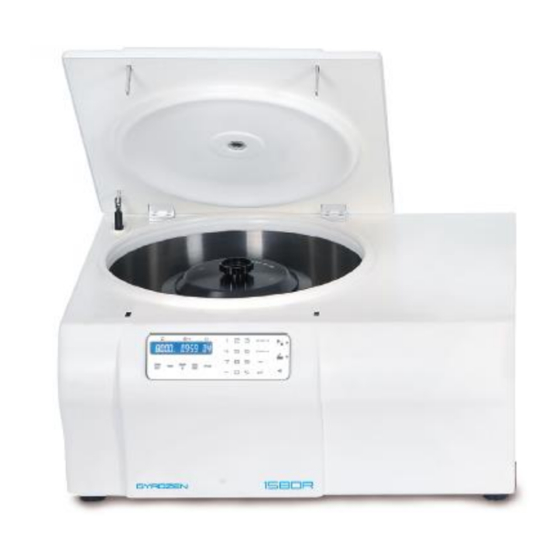
5. Manual Lid Open Hole 3. Display & Control Panel 6. Drain Hole 2.3 Accessories Rotor Locking Tool 6mm wrench AC Power Cord User Manual (Manual Lid Open Tool) ※ Rotor sold separately (Refer to 8. Rotor and accessories) 7 | www.gyrozen.com... -
Page 9: Technical Specifications
Time display hr : min Time control interval (increment) 1 min RPM control interval RCF control interval Min. adjustable speed(RPM) Adjustment of volume and repetition of alarm sound Key lock function Rotor identification Automatic Imbalance cutoff AS : 02-3452-8966/070-8620-5350/techsupport@gyrozen.com | 8... - Page 10 Automatic rotor identification function. Automatic detection and alarms for imbalance, excess speed and heating. Dual lid lock prevents lid opening during operation Lid drop protection Key lock function to prevent set value changes during operation Imbalance cut off 9 | www.gyrozen.com...
-
Page 11: Unpacking
2. Two people should keep the system horizontally to lift up on the flat table. 3. To disassemble the Motor Protecting Devices, use the provided 6mm wrench and unscrew and remove all 3 bolts. It is now ready for installation. ☞Place the instrument on the solid and flat table. AS : 02-3452-8966/070-8620-5350/techsupport@gyrozen.com | 10... -
Page 12: Installation
After entering the operation setting value and touching the [Start] button, the operation starts after the rotor scan process. If the rotor is not installed, the “Error 9” will be appeared. This message will be cleared after rotor installing and running. 11 | www.gyrozen.com... -
Page 13: Lid Release
4.2. Install and Remove a Rotor Before installing a rotor If necessary, remove any dust, foreign objects or residue from the chamber. Wipe the motor shaft and rotor hub from the bottom side of the rotor with a clean AS : 02-3452-8966/070-8620-5350/techsupport@gyrozen.com | 12... -
Page 14: Swing-Out Rotor
3. To remove the rotor, hold the rotor well with one hand and rotate the Rotor Locking Tool counterclockwise. 4. Grasp the rotor with both hands. 5. Pull the rotor directly upwards and away from the motor shaft with both hands. 13 | www.gyrozen.com... -
Page 15: Fixed Angle Rotor
Pull the rotor directly upwards and away from the motor shaft with both hands. Make sure do not tilt the rotor while lifting it. [Check Rotor connection] Before use, make sure that the rotor is securely fastened to the motor shaft. [Check Rotor Lid installation] AS : 02-3452-8966/070-8620-5350/techsupport@gyrozen.com | 14... -
Page 16: Sample Tube Loading
√ rated to or above the selected RCF to be spun at √ used at their minimum fill volume and not above their maximum fill volume √ undamaged and not used above their design life (age or number of runs) 15 | www.gyrozen.com... - Page 17 A full complement of buckets needs to be installed before operating swing out rotor. ->For safety, the “Imbalance Cut Off” function will be occurred, if there is imbalance of loading tubes (Error 8, Imbalance error). Please refer to 7. Trouble Shooting. AS : 02-3452-8966/070-8620-5350/techsupport@gyrozen.com | 16...
- Page 18 User Manual Incorrect loading examples for fixed angle rotor Incorrect loading examples for fixed angle rotor 17 | www.gyrozen.com...
-
Page 19: Drain Hole
‘0’ in deceleration step means natural deceleration. Larger number means faster acceleration or deceleration □ PROG Use to save a set of setting values or recall the saved program number □ KEY LOCK Use for key lock mode AS : 02-3452-8966/070-8620-5350/techsupport@gyrozen.com | 18... -
Page 20: Setting The Rpm/Rcf Value
▷ If you do not touch the number for 15 seconds, the setting mode is cleared. 3. Touch the [ENTER] button to complete the setting. ▷ Touch [ENTER] to save the setting value. ▷ If wrong number is entered, touch [←] button and change the value again. 19 | www.gyrozen.com... -
Page 21: Setting The Time Value
▶ Time setting unit : 1hr / 1min ▶ Time is down-counted after starting centrifugation. 1. Touch the [TIME] button once. ▷ ‘MIN’ value on LED is flickering. 2. Touch the number buttons to change the minute value. AS : 02-3452-8966/070-8620-5350/techsupport@gyrozen.com | 20... -
Page 22: Setting Temperature And Fastcool
2. Touch the number buttons to change the temperature. 3. Touch the [ENTER] button to complete setting. √ If you want to keep the temperature below zero or above room temperature, please contact the service center as prerequisites are required. 21 | www.gyrozen.com... -
Page 23: Fast Cool
▷ If wrong number is entered, touch [←] button and change the value again. 3. To set the ACC level, touch the [ENTER] button. 4. Touch the number buttons to change DEC value. ▷ Input the desired level of DEC from 0 to 9. AS : 02-3452-8966/070-8620-5350/techsupport@gyrozen.com | 22... -
Page 24: Program Saving & Recalling
2. Set the program number you want to recall using the number button, and then touch the [ENTER] button. ▷ If you do not touch the number button for 15 seconds, the setting mode is cleared. ▷ If wrong number is entered, touch [←] button and change the value again. 23 | www.gyrozen.com... -
Page 25: Start / Stop
▶Speed / time / temperature / ACC / DEC setting values can be changed during operation. ▶The changed time input value does not reflect the initial time setting value. AS : 02-3452-8966/070-8620-5350/techsupport@gyrozen.com | 24... -
Page 26: Key Lock Function
▷ Sound level : 0 ∼10 (0 : silent) 5.10.2 Setting the Repeat Count of End Alarm 1. Press the [AT SET SPEED] button for more than 2 seconds. ▷ ‘Sound rPt’ appears on the display window. 25 | www.gyrozen.com... -
Page 27: Pulse
Manual opening should be performed only when spinning is completely stopped. Otherwise, harmful damage will be accompanied to not only operators but samples. After opening the lid manually, it is recommended to wait until normal electricity comes back. AS : 02-3452-8966/070-8620-5350/techsupport@gyrozen.com | 26... -
Page 28: Open Drain Hole
[Close the drain cap] Please close the drain cap after fully tightening before using the product. Operating with the drain cap is not fully closed, cooling air is discharged to the outside through the drain hoe, which reduces cooling efficiency. 27 | www.gyrozen.com... -
Page 29: Maintenance
1. Corrosion and surface treatment of the rotor Corrosion will occur if the acid or alkaline solution react to rotor. If the balance of the rotor weight is not fit by the corrosion, it can cause severe vibration and noise AS : 02-3452-8966/070-8620-5350/techsupport@gyrozen.com | 28... -
Page 30: Movement Of Instrument
2. Do not mount a rotor in any cases of movement. Fill inside the chamber with proper materials to keep the motor shaft on place and not to be influenced by physical pressure. 29 | www.gyrozen.com... -
Page 31: Trouble Shooting
Check if the deceleration step is 0. If yes, change the step. The higher the number, the faster the deceleration. (Refer to 5.5 Acceleration /Deceleration) Can’t set the RPM Check the rotor’s maximum value. Can be checked on the rotor(Swing- value out rotor) or rotor lid(Fixed Angle rotor). AS : 02-3452-8966/070-8620-5350/techsupport@gyrozen.com | 30... -
Page 32: Error Massage
- Shut off the power supply, and then, turn on the power switch again to check the instrument. Error 7 System error - Turn off the power and turn it on to check the operation 31 | www.gyrozen.com... - Page 33 - If the error code persist, please contact the technical support team . Error 16 Compressor Temp. - Check the surrounding environment where the centrifuge is sensor Error installed. -> Whether the centrifuge is installed in direct sunlight. AS : 02-3452-8966/070-8620-5350/techsupport@gyrozen.com | 32...
-
Page 34: Equipment Disposal
This equipment is marked with the crossed out wheeled bin symbol to indicate that this equipment must not be disposed of with unsorted waste. The waste disposal guidelines of the individual EC countries might vary. If necessary, contact your supplier. 33 | www.gyrozen.com... -
Page 35: Rotor & Accessories
Refrigerated, Multi-purpose Centrifuges,1248R/1580R Rotors and Accessories AS : 02-3452-8966/070-8620-5350/techsupport@gyrozen.com | 34... - Page 36 User Manual 35 | www.gyrozen.com...
- Page 37 Refrigerated, Multi-purpose Centrifuges,1248R/1580R AS : 02-3452-8966/070-8620-5350/techsupport@gyrozen.com | 36...
- Page 38 User Manual 37 | www.gyrozen.com...
- Page 39 Refrigerated, Multi-purpose Centrifuges,1248R/1580R AS : 02-3452-8966/070-8620-5350/techsupport@gyrozen.com | 38...
- Page 40 User Manual 39 | www.gyrozen.com...
- Page 41 Refrigerated, Multi-purpose Centrifuges,1248R/1580R AS : 02-3452-8966/070-8620-5350/techsupport@gyrozen.com | 40...
- Page 42 User Manual 41 | www.gyrozen.com...
- Page 43 Refrigerated, Multi-purpose Centrifuges,1248R/1580R AS : 02-3452-8966/070-8620-5350/techsupport@gyrozen.com | 42...
- Page 44 User Manual 43 | www.gyrozen.com...
- Page 45 Refrigerated, Multi-purpose Centrifuges,1248R/1580R AS : 02-3452-8966/070-8620-5350/techsupport@gyrozen.com | 44...
- Page 46 User Manual 45 | www.gyrozen.com...
- Page 47 Refrigerated, Multi-purpose Centrifuges,1248R/1580R AS : 02-3452-8966/070-8620-5350/techsupport@gyrozen.com | 46...
- Page 48 User Manual 47 | www.gyrozen.com...
-
Page 49: Ce Declaration Of Conformity
Refrigerated, Multi-purpose Centrifuges,1248R/1580R 10. CE declaration of conformity AS : 02-3452-8966/070-8620-5350/techsupport@gyrozen.com | 48... - Page 50 User Manual 49 | www.gyrozen.com...
Need help?
Do you have a question about the 1248R and is the answer not in the manual?
Questions and answers