Advertisement
Quick Links
Advertisement

Related Manuals for Sage the Oracle


Summary of Contents for Sage the Oracle
- Page 1 Oracle ™ BES980 QUICK GUIDE...
-
Page 2: Table Of Contents
CONTENTS 2 Sage ® Recommends Safety First Safety switches with a rated 5 Know Your New Appliance operating current not more 7 Operating Your New Appliance than 30mA are recommended. 17 Care & Cleaning Consult an electrician for 23 Troubleshooting professional advice. - Page 3 Sage Service Centre. the machine. • Never remove the portafilter • The appliance can be used by children aged 8 or older and...
- Page 4 • Store filter cartridges in a dry • The use of attachments not sold or recommended by place in the original packaging. Sage may cause fire, electric • Protect cartridges from heat and shock or injury. direct sunlight. • Always turn the appliance to the off position, switch off at •...
-
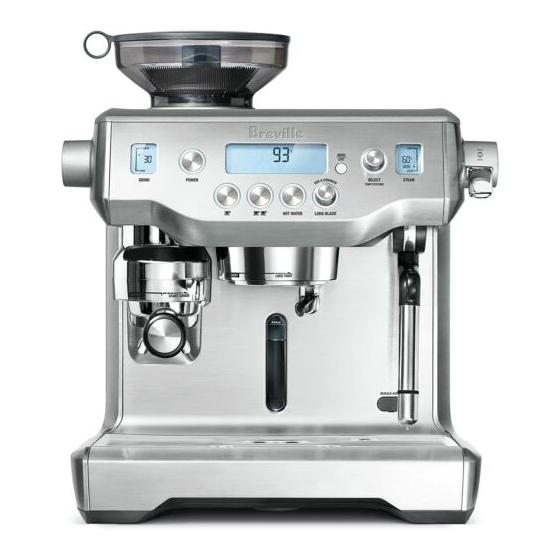
Page 5: Know Your New Appliance
KNOW YOUR NEW APPLIANCE A. Integrated conical burr grinder L. HOT WATER button B. Top-fill 2.5L removable water tank M. LONG BLACK dial C. Grind Size dial N. Steam lever D. Grind LCD O. Steam LCD E. Main LCD P. SELECT dial F. - Page 6 KNOW YOUR NEW APPLIANCE ACCESSORIES A. Stainless steel milk jug H. Grind outlet brush & tamp removal magnet B. 2 cup filter basket I. Cleaning tool for steam wand tip C. 1 cup filter basket J. Allen key D. Water filter holder with filter K.
-
Page 7: Operating Your New Appliance
OPERATING YOUR NEW APPLIANCE BEFORE FIRST USE Machine Preparation Remove and discard all labels and packaging materials attached to your espresso machine. Ensure you have removed all parts and accessories before discarding the packaging. Clean parts and accessories (water tank, portafilter, filter basket, jug) using warm water and a gentle dish washing liquid. - Page 8 OPERATING YOUR NEW APPLIANCE Flushing The Machine SELECTING GRIND SIZE There are 45 espresso grind size settings When the machine has reached STANDBY mode: (No. 1 – finest, No. 45 – coarsest) to enable you 1. Press 2 CUP button to run water through to select the right grind size for your coffee beans the group head for 30 seconds.
- Page 9 OPERATING YOUR NEW APPLIANCE ESPRESSO EXTRACTION MANUAL OVERRIDE Align portafilter handle with the INSERT position Press and hold either the 1 CUP or 2 CUP on the group head. Lift to insert portafilter into the button to commence pre-infusion. When the group head and rotate towards the LOCK TIGHT required pre-infusion duration is met, release the position until resistance is felt.
- Page 10 OPERATING YOUR NEW APPLIANCE AUTO MILK TEXTURING NOTE Start with fresh cold milk. Fill milk jug to below the If machine is run continuously for 30 minutes, spout position. Lift steam wand and insert into milk allow machine to cool for 5 minutes before jug.
- Page 11 OPERATING YOUR NEW APPLIANCE MANUAL LONG BLACK This allows you total control over the Long Black process: pre-infusion duration, espresso volume and hot water volume. During manual Long Black mode, the LCD will show a moving cup icon. Press and hold LONG BLACK dial to activate MENU pre-infusion.
- Page 12 OPERATING YOUR NEW APPLIANCE SHOT TEMPERATURE SET CLOCK Turn the SELECT dial to required temperature Setting the clock is optional. While 'SET CLOCK' then press SELECT dial to set. is displayed on the LCD, press the SELECT dial. SELECT SELECT SELECT SELECT SELECT...
- Page 13 OPERATING YOUR NEW APPLIANCE PRE-INFUSION AUTO OFF MODE The machine automatically switches Low pressure pre-infusion allows you to control to AUTO OFF mode after 30 minutes. the pressure and duration of the pre-infusion phase of the espresso extraction. While 'PRE INFUSE' is displayed on the LCD, press the TAMP SET SELECT dial.
- Page 14 OPERATING YOUR NEW APPLIANCE 5. Rotate the SELECT dial to the custom ADVANCED FEATURES setting you’d like to program - ‘Set 1’ to These features should only be accessed ‘Set 6’. Settings that have already been by experienced users. programmed will display a cup icon. To access Advanced Features, with the machine turned off, press and hold the 1 CUP button, then press and hold the POWER button together for...
- Page 15 OPERATING YOUR NEW APPLIANCE 'Hrd3' will flash on screen. Machine is now Disable Clean Me! Alert (Cln) in Water Hardness mode. See 'Water Hardness Disables the 'CLEAN ME!' alert. Rotate SELECT (Hrd3)' to set. dial to on (On) or off (OFF). The default setting is on.
- Page 16 OPERATING YOUR NEW APPLIANCE Heating Indicates when the machine is heating up or if the temperature drops excessively during use. Lock Hopper Indicates if the bean hopper has not been properly inserted and locked into position. Overheat Please Wait Indicates if the grinder is used excessively and needs time to cool.
-
Page 17: Care & Cleaning
CARE & CLEANING When the cleaning cycle has finished, CLEANING CYCLE • remove the portafilter and ensure the tablet • CLEAN ME! will be displayed on the LCD to has completely dissolved. If the tablet has indicate when a cleaning cycle is required (after approx. - Page 18 CARE & CLEANING CLEANING CONICAL BURRS Regular cleaning helps the burrs achieve consistent grinding results which is especially important when grinding for espresso. Unlock hopper Remove beans Replace & lock Run grinder until empty Unlock & hopper remove hopper Remove upper Clean upper Clean lower Remove...
- Page 19 CARE & CLEANING CLEANING THE STEAM WAND Steam Wand Cleaning Powder 1. Add 1 packet into an empty milk jug. 2. Add 1 cup (240ml) hot water into milk jug. IMPORTANT 3. Remove steam tip and place with steam After every use, thoroughly wipe the wand into jug.
- Page 20 CARE & CLEANING CLEAR WATER BACKFLUSH CLEANING THE OUTER HOUSING After each coffee making session we & CUP WARMING TRAY • recommend doing a clear water backflush • The outer housing and cup warming tray can before you turn off the machine. Empty drip be cleaned with a soft, damp cloth.
- Page 21 CARE & CLEANING DESCALE (dESc) 2 – Empty Boilers a. Remove the grey silicone cover on the lower NOTE front panel marked DESCALE ACCESS. Even if you used the provided water filter, we recommend you to descale if there is scale build-up in the water tank.
- Page 22 Press 1 Cup button and the LCD screen will show countdown time (20 minutes). may be hot. h. Empty water tank, remove water filter. ® Dissolve 1 sachet of Sage Descaler into ™ 1 litre of warm water. Pour solution into the water tank.
-
Page 23: Troubleshooting
• Unplug power cord from power outlet. • See page 15 for list of alerts. There is an alert on the LCD eg. 'OVERHEAT PLEASE If problem persists, WAIT', 'HEATING' etc. contact Sage ® Customer Service Centre or visit www.sageappliances.com... - Page 24 The LCD will display a clock icon when the Auto Start time is programmed. ERR error message ® • A major fault has occurred • Contact Sage Customer on LCD and machine cannot operate. Service Centre or visit www.sageappliances.com...
- Page 25 / low mineral content such as highly filtered, to function. demineralised or distilled water. If the problem persists, contact Sage ® Customer Service Centre. Water does not flow from • Machine has not reached •...
- Page 26 The machine is ‘On’ but 60 minutes and turn machine ceases to operate back on. ® • If problem persists, call Sage Customer Service Centre. • Turn machine off. Wait for Steam pouring out of 60 minutes and turn machine group head back on.
-
Page 27: Guarantee
2 years from the date of purchase against defects caused by faulty workmanship and materials. During this guarantee period Sage Appliances will repair, replace, or refund any defective product (at the sole discretion of Sage Appliances). - Page 28 BRG Appliances Limited Unit 3.2, Power Road Studios, 114 Power Road, London, W4 5PY Freephone (UK Landline): +44 (0)808 178 1650 Mobile Calls (National Rate): 0333 0142 970 www.sageappliances.com Registered in England & Wales No. 8223512. • Due to continued product improvement, the products illustrated or photographed in this document may vary slightly from the actual product. Copyright BRG Appliances 2019.
Need help?
Do you have a question about the the Oracle and is the answer not in the manual?
Questions and answers