Advertisement
IMPORTANT SAFEGUARDS
When using electrical appliances, especially when children are present, basic safety precautions should always be taken, including the following:
- READ ALL INSTRUCTIONS.
- Turn the appliance OFF, then unplug from the outlet when not in use, before assembling or disassembling parts and before cleaning. To unplug, grasp the plug and pull from the outlet. Never pull from the power cord.
- This appliance is not intended for use by children or by persons with reduced physical, sensory, or mental capabilities, or lack of experience and knowledge. Close supervision is necessary when any appliance is used near children. Children should be supervised to ensure that they do not play with the appliance.
- Avoid contact with moving parts and fitted attachments. Keep hands, hair, clothing, as well as spatulas and other utensils away from beaters during operation to reduce the risk of injury to persons and/or damage to the mixer.
- The use of accessories or attachments not recommended or sold by Cuisinart may cause fire, electric shock or injury.
- Do not use more than one accessory or attachment at a time.
- Do not exceed the maximum capacities listed in this Instruction Book.
- Do not use the stand mixer if it is damaged or if the cord is damaged. After having been damaged, have the stand mixer checked and serviced before resuming use.
- When using an attachment, make sure that you have read the safety instructions that come with the particular attachment.
- Do not use outdoors.
- Keep stainless steel bowl away from heat sources such as stovetops, ovens or microwaves.
- To protect against the risk of electric shock, do not put the base power unit in water or other liquids.
- Remove all accessories and attachments from stand mixer before washing.
- Do not let cord hang over edge of table or counter.
- Do not operate any appliance with a damaged cord or plug or after the appliance malfunctions, or is dropped or damaged in any manner. Return appliance to the nearest authorized service facility for examination, repair or electrical or mechanical adjustment. Contact the manufacturer at their customer service telephone number for information on examination, repair, or adjustment.
- Do not operate your appliance in an appliance garage or under a wall cabinet. When storing in an appliance garage, always unplug the unit from the electrical outlet. Not doing so could create a risk of fire, especially if the appliance touches the walls of the garage or the door touches the unit as it closes.
SAVE THESE INSTRUCTIONS FOR HOUSEHOLD USE ONLY
NOTE: The maximum rating is based on the attachment that draws the greatest power. Other recommended attachments may draw significantly less power.

RISK OF FIRE OR ELECTRIC SHOCK
 The lightning flash with arrowhead symbol within an equilateral triangle is intended to alert the user to the presence of uninsulated, dangerous voltage within the product's enclosure that may be of sufficient magnitude to constitute a risk of fire or electric shock to persons.
 The exclamation point within an equilateral triangle is intended to alert the user to the presence of important operating and maintenance (servicing) instructions in the literature accompanying the appliance.
SPECIAL CORD SET INSTRUCTIONS
A short power-supply cord is provided to reduce the risks resulting from becoming entangled in or tripping over a longer cord. Longer extension cords are available and may be used if care is exercised in their use. If a long extension cord is used, the marked electrical rating of the extension cord must be at least as great as the electrical rating of the appliance, and the longer cord should be arranged so that it will not drape over the countertop or tabletop where it can be pulled on by children or tripped over.
GROUNDING INSTRUCTIONS
For your protection, the Cuisinart® Stand Mixer is equipped with a 3-conductor cord set that has a molded 3-prong grounding-type plug, and should be used in combination with a properly connected grounding-type outlet. If a grounding-type outlet is not available, an adapter may be obtained so that a 2-slot wall outlet can be used with a 3-prong plug.
The adapter must be grounded by attaching its grounding lug under the screw of the outlet cover plate.

Before using an adapter, it must be determined that the outlet cover plate screw is properly grounded. If in doubt, consult a licensed electrician. Never use an adapter unless you are sure it is properly grounded.
NOTE: Use of an adapter is not permitted in Canada and Europe.
This appliance is for 120 volts only and should not be used with a converter.

Always unplug the Cuisinart® Precision Master™ 3.5-Quart Stand Mixer from the outlet when assembling and disassembling.
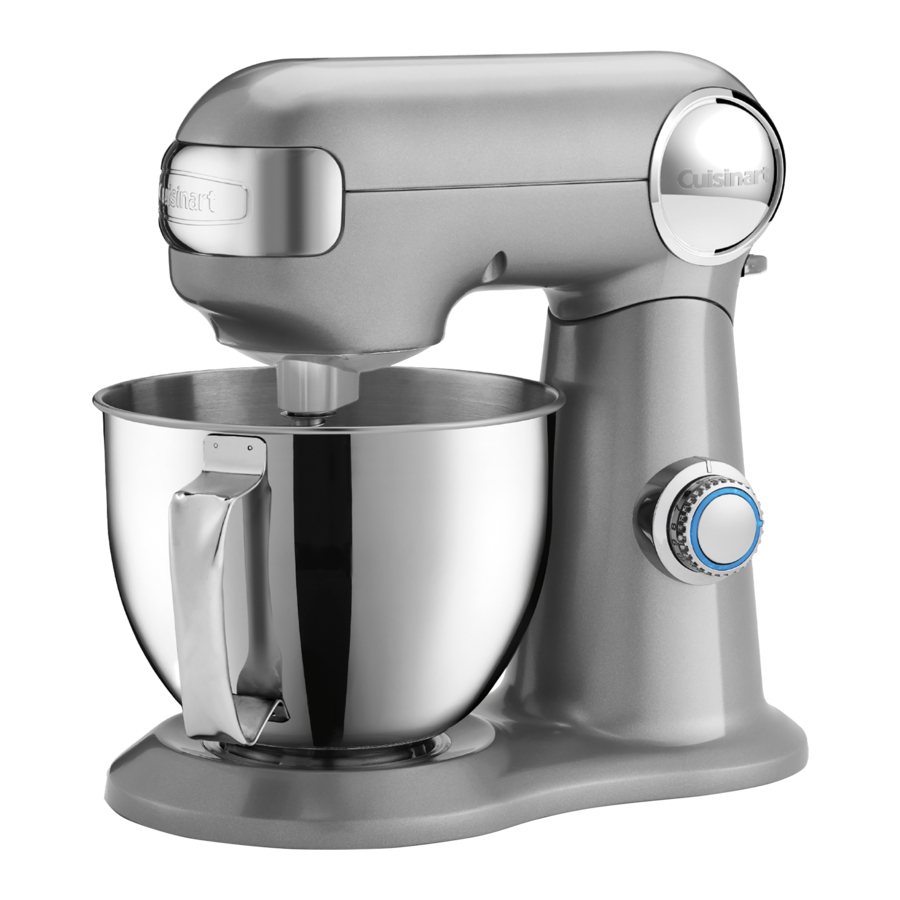
FEATURES AND COMPONENTS
INTRODUCTION
The Cuisinart® Precision Master™ 3.5-Quart Stand Mixer has the capacity, power, and precision engineering to handle almost any job a recipe calls for. Three accessories allow you to mix, whip, knead dough and more – and with 12 speeds, the results are always just right. Cuisinart offers optional attachments: Meat Grinder (MG-50), Spiralizer/Slicer/ Shredder (SPI-50), Pasta Roller & Cutter Set (PRS-50) and Pasta Extruder (PE-50) for purchase. These connect to the port on the front of the mixer to let you make a variety of homemade pastas, grind your own meats or spiralize your favorite vegetables.

- 350 Watt Motor
Plenty of power for heavy mixing tasks. - Tilt-Back Head
Makes it easy to attach accessories and scrape sides and bottom of bowl. - Attachment Port
Meat Grinder, Spiralizer, and 2 pasta maker attachments (sold separately) connect to the port located behind the port cover on the front of the stand mixer head. A locking screw makes attachments easy to put on, secure and take off. - Accessory Port
Chef's whisk, flat mixing paddle and dough hook connect to this port. - 3.5-Quart (3.3L) Stainless Steel
Bowl with Handle Handle makes the bowl easy to lift, hold, scrape and remove. - Head-Lift Release Lever
Securely locks stand mixer head into raised, tilt-back position. Used to return mixer head to mixing position. - ON/OFF and Speed Control Dial
12 speeds for precision mixing. - Blue Light Ring
Illuminates when mixer is operating. Turns off in OFF position. - Chef's Whisk
Incorporates air into ingredients/mixtures. Ideal for whipping eggs, egg whites or heavy cream. Used in recipes for angel food cake, chiffon cake, meringue, some types of candy, such as marshmallows, and quickly whips potatoes.
- Flat Mixing Paddle
Used for stirring, mixing and beating ingredients/mixtures. Best accessory for mixing cookies, cakes and batters, and for frostings. Also use for making pie crusts, biscuits and shortcakes, combining ingredients for meatloaf or meatballs and shredding cooked chicken. - Dough Hook
Used for the mixing and kneading of yeast dough for breads, rolls, pizza/focaccia, pasta dough and yeast-raised coffee cakes. - Splash Guard with Pour Spout
Prevents splattering when mixing and adding ingredients. Guides ingredients into the bowl.
ASSEMBLY INSTRUCTIONS
- Raise Mixer Head – Push down the headlift release lever and raise the stand mixer head until it locks into place.
- Attach Accessory – Place flat mixing paddle, chef's whisk or dough hook into the accessory port. Push up and turn counterclockwise until it locks. Turn clockwise to remove.
- Place Bowl on Base – Turn clockwise to secure.
- Lower Mixer Head – Holding the stand mixer head, push down the head-lift lever again and fully lower the mixer head.
- To Attach Splash Guard with Pour Spout – After attaching the accessory and lowering the stand mixer head, slide the splash guard onto the bowl. The splash guard ring can rotate in any direction to make it easier to add ingredients.
OPERATION
Position the Stand Mixer
The logo plate that covers the attachment port should face you.
To Turn Stand Mixer On
Turn control dial to desired speed – 1 through 12 (see Speed Control Guide).
To Turn Stand Mixer Off
Turn the dial to 0, the OFF position. Mixing process stops and unit shuts off.
CLEANING AND MAINTENANCE
Unplug your Cuisinart® Stand Mixer before cleaning.
Power Unit
Wipe with a damp cloth and dry. Never use abrasives or immerse in water.
Bowl
Wash by hand and dry thoroughly, or put in dishwasher. Never use a wire brush, steel wool or bleach.
Accessories
Mixing paddle and dough hook are top rack dishwasher safe; can also wash by hand and dry thoroughly. Chef's whisk must be washed by hand.
Attachments
Clean as directed in instructions included with each attachment you purchase.
Splash Guard with Pour Spout
Top rack dishwasher safe; can also wash by hand and dry thoroughly.
Maintenance
Any other servicing should be performed by an authorized service representative.
MAXIMUM CAPACITIES
- Yeast doughs (most breads, pizza) – 4½ cups white flour (for 2 pounds baked bread)
- Cookie dough – 5 dozen
- Egg whites – 8 large egg whites
- Heavy cream – 2 cups heavy cream (yield about 4 cups whipped cream)
TROUBLESHOOTING
If the stand mixer shuts off and the light is flashing, the unit may have overheated. Your stand mixer has an overload protection device; it will shut down to protect the motor. Solution: In the unlikely event that this happens:
- Turn off and unplug the unit.
- Reduce the load by removing some of the ingredients, and allow the mixer to stand for a few minutes.
- Plug in and reset the speed. If the stand mixer does not start when you turn the speed dial on, allow the unit to stand for additional time.
TIPS AND HINTS
- Before preheating your oven, adjust racks to accommodate your baking task. Most recipes use the middle rack; pies often bake best in the lower third of the oven.
- Carefully follow each mixing step in a recipe. Take care not to over- or under-mix.
- Do not crowd the oven, and avoid opening the oven door during baking – use the oven light to help you watch. With certain recipes, particularly when baking more than one tray of cookies at a time, rotate halfway through baking.
- Proper measurements are very important when baking. To measure flour correctly, stir the flour first, then spoon into the measuring cup. Level off the top with the blunt side of a knife blade or the handle of a spoon. Do not press or compact flour. It is also very important not to measure directly from the bag – while the flour is pre-sifted, it has been pressed/compacted to fit into the bag. Baked goods made from unstirred flour are likely to be heavy and dry because too much flour is used.
- For most baking recipes, refrigerated items like butter, milk and eggs incorporate better when they are at room temperature.
- Remove butter from the refrigerator and cut into ½-inch pieces to help it come to room temperature faster while you measure out the remaining ingredients.
- To separate eggs for use in any recipe, break them one at a time into a small bowl. Gently remove the yolks, then transfer the whites to a spotlessly clean glass or stainless bowl. If a yolk breaks into a white, use that egg for another recipe. Just a drop of egg yolk in the white prevents the white from whipping properly.
- Scraping the entire bowl – sides, bottom and paddle over the course of mixing and adding new ingredients – ensures even incorporation of ingredients and overall best results. The more you scrape the bowl, the better.
- For whipping egg whites, both the mixing bowl and chef's whisk must be spotlessly clean and dry. Any trace of fat/oil will prevent the egg whites from whipping properly.
- To check the freshness of eggs, place them in a bowl of warm water – if they float, they are not fresh. This is most important when using for whipping egg whites. The fresher the eggs, the more stable the foam.
- To melt chocolate for a recipe, put chopped chocolate in a double boiler insert or larger bowl over a pan of barely simmering water. The water should not boil, nor should it touch the bottom of the double boiler insert or bowl. If it does, this could cause the chocolate to "seize" and you will not be able to use it in your recipe.
- Always test yeast for freshness before using it in a recipe. Sprinkle a little over warm (105°F–110°F) water and add a pinch of sugar from the recipe. If it does not become foamy/bubbly in 5 to 10 minutes, the yeast may be "dead." Start over with fresh yeast from a new package.
COOKIE BAKING
- Use an ice cream scoop to measure out cookie dough – this keeps the cookies evenly shaped and uniform in size. We recommend ice cream scoops in several sizes – #40, #50 and #60, as well as a larger one (about 1⁄3 to ½ cup) for jumbo cookies. Ice cream scoops are also good for filling muffin tins. Use a #16 ice cream scoop to make muffins.
- To better maintain cookie shapes, put scoops of cookie dough onto sheets of waxed paper or plastic wrap on a tray and chill before baking. Most cookie dough can be refrigerated for 2 to 3 days prior to baking – be sure to wrap well.
- Cookie dough may also be frozen. Shape into individual cookies, double wrap and freeze for up to 3 months. Thaw before baking.
- Line baking sheets with parchment paper for easy release and easy cleanup.
- Let cookies rest on sheets for 2 to 3 minutes before removing them to a wire rack to cool. This keeps cookies from wrinkling, crumbling or breaking.
- Cookies must cool completely before being put into storage containers to ensure they don't get soggy or misshapen.
BREAD BAKING
- One ¼-ounce packet of yeast equals 2¼ teaspoons yeast.
- Using milk in place of water will produce a softer crust.
- After baking, you can soften the crust, if desired, by rubbing it with unsalted butter soon after removing it from the oven. This prevents it from drying out quickly.
- If a recipe calls for a specific type of flour, use the flour recommended. If you do not have bread flour, you can substitute unbleached, all-purpose flour, but your bread may not rise quite as much.
- Do not use "lite" or tub margarines for bread baking – they have different structures and they do not work as well in baking.
- Vital wheat gluten is the dried protein taken from the flour by eliminating the starch. It is a good dough conditioner or enhancement for yeast breads, especially for whole-grain breads or when using all-purpose flour. If a recipe specifically calls for vital wheat gluten, we recommend that it be used for best results.
- For 100% whole-wheat bread, use 1½ teaspoons vital wheat gluten per cup of flour.
- Many bread recipes have a "range" amount of flour – start by using the lower end of the range, then add more flour as needed to produce a smooth, not sticky dough.
- Using too much liquid, or baking on a humid day, can cause your bread to fall or wrinkle on top.
- An instant-read thermometer is helpful to have on hand when making bread. It can be used to measure the temperature of the liquid for proofing yeast, and for taking the internal temperature of the baked bread.
- Liquid for proofing yeast should be between 105°F and 110°F.
- Finished bread should have an internal temperature of 190°F (enriched breads, those that normally include eggs, are done at a higher temperature, closer to 207°F).
CAKE BAKING
- Have all ingredients and mixing bowls at room temperature. Room temperature ingredients incorporate and blend more easily.
- Fill pans immediately after mixing.
- Bake immediately after filling pans.
- Check for doneness at the beginning of the time range given.
- Cool cakes in pans until cool to the touch, and remove from pans to completely cool on a wire rack after baking.
- An offset spatula will make spreading frosting easier than a knife or regular spatula.
EGG WHITES
- Egg whites at room temperature are best for whipping. Bring to room temperature safely by placing uncracked eggs in a bowl of warm water for 10 to 15 minutes.
- Add a small amount of acid such as cream of tartar, lemon juice or vinegar when whipping egg whites to stabilize them and allow them to reach their optimum volume and stiffness. Use 1⁄8 teaspoon cream of tartar per large egg white – or 1 teaspoon cream of tartar for 8 egg whites.
- The time required to whip egg whites will vary with the temperature of the egg whites, age of egg whites, and temperature/humidity of the kitchen. Keep a close watch while whipping egg whites.
- In humid or damp weather, you may not get the volume of whipped egg whites that you do in drier, cooler weather.
- Place the room temperature egg whites in the clean, dry mixing bowl. Attach the clean, dry chef's whisk. Start whipping the egg whites on Speed 1 and gradually increase to Speed 6 until foamy, and then gradually increase to Speed 12. If egg whites are beaten too rapidly in the beginning, their structure will not be as stable and strong, and they will not reach the volume that they should when completely beaten. Over-beaten egg whites will also separate or deflate in a meringue topping.
- Timing when adding sugar to egg whites is important. Add sugar slowly and gradually to the whipped egg whites once they start to achieve soft peaks. Always add sugar in a slow, steady stream along the side of bowl while egg whites are being whipped – do not add sugar directly to the center of the bowl on top of beaten egg whites; doing this may cause them to deflate.
- When whipping egg whites, they will at first appear foamy or frothy. Then they will become stiffer and start to hold their shape. Next, soft peaks will form – this is when the tips of the peaks fall when the whisk is lifted up – soft peaks are often required for mousses or soufflés. The next stage is medium to stiff peaks. This is used for recipes such as meringues – the peaks will hold their shape, mostly drooping a bit at the tips. These perfectly hold their shape and are used for decorating. The final stage is stiff and dry. The whites will not be uniformly white, but will appear speckled and they will no longer be shiny in appearance.
- Beaten egg whites should be used immediately after beating them. If they wait for longer than 5 minutes, they will begin to deflate and lose volume and structure. Egg whites beaten with sugar or cream of tartar are more stable and will last a little longer.
SANITIZING EGG WHITES
Take care when adding raw egg whites to recipes that are not cooked or baked as there is a chance they may carry harmful bacteria. If you have a recipe that calls for raw egg whites, you may wish to use powdered egg whites or "sanitize" the egg whites by doing the following:
- Put the egg whites, 2 tablespoons of the granulated sugar from your recipe, 2 tablespoons water, and a pinch of cream of tartar into the Cuisinart® mixing bowl and stir until smooth.
- Put over a pan of simmering water and stir constantly with a spotlessly clean rubber spatula until the mixture registers 160°F on an instant-read thermometer – start checking the temperature after about a minute of stirring.
- When the egg white mixture registers 160°F, dry off the bottom of the bowl and place it on the Cuisinart® stand mixer. Insert the chef's whisk. Continue as directed in your recipe.
WHIPPING CREAM
The difference between heavy cream and whipping cream is the butterfat content. The higher the butterfat content, the more stable the whipped cream. Heavy cream has a higher butterfat content than whipping cream does. Creams that are not ultra-pasteurized are best for whipping.
To make whipped cream:
- Start with well-chilled cream, mixing bowl and chef's whisk (place bowl and whisk in freezer for at least 15 minutes before making whipped cream). The room should not be too hot.
- Whip cream on low speeds until small bubbles form – this will take about 30 seconds. Gradually increase to Speed 12 and continue beating until desired doneness, being careful not to over-whip. It takes just seconds for cream to go from smooth and creamy whipped cream to whipped cream with grainy bits of butter forming.
- If you are making a sweetened, flavored whipped cream, begin to slowly add the sugar and flavorings as the cream becomes soft and billowy in appearance.
- Confectioners' sugar should be sifted before adding to whipping cream.
- Stop whipping cream when it has doubled in volume – it should be smooth, creamy and thick, forming either soft (for garnishing desserts, folding into desserts) or stiff (for topping cakes, desserts, piping decoratively) peaks.
- Unless stabilized, whipped cream should be served immediately.
STABILIZED WHIPPED CREAM
Stabilized whipped cream will hold longer in the refrigerator before using, and it can also be used for decorating, using a pastry bag and tip. Using gelatin or a purchased stabilizer will prevent whipped cream from weeping.
To make stabilized whipped cream, soften powdered gelatin by sprinkling it over water in a measuring cup. Let stand 5 minutes to soften. Then place the measuring cup in a pan of simmering water and stir over low heat until gelatin is dissolved. Let cool slightly before adding to cream – but do not allow to get cold and harden.
- For 1 cup of cream, use ½ teaspoon gelatin soaked in 1 tablespoon water.
- For 2 cups of cream, use 1 teaspoon gelatin soaked in 2 tablespoons water.
- For 8 cups of cream, use 1 tablespoon + 1 teaspoon gelatin soaked in 8 tablespoons water.
Follow basic whipping instructions, adding cooled gelatin mixture to cream all at once after it has whipped to a slightly thickened stage.
LIMITED THREE-YEAR WARRANTY
(U.S. and Canada ONLY)
This warranty is available to consumers only. You are a consumer if you own a Cuisinart® Precision Master™ 3.5-Quart Stand Mixer that was purchased at retail for personal, family or household use. Except as otherwise required under applicable law, this warranty is not available to retailers or other commercial purchasers or owners. We warrant that your Cuisinart® Precision Master™ 3.5-Quart Stand Mixer will be free of defects in materials and workmanship under normal home use for 3 years from the date of original purchase.
We recommend that you visit our website, www.cuisinart. com for a fast, efficient way to complete your product registration. However, product registration does not eliminate the need for the consumer to maintain the original proof of purchase in order to obtain the warranty benefits. In the event that you do not have proof of purchase date, the purchase date for purposes of this warranty will be the date of manufacture.
CALIFORNIA RESIDENTS ONLY
California law provides that for In-Warranty Service, California residents have the option of returning a nonconforming product
- to the store where it was purchased or
- to another retail store that sells Cuisinart products of the same type.
The retail store shall then, according to its preference, either repair the product, refer the consumer to an independent repair facility, replace the product, or refund the purchase price less the amount directly attributable to the consumer's prior usage of the product. If neither of the above two options results in the appropriate relief to the consumer, the consumer may then take the product to an independent repair facility, if service or repair can be economically accomplished. Cuisinart and not the consumer will be responsible for the reasonable cost of such service, repair, replacement, or refund of nonconforming products under warranty. California residents may also, according to their preference, return nonconforming products directly to Cuisinart for repair or, if necessary, replacement by calling our Consumer Service Center toll-free at 1-800726-0190. Cuisinart will be responsible for the cost of the repair, replacement, and shipping and handling of such nonconforming products under warranty.
BEFORE RETURNING YOUR CUISINART PRODUCT
If your Cuisinart® Precision Master™ 3.5-Quart Stand Mixer should prove to be defective within the warranty period, we will repair or, if we think necessary, replace it. To obtain warranty service, please call our Consumer Service Center toll-free at 1-800-726-0190 or write to:
Cuisinart, 7475 North Glen Harbor Blvd., Glendale, AZ

Documents / ResourcesDownload manual
Here you can download full pdf version of manual, it may contain additional safety instructions, warranty information, FCC rules, etc.
Download Cuisinart Precision Master SMD-35 Series - 3.5 Qt. Stand Mixer Manual
Advertisement


Need help?
Do you have a question about the Precision Master SMD-35 Series and is the answer not in the manual?
Questions and answers