
Related Manuals for Weinmann RESCUE-PACK Plus


Summary of Contents for Weinmann RESCUE-PACK Plus
- Page 1 RESCUE-PACK Plus Emergency backpack Instructions for use Read these instructions for use before using the product. Ignoring the instructions for use may lead to serious injury or death.
-
Page 2: Table Of Contents
Stow breathing circuit ................19 5.1.4 Attach RFID card, NFC card, and customized labeling ......19 Adjusting shoulder straps ............20 5.2.1 Stow shoulder straps ................20 5.2.2 Remove shoulder straps ................20 Connecting emergency backpack to the power supply ....20 RESCUE-PACK Plus... - Page 3 Preparing parts for reuse ............. 34 Cleaning and disinfection plan ............. 35 Assembly Inserting backpack padding and backpack reinforcement ..... 36 Attaching shoulder straps ............37 Fitting charging interface port ............37 Fitting charging interface to LIFE-BASE 1NG XS ......38 RESCUE-PACK Plus...
- Page 4 Storage and transport Proper disposal 12.1 Emergency backpack and accessories bags ........45 12.2 Electronic waste ................45 12.3 Contaminated parts ..............45 Scope of supply 13.1 Version supplied (example) ............46 13.2 Other parts ................. 46 Technical data Warranty RESCUE-PACK Plus...
-
Page 5: Introduction
Caution! CAUTION indicates a dangerous situation which may result in minor injury if not prevented. Notice! NOTICE designates risks which may possibly cause material or environmental damage. Designates useful tips relating to a particular sequence of actions. RESCUE-PACK Plus... -
Page 6: Safety
Follow the instructions for use of the fitted devices and associated accessories. 2.1 Intended purpose RESCUE-PACK Plus offers extended transport and storage support for LIFE-BASE, MEDUMAT, MEDUVENT, and MEDUCORE as well as for other emergency medicine devices and other parts. -
Page 7: Do Not Modify The Design Of The Emergency Backpack And Other Parts
Do not modify the design of the emergency backpack and other parts. Modifications to the emergency backpack must only be carried out by WEINMANN Emergency. 2.2.3 Subject the emergency backpack to hygienic reprocessing Poor hygiene poses the following risks: •... -
Page 8: Description
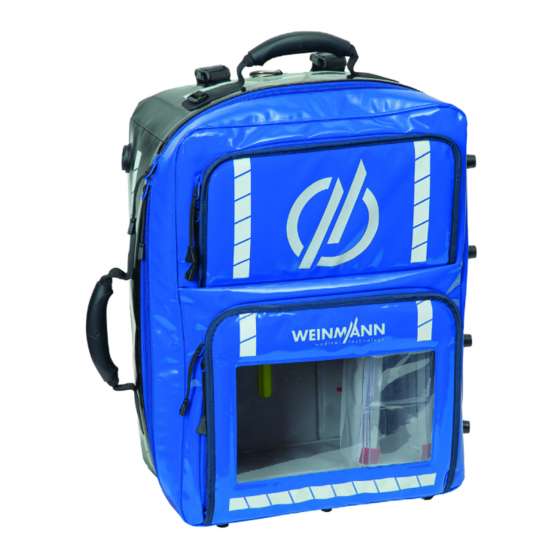
3-1 Front view of the emergency backpack Designation Upper front opening Reflective surface Lower front opening Transparent pocket insert for RFID card or NFC card Transparent pocket insert for customized labeling Zipper Handle Charging interface port Mounting loop for CO detector RESCUE-PACK Plus... - Page 9 3 Description 3-2 Rear view of the emergency backpack Designation Anchor point Shoulder strap Buckle Supporting base Pocket insert for shoulder straps Tension belt with magnetic fastener RESCUE-PACK Plus...
- Page 10 3 Description 3-3 Interior view of the emergency backpack Designation Transparent compartments Magnetic fastener Tension belt for breathing circuit Charging adapter Zipper protection Tension belt for oxygen cylinder Mounting loop for holding bracket Strap guide RESCUE-PACK Plus...
-
Page 11: Holding Brackets
Holding bracket for LIFE-BASE 1NG XS with charging interface Lock for LIFE-BASE portable units Crimp connector Cable tie Mounting rail Latch for holding bracket Retaining strap with magnetic fastener for LIFE-BASE light XS holding bracket LIFE-BASE light XS holding bracket RESCUE-PACK Plus... -
Page 12: Accessories Bags
Used to stow other parts and Accessories bag, square accessories for the device. Used to stow other parts and Accessories bag, long accessories for the device. Accessories bag support Used to secure the accessories bag, with strap guides long. RESCUE-PACK Plus... -
Page 13: Charging Adapter
Charging adapter with Connects the charging interface 12 V vehicle combination port to the power supply. plug Charging adapter with Connects the charging interface magnetic connector port to the power supply. RESCUE-PACK Plus... -
Page 14: Labeling
CE mark (confirms that the product complies with the applicable European directives and regulations) Compatible devices Consult instructions for use Limits of the storage temperature range Limits of the storage humidity range Do not iron Wash at 30 °C RESCUE-PACK Plus... - Page 15 3 Description Symbol Description Do not dry in a tumble-dryer RESCUE-PACK Plus...
-
Page 16: Function Check
4.3 Checking emergency backpack 1. Check that the following parts are secured firmly. Please note: The parts must be connected securely to the emergency backpack. • Handles • Shoulder straps • Holding bracket • Tension belts for oxygen cylinder RESCUE-PACK Plus... -
Page 17: Checking Charging Interface
The charging interface port must fit snugly against the emergency backpack. 3. If the charging interface does not function perfectly: Have WEINMANN Emergency repair or replace the charging interface. 4.5 Checking lock on LIFE-BASE 1NG XS 1. Insert portable unit into holding bracket. - Page 18 3. Push lock cross-bar upward. Please note: • The lock cross-bar must be easy to push upward. • The portable unit must not stick when being removed. 4. If the lock does not function perfectly: Have WEINMANN Emergency replace the lock. RESCUE-PACK Plus...
-
Page 19: Preparation And Operation
5 Preparation and operation Preparation and 5.1.3 Stow breathing circuit operation 5.1 Fitting out emergency backpack 5.1.1 Secure CO detector 5.1.4 Attach RFID card, NFC card, and customized labeling 5.1.2 Fill accessories bags and transparent compartments RESCUE-PACK Plus... -
Page 20: Adjusting Shoulder Straps
This may injure the user or patient. Secure device in the emergency backpack using the retaining strap with magnetic fastener. 1. Connect device to the power supply. To do so, follow the instructions for use of the particular device. RESCUE-PACK Plus... -
Page 21: Secure Device To Life-Base 1Ng Xs In The Emergency Backpack
Check whether the red control pin (b) is flush with the top edge of the lock hous- ing (a) and does not protrude. RESCUE-PACK Plus... -
Page 22: Removing Device From Emergency Backpack
5 Preparation and operation 1. Disconnect the device from the power 5.5 Removing device from supply. emergency backpack 5.5.2 Remove device on LIFE- BASE 1NG XS from 5.5.1 Remove device on LIFE- emergency backpack BASE light XS from emergency backpack RESCUE-PACK Plus... -
Page 23: Operating Device In The Emergency Backpack
Do not operate device in the emergency backpack while inside the vehicle. 3. Select position of the device. Remove the device from the emergency backpack to use it in the vehicle. 1. Secure device in the emergency backpack (see 5.4, p. 20). RESCUE-PACK Plus... -
Page 24: Lowering Emergency Backpack On A Rope
This may injure the user, the patient or third parties. Lower down emergency backpack on the anchor point. Load anchor point with a maximum of 13 kg weight (emergency backpack and contents). 4. Open lower front opening. 5. Remove breathing circuit. RESCUE-PACK Plus... -
Page 25: Using Tension Belt With Magnetic Fastener
5 Preparation and operation 5.8 Using tension belt with magnetic fastener RESCUE-PACK Plus... -
Page 26: Disassembly
To replace individual parts of the emergency backpack, follow the instructions in the particular chapter. It is not necessary to fully disassemble the emergency backpack. 6.1 Removing accessories bags RESCUE-PACK Plus... -
Page 27: Disassembling Holding Bracket
6 Disassembly 6.3 Disassembling holding bracket 6.3.2 Disassemble LIFE- BASE 1NG XS holding 6.3.1 Disassemble LIFE- bracket BASE light XS holding bracket RESCUE-PACK Plus... -
Page 28: Disassembling Charging Interface From Life-Base 1Ng Xs
6 Disassembly 6.5 Disassembling charging interface port 6.4 Disassembling charging interface from LIFE- BASE 1NG XS If the crimp connector is difficult to loosen: Use long-nose pliers. RESCUE-PACK Plus... -
Page 29: Removing Shoulder Straps
6 Disassembly 6.6 Removing shoulder 6.7 Removing backpack straps padding and backpack reinforcement If the backpack padding and backpack reinforcement prove difficult to remove: Turn the upper section of the backpack body inside out. RESCUE-PACK Plus... -
Page 30: Hygienic Reprocessing
2. If present: Remove the following parts from the emergency backpack: • Device on portable unit • Contents of the accessories bags • Breathing circuit 3. Remove emergency backpack (see 6, p. 26). Please note: The shoulder straps must not be removed. RESCUE-PACK Plus... -
Page 31: Cleaning Parts Manually
5. For cables: Wrap disposable cloth around cable and pull the cable through the disposable cloth. 6. In the event of persistent visible soiling: Repeat manual cleaning. 7. Wipe down parts with a damp cloth to remove residues of the cleaning agent. RESCUE-PACK Plus... -
Page 32: Disinfecting Parts By Wiping
3. For cables: Wrap disposable cloth around cable and pull the cable through the disposable cloth. 4. Wipe down parts with a damp cloth to remove residues of the disinfectant. 5. Allow parts to dry completely at room temperature. RESCUE-PACK Plus... -
Page 33: Reprocessing Parts Mechanically
6. Wash the parts in a washing machine with cleaning agent and disinfectant but without a spin cycle. 7. Allow parts to dry fully in a warm place. 8. Rub zippers with a colorless dry lubricant (silicone spray). RESCUE-PACK Plus... -
Page 34: Preparing Parts For Reuse
5. Connect emergency backpack to the power supply (see 5.3, 20). 6. Carry out a function check (see 4, p. 16). 7. In the case of prolonged storage: Place parts in storage in accordance with the storage conditions (see 14, p. 49). RESCUE-PACK Plus... -
Page 35: Cleaning And Disinfection Plan
Portable unit Follow the instructions for use of the portable unit and the device. Device The applicable instructions are those in the instructions for use enclosed by the manufacturers of the individual parts. Follow these instructions for use. RESCUE-PACK Plus... -
Page 36: Assembly
8.1 Inserting backpack padding and backpack reinforcement If the backpack padding and backpack reinforcement prove difficult to insert: Turn the upper section of the backpack body inside out. RESCUE-PACK Plus... -
Page 37: Attaching Shoulder Straps
• The negative pole (–) of the plug must be at the top and the positive pole (+) at the bottom. • The sealing ring (a) must be placed directly on the outer wall of the emergency backpack. RESCUE-PACK Plus... -
Page 38: Fitting Charging Interface To Life-Base 1Ng Xs
8 Assembly 8.5 Fitting holding bracket 8.5.1 Fit LIFE-BASE 1NG XS holding bracket 8.4 Fitting charging interface to LIFE- BASE 1NG XS RESCUE-PACK Plus... -
Page 39: Fit Life-Base Light Xs Holding Bracket
This may injure the user or patient and damage the device, accessories for the device or other parts. Secure oxygen cylinder in the emergency backpack using tension belts. RESCUE-PACK Plus... -
Page 40: Securing Accessories Bags
8 Assembly 8.7 Securing accessories bags RESCUE-PACK Plus... -
Page 41: Faults
If you are not able to remedy faults at once with the aid of the table, you should contact the manufacturer WEINMANN Emergency or an WEINMANN Emergency authorized dealer to have the emergency backpack repaired. To avoid more serious harm, do not continue using the emergency backpack. - Page 42 Magnetic fastener defective Replace magnetic fastener. circuit Emergency backpack cannot be Zipper defective Replace emergency backpack. closed Emergency backpack cannot be Replace shoulder straps (see 6.6, Shoulder strap defective carried on the shoulder 29), (see 8.2, p. 37). RESCUE-PACK Plus...
-
Page 43: Maintenance
Portable unit Follow the instructions for use of the portable units. The devices are subject to Manufacturer or a their own maintenance technician expressly Device intervals. Follow the authorized by the instructions for use of the manufacturer devices. RESCUE-PACK Plus... -
Page 44: Storage And Transport
11 Storage and transport 11 Storage and transport You can carry, put down, store, and transport the emergency backpack in the vehicle in the following positions: 11-1 Positions for storage and transport RESCUE-PACK Plus... -
Page 45: Proper Disposal
Electronic waste poses an environmental hazard, and must be subjected to proper disposal. Do not dispose of electronic waste in domestic waste. Contact WEINMANN Emergency or a licensed, certified electronic waste dealer for proper disposal. The following products are categorized as electronic waste: •... -
Page 46: Scope Of Supply
Reusable • For RESCUE-PACK Plus Accessories bag support with strap guides WM 9128 • Reusable Instructions for use RESCUE-PACK Plus – WM 66531 13.2 Other parts This sub-section describes other parts. Other parts can be ordered separately, if required. Supplementary Part Article no. - Page 47 13 Scope of supply Supplementary Part Article no. information • For RESCUE-PACK Plus Set of 2, latch for holding bracket WM 18019 • Reusable • For: BASE-STATION 1 NG, Kit, lock for LIFE-BASE portable units BASE-STATION 3 NG, WM 15211 BASE-STATION Mini II •...
- Page 48 13 Scope of supply Supplementary Part Article no. information • For RESCUE-PACK Plus Set of 2, shoulder strap WM 18029 • Reusable • For: RESCUE-PACK Plus, Set of 2, magnetic fastener for 25 mm wide straps WM 18021 LIFE-BASE 1NG XS •...
-
Page 49: Technical Data
Fabrics made of polyester with single-sided coating Materials made of thermoplastic polyurethane (TPU) * The temperature range of RESCUE-PACK Plus may differ from the temperature range of the transported devices. The temperature range of the devices takes precedence. RESCUE-PACK Plus... -
Page 50: Warranty
15 Warranty 15 Warranty Starting from the date of purchase, WEINMANN Emergency offers the customer a limited manufacturer’s warranty on a new original WEINMANN Emergency product or spare part installed by WEINMANN Emergency in accordance with applicable warranty terms and conditions for the particular product and the warranty periods listed below. - Page 52 Manufacturer Center for Production, Logistics, Service WEINMANN Emergency WEINMANN Emergency Medical Technology GmbH + Co. KG Medical Technology GmbH + Co. KG Frohbösestraße 12 Siebenstücken 14 22525 Hamburg 24558 Henstedt-Ulzburg GERMANY GERMANY T: +49 40 88 18 96-120 E: customerservice@weinmann-emt.de...
Need help?
Do you have a question about the RESCUE-PACK Plus and is the answer not in the manual?
Questions and answers