Weinmann MEDUMAT Standard2 Step-By-Step Instructions
Hide thumbs
Also See for MEDUMAT Standard2:
- Instructions for use manual (272 pages) ,
- Step-by-step instructions (24 pages) ,
- Additional information (24 pages)
Advertisement
Quick Links
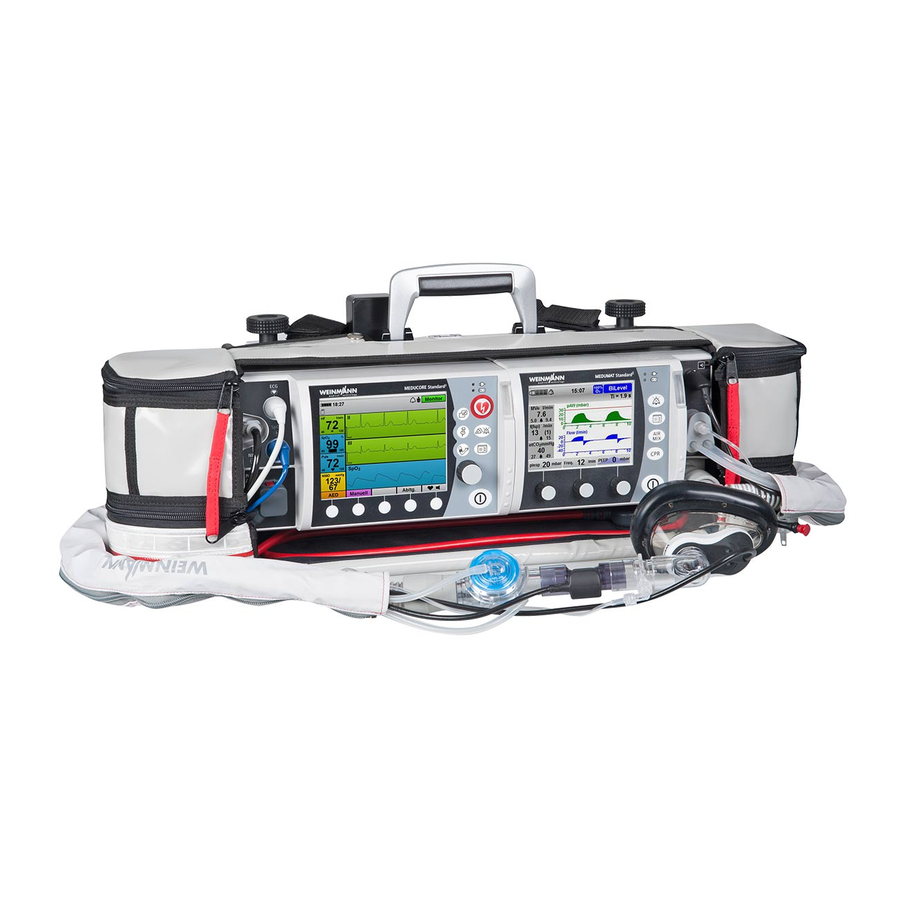
MEDUMAT Standard
2
Step-by-step instructions
• Start ventilation by height
• NIV therapy
Important:
• Resuscitation (CPR) with IPPV
This document
- Resuscitation (CPR) with CCSV
does not replace the
instructions for use.
• Anesthesia induction (RSI)
Complete information
can be found in
the instructions
for use.
Advertisement

Related Manuals for Weinmann MEDUMAT Standard2


Summary of Contents for Weinmann MEDUMAT Standard2
- Page 1 MEDUMAT Standard Step-by-step instructions • Start ventilation by height • NIV therapy Important: • Resuscitation (CPR) with IPPV This document - Resuscitation (CPR) with CCSV does not replace the instructions for use. • Anesthesia induction (RSI) Complete information can be found in the instructions for use.
-
Page 2: Operating Steps
Operating steps Switch on ventilator Select “New patient”. Select patient height and gender Select “next” Select the ventilation mode and check Start ventilation the displayed ventilation parameters... - Page 3 Start ventilation by height Start up quickly and ventilate accurately From now on, you no longer need to spend time considering which tidal volume (Vt) and which respiratory rate (Freq.) are best suited to your patient. With MEDUMAT Standard , you can now initiate ventilation even more precisely and quickly. By entering the patient’s height and gender, your ventilator automatically calculates all ventilation parameters for the ideal body weight (IBW).
- Page 4 Use presets and work according to guidelines In the Start menu, you can set the patient's height under the “New patient” menu item. This section explains how the ventilator automatically calculates the ideal tidal volume using height and gender. Ideal body weight (IBW) in kg is calculated from stated height in cm (x) as shown below: •...
- Page 6 NIV therapy Switch on ventilator. Select “New patient” in the start menu. Set the patient’s height and gender or select the appropriate patient group: Adult, Child, Infant.
- Page 7 Select one of the following ventilation modes: CPAP + ASB (if available) or CPAP (CPAP is the ventilation form “CPAP + ASB” with a ΔpASB of 0 mbar). Select the desired CPAP therapy using the navigation knobs: PEEP, pMax, ΔpASB. After adjusting the values, begin the ventilation via “start”.
- Page 8 Non-invasive ventilation (NIV) in the case of acute respirators insufficiency (ARI) Modified in accordance with therapy recommendations for emergency medicine 2022 published by the Association of Emergency Physicians of Northern Germany (Arbeitsgemeinschaft in Norddeutschland tätiger Notärzte e.V. - AGNN). Indications •...
- Page 9 Adjusting the ventilation mode in the case of hypoxemic ARI Mode: ..............CPAP (without pressure support) Initial PEEP: ....................5 mbar Initial FiO : ....................100% Target: ............SpO > 94 % (with COPD 88 – 92 %) Reduce the FiO accordingly in the case of a more pronounced SpO increase Increase PEEP in the case of insufficient SpO...
- Page 10 Inspiratory trigger The inspiratory trigger triggers a pressure support or a mechanical breath as soon as inhalation effort is detected. Flow Trigger sensitivity: 1 l/min-15 l/min 1 l/min 5 l/min 10 l/min 15 l/min Very sensitive Sensitive Insensitive Very insensitive Setting the levels of the inspiratory trigger: (If “3 levels”...
- Page 11 Pressure support and the expiratory trigger Pressure ΔpASB PEEP Time Flow Max. 4 s 100% 80% Flow 5% Flow Time Pressure support ΔpASB The pressure support is always given as a value above PEEP. In addition to the set PEEP, a patient receives this as soon as the inspiration trigger has been detected. Example calculation: PEEP = 5 mbar, ΔpASB = 10 mbar inspiration pressure in the inhalation phase = 15 mbar Expiratory trigger...
- Page 12 Pressure ramp (pressure increase time) A pressure ramp (or the pressure increase time) defines the time in which the pressure increases from the PEEP to the inspiration pressure. This pressure increase time can be set by the shape of the ramp: flat, medium and steep. < 0.2 seconds: Approx.
- Page 14 Resuscitation (CPR) with IPPV Switch on the device. Press the CPR button and select the pa- tient group. Check the ventilation parameters. In the ventilation phase of 30:2 or 15:2 resuscitation, press the mask with the “Double C grip” over the patient’s mouth and nose.
- Page 15 Following successful intubation, switch to continuous ventilation “CPR IPPV”. Check the ventilation parameters. During the cardiac rhythm analysis or defibrillation, select “pause” to pause the ventilation. Following successful defibrillation, if applicable, press “pause” again to restart the ventilation. The ventilation will start automatically after at most 50 seconds.
- Page 16 Resuscitation (CPR) with CCSV Switch on the device. Press the CPR button and select the pa- tient group. Check the ventilation parameters. In the ventilation phase of 30:2 or 15:2 resuscitation, press the mask with the “Double C grip” over the patient’s mouth and nose.
- Page 17 Following successful intubation, switch to continuous ventilation “CPR CCSV”. Perform chest compressions continuously. MEDUMAT Standard² will deliver mechanical breath synchronously to each compression. You can use the frequency tachometer shown above determine frequency of the compressions. If a chest compression device is being used, this will need to be specified using the middle navigation knob.
- Page 18 The hands-off time is shown for missing chest compressions. Once the alarm lim- it is reached, the device emits a hands- off time alarm . If this is not answered with compressions, the device automati- cally switches to "CPR IPPV" ventilation. If chest compressions are detected again by MEDUMAT Standard²...
- Page 19 Interactive Simulation Operate MEDUMAT Standard² live on your computer with our free simulation software. You can find more information at: WEINMANN-Emergency.com...
- Page 20 Advanced Life Support Give high-quality chest Identify and treat Consider reversible causes compressions and • Coronary angio- graphy/percutaneous • Hypoxia • Give oxygen coronary • Hypovolaemia • Use waveform • Mechanical chest capnography • Hypo-/hyperkalemia/ compressions to metabolic • Continuous facilitate transfer/ compressions if •...
- Page 22 Anesthesia induction (RSI) Switch on the device. Select “New patient” on the home screen and set the patient’s height and gender. Or select the appropriate patient group: Adult, Child, Infant. Select “RSI” “Mode” submenu. MEDUMAT Standard² begins therapy in demand mode. In this mode, the spontaneously breathing patient is pre-oxygenated.
- Page 23 To check the tube position following successful intubation or as a fallback position for a difficult airway, switch to the Manual mode. Check the ventilation parameters. Con- nect the breathing circuit to the endo- tracheal tube or press the mask with the “Double C grip”...
- Page 24 Excerpt from the S1 guideline "Prehospital Emergency Anaesthesia in Adults" of the DGAI Indications for prehospital emergency anaesthesia • Acute respiratory insufficiency (hypoxia and/or respiratory rate* < 6 or > 29/min) and contraindications for or failure of non-invasive ventilation (NIV) •...
- Page 25 The complete guideline is available on the website of the Scientific Medical Society’s Working Group (Arbeitsgemeinschaft der Wissenschaftlichen Medizinischen Fachgesellschaft e.V.) at: awmf.org. Source: Anästh Intensivmed 2015;56:317-335 Aktiv Druck & Verlag GmbH (Translation by WEINMANN Emergency) Please note that different standard operating procedures or guidelines may apply in your region.
- Page 26 Simplify Saving Lives...
- Page 28 We Simplify Saving Lives WEINMANN-Emergency.com Follow us on: WM 68061 2022-08 EN © Copyright reserved. Duplication of any kind can only be undertaken with the express permission of WEINMANN Emergency. Subject to any printing errors as well as changes in technology and design.
Need help?
Do you have a question about the MEDUMAT Standard2 and is the answer not in the manual?
Questions and answers