RADEMACHER RolloTron Swivel Winder Comfort 1500 Operating And Assembly Manual
Electronic roller shutter belt winder rollotron swivel winder comfort
Source: rademacher.de
Table of Contents

Related Manuals for RADEMACHER RolloTron Swivel Winder Comfort 1500


Summary of Contents for RADEMACHER RolloTron Swivel Winder Comfort 1500
- Page 1 Electronic Roller Shutter Belt Winder RolloTron Swivel Winder Comfort Operating and Assembly Manual Item No.: RolloTron Swivel Winder Comfort 1500 1623 30 19 RolloTron Swivel Winder Comfort 1540 * 1615 30 19 Mini belt VBD 649-02 (01.23)
-
Page 2: Dear Customer
Dear Customer, With your purchase of a RolloTron Swivel Winder Comfort, you have chosen a quality product manufac- tured by RADEMACHER. Thank you for the trust you have placed in us. This roller shutter belt winder has been designed to provide optimal convenience and operability as well as in terms of ensuring solidity and durability. -
Page 3: Table Of Contents
Table of Contents Dear Customer, .............2 13. Introduction to opening and setting the functions ..............30 These instructions............4 Application of this manual ..........4 14. Initial commissioning with the help of the Hazard symbols ............4 installation wizard ............31 Levels of danger and signal words ........5 15. -
Page 4: These Instructions
1. These instructions..describe how to install, connect the electrical system and operate your roller shutter belt winder RolloTron Swivel Winder Comfort. 1.1 Application of this manual ◆ Before you begin, please read this manual through ◆ When passing the RolloTron Swivel Winder Comfort completely and follow all the safety instructions. -
Page 5: Levels Of Danger And Signal Words
2.1 Levels of danger and signal words CAUTION! DANGER! This hazard may result in minor or moderate injury if This hazard will result in serious injury or death if not not avoided. avoided. WARNING! WARNING! ATTENTION! This hazard may result in serious injury or death if not This hazard may lead to property damage. -
Page 6: Safety Instructions
3. Safety instructions the settings and during normal operation, and keep The use of defective equipment can lead to personal other people away from the area to avoid injury in injury and damage to property (electric shocks, short the event the shutters suddenly slip. circuiting). -
Page 7: Intended Use
Only use the RolloTron Swivel Winder Comfort for open- Only use original spare parts ing and closing roller shutters with a permissible belt. from RADEMACHER ◆ By doing so, you avoid risk of malfunctions and Mechanical locks of any kind are not suitable damage to your RolloTron Swivel Winder Comfort. -
Page 8: Improper Use
3.1 Intended use Operating conditions ◆ Only operate the RolloTron Swivel Winder Comfort in dry rooms. ◆ An easily accessible 230 V/50 Hz mains socket must be available at the installation site. ◆ The roller shutters must run up and down smooth- ly and should not stick. -
Page 9: Technical Term - Definition
3.3 Technical Term - Definition DIN EN 13659 End points "Shutters and external Venetian blinds - Performance ◆ An end point is defined and set for each running requirements including safety. " direction of the roller shutter. Once this point has been reached, the RolloTron Swivel Winder Comfort ◆... -
Page 10: Included In Delivery
4. Included in delivery Included in delivery 1 x RolloTron Swivel Winder Comfort 1500 or 1 x RolloTron Swivel Winder Comfort 1540 1 x Wall bracket 2 x Assembly screws (4 x 40 mm) 2 x Assembly screws (4.2 x 19 mm) -
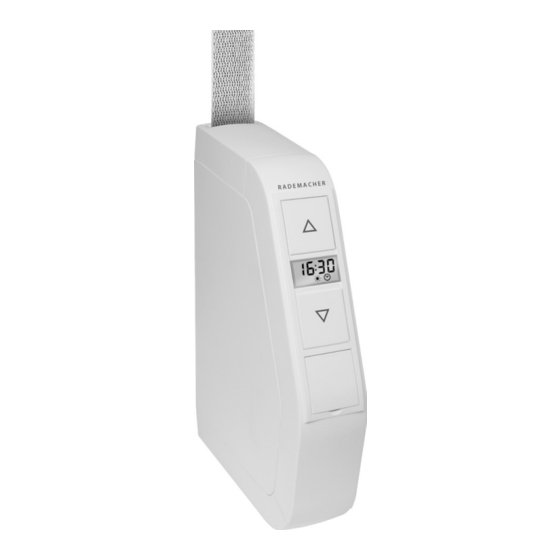
Page 11: Overview Rollotron Swivel Winder Comfort
5. Overview RolloTron Swivel Winder Comfort Wall bracket Mounting Belt inlet Reel compartment cover Fastening hook Disengaging bracket Reel Display Operating buttons Drive release Type plate Assembly locking device Setting buttons Mains connection Cover plate Mounting Connection socket for the light sensor... -
Page 12: Operating Buttons
5.1 Operating buttons Pos. Symbol Description Up / Stop button ◆ The roller shutter travels upwards ◆ The roller shutter stops Down / Stop button ◆ The roller shutter travels downwards ◆ The roller shutter stops Menu button ◆ Call up the main menu ◆... -
Page 13: The Display And Its Symbols
5.2 The display and its symbols Pos. Symbol Description Time / setting parameters Switching automatic mode on/off Direction of travel - up / down Switching times (opening / closing time) Automatic dusk function Automatic solar function Setting the end points Setting the time / date Setting the weekend switching times... -
Page 14: The Standard Display And The Main Menu
5.3 The standard display and the main menu The standard display (see example) The main menu Displays the time, no Enables display and automatic functions are selection of the individual active. functions and menus. Displays the time and The selected menu the activated automatic flashes, e.g. -
Page 15: Functional Description
6. Functional description The RolloTron Swivel Winder Comfort is an electric roller Features and control options: shutter belt winder designed for use inside. The unit is installed as a surface-mounted device. ◆ Installation wizard The power supply is provided via the enclosed connect- ◆... -
Page 16: Description Of The Safety Functions
6.1 Description of the safety functions Obstacle detection Overload cut-off The movement of the belt is monitored. If the roller The RolloTron Swivel Winder Comfort is equipped shutters hit an obstacle in the DOWN ( t t ) direction, the with an overload cut-off system. belt will stop moving and the RolloTron Swivel Winder If the drive jams in the UP ( ▲ ... -
Page 17: Conduct In The Event Of Power Failure
6.2 Conduct in the event of power failure After a power failure the time flashes in the display and Data retention following a power failure the installation wizard is active. All settings are permanently saved. The configured switching times are retained even following extended power failure. -
Page 18: Technical Specifications
7. Technical Specifications Power supply Operating conditions Number of switching Supply voltage: 230 V ~ / 50 Hz 4 (up and down) times: Nominal power: 70 W Mains connecting cable: 2 x 0.75 mm (H03VVH2-F) Consumption: Standby: < 0.5 W Permissible ambient tem- 0 °C to +40°C perature:... -
Page 19: Dimensions
7.1 Dimensions RolloTron Swivel Winder Comfort Item No.: 1623 30 19 / 1615 30 19 OBEN R A D E M A C H E R All dimensions in mm... -
Page 20: Permissible Roller Shutter Belts
7.2 Permissible roller shutter belts ATTENTION! The specifications are intended for guidance only and apply to an ideal installation situa- The RolloTron Swivel Winder Comfort may be dam- tion. aged if excessively long belts are used. The actual values may vary due to local Only use belts of the permissible lengths. -
Page 21: Safety Instructions For The Installation
8. Safety instructions for the installation Poor routing of the belt can cause the belt to fail Incorrect installation can lead to property damage. and leads to unnecessary loads on the RolloTron ◆ Strong forces are exerted during operation of the sys- Swivel Winder Comfort. -
Page 22: Preparation For Installation
9. Preparation for installation Take measurements. Check that there is sufficient space for the RolloTron Swivel Winder Comfort. Remove the old belt winder, if you are carrying out a conversion to an existing roller shutter system. Let the roller shutter move fully down, until the slats are completely closed. - Page 23 9. Preparation for installation Prepare the belt. Cut the belt off approx. 20 cm under the mounting position. Fold the end of the belt over by approx. 2 cm and cut a short slit in the centre. This enables you to subsequently hook the belt onto the reel.
-
Page 24: Mounting The Wall Bracket
10. Mounting the wall bracket Note for mounting on window frames, etc. Draw on the new mounting holes. Hold the wall bracket onto the Weak window frames may break. desired installation position ◆ When mounting on window frames, please check and draw on both mounting their structure and load capacity. - Page 25 10. Mounting the wall bracket The letterings "TOP and OBEN" on the wall bracket indicates the correct mounting posi- tion. Screw on the wall bracket with the screws provided and ensure that the right side is facing upwards (TOP/OBEN). Use the correct type of screw depending on the mounting surface, see the 'included in delivery' section on page 10.
-
Page 26: Drawing In And Fastening The Belt
11. Drawing in and fastening the belt First, plug in the small appliances plug into the mains connection of the RolloTron Swivel Winder Comfort and subsequently the mains plug into the socket. CAUTION! There is a risk of injury from the reel. Never reach into the reel compartment when the motor is running. - Page 27 11. Drawing in and fastening the belt Next, draw-in the belt into the RolloTron Swivel Winder Comfort from the top. Feed the belt into the device, as shown in the image, and slide it over the fastening hook from below. Re-insert the mains plug into the socket.
-
Page 28: Mounting The Rollotron Swivel Winder Comfort
12. Mounting the RolloTron Swivel Winder Comfort Slide the RolloTron Swivel Winder Comfort onto the wall bracket from below until it engages. The RolloTron Swivel Winder Comfort may fall off again otherwise. WARNING! WARNING! A damaged connecting cable may cause a short circuit. - Page 29 12. Mounting the RolloTron Swivel Winder Comfort Mount the light sensor (not included, see page 57, Accessories). ◆ Insert the light sensor plug into the designated connection socket at the bottom of the RolloTron Swivel Winder Comfort. ◆ Subsequently secure the light sensor to the win- dow pane using the suction cup.
-
Page 30: Introduction To Opening And Setting The Functions
13. Introduction to opening and setting the functions Open the main menu. Select the desired setting (e.g. On). Pressing the menu button in the standard display causes the main menu to open. By confirming the setting you will return Select the desired menu. to the main menu. -
Page 31: Initial Commissioning With The Help Of The Installation Wizard
14. Initial commissioning with the help of the installation wizard The wizard automatically guides you through the con- Additional information about configuring the end points figuration process for initial commissioning or after a software reset (see page 47). The end points must be configured for the roller shutters With the help of the installation wizard you will be to stop at the desired upper and lower positions. - Page 32 14. Initial commissioning with the help of the installation wizard The installation wizard appears as soon as Set the current date (day.month) and the plug is plugged into the socket. confirm each entry. All icons and digits in the display will flash. Set the current year and confirm the Activate the time setting function.
- Page 33 14. Initial commissioning with the help of the installation wizard Set the upper end point. ATTENTION! Setting the wrong upper end point may lead to over- load or damage the RolloTron Swivel Winder Comfort or the drive. ◆ Do not set the upper end point right up to the limit Press and hold the Up button.
- Page 34 14. Initial commissioning with the help of the installation wizard The standard display is shown as soon Set the lower end point. as the final setting is confirmed. Press and hold the Down button. The RolloTron Swivel Winder Comfort is now ready for operation.
-
Page 35: Manual Operation
15. Manual operation Manual operation is possible in any of the modes and has priority over the programmed automatic functions. Open the roller shutters. By briefly pressing the button, the roller shutters will move to the upper end point. Stop the shutters in the interim. Close the roller shutters. -
Page 36: Description Of The Functions And Setting Options In The Main Menu
16. Description of the functions and setting options in the main menu Functions in the main menu Pos. Symbol Description Automatic operation Switching times (opening / closing time) Automatic dusk function (with light sensor) In the main menu, you can call up and set all of the functions for the RolloTron Swivel Automated solar function (with light sensor) Winder Comfort. -
Page 37: Switching Automatic Mode On/Off
16.1 Switching automatic mode on/off Automatic mode [ On ] Open the main menu. ◆ All previously entered automatic mode functions Select automatic mode and open the are active. menu. ◆ Manual operation is also possible in automatic mode. Automatic mode [ OFF ] ◆... -
Page 38: Setting The Switching Times (Opening And Closing Times)
16.2 Setting the switching times (opening and closing times) You can configure four different opening and closing Deactivating the switching times [ OFF ] times for the RolloTron Swivel Winder Comfort in order to Each switching time can be deactivated individually. open or close your roller shutters at your preferred times. - Page 39 16.2 Setting the switching times (opening and closing times) Set the opening time [ ▲ ] for Monday to Friday: Set the opening [ ▲ ] and closing time [ t ] for ▲ ▲ Saturday and Sunday: Set the desired opening time (hours : min- utes) and confirm each entry.
-
Page 40: Setting The Automatic Dusk Function
16.3 Setting the automatic dusk function The automatic dusk function causes the roller shutters Open the main menu. to close to the lower end point automatically. Select the automatic dusk function and Automatic dusk function with connected open the menu. light sensor At twilight, the roller shutters will lower to the lower end... - Page 41 16.3 Setting the automatic dusk function Setting the twilight limit: Set the desired limit. ACTUAL value Currently measured brightness (e.g. 10). "- -" = too bright SET value Configurable set limit 01 = very dark, approx. 2 Lux 15 = less dark, approx. 50 Lux If the set limit value is not met due to the on- set of twilight, the roller shutters will close.
-
Page 42: Setting The Automatic Solar Function
16.4 Setting the automatic solar function The automatic solar function enables brightness-de- pendent control of the roller shutters in combination with the light sensor. To do this, the light sensor is secured to the window pane with a suction cup and then plugged into the RolloTron Swivel Winder Comfort. - Page 43 16.4 Setting the automatic solar function Automatic lowering If the sensor detects uninterrupted sunlight for 10 min- 10 mins utes, the shutter will descend until its shadow covers the light sensor. Automatic clearing After approx. 20 minutes, the roller shutter is automati- After cally raised a small amount to uncover the sensor.
- Page 44 16.4 Setting the automatic solar function Setting the solar limit value: Open the main menu. Select the automatic solar function and Set the desired limit. open the menu. ACTUAL value Currently measured brightness (e.g. 37). "- -"= too dark Switch the automatic solar function on and confirm the entry.
-
Page 45: Setting The End Points
16.5 Setting the end points Setting order First move the roller shutters to the centre position. Set the upper end point, see page 33. Set the lower end point, see page 34. Open the main menu. Select the end point and open the menu. -
Page 46: Set Time And Date
16.6 Set time and date Set the year, Open the main menu. see page 32. Select the time and date and open the menu. Setting order Set the time (hours: minutes), see page 32. Set the date (day. month), see page 32. -
Page 47: Erase All Settings, Software Reset
17. Erase all settings, software reset If necessary, you can erase all of your settings and return This displays the software version for the RolloTron the RolloTron Swivel Winder Comfort system to its origi- Swivel Winder Comfort. nal factory settings. Example Remove the cover plate from the setting buttons. -
Page 48: Removing The Rollotron Swivel Winder Comfort (E.g. In The Event Of A Move)
18. Removing the RolloTron Swivel Winder Comfort (e.g. in the event of a move) Remove the cover plate from the setting buttons. Erase all settings. Simultaneously press and hold the buttons for 4 seconds. Fully close the roller shutters. Continue to press and hold the down button. When doing so, pull out the belt as far as possible from the top of the RolloTron Swivel Winder Comfort. - Page 49 18. Removing the RolloTron Swivel Winder Comfort (e.g. in the event of a move) Remove the reel compartment cover and check the position of the fastening hook. If necessary, move the fastening hook into an easily accessible position. For this, plug the mains cable into the RolloTron Swivel Winder Comfort and into the socket.
-
Page 50: Removing The Belt In The Event Of Unit Failure
19. Removing the belt in the event of unit failure In the event that the RolloTron Swivel Winder Comfort Maintain pressure on the disengaging bracket and pull unit fails and the motor no longer runs, you can use the the belt out of the RolloTron Swivel Winder Comfort as disengaging bracket provided in order to fully remove far as possible. -
Page 51: What To Do If
20. What to do if... ? Fault Possible cause / solution ... the RolloTron Swivel Winder Comfort indicates Check the power supply incl. connecting cable and plug. no functions? ... the RolloTron Swivel Winder Comfort fails to a) There may have been a power failure, see page 17. Reset the time react at the configured switching time? and date with the help of the installation wizard, see page 32. - Page 52 20. What to do if... ? Fault Possible cause / solution ... the roller shutters stop during downward travel? a) The roller shutters may have hit an obstacle. Move the roller shutters back up and remove the obstacle. b) Slats have shifted out of alignment. If possible, move the roller shutters back up and realign the slats.
-
Page 53: Information About Maintenance And Care Of Your Equipment
21. Information about maintenance and care of your equipment Maintenance Care You can clean the RolloTron Swivel Winder Comfort CAUTION! using a damp cloth. Please do not use aggressive or abrasive cleaning agents. A lack of maintenance can lead to personal injury through damage to your RolloTron Swivel Winder Comfort and the roller shutter system. -
Page 54: Tractive Force Diagram
22. Tractive force diagram Lifting weight [Kg] Belt thickness 1.0 mm Belt thickness 1.3 mm Belt thickness 1.5 mm Belt length [m]... -
Page 55: Factory Settings
23. Factory Settings Pos. Description Status / settings Automatic operation Switching times (opening / closing time) Opening times (Monday to Friday) 07:00 Closing times (Monday to Friday) 20:00 Opening times (Saturday and Sunday) 08:00 Closing times (Saturday and Sunday) 22:00 Automatic dusk function Twilight limit value Automatic solar function... -
Page 56: Simplified Eu Declaration Of Conformity
24. Simplified EU Declaration of Conformity RADEMACHER Geräte-Elektronik GmbH hereby declares The full text of the EU declaration of conformity is that the RolloTron Swivel Winder Comfort comply with included with the product and is kept on file by the the Directives 2006/42/EC (Machinery Directive) and manufacturer.s. -
Page 57: Accessories
RolloTron Swivel Winder Comfort to Item No. Cable length local conditions. 7000 00 88 0.75 m Further information about our accessories is available at 7000 00 89 1.5 m the following website: 7000 00 90 www.rademacher.de/zubehoer 7000 00 91 7000 00 92 10 m... - Page 60 RADEMACHER Geräte-Elektronik GmbH Buschkamp 7 46414 Rhede (Germany)
Need help?
Do you have a question about the RolloTron Swivel Winder Comfort 1500 and is the answer not in the manual?
Questions and answers