Table of Contents
Advertisement
Quick Links
Advertisement
Table of Contents

Related Manuals for AGFA CG Triumvirate 3R20P


Summary of Contents for AGFA CG Triumvirate 3R20P
- Page 1 3R20/ 3R20P Direct Thermal Portable Printer USER’S MANUAL...
- Page 2 The copyright in this manual, the software, and firmware in the printer described therein are owned by the company. All rights reserved. CG Triumvirate is a trademark of Agfa Corporation. CG Triumvirate Bold Condensed font is under license from the Monotype Corporation.
- Page 3 Agency Compliance and Approvals GB 4943.1 GB/T9254 GB 17625.1 IS 13252(Part 1)/ IEC 60950-1 KN 32 / KN 35 EN 55032 EN 55035 EN 62368-1 FCC part 15B This device complies with Part 15 of the FCC Rules. Operation is subject to the following two conditions: (1) This device may cause harmful interference, and (2) this device must accept any interference received, including interference that may cause undesired operation.
- Page 4 4. DO NOT throw the battery in municipal waste. 5. The symbol of the crossed out wheeled bin indicates that the battery should not be placed in municipal waste. Caution: Hot surface for printhead. Do not touch the printhead before it cooling.
-
Page 5: Table Of Contents
Contents 1. Introduction ......................1 1.1 Product Introduction ..................1 1.2 Product Features ....................2 1.2.1 Printer Standard Features ..............2 1.2.2 Printer Optional Features ..............3 1.3 General Specifications ..................3 1.4 Print Specifications ................... 4 1.5 Media Specifications ..................5 2. - Page 6 6.3 Calibrating Media Sensor by Diagnostic Tool ..........29 6.3.1 Auto Calibration ................29 6.4 Setting Bluetooth by Diagnostic Tool (Optional) .......... 30 7. Troubleshooting ....................31 7.1 Common Problems ..................31 8. Maintenance ...................... 33 Revise History ....................... 34...
-
Page 7: Introduction
1. Introduction 1.1 Product Introduction Thank you very much for purchasing zenpert barcode printer. Enjoy zenpert’s reputation for cost-efficient, high durability printers with the 3R20 Series mobile barcode printer. The 3R20 Series is a comfortable, light-weight printer capable of working with any mobile printing application where you need quick, simple receipts/labels on demand. -
Page 8: Product Features
1.2 Product Features 1.2.1 Printer Standard Features The printer offers the following standard features. Product standard feature Direct thermal printing Black mark reflective sensor Transmissive gap sensor Head open sensor 1 Feed/ Pause button 1 Power button 1 Top cover open button 1 LCD screen for printer status (indicates battery level/ media type/ firmware version/ BT MAC address/ error messages) Audible alert Programmable buzzer... -
Page 9: Printer Optional Features
Text, bar code, graphics/image printing (Please refer to the TSPL EZC programming manual for supporting code page) Supported Bar Codes Supported Image Format 1D bar code 2D bar code Windows .BMP, CODABLOCK Code128 subsets mode, DataMatrix, A.B.C,Code128UCC, (Max. 256 colors Maxicode, PDF-417, graphics) Aztec, MicroPDF417,... -
Page 10: Print Specifications
Auto-switching AC adapter Note: The printer will automatically turn off when stopping operation after 30 minutes. Battery Output 7.4V Capacity 2000mAh Charging time 2hrs Environmental Operation Temperature: 0 ~ 40˚C (32 ~ 104˚F) condition Storage Temperature: -20 ~ 60 ˚C (-4 ~ 140˚F) Relative Humidity: - Operation: 10% to 85% non-condensing - Storage: 5% to 90% non-condensing... -
Page 11: Media Specifications
1.5 Media Specifications Media Specifications 3R20 Series 3R20P Series Media roll capacity Max. O.D.: 50 mm (1.97”) Media type Continuous, die-cut, black mark Media wound type Outside wound 15 mm (0.59”) ~ 2,794 mm (110”) Media length Tear mode: 25.4 mm (1”) ~ max. print length Without media fixing tabs: max. -
Page 12: Operations Overview
2. Operations Overview 2.1 Unpacking and Inspection This printer has been specially packaged to withstand damage during shipping. Please carefully inspect the packaging and printer upon receiving the bar code printer. Please retain the packaging materials in case you need to reship the printer. Unpacking the printer, the following items are included in the carton. -
Page 13: Printer Overview
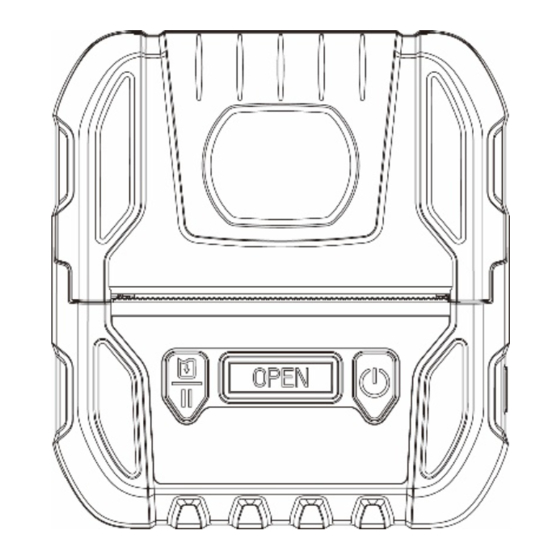
2.2 Printer Overview 2.2.1 Front View Power on/ off button Media cover release button Feed/ Pause button LCD screen (indicates battery status/ media type/ firmware version/ BT MAC address/ error messages) Media cover Media cover window... -
Page 14: Interior View
2.2.2 Interior View Tear edge Print head Gap sensor Black mark sensor Platen roller... -
Page 15: Rear View
2.2.3 Rear View Li-ion Battery Battery open clasp USB interface Interface cover... -
Page 16: Operator Control
2.3 Operator control 2.3.1 LCD Indication and Keys Power on/ off button Media cover release button Feed/ Pause button LCD screen (indicates battery status/ media type/ firmware version/ BT MAC address/ error messages) Keys Function 1. Press and hold for 2-3 seconds to turn on the printer. 2. - Page 17 LCD monitor Cont. Media type Battery level B1.00 D148 F/W version Bluetooth BT MAC address...
-
Page 18: Battery Charging Cycle
2.3.2 Battery Charging Cycle 1. Charging the battery when the printer turns on. Fully charged then turn off Charging mode the printer automatically. Charging cycle LCD version 1. Charging the battery when 1 block blinking Charging level: 0~25% the printer turns on. 2 blocks blinking Charging level: 25~50% 3 blocks blinking... -
Page 19: Setup
3. Setup 3.1 Install the Battery 1. Insert the battery to the left side of battery slot on the rear of the printer. 2. Push the right side of the battery down. 3. Pull the battery latch to lock the battery. -
Page 20: Charge The Battery
Battery safety warning: DO NOT throw the battery in fire. DO NOT short circuit the contacts. DO NOT disassemble the battery. DO NOT throw the battery in municipal waste. The symbol of the crossed out wheeled bin ( ) indicates that the battery should not be placed in municipal waste. -
Page 21: Communicate
the printers), the printer or battery charger may stop charging for a period of time to keep the battery at acceptable temperatures. 3.3 Communicate 3.3.1 Connecting with the Communication Cable USB to USB Cable 1. Open the interface cover and connect the printer to the computer with USB cable. -
Page 22: Connecting With Bluetooth
3.3.2 Connecting with Bluetooth Turn on the printer and make sure the Bluetooth Default device opened. Name Model name+last Note: 4 digits of Mac Please refer to section 6.4 to change the name of default and PIN. Address 0000... -
Page 23: Loading The Media
3.4 Loading the Media 1. Open the printer media cover by pressing the media cover release button. 2. Place the media roll at the correct side, and pull out enough paper over the tear edge. 3. Press the media cover on both sides to close it and make sure the media cover have closed correctly. -
Page 24: Accessories
4. Accessories 4.1 Install the Media Spacers Open the printer media cover by pressing the media cover release button. Fix the media spacer in the slots on printer inner mechanism as indicated. Slots... - Page 25 Note: Users can install the media spacers on the different slots as picture shown to fit the 1" width label 1.5" width width. 2" width 2.5" width Complete the installation of media spacers. Place the paper roll between the media spacers.
- Page 26 Note: 1. The media spacers could support 1/ 1.5/ 2/ 2.5 inches width of media roll. 2. When removing the media spacers, please follow the removal direction as pictured.
-
Page 27: Install The Shoulder Strap (Option)
4.2 Install the Shoulder Strap (Option) Install the shoulder strap on the both sides of the pillars as indicated. Pillars The printer can be hung on the shoulder strap. -
Page 28: Power-On Utilities
5. Power-on Utilities There are three power-on utilities to set up and test printer hardware. These utilities are activated by pressing FEED button ( ) then turning on the printer power simultaneously and release the button at different positions of LCD indicator. Please follow the steps below for different power-on utilities. -
Page 29: Self-Test And Dump Mode
5.2 Self-test and Dump Mode Please follow the steps below. 1. Please check if the media roll has installed correctly. 2. Turn off the power switch ( 3. Hold on the FEED button ( ) then turn on the power switch ( Self Test.. - Page 30 Printing setting information Print speed (inch/sec) Print darkness Label size (inch) Black mark height (inch) Gap/black mark sensor intension Code page Country code Sleep time ZPL setting information Print darkness Print speed (inch/sec) Label size Control prefix Format prefix Delimiter prefix Printer power up motion Printer head close motion Note:...
- Page 31 Numbers of download files Total & available memory space Print head check pattern Dump mode Printer will enter dump mode after printing printer configuration. In the dump mode, all characters will be printed in 2 columns as following. The left side characters are received from your system and right side data are the corresponding hexadecimal value of the characters.
-
Page 32: Printer Initialization
5.3 Printer Initialization Printer initialization is used to clear DRAM and restore printer settings to defaults. Printer initialization is activated by the following procedures. 1. Turn off the power switch ( 2. Hold on the FEED button ( ) then turn on the power switch ( Initialize.. -
Page 33: Diagnostic Tool
6. Diagnostic Tool Diagnostic Utility is an integrated tool incorporating features that enable you to explore a printer’s settings/status; change a printer’s settings; download graphics, fonts and firmware; create a printer bitmap font; and send additional commands to a printer. With the aid of this powerful tool, you can review printer status and settings in an instant, which makes it much easier to troubleshoot problems and other issues. -
Page 34: Printer Function
6.2 Printer Function 1. Select the PC interface connected with bar code printer. The default interface setting is USB interface. If USB interface is connected with printer, no other settings need to be changed in the interface field. 2. Click the “Printer Function” button to setup. 3. -
Page 35: Calibrating Media Sensor By Diagnostic Tool
6.3 Calibrating Media Sensor by Diagnostic Tool 6.3.1 Auto Calibration 1. Make sure the media is already installed and media cover is closed. (Please refer section 3.4) 2. Turn on the printer power switch. 3. Open Diagnostic tool and set interface (The default setting is USB). The default interface setting is USB interface. -
Page 36: Setting Bluetooth By Diagnostic Tool (Optional)
6.4 Setting Bluetooth by Diagnostic Tool (Optional) 1. Make sure the media is already installed and media cover is closed. (Please refer section 3.4) 2. Turn on the printer power switch. 3. Open Diagnostic tool and set interface. (The default setting is USB) The default interface setting is USB interface. -
Page 37: Troubleshooting
7. Troubleshooting 7.1 Common Problems The following guide lists the most common problems that may be encountered when operating this bar code printer. If the printer still does not function after all suggested solutions have been invoked, please contact the Customer Service Department of your purchased reseller or distributor for assistance. - Page 38 Missing printing on the left or * Wrong label size setup. * Set the correct label size. right side of label * The print head is dirty. * Clean the print head. Gray line on the blank label * The platen roller is dirty. * Clean the platen roller.
-
Page 39: Maintenance
8. Maintenance This session presents the clean tools and methods to maintain your printer. 1. Please use one of following material to clean the printer. Cotton swab Lint-free cloth Vacuum / Blower brush 100% Ethanol or Isopropyl Alcohol ... -
Page 40: Revise History
Revise History Date Content Editor Kate 2019/12/31 Modify Ch.3.2.1 Charge the Battery Charging Warning Modify Ch. 2.3.1 LCD Indication and Keys 2020/1/2 Kate Modify Ch. 5 Power-on Utilities 2020/3/30 Add Agency Compliance and Approvals (NBTC SDoC) Camille 2021/3/10 Add 3R20P at title and add the spec Linda 2023/6/28 Update Agency Compliance and Approvals section... - Page 41 TSC Auto ID Technology Co., Ltd. 2nd Floor Workshop, Rongda Building, No. 51 the 9th Avenue, Tianjin Economic and Technological Development Area, Tianjin, China 300457 TEL:+86 22 5981 6661 FAX:+86 22 5981 5312 E-mail: Sales_support@zenpert.com Tech_support@zenpert.com...
Need help?
Do you have a question about the CG Triumvirate 3R20P and is the answer not in the manual?
Questions and answers