AGFA Drystar AXYS User Manual
Hide thumbs
Also See for Drystar AXYS:
- Service manual (461 pages) ,
- User manual (168 pages) ,
- Reference manual (137 pages)
Table of Contents
Advertisement
Quick Links
Advertisement
Table of Contents

Related Manuals for AGFA Drystar AXYS


Summary of Contents for AGFA Drystar AXYS
-
Page 1: User Manual
Drystar AXYS User Manual 2852 A EN 20070205... - Page 2 Agfa-Gevaert N.V. shall under no circumstances be liable for any damage arising from the use or inability to use any information, apparatus, method or process disclosed in this document.
-
Page 3: Table Of Contents
Introduction to this Manual................8 Scope of this Manual .................... 8 Warnings, Cautions, Instructions and Notes ............9 Disclaimer......................10 Introduction to Drystar AXYS ................11 Intended Use...................... 11 Intended User ....................11 Configuration ....................12 Main Components ..................12 Functional Description .................. - Page 4 Getting Started ................45 Drystar AXYS Basic Features ................46 Switching on the Drystar AXYS ................ 48 Drystar AXYS Basic Workflow ................50 Controlling the Working of the Drystar AXYS .............50 Operator mode ....................51 Key-operator mode ..................51 Service mode....................51 Specialist mode .....................52...
- Page 5 Loading films....................76 When the Drystar AXYS is printing or calculating and an input tray is empty ..77 When the Drystar AXYS is in the ready state and an input tray is empty ....78 Film loading procedure ..................79 Checking the correct position of a film in the input tray........
- Page 6 AXYS RYSTAR Performing the daily QC test for mammography application (DT 2 Mammo) (optional) ....................116 Performing the Weekly QC tests for mammography application (DT 2 Mammo) (optional) ....................118 Performing the Annual QC tests for mammography application (DT 2 Mammo) (optional) ....................
-
Page 7: Introduction
Introduction This chapter covers the following topics: Introduction to this Manual ❑ Introduction to Drystar AXYS ❑... -
Page 8: Introduction To This Manual
RYSTAR Introduction to this Manual Scope of this Manual This manual contains information for the safe and effective operation of AGFA Healthcare products. This manual contains all instructions for the key-operator or any other skilled person, to work easily and correctly with the Drystar AXYS. -
Page 9: Warnings, Cautions, Instructions And Notes
AXYS RYSTAR Warnings, Cautions, Instructions and Notes The following samples show how warnings, cautions, instructions and notes appear in this document. The text explains their intended use. WARNING: Warnings are directions which, if they are not followed, can cause fatal or serious injuries to a user, engineer, patient or any other person or can lead to a mistreatment. -
Page 10: Disclaimer
AXYS RYSTAR Disclaimer Agfa assumes no liability for use of this document if any unauthorized changes to the content or format have been made. Every care has been taken to ensure the accuracy of the information in this doc- ument. However, Agfa assumes no responsibility or liability for errors, inaccura- cies, or omissions that may appear in this document. -
Page 11: Introduction To Drystar Axys
It can print multiple formats (8x10”, 10x12”, 11x14”, 14x14” and 14x17”) of blue-based (Drystar DT 2 B) and clear-based (Drystar DT 2 C) film and offers crisp, dense grayscale images. The Drystar AXYS can be used for gen- eral radiography and optionally for the mammography application. It is designed for high-throughput and for use as a central printer. -
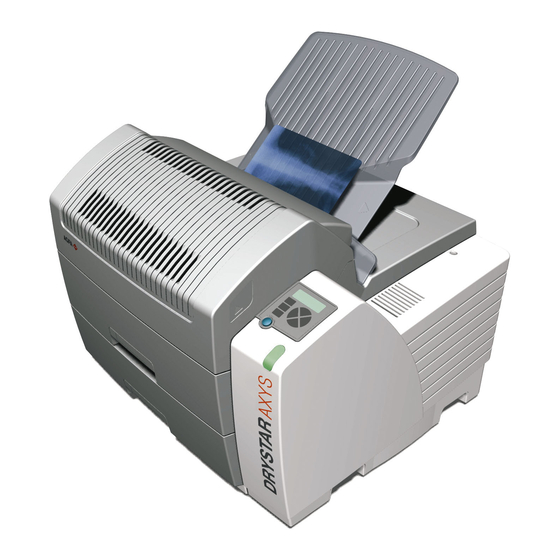
Page 12: Configuration
AXYS RYSTAR Configuration Main Components The figure below illustrates the main components of the printer Figure 2: Front view 1. Top cover 2. Output tray 3. User interface (refer “Overview of user interface controls” on page 4. Input tray 2852 A EN 20070205... -
Page 13: Functional Description
AXYS RYSTAR Functional Description The Drystar AXYS consists of two functional blocks: a controller and a print engine. The controller The controller captures the incoming data and stores the image. The controller composes the different images and generates the appropriate print engine control signals. -
Page 14: Film Formats
AXYS RYSTAR Film Formats Multiple film formats (8x10”, 10x12”, 11x14”, 14x14” and 14x17”) can be used. Any combination of two film formats can be used “online”. Both input trays can be adjusted for all film formats. 2852 A EN 20070205... -
Page 15: Operation Controls
AXYS RYSTAR Operation Controls The Drystar AXYS interfaces with the user via the following controls: Power/Reset button; a keypad and a display; a status indicator; audio signals. Overview of user interface controls Figure 4: User interface controls 1. Power/Reset button 2. -
Page 16: The Status Indicator Led
AXYS RYSTAR The status indicator LED On the right side of the display, an LED indicates the status of the Drystar AXYS. Colour/Light Status Action Green Constant Ready (stand-by) Proceed Blinking Busy or in key-opertor Wait mode Constant Warning status Check the display for messages. -
Page 17: System Documentation
AXYS RYSTAR System Documentation The documentation shall be kept with the system for easy reference. Technical documentation is available in the product service documentation that is avail- able from your local support organisation. The documentation consists of: Reference Manual (English only), this document. User Manual, document 2852. -
Page 18: Options And Accessories
AXYS RYSTAR Options and Accessories ABC Ordering Codes The table below lists the ordering codes for the Drystar AXYS and possible options. Description ABC code Remark Drystar AXYS EYZ4E A#sharp technology is included Mammo option EY8RN A#sharp technology is included... - Page 19 Table 4: Software version Consumables The Drystar AXYS can handle DRYSTAR DT 2 B and DRYSTAR DT 2 C consum- ables (both are general radiography film types) in multiple formats (8x10” up to 14x17”) and optionally DRYSTAR DT 2 Mammo (mammograpy film type) consumables, available in the formats 8x10”, 10x12”...
-
Page 20: Training
Agfa. If the device malfunctions and may have caused or contributed to a serious injury of a patient, Agfa must be notified immediately by telephone, fax or writ- ten correspondence to the following address: Agfa Service Support - local support addresses and phone numbers are listed on www.agfa.com... -
Page 21: Compatibility
Agfa has made the effort to test and release the Drystar AXYS with most of modalities on the market. For the complete list or if you want to check on a specific modality, contact your Agfa representative. -
Page 22: Compliance
AXYS RYSTAR Compliance This paragraph sums up the directives, standards and harmonization initiatives Drystar AXYS complies with. Directive Council Directive 93/42/EEC of 14 June 1993 concerning medical devices (OJ No L 169/1 of 1993-07-12) ANNEX I - ESSENTIAL REQUIREMENTS - GENERAL REQUIREMENTS... -
Page 23: Standards
AXYS RYSTAR Standards ISO 14971:2000, Medical devices - Application of risk management to medical devices IEC 60601-1-2 It specifies the manufacturer of the medical equipment or medi- cal system. It also provides information to the responsible organization that is essential in determining the suitability of the medical equipment or medical system for the electromagnetic environment of use, and in managing the elec- tromagnetic environment of use to permit the medical equipment or medical system to maintain basic safety and provide its essential performance without... - Page 24 This equipment gener- ates, uses and can radiate radio frequency energy and, if not installed and used in accordance with the Drystar AXYS Reference manual, may cause harmful interference to radio communications. Operation of this equipment in a resi- dential area is likely to cause harmful interference, in which case the user will be required to correct the interference at its own expense.
-
Page 25: Additional Standards For Documentation
It is a multilateral agreement among participating countries and certification organizations. Agfa has produced a CB test report and claims national certification in all other member countries of the CB Scheme. -
Page 26: Performance
AXYS RYSTAR Performance The direct thermal printing system provides grayscale images with high quality: 508 pixels per inch resolution, each pixel with 12 bit contrast resolution and an average density of 3.2 for general radiography applications and an average den- sity of 3.8 for optional mammography application (measured with an X-Rite densitometer). -
Page 27: Connectivity
The functionality of the Drystar AXYS is completely controlled via the network. You can control the working of the Drystar AXYS via the local keypad or via a remote PC with a functioning web browser. 2852 A EN 20070205... -
Page 28: Network Configuration
Network Images Paxport Modality CR Workstation Drystar AXYS PACS Example of Drystar AXYS in a network configuration Figure 5: Drystar AXYS Paxport Modality Example of Drystar AXYS in a point-to-point configuration Figure 6: Network configuration * A Paxport is required if the modality is not a DICOM modality. -
Page 29: Installation
Agfa training course has been provided.) Contact your local support organiza- tion for more information. For more information about the installation, refer to the Drystar AXYS Plug & Play installation manual and/or the Drystar AXYS Mobile Kit installation man- ual. -
Page 30: Connections
AXYS RYSTAR Connections At the rear side of the printer, one slot and three connectors are available: CF-card slot To insert an external CF-card for software installation, back- up, etc. Network connector To connect to the hospital net- work. Input/output connector To connect a terminal PC (used by the Service engineer). -
Page 31: Transport After Installation
AXYS RYSTAR Transport after installation The Drystar AXYS is quite compact, so moving the printer over a short distance - if required - can be done in a convenient way. Always keep in mind the following safety guidelines: Note: Refer to “Safety Directions”... -
Page 32: Changing The Film Format Of The Trays
Switch off the Drystar AXYS (refer to “Switching off the Drystar AXYS” page 63). Disconnect the cables. Move the Drystar AXYS to its destination (with 2, preferably 3 persons!). Reconnect the cables. Switch Drystar AXYS on (refer to “Switching on the Drystar AXYS”... - Page 33 AXYS RYSTAR Proceed as follows to perform the mechanical modification: Make sure that the printer is in ‘Ready’ mode. Open the input tray you want to adapt and remove eventually loaded films. Locate the correct tab position for the desired film format. 17"...
- Page 34 AXYS RYSTAR Remove the film position tab. Put the filmion tab in place and push it down until it locks. Tighten the screws of the width format tabs. Load a new film pack. Refer to “Loading films” on page 76. 2852 A EN 20070205...
-
Page 35: Messages
This will be either performing an action to resolve the problem or to contact the Agfa service organization. Details on the contents of messages can be found in the service documentation which is available to Agfa service personnel. -
Page 36: Labels
AXYS RYSTAR Labels [The following samples illustrate some of the warning labels (ISO 3864 Safety Signs define the design principles for international safety signs) that may appear on the medical equipment.] Symbol Explanation Radiation Warning Indicates the possibility of increased levels of radi- ation. - Page 37 Figure 14: Caution hot: In order to reduce the risk of electric shock, do not remove any covers. Figure 15: High voltage Indicates that the Drystar AXYS complies with the lim- its for type B equipment. Figure 16: Type B equipment:...
- Page 38 AXYS RYSTAR The Drystar AXYS carries the CE, TÜV, cULus and CCC labels. Figure 21: Location CE, TÜV, cULus and CCC label 1. CCC label 2. CE, TÜV and cULus label 2852 A EN 20070205...
-
Page 39: Patient Data Security
‘communication allowed’ table. A Certification Authority (CA) is responsible for creating a certificate. The CA can be the hospital, Agfa or a third party. This CA distributes the certificate to the hospital security responsible or service technician, who for his part: Imports the device certificate, created by the CA. -
Page 40: Maintenance
Print head cleaning must be done when image quality problems occur. For more information, refer to “Cleaning the print head” on page 123. Always consult the Agfa Service documentation and the Agfa trained service personnel for complete maintenance schedules. 2852 A EN 20070205... -
Page 41: Environmental Protection
AXYS RYSTAR Environmental protection Waste Disposal and Environmental Regulations WEEE Notice The Directive on Waste Electrical and Electronic Equipment (WEEE), which entered into force as European law on 13th February 2003, resulted in a major change in the treatment of electrical equipment at end-of-life. The purpose of this Directive is, as a first priority, the prevention of WEEE, and in addition, to promote the reuse, recycling and other forms of recovery of such wastes so as to reduce the disposal of waste. -
Page 42: Restriction Of The Use Of Certain Hazardous Substances (Rohs)
At the date of preparation of this manual, Medical Devices are exempted of the RoHS Directive. However Agfa HealthCare is committed to meet the requirements of the Euro- pean RoHS Directive in case the exemption is cancelled. If there is a RoHS label at the rear of the printer it means that the printer is RoHS compliant and does not contain the above listed substances above the mentioned concentrations at the homogeneous material level. -
Page 43: Safety Directions
[Any error (crash/ lock up) leading to an image processing failure can cause loss of diagnostic information.] Caution: Position the Agfa product so that it is possible to disconnect the mains power connection if required. Caution: Changes, additions or maintenance to the Agfa products carried... - Page 44 AXYS RYSTAR WARNING: Do not override or disconnect the integrated safety features Caution: Ventilation openings should not be covered. [In the United States, Federal law restricts this device to sale, distribution and use by, or on order of, a licensed physician.] WARNING: (U.S.A.
-
Page 45: Getting Started
Getting Started This chapter covers the following topics: Drystar AXYS Basic Features ❑ Switching on the Drystar AXYS ❑ ❑ Drystar AXYS Basic Workflow Cooling down the Drystar AXYS ❑ ❑ Switching off the Drystar AXYS... -
Page 46: Drystar Axys Basic Features
Maintenance and service activities are reduced to a mini- mum. The input trays of the Drystar AXYS are equipped with an RF-tag reader, which automatically traces the films used in the printer and protects the printer when detecting non-identified media. - Page 47 AXYS RYSTAR Integrated A#sharp technology. A#sharp is a technology that enhances image sharpness for the Drystar AXYS. An A#sharp label on the lower tray shows that the imager is equipped with this technology. 1. A#Sharp label 2852 A EN 20070205...
-
Page 48: Switching On The Drystar Axys
Refer to “Safety Directions” on page 43. Follow the procedure below to ensure proper start-up of the Drystar AXYS and to check that everything is working correctly. Procedure: Check that the power cord is plugged in and then switch on the printer by press- ing the Power/Reset button. - Page 49 When you send print jobs to the Drystar AXYS during this five minutes, the printer will use that time to calculate the print job and the display will inform you that the printer is warming up.
-
Page 50: Drystar Axys Basic Workflow
Drystar AXYS Basic Workflow Controlling the Working of the Drystar AXYS You can control the working of the Drystar AXYS via the local keypad or via a networked remote PC. The Drystar AXYS can be operated in five modes: Operator mode, Key-operator mode, Service mode, Specialist mode and Administrator mode. -
Page 51: Operator Mode
The Key-operator mode is accessible by the keypad and by browser via a remote PC (password protected). The Key-operator mode is menu-driven. The Key-operator functions are described in the Drystar AXYS Reference manual only. Refer to the chapter “Advanced operation (Key-operator mode)” on page 85. -
Page 52: Specialist Mode
Specialist mode The specialist mode functions are reserved for trained service personnel of the Agfa Customer Support Center. The specialist mode is password protected and is only accessible by browser via a remote PC. Administrator mode (also known as Security) The Administrator mode functions are reserved for the System Administrator. -
Page 53: Working With The Keypad
AXYS RYSTAR Working with the keypad The keypad is located below the display panel. The Drystar AXYS keypad features the following keys: To access the advanced functions of the key- Key-operator operator mode. Refer to the chapter “Advanced operation (Key-operator mode)”...
Need help?
Do you have a question about the Drystar AXYS and is the answer not in the manual?
Questions and answers