Advertisement
Quick Links
Advertisement

Subscribe to Our Youtube Channel
Related Manuals for Craftex CT133


Summary of Contents for Craftex CT133
- Page 1 OWNER’S MANUAL CT133 - MINI MILLING MACHINE...
- Page 2 CT133 MINI MILLING MACHINE INDEX GENERAL SAFETY INSTRUCTIONS PAGE 3 SPECIFIC SAFETY INSTRUCTIONS PAGE 4 FEATURES ILLUSTRATED FEATURES PAGE 5 MACHINE SPECIFICATIONS PAGE 6 LIST OF ACCESSORIES PAGE 7 POWER SAFETY PAGE 8 MAHCINE INSTALLATION PAGE 9 – 10 MECHANSIM ADJUSTMENT PAGE 11 –16...
-
Page 3: General Safety Instructions
GENERAL SAFETY INSTRUCTIONS EXTREME CAUTION SHOULD BE USED IN OPERATING ALL POWER TOOLS. KNOW YOUR POWER TOOL, BE FAMILIAR WITH ITS OPERATION. READ THE OWNER’S MANUAL AND PRACTICE SAFE USAGE PROCEDURES AT ALL TIMES. CONNECT your machine ONLY to the matched and specified power ... -
Page 4: Specific Safety Instructions
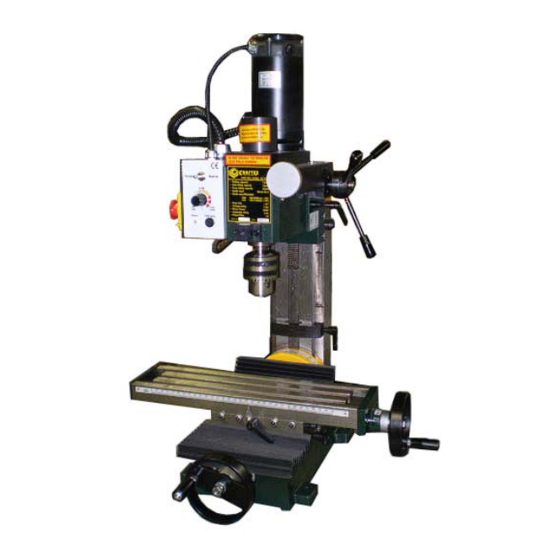
SPECIFIC SAFETY INSTRUCTIONS This machine is designed for drilling, deep milling and face milling of small pieces with a limit size of approx. 12” x 8” x 8”. It is highly recommended that you read this manual carefully before operating this machine. •... - Page 5 CT133 - FEATURES A – MOTOR B – FINE FEEDING WHEEL C – HEADSTOCK & SPINDLE D – LOGINTUDINAL FEED HAND WHEEL E – WORKING TABLE F – SADDLE G – CROSS FEED WHEEL H – BASE I – CONNECTING STRUT J –...
- Page 6 CT133 - MACHINE SPECIFICATIONS As part of the growing line of Craftex metalworking equipment, we are proud to offer the CT133 Mini Milling Machine. The Craftex name guarantees Craft Excellence. By following the instructions and procedures laid out in this owner’s manual, you will receive years of excellent service and satisfaction.
- Page 7 CT113 – STANDARD ACCESSORIES Description Large Wrench S: 36 Drill Chuck & Taper Shank Oil Can Fixing Pin L Hex. Wrench S: 3, 4, 5, Socket Head Wrench D: 45 – 52 Double End Wrench 8-10, 14-17, 17-19 Drill Chuck Holder Handle T-Nut Fuse 4.5A(110V)
- Page 8 CT133 - POWER CONNECTION/DISCONNECT & OPEARTION The connection, disconnection and grounding is carried out through the plug on the machine. For safety reasons do not change this plug in any situation. For the protection control device, we recommend that the operator should supply a fuse with current ratings and the total length between the fuse and connection terminal should coincide with the following “...
- Page 9 CT133 – MACHINE INSTALLATION MACHINE LOCATION & SET UP The machine should be fixed on the working table with four hexagon holts. Please install it to an appropriate location in order to meet with the precision requirements of the machine. Before setting your machine up, clean off any anti- rust protector and grease that was used for shipping purposes.
- Page 10 CT133 – MACHINE INSTALLATION CHECK THE FOLLOWING BEFORE SWITCHING YOUR MACHINE (1) Remove all fixtures that were used while initial set up of your machine took place. (2) Check whether the power voltage is suited for your machine (3) Remove all obstacles which are around your machine and might come in the (4) Check the angle of the pillar and adjust the bolts to see if they are tight enough.
- Page 11 CT133 – MECHANISM ADJUSTMENT INSTALATION OF THE TAPER SHANK (1) Turn the main power off before replacing the cutter. (2) Pull out the protective cover (a) (3) Wipe the spindle sleeve and the taper shank from any debris or dirt.
- Page 12 CT133 – CONTROL PANEL Review the following diagram to familiarize yourself with the CT133 Control Panel. (A) Emergency Stop Switch (B) Electrical Control Box (C) Variable Speed Control Knob (D) Fuse Socket Note – After using the Emergency Stop control, it will be necessary to reset the...
- Page 13 CT133 – MECHANISM ADJUSTMENT TEST RUN & SPINDLE BREAK IN The CT133 has two spindle speeds: Low – 0 ~ 1100 & High – 0 ~ 2500 RPM. It is important to break the machine in properly before consistently using your machine.
- Page 14 CT133 – MECHANISM ADJUSTMENT TRAVEL ADJUSTMENT Using the limit block you can control the traveling of the spindle box. (1) Loosen the handle (a) beside the limit block (2) Adjust the limit block in position (3) Tighten the handle (4) The travel position can be referred to the measurement guide of the column...
- Page 15 ADJUST THE ANGLE OF THE COLUMN (1) Turn the main power off before making this adjustment (2) Hold the column with your hands in order to prevent the column from free fall once it is loose. (3) Loosen the locked nut (a) with a large wrench (b) (4) Adjust the column angle as desired.
- Page 16 MITER WEDGE ADJUSTMENT After long term use & contact motion to the machine function, errors may occur due to relative surface motion. The miter wedge acts as an interface on each slide face. In order to eliminate this error, make use of the adjusting screw by keeping pressure between two machine parts (example –...
- Page 17 CT133 – OPERATIONS & TECHNIQUES METHOD OF OPERATION – DRILLING & DEEP MILLING (1) Install the appropriate tool and tighten & make sure your adjustments are firm. (Make sure the power is turned to OFF at this time) (2) Select an appropriate speed level.
- Page 18 CT133 – OPERATIONS & TECHNIQUES INSPECTION DURING OPERATION During operation it is important to be aware at all times not only of your work piece and machine but of your surroundings. The machine will not perform to the best of its abilities under the following conditions.
- Page 19 CT133 – ELECTRICAL CIRCUIT DIAGRAM...
- Page 20 CT133 – MAINTENANCE LUBRICATION In order to ensure precision and maintenance of your machine, you must keep your machine properly lubricated. Part of your standard accessories there is an oil-can; you can use this to lubricate your machine. It is recommended that you use two to three drops on all contact points shown in the diagram below with ISO 68 or SAE 20W oil or similar lubricant.
- Page 21 CT133 – MAINTENANCE To get the most out of your machine, it is imperative that you maintain it. Daily, weekly, monthly and yearly maintenance is highly recommended and keeping a log of your maintenance is also recommended. DAILY MAINTENANCE (1) Inspect each operation part to ensure the condition of lubrication.
- Page 22 CT133 ASSEMBLY DIAGRAM...
- Page 23 CT133 ASSEMBLY DIAGRAM...
- Page 24 CT133 ASSEMBLY DIAGRAM...
- Page 25 CT133 PARTS LISTING...
- Page 26 CT133 PARTS LISTING...
-
Page 27: Warranty
WARRANTY CRAFTEX 2 YEAR LIMITED WARRANTY Craftex warrants every product to be free from defects in materials and agrees to correct such defects where applicable. This warranty covers two years for parts and 90 days for labour (unless specified otherwise), to...
Need help?
Do you have a question about the CT133 and is the answer not in the manual?
Questions and answers