
Related Manuals for KODU BUFFET UH10818


Summary of Contents for KODU BUFFET UH10818
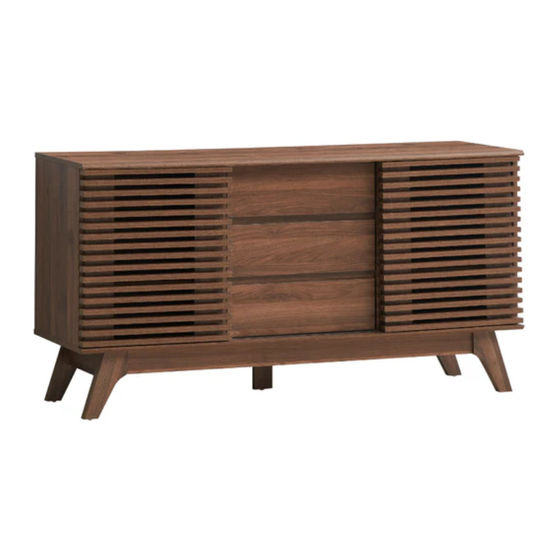
- Page 1 BUFFET ASSEMBLY INSTRUCTIONS AFTER SALES SUPPORT ASSEMBLY INSTRUCTIONS 1300 777 137 UH10818 / UH10819...
- Page 2 TIPS BEFORE YOU START Please check that all parts are present before you start the assembly of your furniture. For ease and speed of assembly, we recommend that before you commen ce each step of the assembly, that you identify all the parts required for that step. For larger items, please ensure that you have sufficient space and people to assemble your product safely.
- Page 3 USING CAM LOCK AND QUICKFIT QUICKFIT Tighten quickfit until shoulder is flush with panel. Do not overtighten or undertighten. SHOULDER PANEL PANEL CAM LOCK When fitting cam lock, ensure starting position is correct before you insert connecting quickfit. CORRECT WRONG Quickfit head should be in the centre of the cam lock when the two panels are joined.
-
Page 4: Hardware List
HARDWARE LIST 16 x A 16 x B 16 x C 26 x D Cam Lock Quickfit Cover Wooden Dowel Screw 12 x E 1 x F 16 x G 2 x H Screw Allen Key Screw Screw 16 x I 5 x J 24 x K 10 x L... -
Page 5: Parts List
PARTS LIST 1 PC 1 PC 2 PCS 1 PC 2 PCS 2 PCS 1 PC 1 PC 1 PC 5 of 25 AFTER SALES SUPPORT ASSEMBLY INSTRUCTIONS 1300 777 137 UH10818 / UH10819... - Page 6 ASSEMBLY INSTRUCTIONS STEP 1 Insert cam locks (A) to parts 3, 4 and 5. A x 8 Insert quickfit screws (B) to part 1. Insert wooden dowels (D) to parts 3, 4 and 5, as shown. B x 12 D x 16 6 of 25 AFTER SALES SUPPORT ASSEMBLY INSTRUCTIONS...
- Page 7 ASSEMBLY INSTRUCTIONS STEP 2 Insert cam locks (A) to parts 8 and 11. A x 8 Insert quickfit screws (B) to parts 12 and 13. Insert wooden dowels (D) to parts 11, 12 and 13, as shown. B x 4 D x 10 B B B B B B...
- Page 8 ASSEMBLY INSTRUCTIONS STEP 3 Fix parts 3, 4 and 5 to part 1. C x 8 Turn cam locks clockwise to tighten Attach covers (C) to parts 3, 4 and 5, as shown. 8 of 25 AFTER SALES SUPPORT ASSEMBLY INSTRUCTIONS 1300 777 137 UH10818 / UH10819...
- Page 9 ASSEMBLY INSTRUCTIONS STEP 4 Fix parts 8 to part 1. C x 4 Turn cam locks clockwise to tighten. Attach covers (C) to parts 8, as shown. 9 of 25 AFTER SALES SUPPORT ASSEMBLY INSTRUCTIONS 1300 777 137 UH10818 / UH10819...
- Page 10 ASSEMBLY INSTRUCTIONS STEP 5 Insert part 9 into grooves between parts 1, 3 and 4, as shown. 10 of 25 AFTER SALES SUPPORT ASSEMBLY INSTRUCTIONS 1300 777 137 UH10818 / UH10819...
- Page 11 ASSEMBLY INSTRUCTIONS STEP 6 Fix part 2 to parts 3, 4, 5 and 8 using screws (E) and allen key (F), as shown. E x 12 F x 1 11 of 25 AFTER SALES SUPPORT ASSEMBLY INSTRUCTIONS 1300 777 137 UH10818 / UH10819...
- Page 12 ASSEMBLY INSTRUCTIONS STEP 7 Secure part 9 by fixing wedges (L) using screws (M), as shown. L x 10 M x 10 12 of 25 AFTER SALES SUPPORT ASSEMBLY INSTRUCTIONS 1300 777 137 UH10818 / UH10819...
- Page 13 ASSEMBLY INSTRUCTIONS STEP 8 Attach parts 11 to parts 12 and 13. C x 4 Turn cam lock clockwise to tighten. Attach covers (C) to parts 11, as shown. 13 of 25 AFTER SALES SUPPORT ASSEMBLY INSTRUCTIONS 1300 777 137 UH10818 / UH10819...
- Page 14 ASSEMBLY INSTRUCTIONS STEP 9 Fix parts 11, 12 and 13 to part 2 using screws (I), as shown. I x 16 14 of 25 AFTER SALES SUPPORT ASSEMBLY INSTRUCTIONS 1300 777 137 UH10818 / UH10819...
- Page 15 ASSEMBLY INSTRUCTIONS STEP 10 Fix part 14 to part 13 using screws (H), as shown. H x 2 15 of 25 AFTER SALES SUPPORT ASSEMBLY INSTRUCTIONS 1300 777 137 UH10818 / UH10819...
- Page 16 ASSEMBLY INSTRUCTIONS STEP 11 Fix legs (J) to parts 12, 13 and 14, as shown. J x 5 16 of 25 AFTER SALES SUPPORT ASSEMBLY INSTRUCTIONS 1300 777 137 UH10818 / UH10819...
- Page 17 ASSEMBLY INSTRUCTIONS STEP 12 Insert shelf pins (K) to parts 3, 4 and 5, as shown. K x 24 17 of 25 AFTER SALES SUPPORT ASSEMBLY INSTRUCTIONS 1300 777 137 UH10818 / UH10819...
- Page 18 ASSEMBLY INSTRUCTIONS STEP 13 Insert parts 6 and 7 to assembled buffet, as shown. 18 of 25 AFTER SALES SUPPORT ASSEMBLY INSTRUCTIONS 1300 777 137 UH10818 / UH10819...
- Page 19 ASSEMBLY INSTRUCTIONS STEP 14 Fix rollers (N) and (O) to parts 10 using screws (G), as shown. G x 16 N x 4 O x 4 19 of 25 AFTER SALES SUPPORT ASSEMBLY INSTRUCTIONS 1300 777 137 UH10818 / UH10819...
- Page 20 ASSEMBLY INSTRUCTIONS STEP 15 Insert parts 10 to assembled buffet, as shown. 20 of 25 AFTER SALES SUPPORT ASSEMBLY INSTRUCTIONS 1300 777 137 UH10818 / UH10819...
- Page 21 ASSEMBLY INSTRUCTIONS STEP 16 Fix wall brackets (P) to part 1 using screws (Q), as shown. P x 2 Q x 2 21 of 25 AFTER SALES SUPPORT ASSEMBLY INSTRUCTIONS 1300 777 137 UH10818 / UH10819...
- Page 22 ASSEMBLY INSTRUCTIONS STEP 17 For extra stability, you must fix your cabinet to the wall using the additional P x 2 hardware (P) and (R), as shown. Fix wall brackets (P) to wall using screws (R), as shown. R x 2 Should you choose not to affix the product to the wall, serious injury may be caused if the product tips over.
- Page 23 ASSEMBLY INSTRUCTIONS STEP 18 Cable ties (S) are fixed through the wall brackets (P), and tighten to the other end, S x 2 as shown. WALL 23 of 25 AFTER SALES SUPPORT ASSEMBLY INSTRUCTIONS 1300 777 137 UH10818 / UH10819...
- Page 24 ASSEMBLY INSTRUCTIONS STEP 19 Please note: the maximum recommended weight is 5kg for each shelves and 20kg on top of buffet. Your buffet is ready for use.. 24 of 25 AFTER SALES SUPPORT ASSEMBLY INSTRUCTIONS 1300 777 137 UH10818 / UH10819...
- Page 25 WALL FIXING GUIDE NOTE: Supplied wall plugs are only suitable for use in masonry walls. If you have any doubts about using the correct plug for your wall, please seek professional advice. Failure of the product due to using incorrect fixings is the responsibility of the installer. IMPORTANT: When drilling into walls, always check for hidden wires or pipes, etc.
Need help?
Do you have a question about the BUFFET UH10818 and is the answer not in the manual?
Questions and answers