D-Link DWR-953 User Manual
Wireless ac1200 4g lte multi-wan router
Hide thumbs
Also See for DWR-953:
- User manual (264 pages) ,
- Quick installation manual (61 pages) ,
- User manual (100 pages)

Related Manuals for D-Link DWR-953


Summary of Contents for D-Link DWR-953
- Page 1 Version 1.01 | 09/14/2018 User Manual Wireless AC1200 4G LTE Multi-WAN Router DWR-953...
- Page 2 Preface D-Link reserves the right to revise this publication and to make changes in the content hereof without obligation to notify any person or organization of such revisions or changes. Manual Revisions Revision Date Description 1.00 April 13, 2018 • Initial release 1.01...
-
Page 3: Table Of Contents
Bridge Mode (RFC-1483 Bridged) ......19 Parent Control Filter ............53 Wizard ..................20 MAC Filter .................55 Multi-WAN ................23 IP Filters ................56 IP/PPP Config ..............23 IP Filter Config ..............57 Default Route ..............24 URL Filter ................59 IPv6 ..................25 Dos Protection ..............60 IPv6 WAN ................25 D-Link DWR-953 User Manual... - Page 4 Windows® XP ................126 Password ................94 WPA/WPA2 ................. 127 Remote Management ............95 SysLog ..................97 Troubleshooting ............129 Message Service ..............98 Wireless Basics ...............133 SMS Inbox .................98 What is Wireless? ..............134 Create Message ..............99 Tips ....................136 USSD ..................100 D-Link DWR-953 User Manual...
- Page 5 Table of Contents Wireless Modes ................. 137 Networking Basics ............138 Check your IP address ............138 Statically Assign an IP address ..........139 Wireless Security ............140 What is WPA? ..............140 Technical Specifications ..........141 Regulatory Information ..........142 D-Link DWR-953 User Manual...
-
Page 6: Product Overview
Section 1 - Product Overview Product Overview Package Contents DWR-953 Wireless AC1200 4G LTE Multi-WAN Router with Preinstalled SIM/UICC Power Adapter 3G/4G Antennas RJ-45 Cable If any of the above items are missing, please contact your reseller. System Requirements • A compatible SIM/UICC card with service.* •... -
Page 7: Introduction
Ethernet ports. The DWR-953 lets you connect to your 4G mobile connection with fast downlink speeds of up to 150 Mbps and uplink speeds up to 50 Mbps, giving you the speed to ensure fast, responsive Internet access. Surf the web with ease and stream music and video over the Internet to your PCs and mobile devices. -
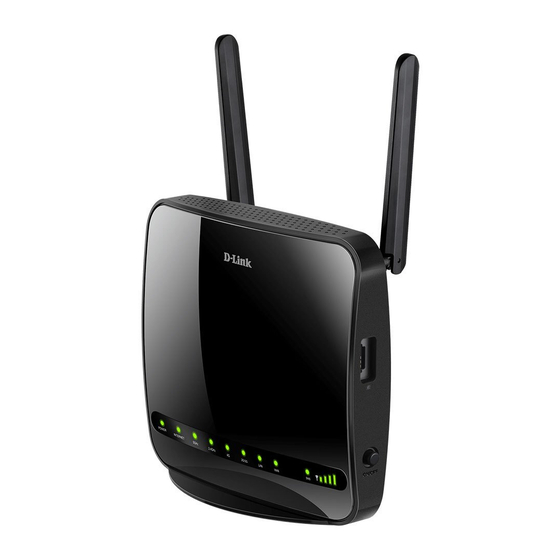
Page 8: Hardware Overview
Will be lit if an Ethernet LAN connection is established, and will blink when data is being transferred. Will be lit if an Ethernet WAN connection is established, and will blink when data is being transferred. D-Link DWR-953 User Manual... - Page 9 Will be solid green if the SMS inbox is full, or blinking if there is an unread new SMS message. Signal Strength LED Indicates 4G signal strength with bars. More bars indicates a stronger signal. Power Button Powers the device on or off. D-Link DWR-953 User Manual...
-
Page 10: Back View
Section 1 - Product Overview Back View Power Connector Connects to the included power adapter. Ethernet WAN Port For connection to a DSL/cable modem or router. Ethernet LAN Ports For connection to a network-enabled desktop or notebook computer. D-Link DWR-953 User Manual... -
Page 11: Side View
Press this button to initiate a new WPS connection. See WPS Button on page 111 for details. WLAN Press this button to toggle wireless LAN on or off. SIM Card Slot Accepts a standard mini-SIM/UICC card for 4G LTE connectivity. Power Button Turns the device on or off. D-Link DWR-953 User Manual... -
Page 12: Installation
2. Attach the included antennas to the back of the router, screwing them in clockwise. Arrange them so that they point upward. 3. Connect the power adapter to the socket on the back panel of your DWR-953. Plug the other end of the power adapter into a wall outlet or power strip. -
Page 13: Wireless Installation Considerations
Wireless Installation Considerations The DWR-953 can be accessed using a wireless connection from anywhere within the operating range of your wireless network. Keep in mind that the quantity, thickness, and location of walls, ceilings, or other objects that the wireless signals must pass through may limit the range of the wireless signal. -
Page 14: Configuration
Internet connection, the wireless/LAN status, and system information. At the top of the page is a menu. Clicking on one of these icons will take you to the appropriate configuration section. D-Link DWR-953 User Manual... -
Page 15: Internet
Select Manual to enter the details of your connection manually. Prefer Service Choose whether the DWR-953 should only use 4G networks, Type: 3G networks, 2G networks, or use Auto Mode to automatically select a network. - Page 16 Check this box to enable cellular radios. If this box is unchecked, Frequency: the 3G/4G radios will be disabled. WAN Ping Check this box to enable response when the router is pinged. Enable: Click Apply to save your settings, or Cancel to revert to your previous settings. D-Link DWR-953 User Manual...
- Page 17 Indicates the cellular network to which the modem is connected. Net: Signal Indicates the signal quality in dBi. The value is negative. A higher Quality: value is a stronger signal. For example -78 is a stronger signal than -90. Click Refresh to update the table. D-Link DWR-953 User Manual...
-
Page 18: Ethernet Wan Setup
If you have chosen Dynamic IP, see Dynamic IP (DHCP) on page 17. If you have chosen Static IP, see Static IP on page 18. If you have chosen Bridge Mode, see Bridge Mode (RFC-1483 Bridged) on page D-Link DWR-953 User Manual... -
Page 19: Pppoe (Username / Password)
If you have selected Static IP, enter the subnet mask provided by your ISP or network administrator. NAT: Disabling this option will disable the NAT firewall function of the DWR-953, exposing all connected devices directly to the Internet. This is an advanced feature and not recommended for normal use. Authentication... - Page 20 The amount of time of inactivity before disconnecting an Time: established PPPoE session. Set it to zero or enable auto- reconnect to disable this feature. LCP Interval: Specifies the Link Control Protocol (LCP) interval in seconds. D-Link DWR-953 User Manual...
- Page 21 Section 3 - Configuration Wan Ping Check this box to have the router respond to WAN pings. This is Enable: not recommended. Click Apply to save your settings, or Cancel to revert to your previous settings. D-Link DWR-953 User Manual...
-
Page 22: Dynamic Ip (Dhcp)
State of Connection: connection. NAT: Disabling this option will disable the NAT firewall function of the DWR-953, exposing all connected devices directly to the Internet. This is an advanced feature and not recommended for normal use. DNS Enabled: Enables DNS lookup. -
Page 23: Static Ip
State of Connection: connection. NAT: Disabling this option will disable the NAT firewall function of the DWR-953, exposing all connected devices directly to the Internet. This is an advanced feature and not recommended for normal use. DNS Enabled: Enables DNS lookup. -
Page 24: Bridge Mode (Rfc-1483 Bridged)
Bridge Mode (RFC-1483 Bridged) Bridge Mode (RFC-1483 Bridged) Select Enable to enable the connection or Disable to disable the State of Connection: connection. Click Apply to save your settings, or Cancel to revert to your previous settings. D-Link DWR-953 User Manual... -
Page 25: Wizard
Click Back to go back to the previous page or click Cancel to close the wizard. Note: The DWR-953 has a Multi-WAN Failover feature that allows the router to switch to a 3G/4G connection if the WAN connection is down or unavailable. - Page 26 See Static IP on page 18 for information about how to configure this type of connection. Bridge Mode Choose this option to use the DWR-953 as a network bridge. For (RFC-1483 details see Bridge Mode (RFC-1483 Bridged) on page 19.
- Page 27 Unless you chose None in the previous step, enter a security password. Clients must enter this password to connect to your wireless network. Click Next to continue, and when prompted click OK to reboot the device. D-Link DWR-953 User Manual...
-
Page 28: Multi-Wan
IP/PPP Config The DWR-953’s multi-WAN feature allows you to set your router to automatically switch to a secondary Internet connection if your primary Internet connection is lost. Note that you must first setup your Ethernet connection before you can configure failover. By default, the primary connection is 3G/4G. -
Page 29: Default Route
(if your Ethernet is configured for Static IP, DHCP, or Bridge Route: mode),ETH0_PPPoE (if your Ethernet WAN is configured for PPPoE), or LTE_Modem_PPP for cellular Internet access. Click Apply to save your settings, or Cancel to revert to your previous settings. D-Link DWR-953 User Manual... -
Page 30: Ipv6
Indicates whether the connection is Enabled or Disabled. Action: Click the pencil ( ) icon to edit the connection, click the trash can icon ( ) to delete the connection. Click Add to add a new connection, described on the following page. D-Link DWR-953 User Manual... - Page 31 Specify the type of IPv6 connection your ISP uses. Choose from Connection Static IPv6, Autoconfiguration (Stateless/DHCPv6), PPPoE. Connection Select a LAN interface from the list to apply the IPv6 connection Name: settings. Click Apply to save your settings, or Cancel to revert to your previous settings. D-Link DWR-953 User Manual...
- Page 32 IPv6 transitions. Check this box if your connection uses DS-Lite. AFTR IPv6 If DS-Lite is enabled, enter the AFTR IPv6 address provided by Address: your ISP. Click Apply to save your settings, or Cancel to revert to your previous settings. D-Link DWR-953 User Manual...
- Page 33 IPv6 transitions. Check this box if your connection uses DS-Lite. AFTR IPv6 If DS-Lite is enabled, enter the AFTR IPv6 address provided by Address: your ISP. Click Apply to save your settings, or Cancel to revert to your previous settings. D-Link DWR-953 User Manual...
- Page 34 IPv6 transitions. Check this box if your connection uses DS-Lite. If DS-Lite is enabled, enter the AFTR IPv6 address provided by AFTR IPv6 Address: your ISP. Click Apply to save your settings, or Cancel to revert to your previous settings. D-Link DWR-953 User Manual...
-
Page 35: Ipv6 Lan Setting
Prefix: LAN Local If applicable, enter the LAN Local Address here. Address: LAN Link- Displays the link-local address. Local Address: LAN IPv6 Gateway Interface Address Setting Autoconfig Specify none, stateless, or stateful. Type: D-Link DWR-953 User Manual... - Page 36 Enter the option value. Option Value: Action: Click the trash can icon ( ) to delete options already stored in the table. Click Apply to save your settings, or Cancel to revert to your previous settings. D-Link DWR-953 User Manual...
- Page 37 Enter the DHCP Unique Identifier (DUID) to which the address will be assigned Action: Click the trash can icon ( ) to delete options already stored in the table. Click Apply to save your settings, or Cancel to revert to your previous settings. D-Link DWR-953 User Manual...
-
Page 38: Wi-Fi
If Auto Channel Scan is disabled, select the desired channel here. Channel: Wireless Select the IEEE 802.11 standard used by your wireless clients. Mode: Click Apply to save your settings, or Cancel to revert to your previous settings. D-Link DWR-953 User Manual... -
Page 39: Security Setting
If you have multiple SSIDs, select the SSID you wish to apply security settings to. Security Configuration Security Choose WEP, WPA, WPA2, or WPA/WPA2+TKIP/AES. This setting Mode: will alter the following options. The default and recommended setting for home users is WPA2. D-Link DWR-953 User Manual... - Page 40 Choose HEX or ASCII. Passphrase: Enter a passphrase. Click Generate to generate a new, random passphrase. Key 1-4: Select an WEP key index. Click Apply to save your settings, or Cancel to revert to your previous settings. D-Link DWR-953 User Manual...
- Page 41 This is the password that will be required to connect to your Passphrase: network. Enter the key/password you want to use for your wireless network. The key must be between 8 and 63 characters long, and may only contain letters and numbers. D-Link DWR-953 User Manual...
- Page 42 Enter the shared secret used here. This secret phrase needs to be Key: the same on all of the wireless clients for them to be able to connect to the wireless network successfully. Click Apply to save your settings, or Cancel to revert to your previous settings. D-Link DWR-953 User Manual...
-
Page 43: Advanced Wireless
However, wider channels both cause more interference and are themselves more vulnerable to interference. Therefore, in crowded network environments, smaller channel sizes may be more appropriate. The default and recommended setting is 40 MHz. D-Link DWR-953 User Manual... - Page 44 However, it can also increase error rate in some installations, due to increased sensitivity to radio-frequency reflections. Select the option that works best for your installation. Click Apply to save your settings, or Cancel to revert to your previous settings. D-Link DWR-953 User Manual...
-
Page 45: Wireless Mac Filter
Click Apply to save your settings, or Cancel to revert to your previous settings. MAC Address list MAC Address: Indicates the MAC address being filtered. Action: Click the trash can icon ( ) to delete the rule. D-Link DWR-953 User Manual... -
Page 46: Wps
WPS-PIN configuration. Auto-lock- Auto-lock-down is activated when a device attempts too many down State: unsuccessful PIN-based WPS pairing attempts. Click Apply to save your settings, or Cancel to revert to your previous settings. D-Link DWR-953 User Manual... - Page 47 If the client device has a PIN, you may enter it here. Add: If you have selected Push Button, clicking Add will trigger the pairing process. If you have selected PIN, clicking Add will pair using the PIN entered in the Client Pin field. D-Link DWR-953 User Manual...
-
Page 48: Lan
DHCP server for your LAN. IP Pool Enter first address in the range of IPs the DHCP server will use to Starting assign IP addresses to devices on your network. Address: D-Link DWR-953 User Manual... - Page 49 DHCP clients. Disabled if DNS Relay is checked. Lease Time: The lease time determines the period that the host retains the assigned IP addresses before the IP addresses change. Click Apply to save your settings, or Cancel to revert to your previous settings. D-Link DWR-953 User Manual...
-
Page 50: Advanced Lan
Enter the subnet mask over which this IP address will function. Addressing Displays the type of address Type: Action: Click Delete to delete an interface, or click Apply to apply any changes made in the previous fields. D-Link DWR-953 User Manual... -
Page 51: Advanced
Send Mode: The options are RIP1, RIP2, or Both. Click Add to add your current settings to the table. Click the Action: trash can icon ( ) to delete rules already stored in the table. D-Link DWR-953 User Manual... -
Page 52: Nat
Click the pencil ( ) icon to edit the filter, click the trash can icon ( ) to delete the virtual server rule. Click Add to add a new Virtual Server, described on the following page. D-Link DWR-953 User Manual... -
Page 53: Virtual Server Config
Select the time schedule during which the virtual server rule is Schedule: active. To create a new time schedule, click New Time Schedule. Click Apply to save your settings, Cancel to revert to your previous settings, or Back to return to the previous screen. D-Link DWR-953 User Manual... -
Page 54: Port Trigger
Some legacy applications require multiple connections, such as Internet gaming, video conferencing, and Internet telephony. These applications may have difficulty working through NAT (Network Address Translation). The Port Trigger feature allows some of these applications to work with the DWR-953 by opening ports after detecting traffic being sent through a trigger port. Rule Name: Indicates the name of the rule for reference. -
Page 55: Port Trigger Config
Select the time schedule during which the port trigger rule is Schedule: active. To create a new time schedule, click New Time Schedule. Click Apply to save your settings, Cancel to revert to your previous settings, or Back to return to the previous screen. D-Link DWR-953 User Manual... -
Page 56: Alg
For each protocol type, check Enable to activate the ALG, and specify a port. Click Apply to save your settings, or Cancel to revert to your previous settings. D-Link DWR-953 User Manual... -
Page 57: Vpn Passthrough
VPN sessions to establish properly. Multiple VPN connections can be made through the device. This is useful when you have many VPN clients on the Local Area Network. For each VPN type, check Enable to activate the passthrough, and specify a port. Click Apply to save your settings, or Cancel to revert to your previous settings. D-Link DWR-953 User Manual... -
Page 58: Firewall
IP Address: If you have specified IP Address above, enter an IP address range to which this filter will apply. You can check addresses of currently connected devices using the Clients sections under Status on page 106. D-Link DWR-953 User Manual... - Page 59 IP Address: Indicates the IP Address range (if selected) to which Internet access is granted during the specified times. Action: Click the trash can icon ( ) to delete the rule. D-Link DWR-953 User Manual...
-
Page 60: Mac Filter
Click Apply to save your settings, or Cancel to revert to your previous settings. MAC Address list MAC Address Displays the MAC Address(es) to be filtered. Action: Click the trash can icon ( ) to delete the rule. D-Link DWR-953 User Manual... -
Page 61: Ip Filters
Click the pencil ( ) icon to edit the filter, click the trash can icon ( ) to delete the filter. Click Add to add a new filter, described in IP Filter Config on page 57. D-Link DWR-953 User Manual... -
Page 62: Ip Filter Config
Specify the destination IP or IP range end to which the rule will Destination apply. To specify a range, enter the end of the range in this box. IP Address: To specify a single IP, enter the same address in the Start and End boxes. D-Link DWR-953 User Manual... - Page 63 Select a time schedule to apply to the filter. To create a new filter, Schedule: click New Time Schedule and see Time Schedule on page 101. Click Apply to save your settings, Cancel to revert to your previous settings, or Back to return to the previous screen. D-Link DWR-953 User Manual...
-
Page 64: Url Filter
URL: Indicates the URL or keyword to which the filter will apply. Time Indicates the time schedule during which the filter will apply. Schedule: Action: Click the trash can icon ( ) to delete the filter. D-Link DWR-953 User Manual... -
Page 65: Dos Protection
Check this box to enable DoS prevention. Attack types may be Protection: individually enabled and thresholds (if applicable) manually configured. Click Apply to save your settings, or Cancel to revert to your previous settings. D-Link DWR-953 User Manual... -
Page 66: Domain Blocking
Domain List Time Indicates the time schedule during which the filter will apply. Schedule: Domain: Indicates the domain to which the filter will apply. Action: Click the trash can icon ( ) to delete the filter. D-Link DWR-953 User Manual... -
Page 67: Dmz
Select a WAN interface to which the DMZ will be applied. DMZ Host IP Specify the IP address of the computer on the LAN that you want Address: to have unrestricted Internet communication. Click Apply to save your settings. D-Link DWR-953 User Manual... -
Page 68: Spi Settings
Check the Enable SPI box to enable the SPI (Stateful Packet Inspection) feature. Endpoint Select the appropriate endpoint filter setting. Filter: Log Dropped Select Enable to log all dropped packets. The default setting is Packet Disable. Enable: Click Apply to save your settings. D-Link DWR-953 User Manual... -
Page 69: Packet Filter
Click the pencil ( ) icon to edit the filter, click the trash can icon ( ) to delete the filter. Click Add to add a new filter, described in Packet Filter -- Filters on page 67. D-Link DWR-953 User Manual... - Page 70 Click Add to add a new rule, described in Packet Filter -- Rules on page 68. Generic Rules Index: Indicates the index of the rule. Filter Name: Indicates the name of the filter to which the rule is applied. Status: Indicates the current status of the rule (usually Enabled or Disabled). D-Link DWR-953 User Manual...
- Page 71 Click the pencil ( ) icon to edit the rule, click the trash can icon ( ) to delete the rule. Click Add to add a new generic rule, described in Packet Filter -- Generic Rules on page 70. D-Link DWR-953 User Manual...
- Page 72 Specify whether the filter applies to inbound or outbound packets. Default Specify the default action - permitting packets or dropping Action: them. Click Apply to save your settings, Cancel to clear settings, or Back to return to the previous page. D-Link DWR-953 User Manual...
- Page 73 (Optional) Length: Origin Port: If Port has been set to TCP or UDP and Ether Type has been set to IPv4 or IPv6, specify an origin port to which the rule will apply. (Optional) D-Link DWR-953 User Manual...
- Page 74 Enter a source MAC address to which the rule will apply. Address: (Optional) Destination Enter a destination MAC address to which the rule will apply. MAC Address: (Optional) Click Apply to save your settings, Cancel to clear settings, or Back to return to the previous page. D-Link DWR-953 User Manual...
- Page 75 Enter a value the rule will use to evaluate. Action: Specify the action taken when the rule is triggered. Click Apply to save your settings, Cancel to clear settings, or Back to return to the previous page. D-Link DWR-953 User Manual...
-
Page 76: Static Route
Indicates the interface used by the static route. Action: Click the pencil ( ) icon to edit the filter, click the trash can icon ( ) to delete the static route. Click Apply to save your settings. D-Link DWR-953 User Manual... -
Page 77: Static Route Set
Specify the destination mask of the static route. Mask: Gateway: Specify the gateway that will be used (or avoided) by the static route. Interface: Specify the interface used by the static route. Click Apply to save your settings. D-Link DWR-953 User Manual... -
Page 78: Multicast
The query interval is the amount of time in seconds between Interval: General Query messages sent by the router (if the router is querying on this subnet). Robust Set robustness value to account for packet loss on congested Count: networks. D-Link DWR-953 User Manual... - Page 79 The last member query count is the number of messages the Member router sends out during the Last Member Query Interval. If no Query Count: host responds to those messages, the IGMP state is removed from those hosts. D-Link DWR-953 User Manual...
- Page 80 IGMP Max Specify the maximum number of groups a host can join. Groups: For Snooping and Proxy: LAN1-4, 2.4, Select Enable to enable IGMP on this interface. and 5 GHz Wireless: Click Apply to save your settings. D-Link DWR-953 User Manual...
-
Page 81: Mld
Specify the query interval which is the amount of time in Interval: seconds between General Query messages sent by the router (if the router is querying on this subnet). Robust Set a robustness value to account for packet loss on congested Count: networks. D-Link DWR-953 User Manual... - Page 82 Interval: response to a Group-Specific Query message. The last member query interval is also the amount of time in seconds between successive Group-Specific Query messages. D-Link DWR-953 User Manual...
- Page 83 General Query message. The query response interval is the Maximum Response Time field in the message header. The default query response interval is 10 seconds and must be less than the query interval. Click Apply to save your settings. D-Link DWR-953 User Manual...
-
Page 84: Dynamic Dns
Click the pencil ( ) icon to edit the DDNS entry, click the trash can icon ( ) to delete the DDNS entry. Add: Click Add to add a new DDNS service. This will launch the Dynamic DNS Add screen, described on the next page. D-Link DWR-953 User Manual... -
Page 85: Dynamic Dns Add
For example, if your hostname is hostname.ddns.com, typing www.hostname.ddns.com or lakjsdfhlkadf.hostname.ddns.com would both resolve to the same IP address. Click Apply to save your settings, Cancel to clear current settings, or Back to return to the previous page. D-Link DWR-953 User Manual... -
Page 86: Ethernet Settings
Indicates the speed and duplex mode used by the Ethernet port. The default and recommended setting is Auto. FlowCtrl: Check this box to enable flow control on the connection. This setting is only available in some modes. Click Apply to save your settings. D-Link DWR-953 User Manual... -
Page 87: Quality Of Service
Specify a default Differentiated Services Code Point (DSCP) mark Mark: for queues. Interface: Select an interface to which the Queue settings will apply. Default Rate: Specify a default rate in kilobits per second. Click Apply to save your settings. D-Link DWR-953 User Manual... -
Page 88: Queue Config
Click the pencil ( ) icon to edit the queue, click the trash can icon ( ) to delete the queue. Select the C icon to clone the queue. Click Add to add a new queue, described in Queue Config - Add Add: on page 84. D-Link DWR-953 User Manual... - Page 89 If you have selected bits for bandwidth expression, specify a (bit): ceiling rate. The ceiling rate is the maximum bandwidth while bursting. Percent: If you have selected percent for bandwidth expression, specify the percent of total bandwidth assigned to the queue. D-Link DWR-953 User Manual...
- Page 90 The maximum burst size is the total number of bytes permitted to be transferred at burst speeds. Click Apply to save your settings or Back to return to the previous page withouth saving. D-Link DWR-953 User Manual...
-
Page 91: Qos Classification
Click the pencil ( ) icon to edit the queue, click the trash can icon ( ) to delete the queue. Select the C icon to clone the queue. Add: Click Add to add a new QoS class, described on QoS Classification - Add on page <OV>. D-Link DWR-953 User Manual... - Page 92 Specify the MAC Mask used to filter MAC addresses. (Optional) Mask: Destination Enter a destination MAC address to which the rule will apply. MAC Address: (Optional)class Destination Specify the MAC Mask used to filter MAC addresses. (Optional) MAC Mask: D-Link DWR-953 User Manual...
- Page 93 0 is default priority, and 2-7 are increasing priority, with 7 being highest. (Optional) Specify Classification Results: Assign For packets that trigger this classification, specify in which queue Classification they should be placed. (Required) Queue: D-Link DWR-953 User Manual...
- Page 94 If Default VLAN ID is not checked, specify the VLAN ID for VLAN ID: classified packets. (Optional) Forwarding Select a forwarding policy from the dropdown box. (Optional) Policy Name: Click Apply to save your settings, or click Back to return to the previous screen. D-Link DWR-953 User Manual...
-
Page 95: Queue Status
Output Indicates the number of packets output from the queue. Packets: Output Bytes: Indicates the number of bytes output from the queue. Dropped Indicates the number of dropped packets. Packets: Click Refresh to refresh this list. D-Link DWR-953 User Manual... -
Page 96: Upnp
UPnP LOG: Check this box to enable logging of UPnP activity. TR064: TR-064 is used by service providers to automatically update and configure end-user equipment. Check this box to enable it. Click Apply to save your settings. D-Link DWR-953 User Manual... -
Page 97: Snmp
SNMP (Simple Network Management Protocol) is a widely used network monitoring and control protocol that reports activity on each network device to the administrator of the network. SNMP can be used to monitor traffic and statistics of the DWR-953. The DWR-953 supports SNMP v1 and v2c. -
Page 98: System
Start Time: Specify a start date for daylight saving time adjustments. End Time: Specify an start date for daylight saving time adjustments. Click Apply to save your settings, or Cancel to revert to your previous settings. D-Link DWR-953 User Manual... -
Page 99: Password
Enter the current password for the account. Password: Enter the new password for the account. Password: Confirm Confirm the new password for the account. Password: Click Apply to save your settings, or Cancel to revert to your previous settings. D-Link DWR-953 User Manual... -
Page 100: Remote Management
Http Management Http Enable: Check this check box to enable remote management. Remote management allows the DWR-953 to be configured over the Internet through a web browser. A username and password will still be required to access the web-management interface. - Page 101 Click Apply to save your settings, or Cancel to revert to your previous settings. HTTPS Management HTTPS Enables HTTPS access to the router. Enable: Note that this does not disable unencrypted LAN access. Click Apply to save your settings, or Cancel to revert to your previous settings. D-Link DWR-953 User Manual...
-
Page 102: Syslog
Section 3 - Configuration SysLog The DWR-953 keeps a running log of events and activities occurring on the router. You may download these logs as a file. |<: Click this button to go to the first page. <<: Click this button to go to the previous page. -
Page 103: Message Service
Click this button to go to the first page. Reply: Click this button to go to the previous page. Forward: Click this button to go to the next page. Refresh: Click this button to go to the last page. D-Link DWR-953 User Manual... -
Page 104: Create Message
Click this button to go to the first page. Reply: Click this button to go to the previous page. Forward: Click this button to go to the next page. Refresh: Click this button to go to the last page. D-Link DWR-953 User Manual... -
Page 105: Ussd
Unstructured Supplementary Service Data (USSD) allows ISP-specific applications to be activated with an SMS message. Enter an application activation code and click Send. This will USSD: allow you to activate applications by sending an SMS message to your ISP. D-Link DWR-953 User Manual... -
Page 106: Time Schedule
Indicates the day of the week for the start time and end time. Star Time: Indicates the time when the schedule will become active. End Time: Indicates the time when the schedule will become inactive. Action: Click the trash can icon ( ) to delete the schedule. D-Link DWR-953 User Manual... -
Page 107: Firmware Upgrade
Here, you can upgrade the firmware of your router. Make sure the firmware you want to use is on the local hard drive of the computer and then click Browse to upload the file. You can check for and download firmware updates at the D-Link support site at http://support.dlink.com. -
Page 108: Reboot & Reset
This option will restore all settings back to their defaults. Any Factory settings that have not been backed up will be lost, including any Default: rules that you have created. Reboot: This option will reboot the router. D-Link DWR-953 User Manual... -
Page 109: Ping
Host Address: the ping test, or click Stop to stop the ping. Specify whether the ping test will traverse IPv4 or IPv6. IP Protocol Version: Ping Test Ping Result: This section displays the result of the ping. D-Link DWR-953 User Manual... -
Page 110: Trace Route
Specify a WAN interface over which the trace route will be run. Connection: Click Apply to start the traceroute. Trace Route Result Trace Route This section displays the results of the traceroute. Result: D-Link DWR-953 User Manual... -
Page 111: Status
Indicates the MAC address of the client RSSI: Indicates signal strength measured by received signal strength indicator (RSSI). In this case, higher numbers indicate stronger signal. This screen refreshes automatically unless you click Stop Stop Refresh: Refresh. D-Link DWR-953 User Manual... -
Page 112: Lan Clients
Indicates the lease time in minutes. Interface: Indicates the interface over which the connection is established Action: Click the trash can icon ( ) to delete inactive IP entries. Stop Refresh: This screen refreshes automatically unless you click Stop Refresh. D-Link DWR-953 User Manual... -
Page 113: Routing Table
Gateway: Indicates the gateway used by the route. GenMask: Indicates the subnet mask of the destination IP. Flags: Indicates any flags used on this route. Interface: Indicates the interface over which the route exits the router. D-Link DWR-953 User Manual... -
Page 114: Traffic Meter
Indicates received unicast data rates in bits per second. Tx Unicast: Indicates transmitted unicast data rates in bits second. Rx Multicast: Indicates received unicast data rates in bits per second. Tx Multicast: Indicates received unicast data rates in bits per second. D-Link DWR-953 User Manual... -
Page 115: Statistics
Indicates the total number of successfully received packets over the link. Rx Drop: Indicates the total number of dropped received packets over the link. Rx Error: Indicates the total number of packets with receive errors over the interface. D-Link DWR-953 User Manual... -
Page 116: Connect A Wireless Client To Your Router
Blu-ray DVD players, wireless printers and cameras will have a WPS button (or a software utility with WPS) that you can press to connect to the DWR-953 router. Please refer to your user manual for the wireless device you want to connect to make sure you understand how to enable WPS. -
Page 117: Windows® 10
Wireless Icon Clicking on this icon will display a list of wireless networks which are within range of your computer. Select the desired network by clicking on its SSID. D-Link DWR-953 User Manual... - Page 118 It may take 20-30 seconds to connect to the wireless network. If the connection fails, please verify that the security settings are correct. The key or passphrase must be exactly the same as the one on the wireless router. D-Link DWR-953 User Manual...
-
Page 119: Windows® 8
Wireless Icon Clicking on this icon will display a list of wireless networks that are within connecting proximity of your computer. Select the desired network by clicking on the network name. D-Link DWR-953 User Manual... - Page 120 WPS button on your router during this step to enable the WPS function. When you have established a successful connection to a wireless network, the word Connected will appear next to the name of the network to which you are connected to. D-Link DWR-953 User Manual...
-
Page 121: Windows® 7
If you are joining an existing network, you will need to know the security key or passphrase being used. 1. Click on the wireless icon in your system tray (lower-right corner). Wireless Icon 2. The utility will display any available wireless networks in your area. D-Link DWR-953 User Manual... - Page 122 If you get a good signal but cannot access the Internet, check your TCP/IP settings for your wireless adapter. Refer to Networking Basics on page 138 for more information. 4. The following window appears while your computer tries to connect to the router. D-Link DWR-953 User Manual...
- Page 123 It may take 20-30 seconds to connect to the wireless network. If the connection fails, please verify that the security settings are correct. The key or passphrase must be exactly the same as the one on the wireless router. D-Link DWR-953 User Manual...
-
Page 124: Wps
Section 4 - Connecting to a Wireless Network The WPS feature of the DWR-953 can be configured using Windows® 7. Carry out the following steps to use Windows® 7 to configure the WPS feature: 1. Click the Start button and select Computer from the Start menu. - Page 125 Section 4 - Connecting to a Wireless Network 3. Double-click the DWR-953. 4. Input the WPS PIN number (on the router label) in the Setup > Wireless Setup menu in the Router’s Web UI) and click Next. D-Link DWR-953 User Manual...
- Page 126 Section 4 - Connecting to a Wireless Network 5. Type a name to identify the network. 6. To configure advanced settings, click the icon. Click Next to continue. D-Link DWR-953 User Manual...
- Page 127 Make a note of the security key as you may need to provide this security key if adding an older wireless device to the network in the future. 9. Click Close to complete WPS setup. D-Link DWR-953 User Manual...
-
Page 128: Windows Vista
(displayed using the SSID) and click the Connect button. If you get a good signal but cannot access the Internet, check you TCP/IP settings for your wireless adapter. Refer to the Networking Basics section in this manual for more information. D-Link DWR-953 User Manual... -
Page 129: Wpa/Wpa2
1. Open the Windows Vista® Wireless Utility by right-clicking on the wireless computer icon in your system tray (lower right corner of screen). Select Connect to a network. 2. Highlight the Wi-Fi name (SSID) you would like to connect to and click Connect. D-Link DWR-953 User Manual... - Page 130 It may take 20-30 seconds to connect to the wireless network. If the connection fails, please verify that the security settings are correct. The key or passphrase must be exactly the same as the one on the wireless router. D-Link DWR-953 User Manual...
-
Page 131: Windows® Xp
Wi-Fi network (displayed using the SSID) and click the Connect button. If you get a good signal but cannot access the Internet, check you TCP/IP settings for your wireless adapter. Refer to the Networking Basics section in this manual for more information. D-Link DWR-953 User Manual... -
Page 132: Wpa/Wpa2
1. Open the Windows® XP Wireless Utility by right-clicking on the wireless computer icon in your system tray (lower-right corner of screen). Select View Available Wireless Networks. 2. Highlight the Wi-Fi network (SSID) you would like to connect to and click Connect. D-Link DWR-953 User Manual... - Page 133 It may take 20-30 seconds to connect to the wireless network. If the connection fails, please verify that the WPA-PSK settings are correct. The Wi-Fi password must be exactly the same as on the wireless router. D-Link DWR-953 User Manual...
-
Page 134: Troubleshooting
1. Why can’t I access the web-based configuration utility? When entering the IP address of the D-Link router (192.168.0.1 for example), you are not connecting to a website, nor do you have to be connected to the Internet. The device has the utility built-in to a ROM chip in the device itself. Your computer must be on the same IP subnet to connect to the web-based utility. - Page 135 • Close your web browser (if open) and open it. • Access the web management. Open your web browser and enter the IP address of your D-Link router in the address bar. This should open the login page for your web management.
- Page 136 • Windows® 95, 98, and Me users type in command (Windows® NT, 2000, XP, Vista®, and 7 users type in cmd) and press Enter (or click OK). • Once the window opens, you’ll need to do a special ping. Use the following syntax: ping [url] [-f] [-l] [MTU value] Example: ping yahoo.com -f -l 1472 D-Link DWR-953 User Manual...
- Page 137 • To change the MTU, enter the number in the MTU field and click Apply to save your settings. • Test your email. If changing the MTU does not resolve the problem, continue changing the MTU in increments of ten. D-Link DWR-953 User Manual...
-
Page 138: Wireless Basics
D-Link wireless products are based on industry standards to provide easy-to-use and compatible high-speed wireless connectivity within your home, business, or public access wireless networks. Strictly adhering to the IEEE standard, the D-Link wireless family of products will allow you to access the data you want, when, and where you want it. You will be able to enjoy the freedom that wireless networking delivers. -
Page 139: What Is Wireless
D-Link is the worldwide leader and award winning designer, developer, and manufacturer of networking products. D-Link delivers the performance you need at a price you can afford. D-Link has all the products you need to build your network. How does wireless work? Wireless works similarly to how cordless phones work, through radio signals that transmit data from one point A to point B. - Page 140 Who uses wireless? Wireless technology as become so popular in recent years that almost everyone is using it, whether it’s for home, office, business, D-Link has a wireless solution for it. Home Uses/Benefits • Gives everyone at home broadband access •...
-
Page 141: Tips
The wireless connection in public places is usually called “hotspots”. Using a D-Link CardBus Adapter with your laptop, you can access the hotspot to connect to the Internet from remote locations like: airports, hotels, coffee shops, libraries restaurants, and convention centers. -
Page 142: Wireless Modes
An Infrastructure network contains an access point or wireless router. All the wireless devices, or clients, will connect to the wireless router or access point. An ad hoc network contains only clients, such as laptops with wireless adapters. All the adapters must be in ad hoc mode to communicate. D-Link DWR-953 User Manual... -
Page 143: Networking Basics
Check your IP address After you install your new D-Link adapter, by default, the TCP/IP settings should be set to obtain an IP address from a DHCP server (i.e. wireless router) automatically. To verify your IP address, please follow the steps below. -
Page 144: Statically Assign An Ip Address
Set Primary DNS the same as the LAN IP address of your router (192.168.0.1). The Alternate DNS is not needed or you may enter a DNS server from your ISP. Step 5 Click OK twice to save your settings. D-Link DWR-953 User Manual... -
Page 145: Wireless Security
Appendix B - Networking Basics Wireless Security This section will show you the different levels of security you can use to help protect your data from intruders. The DWR-953 offers the following types of security: • WPA2 (Wi-Fi Protected Access 2) •... -
Page 146: Technical Specifications
Maximum wireless signal rate derived from IEEE Standard 802.11ac/n/g/b/a specifications. Actual data throughput will vary. Network conditions and environmental factors, including volume of network traffic, building materials and construction, and network overhead, lower actual data throughput rate. Environmental factors will adversely affect wireless signal range. D-Link DWR-953 User Manual... -
Page 147: Regulatory Information
Potencia máxima de Salida Frequenza/e Potenza max. Output Frequentie(s) Max. Output Power 5.15 – 5.25 GHz 200 mW 5.25 – 5.35 GHz 200 mW 5.47 – 5.725 GHz 2.4 G 2.4 – 2.4835 GHz 100 mW D-Link DWR-953 User Manual... - Page 148 υλικολογισμικό του προϊόντος είναι διαθέσιμα για λήψη από τη σελίδα του προϊόντος στην τοποθεσία www.dlink. com. Par les présentes, D-Link Corporation déclare que ce produit, ces accessoires et ce logiciel sont conformes aux Français [French] directives 2014/53/UE.Le texte complet de la déclaration de conformité de l'UE et le icroprogramme du produit sont disponibles au téléchargement sur la page des produits à...
- Page 149 2014/53/EU. Pełen tekst deklaracji zgodności UE oraz oprogramowanie sprzętowe do produktu można pobrać na stronie produktu w witrynie www.dlink.com. Desta forma, a D-Link Corporation declara que este produto, os acessórios e o software estão em conformidade Português [Portuguese] com a diretiva 2014/53/UE. O texto completo da declaração de conformidade da UE e do firmware...
- Page 150 2014/53/EU. Hela texten med EU-försäkran om överensstämmelse och produkt-firmware kan hämtas från produktsidan på www.dlink.com. Hér með lýsir D-Link Corporation því yfir að þessi vara, fylgihlutir og hugbúnaður eru í samræmi við tilskipun Íslenska [Icelandic] 2014/53/EB. Sækja má ESB-samræmisyfirlýsinguna í heild sinni og fastbúnað vörunnar af vefsíðu vörunnar á www.
- Page 151 Access Points unterstützen die Funktionen DFS (Dynamic Frequency Selection) und TPC (Transmit Power Control) wie erforderlich bei Betrieb auf 5 GHz innerhalb der EU. • Bitte schlagen Sie im Handbuch oder Datenblatt nach nach, ob Ihr Gerät eine 2,4 GHz und / oder 5 GHz Verbindung nutzt. D-Link DWR-953 User Manual...
- Page 152 5 Ghz dentro de la UE. • Por favor compruebe el manual o la ficha de producto para comprobar si el producto utiliza las bandas inalámbricas de 2.4 GHz y/o la de 5 GHz. D-Link DWR-953 User Manual...
- Page 153 Toegangspunten ondersteunen DFS (Dynamic Frequency Selection) en TPC (Transmit Power Control) functionaliteit zoals vereist bij gebruik in 5 GHz binnen de EU. • Raadpleeg de handleiding of de datasheet om te controleren of uw product gebruik maakt van 2.4 GHz en/of 5 GHz. D-Link DWR-953 User Manual...
- Page 154 • Halten Sie das Produkt von Heizkörpern und anderen Quellen fern, die Wärme erzeugen. • Trennen Sie das Produkt immer von der Stromzufuhr, bevor Sie es reinigen und verwenden Sie dazu ausschließlich ein trockenes fusselfreies Tuch. D-Link DWR-953 User Manual...
- Page 155 • Mantenga el producto alejado de los radiadores y de otras fuentes de calor. • Desenchufe siempre el producto de la alimentación de red antes de limpiarlo y utilice solo un paño seco sin pelusa. D-Link DWR-953 User Manual...
- Page 156 • Houd het product uit de buurt van radiators en andere warmtebronnen. • U dient het product steeds los te koppelen van de stroom voordat u het reinigt en gebruik uitsluitend een droge pluisvrije doek. D-Link DWR-953 User Manual...
- Page 157 D-Link designs and builds its products to be as environmentally friendly as possible, by using recyclable, low toxic materials in both products and packaging. D-Link recommends that you always switch off or unplug your D-Link products when they are not in use. By doing so you will help to save energy and reduce CO2 emissions.
- Page 158 D-Link et l’environnement Chez D-Link, nous sommes conscients de l'impact de nos opérations et produits sur l'environnement et nous engageons à le réduire. Pour limiter cet impact, D-Link conçoit et fabrique ses produits de manière aussi écologique que possible, en utilisant des matériaux recyclables et faiblement toxiques, tant dans ses produits que ses emballages.
- Page 159 D-Link zijn producten zo milieuvriendelijk mogelijk, door het gebruik van recycleerbare producten met lage toxiciteit in product en verpakking. D-Link raadt aan om steeds uw D-Link producten uit te schakelen of uit de stekker te halen wanneer u ze niet gebruikt. Door dit te doen bespaart u energie en beperkt u de CO2-emissies.
- Page 160 D-Link a životní prostředí Ve společnosti D-Link jsme si vědomi vlivu našich provozů a výrobků na životní prostředí a snažíme se o minimalizaci těchto vlivů. Proto své výrobky navrhujeme a vyrábíme tak, aby byly co nejekologičtější, a ve výrobcích i obalech používáme recyklovatelné a nízkotoxické materiály.
- Page 161 D-Link produkter som er så miljøvennlig som mulig, ved å bruke resirkulerbare, lav-toksiske materialer både i produktene og forpakningen. D-Link anbefaler at du alltid slår av eller frakobler D-Link-produkter når de ikke er i bruk. Ved å gjøre dette hjelper du å spare energi og å redusere CO2-utslipp.
- Page 162 D-Link sine produkter, så de er så miljøvenlige som muligt, ved at bruge genanvendelige materialer med lavt giftighedsniveau i både produkter og emballage. D-Link anbefaler, at du altid slukker eller frakobler dine D-Link-produkter, når de ikke er i brug. Ved at gøre det bidrager du til at spare energi og reducere CO2-udledningerne.
- Page 163 D-Link och miljön På D-Link förstår vi och är fast beslutna att minska den påverkan våra verksamheter och produkter kan ha på miljön. För att minska denna påverkan utformar och bygger D-Link sina produkter för att de ska vara så miljövänliga som möjligt, genom att använda återvinningsbara material med låg gifthalt i både produkter och förpackningar.
Need help?
Do you have a question about the DWR-953 and is the answer not in the manual?
Questions and answers