Table of Contents
Advertisement
Quick Links
Advertisement
Table of Contents

Related Manuals for Sandstrom RETRO SPLDAB17


Summary of Contents for Sandstrom RETRO SPLDAB17
- Page 1 Instruction Manual Portable DAB radio SPLDAB17...
-
Page 3: Table Of Contents
Contents Safety Warnings..................................6 Unpacking ....................................12 Product Overview ................................... 13 Front View............................................13 Top View ............................................14 Rear View ............................................15 Connections .................................... 16 Using the AUX Connection ......................................16 Using Earphones ..........................................17 Connecting to the Mains Supply.....................................18 General Operation.................................. 19 Switching ON/OFF .........................................19 Selecting Modes ..........................................20 Adjusting the Volume ........................................20 System Settings .................................. - Page 4 Sleep ..............................................21 Equaliser ............................................22 Setting the Time and Date ......................................23 Backlight ............................................24 Inactive Standby ..........................................24 Language ............................................25 System Reset ...........................................25 Software Version ...........................................26 DAB Operation ..................................27 Auto Scan ............................................28 Manual Tune ............................................29 DRC ..............................................29 Presetting Stations........................................30 Recalling a Preset Station ......................................31 DAB Display Modes ........................................32 FM Operation ..................................
- Page 5 Searching for a Station Manually ....................................36 Scan Setting .............................................37 Audio Setting ..........................................37 Presetting Stations........................................38 Recalling a Preset Station ......................................39 AUX Operation ..................................40 Maintenance ................................... 41 Cleaning the Unit ...........................................41 Hints and Tips..................................42 Specifications ..................................44...
-
Page 6: Safety Warnings
Safety Warnings • Read all the instructions carefully before using the unit and keep them for future reference. • Retain the manual. If you pass the unit onto a third party make sure to include this manual. Damage • Please inspect the unit for damage after unpacking. • Do not continue to operate the unit if you are in any doubt about it working normally, or if it is damaged in any way - switch off and consult your dealer. - Page 7 • Avoid exposure to direct sunlight and other sources of heat. Naked Flames • Never place any type of candle or naked flame on the top of or near the unit. Moisture • Do not submerge this unit in water. It can cause serious damage. Ventilation • To prevent the risk of electric shock or fire hazard due to overheating, ensure that curtains and other materials do not obstruct the ventilation vents.
- Page 8 Service • To reduce the risk of electric shock, do not remove screws. The unit does not contain any user- serviceable parts. Please leave all maintenance work to qualified personnel. • Do not open any fixed covers as this may expose dangerous voltages. Built-in Battery Care • Your product is powered by a rechargeable battery.
- Page 9 • The unit should be fully recharged after using the device each time. This will keep the health of the battery. • If you plan to store your device for longer than six months, charge the battery for an hour every six months to keep it fresh.
- Page 10 Maintenance • Do not use any type of abrasive pad or abrasive cleaning solutions as these may damage the unit’s surface. • Do not use liquids to clean the unit.
- Page 11 Thank you for purchasing your new product. We recommend that you spend some time reading this instruction manual in order that you fully understand all the operational features it offers. You will also find some hints and tips to help you resolve any issues.
-
Page 12: Unpacking
Unpacking Remove all items from the packaging. Retain the packaging. If you dispose of it please do so according to local regulations. The following items are included: • Main Unit • Mains Adapter • 3.5mm to 3.5mm Stereo Audio Cable • Instruction Manual If items are missing, or damaged please contact Partmaster (UK only). -
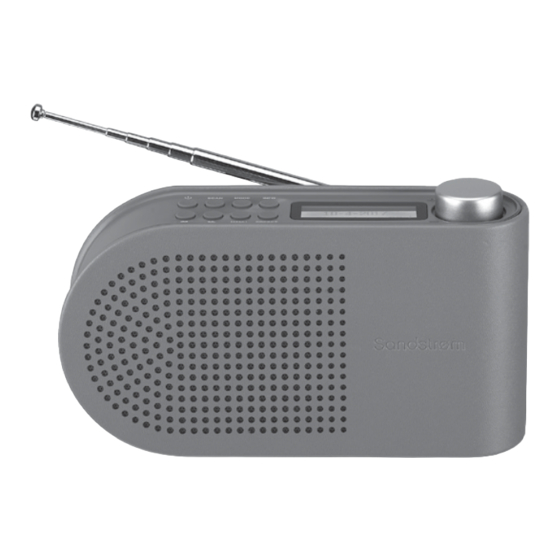
Page 13: Product Overview
Product Overview Front View 1. Speaker... -
Page 14: Top View
Top View ON/OFF Button 2 3 4 2. SCAN Button 3. MODE Button 4. INFO Button 5. Display 6. Aerial 7. VOLUME +/– Dial 8. TUNE Button 9. MENU Button 10. PRESET Button 9 10... -
Page 15: Rear View
Rear View 1. RESET Button 2. AUX IN Socket Earphones Socket 4. DC IN-5V Socket RESET AUX IN DC IN-5V... -
Page 16: Connections
Connections Using the AUX Connection Use a 3.5 mm to 3.5 mm stereo audio cable Mobile device (included) to connect a mobile device to the main unit’s AUX IN socket. RESET AUX IN DC IN-5V 3.5 mm to 3.5 mm stereo audio cables (included) -
Page 17: Using Earphones
Using Earphones Turn down the volume before connecting the earphones. Slowly raise the volume with the earphones on until you reach your desired volume. When earphones are connected, the speakers automatically mute. RESET AUX IN DC IN-5V Long-term exposure to loud music may cause hearing damage. It is best to avoid extreme volume when using earphones, especially for extended periods. -
Page 18: Connecting To The Mains Supply
Connecting to the Mains Supply • This unit is designed to operate with an AC power To the mains socket supply or with the built-in battery. • Connecting the unit to any other power source may cause damage to the unit. Unwind the mains cable to its full length. -
Page 19: General Operation
General Operation Switching ON/OFF While using battery power: • Press and hold button to switch the unit on. • Press and hold button again to switch the unit off. While using mains power: • Press and hold button to switch the unit on. button again to switch the unit in Standby mode. -
Page 20: Selecting Modes
The unit will enter STANDBY mode (while using mains power) or switch OFF (while using built-in battery power) for power saving, if the unit is muted, or it is in Auxiliary input mode but without input signal for approximately 10 minutes. Selecting Modes Press MODE button repeatedly on the unit to switch between DAB, FM, and Auxiliary Input mode. -
Page 21: System Settings
System Settings Sleep You can set a sleep timer so if you are listening to your radio and fall asleep, it will automatically switch off at the preset time. The sleep timer can be activated for up to a maximum of 90 minutes. 1. -
Page 22: Equaliser
Equaliser Your radio has preset equaliser setting. This feature enables you to set a sound equalization profile. The equalization setting will change the tone of the sound from your radio. 1. In ON mode, press MENU button, and then turn the +/– dial or press button to select System. -
Page 23: Setting The Time And Date
Setting the Time and Date 1. In ON mode, press MENU button, and then turn the +/– dial or press button to select System. Press the +/– dial to confirm. 2. Turn the +/– dial or press button to select Time. Press the +/– dial to confirm. 3. -
Page 24: Backlight
Backlight You can set the brightness for the power on screens and the Standby screen. 1. In ON mode, press MENU button, and then turn the +/– dial or press button to select System. Press the +/– dial to confirm. 2. -
Page 25: Language
Language This feature enables you to change menu language. 1. In ON mode, press MENU button, and then turn the +/– dial or press button to select System. Press the +/– dial to confirm. 2. Turn the +/– dial or press button to select Language. -
Page 26: Software Version
1. In ON mode, press MENU button, and then turn the +/– dial or press button to select System. Press the +/– dial to confirm. 2. Turn the +/– dial or press button to select Factory Reset. Press the +/– dial to confirm. 3. -
Page 27: Dab Operation
DAB Operation When you turn on the radio it will automatically search and store all the available stations. You may conduct an additional full scan to ensure all stations are picked up and stored. It is also recommended every few months to run a new scan to pick up any new DAB/DAB+ that may have begun broadcasting after your radio scanned last time. -
Page 28: Auto Scan
Auto Scan The auto scan will search for all DAB Band III channels. After the scan has finished, the first alphanumerically found station will be automatically selected. 1. In ON mode, press MENU button, and then turn the +/– dial or press button to select Full scan. -
Page 29: Manual Tune
Manual Tune This function is for advanced users only. Stations are selected from the station list. Manual scan enables you to tune to each multiplex channel, check if a multiplex is present and measure the signal strength. 1. In ON mode, press MENU button, and then turn the +/– dial or press button to select Manual tune. -
Page 30: Presetting Stations
Presetting Stations You can store up to 10 of your favourite DAB stations to the memory. This will enable you to access your favourite stations quickly and easily. 1. In ON mode, press MENU button, and then turn the +/– dial or press button to select Preset. -
Page 31: Recalling A Preset Station
Recalling a Preset Station 1. In ON mode, press MENU button, and then turn the +/– dial or press button to select Preset. Press the +/– dial to confirm. 2. Turn the +/– dial or press button to select Recall. Press the +/– dial to confirm. 3. -
Page 32: Dab Display Modes
DAB Display Modes Every time you press the INFO button, the display will cycle through the following display modes. DLS (Dynamic Label Segment) Dynamic label segment is a scrolling message that the broadcaster may include with their transmissions. The message usually includes information, such as programme details etc. DAB –... - Page 33 Ensemble Name A Ensemble/multiplex is a collection of radio stations that are bundled and transmitted on one frequency. There are national and local multiplexes. Local ones contain stations that are specific to that area. Channel Number DAB digital radio can be broadcast on a wide number of frequencies. Frequency The frequency of the present station will be displayed.
- Page 34 Bitrate The display will show the digital audio bit rate being received. Clock The broadcaster (Radio station) provides clock information automatically. If the information is not available, the display will show the incorrect time. Date The broadcaster (Radio station) provides date information automatically. If the information is not available, the display will show the incorrect date.
-
Page 35: Fm Operation
FM Operation Selecting FM Mode The unit will automatically select a FM radio station with a good signal. 1. Press MODE button repeatedly to select FM mode. 2. For initial use, it will start at the beginning of the FM frequency range (87.50 MHz). Or it will play the last FM station you were listening to. -
Page 36: Searching For A Station Automatically
Searching for a Station Automatically In FM mode, press and hold the button until the tuner starts searching for a station. The tuner will stop searching after tuning into a radio station. The search may not stop at a station with a very weak signal. Searching for a Station Manually In FM mode, repeatedly press the button until the desired frequency reception quality is found. -
Page 37: Scan Setting
Scan Setting In the Scan Settings menu you can choose if you want your radio to tune to All stations or Strong stations only, and it will try to tune to all stations, however some may be very weak. 1. In ON mode, press MENU button, and then turn the +/– dial or press button to select Scan setting. -
Page 38: Presetting Stations
Presetting Stations You can store up to 10 of your favourite FM stations to the memory. This will enable you to access your favourite stations quickly and easily. 1. In ON mode, press MENU button, and then turn the +/– dial or press button to select Preset. -
Page 39: Recalling A Preset Station
Recalling a Preset Station 1. In ON mode, press MENU button, and then turn the +/– dial or press button to select Preset. Press the +/– dial to confirm. 2. Turn the +/– dial or press button to select Recall. Press the +/– dial to confirm. 3. -
Page 40: Aux Operation
AUX Operation There are AUX IN socket located at the rear of the unit. Analogue audio sound signals from other sources can be connected to the unit through these sockets. 1. Connect to another audio device using the AUX IN socket via a RCA stereo audio cable (not included). 2. -
Page 41: Maintenance
Maintenance Cleaning the Unit Ensure the unit is fully unplugged from the mains socket before cleaning. • To clean the unit, wipe the case with a slightly moist, lint-free cloth. • Do not use any cleaning fluids containing alcohol, ammonia or abrasives. • Do not spray an aerosol at or near the unit. -
Page 42: Hints And Tips
Hints and Tips If a problem occurs, it may often be due to something very minor. The following table contains various tips: Problem Solution No power • Ensure the mains cable is connected securely. • Make sure that the unit is switched on. No Sound • Adjust the volume control, it may not be turned up. - Page 43 Problem Solution The unit does not • The unit may freeze up during use. Switch the unit off and then on respond when pressing again at the mains socket to reset the unit. any button Desired station not found • Weak signal. Use the Manual Tune function. No coverage in your area • Adjust the position of the aerial.
-
Page 44: Specifications
Specifications Model SPLDAB17 Power Consumption 1 × 3 W rms, 3.5 ohm Power Standby <1 W Frequency response 100 Hz-10 KHz (-10dB) <10% >65 dB(A) Radio Frequency range FM: 87.5 MHz~108 MHz DAB: 174.928 MHz~239.200 MHz Battery Lithium battery 2200 mAh, 3.7 V Playback Time 6 hours (50% Volume) Net Weight... - Page 45 Power Adapter (Use only power adapter listed below) Power Adapter Model PS06H050K1000BD Power Adapter Manufacturer Shenzhen Flypower Technology Co., LTD Power Supply Input: AC 100-240 V~, 50/60 Hz, 0.25 A Output: 5 V 1.0 A Features and specifications are subject to change without prior notice.
- Page 46 For general information about this appliance and handy hints and tips, please visit www.knowhow.com/knowledgebank or call UK: 0344 561 1234 Ireland: 1890 818 575. Visit Partmaster.co.uk today for the easiest way to buy electrical spares and accessories. With over 1 million spares and accessories available we can deliver direct to your door the very next day.
- Page 47 The symbol on the product or its packaging indicates that this product must not be disposed of with your other household waste. Instead, it is your responsibility to dispose of your waste equipment by handing it over to a designated collection point for the recycling of waste electrical and electronic equipment.
- Page 48 DSG Retail Ltd. (co. no. 504877) 1 Portal Way, London, W3 6RS, UK (IB-SPLDAB17-170509V1)
Need help?
Do you have a question about the RETRO SPLDAB17 and is the answer not in the manual?
Questions and answers