
Subscribe to Our Youtube Channel
Related Manuals for Kärcher PROCHEM Peak GTX2


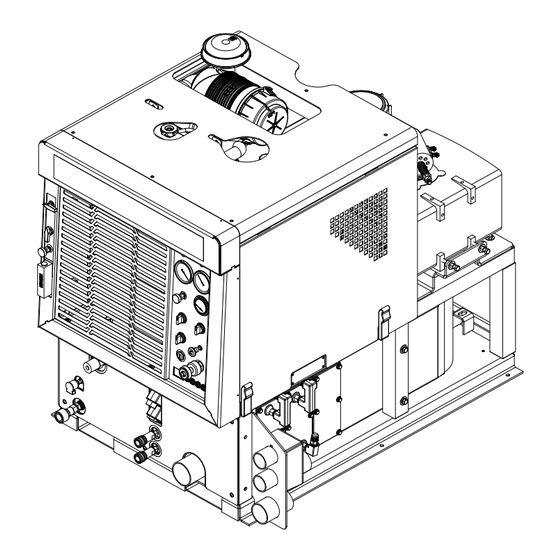
Summary of Contents for Kärcher PROCHEM Peak GTX2
- Page 1 Peak GTX2 Mobile Cleaning Unit Operating Instructions (ENG) MODELS: 1.001-132.0 From Serial Number (Ref No1*) *See Serial Number Page in spare parts list or call manufacturer 86411120-B 10/15/16...
- Page 2 This page left intentionally blank...
-
Page 3: Machine Data Log / Overview
Machine Data Log / Overview Welcome…and congratulations on the purchase of your Mobile Cleaning Unit. This instruction manual is a guide for operating and servicing your unit. Read this manual completely before installing or operating this unit. This unit offers you personal convenience. All of your instrumentation and controls have been positioned to give you easy access for operation and daily maintenance. -
Page 4: Table Of Contents
Table of Contents Operations Machine Data Log / Overview ....1 Technical Specifications ....23 Table of Contents . -
Page 5: Table Of Contents
Table of Contents Maintenance Service Schedule ......38 Key Checkpoints ......40 Engine Coolant System (Radiator) Maintenance . -
Page 6: Receiving Your Unit
Receiving Your Unit Acceptance of Shipment Equipment List Every part of your cleaning unit was carefully checked, 1. Console. tested, and inspected before it left our manufacturing 2. Waste tank plant. Upon receiving the unit, make the following acceptance check: 3. -
Page 7: How To Use This Manual
How to Use This Manual This manual contains the following sections: The SAFETY section contains important information regarding hazardous or unsafe practices for this • How to Use This Manual machine. Levels of hazards are identified that could • Safety result in product damage, personal injury, or severe •... -
Page 8: Safety
Safety IMPORTANT SAFETY INSTRUCTIONS When using this machine, basic precaution must always be followed, including the following: READ ALL INSTRUCTIONS BEFORE USING THIS MACHINE. These symbols mean WARNING or CAUTION. Failure to follow warnings and cautions could result in fatality, personal injury to yourself and/or others, or property damage. - Page 9 Safety DO NOT leave the vehicle engine running while operating this unit. Dangerous Acid, Explosive Gases! Batteries contain sulfuric acid. To prevent acid burns, avoid contact with skin, eyes and clothing. Batteries produce explosive hydrogen gas while being charged. To prevent a fire or explosion, charge batteries only in well ventilated areas.
- Page 10 Safety MESURES DE SÉCURITÉ IMPORTANTES Lors de l’utilisation d’un appareil à batteries, il est nécessaire de respecter systématiquement des mesures de sécurité de base, comme suit : PRENEZ NOTE DE TOUTES CES MESURES AVANT D’UTILISER CETTE MACHINE. Ces symboles signifient AVERTISSEMENT ou MISE EN GARDE.
- Page 11 Safety Acide dangereux, gaz explosifs! Les batteries contiennent de l'acide sulfurique. Pour prévenir les brûlures par acides, éviter tout contact avec la peau, les yeux et les vêtements. Les batteries produisent du gaz hydrogène explosif pendant la charge. Pour empêcher tout incendie ou toute explosion, charger les batteries uniquement dans des endroits bien ventilés. Garder la batterie à...
-
Page 12: Hazard Intensity Level
Safety The following symbols are used throughout this guide as indicated in their descriptions: Hazard Intensity Level There are three levels of hazard intensity identified by signal words - WARNING and CAUTION and FOR SAFETY. The level of hazard intensity is determined by the following definitions: WARNING - Hazards or unsafe practices which COULD result in severe personal injury or death. - Page 13 Safety Les symboles ci-dessous sont utilisés à travers ce manuel comme illustré dans leurs descriptions : DEGRÉS DE RISQUES EN CAS DE DANGER Il existe trois degrés de risques identifiés par les termes signalétiques –AVERTISSEMENT et ATTENTION et POUR VOTRE SÉCURITÉ. Le degré de risque est défini de la manière suivante: AVERTISSEMENT - Dangers ou méthodes dangereuses qui POURRAIENT provoquer de graves blessures ou entraîner la mort.
-
Page 14: Safety Labels
Safety Safety Labels The following WARNING LABELS are found on your cleaning unit. These labels point out important Warnings and Cautions which should be followed at all times. Failure to follow warnings and cautions could result in fatality, personal injury to yourself and/or others, or property damage. Follow these instructions carefully! DO NOT remove these labels. - Page 15 Notes 86411120 Manual Operators - Peak GTX2 Prochem...
-
Page 16: Installation
Installation Dealer Responsibility 4. We do not recommend using flooring materials that absorb water. This could result in rust and Your distributor from whom you purchased this mobile corrosion of the vehicle floor. cleaning unit is responsible for correct installation of 5. -
Page 17: Lifting Unit Onto Vehicle
Installation Lifting Unit Onto Vehicle Bolting Down Unit And Waste Tank NOTE: When positioning waste tank with respect to Since console weighs approximately 734 lbs. pounds, console, hook up the vacuum hose to waste tank. we recommend using a forklift to lift unit onto vehicle. This will ensure that waste tank is positioned Position forks under unit from front and make CERTAIN correctly. -
Page 18: Layout With 60 Gallon Waste Tank
Installation Layout with 60 Gallon Waste Tank BACK OF DRIVERS SEAT " " IN REAR MOST POSITION. 2X 1 " 2X 6 " 2X 12 " " " 6X Ø " 2X 1 " " " MIN. 6X Ø " "... -
Page 19: Layout With 100 Gallon Waste Tank
Installation Layout with 100 Gallon Waste Tank BACK OF DRIVERS SEAT " " IN REAR MOST POSITION. 2X 1 " 2X 6 " 2X 12 " 6X Ø " " " " " MIN. 6X Ø " 2X 1 " 2X 19 "... -
Page 20: Waste Tank To Console Connection
Installation Waste Tank To Console Connection NOTE: Before connecting any hoses to the waste tanks, make certain the hose clamps are on each Avant de percer les trous de montage dans le hose. plancher du véhicule, s'assurer que les trous ne causeront aucun dommage au réservoir à... -
Page 21: Van Bulkhead Installation
Installation Van Bulkhead Installation 1. Select a location on the vehicle floor to drill the hole for the bulkhead adapter. This location should be situated in a position that eliminates the possibility of fuel line contact by either the operator(s) or accessories during the working hours or maintenance periods. -
Page 22: Fuel Supply & Return Line Installation
Installation Fuel Supply & Return Line Installation (Underneath Van) 1. Attach the 1/8 NPT x 5/16 Hosebarb 90 degree elbow to the bulkhead adapter underneath the van to be used for the fuel supply line. 2. Cut to length the 6' piece of 5/16" 50 PSI fuel hose used for the supply line from: a. -
Page 23: Battery Connection
Installation Battery Connection 1. Attach the red positive (+) battery cable from the console starter solenoid to the positive (+) terminal on the battery and tighten the holding nut. Dangerous Acid, Explosive Gases! Batteries contain sulfuric acid. To prevent acid burns, avoid contact with skin, eyes, and clothing. -
Page 24: Initial Operational Settings
Installation Initial Operational Settings Engine NOTE: Due to temperature and altitude changes, the Set RPM Values as shown below. Refer to Engine optimal settings for each truckmount must be Operation Manual for adjustment instructions. adjusted after installation. Failure to make these adjustments may lead to poor unit performance and Throttle Load... -
Page 25: Operations
Operations Technical Specifications ITEM DIMENSION/CAPACITY 2850 rpm (high speed) Water Pump ON Engine speed 1200 rpm (idle speed) Water Pump OFF. Solution pump rpm 1750 rpm Vacuum pump rpm 3350 rpm Water flow rate 3.5 GPM (maximum) Solution pump pressure (low pressure) 1200 PSI (maximum) Vacuum relief valve 13"... -
Page 26: Fuel Requirements
Operations Fuel Requirements Altitude Requirements Use unleaded gasoline ONLY. DO NOT use any Engines perform differently with increases/decreases in gasoline additives. We recommend the use of clean, altitude. Be sure to check engine speeds during initial fresh, unleaded gasoline intended for automotive use. installation. -
Page 27: Water Requirements
Operations Water Requirements If you are operating this unit in an area where the unit will be using water in which the harness exceeds 3-1/2 Hard water deposits will adversely affect the plumbing grains, we highly recommend a suitable water softener and heat exchange systems on this unit. -
Page 28: Components
Operations Components FRONT VIEW OF CONTROL PANEL 86411120 Manual Operators - Peak GTX2 Prochem... - Page 29 Operations Components 9. Solution Pump Switch This switch serves to energize the magnetic clutch 1. Solution Temp Control Valve to turn the solution pump on or off. Turn clockwise This valve allows the operator to control the for activating the pump and counter clockwise for solution temperature by bypassing hot water to the deactivating the pump.
- Page 30 Operations 15. Vacuum Inlets 23.Flow Meter The vacuum inlets serve as connecting points for The flow meter is a gauge to indicate how much vacuum hoses. liquid chemical is being introduced in the water system. The quantity can be increased by turning 16.
-
Page 31: Vacuum System
Operations Vacuum System The vacuum pump compresses and heats the incoming air. The hot discharged air is forced down stream into a The engine turning a vacuum pump generates vacuum. silencer for noise abatement. After exiting the silencer, The air is channeled in one side of the vacuum pump, this hot air is mixed with hot air exhaust gases from the compressed and discharged on the opposite side, engine. -
Page 32: Water Pumping And Heat Transfer System
Operations Water Pumping and Heat Transfer System Finally, the cleaning water passes to the solution outlet manifold where cleaning chemicals are injected from Cold water enters the console through the water inlet. the chemical pulse pump. This manifold serves as a When the water box is full the valve will automatically temperature sensing point and the temperature control shut off. - Page 33 Operations = COLD WATER = WARM WATER WASTE TANK = HOT WATER = NO WATER VACUUM EXHAUST HEAT EXCHANGERS THERMO RELIEF WATER BOX ENGINE SOLUTION PUMP ENGINE THERMOSTAT RADIATOR TO PRESSURE GAUGE TEMPERATURE CONTROL BYPASS PULSE HOSE MANIFOLD CHEMICAL INJECTION WATER INLET PRESSURE REGULATOR...
-
Page 34: Chemical Injection System
Operations Chemical Injection System The chemicals flow to the chemical selector valve, which can turn off the chemical flow or when set to The chemical injection system is unique in that it "Prime" sends it into the waste tank to purge air from utilizes the pressure spikes generated by the high- the system, or when "CHEM"... -
Page 35: Pre-Run Inspection / Setup
Operations Pre-Run Inspection / Setup NOTE: Operation of this unit is simple. However, only trained personnel should proceed. Don't run the solution pump dry, damage may occur and void the warranty. In the event the pump is run dry, allow the pump to Operate this unit and equipment only in a well- cool down to ambient temperature before reintro- ventilated area. -
Page 36: Priming The Chemical Pump
Operations Priming the Chemical Pump 2. Turn the pump-out switch on the control panel to the ON position. The waste pump will operate auto- 1. Fill chemical container and inspect chemical matically throughout the cleaning operation. strainer. We recommend that you use a 3/4" I.D. water hose 2. -
Page 37: Upholstery Cleaning
Operations Upholstery Cleaning De-flooding operations Upholstery tool, (See Options Section) De-flooding operations involve removal of water from carpet and flooring. This differs from normal cleaning 1. To protect fabrics, reduce solution temperature as operations in that no water or solution is required. An needed by opening the solution temp control valve automatic waste pump-out is highly recommended for on the control panel. -
Page 38: Winterizing Your Unit
Operations Winterizing Your Unit 7. Turn the solution pump switch OFF. Attach the winterizing loop hose with attachment, Part 1. Shut off the water supply. Disconnect the water #86260700, to the bottom solution outlet connec- inlet hose from the front of your console. tion and the water inlet connection. -
Page 39: Removing Anti-Freeze From The Unit
Operations Removing Anti-Freeze From the Unit 7. Place the chemical prime hose into the approved container. Submerge the chemical inlet hose in 1. Connect one end of the winterizing loop hose to water. Turn the chemical valve to the PRIME the bottom solution outlet connection. -
Page 40: Service Schedule
Maintenance Service Schedule Engine Daily Check engine oil level. *** Fill to proper level Engine Daily Check coolant level in overflow bottle Spray water displacing lubricant in lubrication cup at front of Vacuum Pump Daily console for 5 sec. Solution Pump Daily Check oil level.** Fill to proper level Chemical Inlet Tube Strainer... - Page 41 Maintenance Service Schedule Vacuum Exhaust Heat Exchanger 500 hrs Inspect cores and remove debris. Solution Pump 500 hrs Change oil** Pulley Set Screws & Hub Cap Screws, Solution Pump Clutch 500 hrs Check for proper torque values. Re-torque, if required**** Shaft Bolt Drive Pulley 500 hrs...
-
Page 42: Key Checkpoints
Maintenance Key Checkpoints Heat Exchanger System Maintenance Note: Initiation of a planned preventative maintenance The heat exchange system in your unit transfers program will assure that your unit has optimum perfor- energy between the engine’s exhaust and blower mance, a long operating life, and a minimal amount of discharge air to the solution supply system. -
Page 43: Engine
Maintenance 3. Re-torque the manifold and exhaust tube nuts, cylinder head bolts, and carburetor attaching nuts after the first 200 hours of use. DO NOT service this unit while it is running. The high-speed mechanical parts as well as high 4. -
Page 44: Vacuum Pump
Maintenance Vacuum Pump Refer to the Vacuum Pump Operation and Service Manual (P/N 86269820) for specific instructions. Lubrication: We recommend that you use AEON PD- XD synthetic lubricant. AEON PD-XD synthetic lubricant is formulated especially for positive displacement blower service to provide maximum protection for all operation temperatures. -
Page 45: Solution Pump
Maintenance Solution Pump Vacuum Relief Valve Refer to the Solution Pump Operation and Service The vacuum should be set at 13” Hg. Connect a 50 foot Manual for specific instructions (P/N 86269900). vacuum hose and a 50 foot solution line to the wand. Start the truckmount and bring the engine up to 1. -
Page 46: Solution Pump Drive Belt
Maintenance Solution Pump Drive Belt Waste Tank Strainer Basket To tighten the solution pump belt: The strainer basket located inside the waste tank should be removed and cleaned whenever it is full of 1. Loosen the nuts which hold the solution pump debris. -
Page 47: Chemical Pump
Maintenance Chemical Pump All high pressure solution hoses must be rated for 3000 PSI at 250°F. Thermoplastic hoses do not meet Rebuild the chemical pump every 500 hours. This these specifications and should not be used. involves changing the diaphragm, plastic disk and Severe burns and injury may result if the hoses do check valves. -
Page 48: General Service Adjustments
Maintenance General Service Adjustments 5. Re-assemble the check valve. Start the seat by hand, tighten using a 5/16" Allen wrench. DO NOT over-tighten seat. The high-speed mechanical parts as well as high temperature components may result in severe injury, severed limbs, or fatality. Tight wrap On spring Les pièces mécaniques se déplaçant à... -
Page 49: Packing Nut Adjustments For Chemical Valves
Maintenance Packing Nut Adjustments For Chemical Valves Make certain that when you re-torque these screws, Examine the packing nut on all chemical valves for that you use a clockwise pattern and continue until proper tension every 200 hours. When turning the proper torque is achieved. -
Page 50: Pressure Regulator
Maintenance Pressure Regulator We recommend that you lubricate the pressure regulator o-ring every 50 hours, or whenever required. The pressure regulator serves to maintain water If you do not, the stem may become seized due to inad- pressure at a preset point and to bypass water back to equate lubrication. -
Page 51: Troubleshooting
Maintenance Troubleshooting PROBLEM CAUSE SOLUTION Turn the water supply on or up. Check for kinks Water supply is turned off or the float in the water supply hose. Examine the float valve valve is stuck or improperly adjusted. and adjust or replace. Examine the water inlet strainer inside the water box. - Page 52 Maintenance PROBLEM CAUSE SOLUTION Vacuum obstruction Inspect hoses for obstructions. Vacuum gauge is giving an improper Examine the tubing between the vacuum relief valve reading. and the vacuum gauge and remove any blockage. Vacuum hose(s) is damaged, causing a Inspect hose(s), repair or replace. suction leak.
- Page 53 Maintenance PROBLEM CAUSE SOLUTION Tighten fittings. Re-apply thread sealant where External leak in chemical piping required. If any fittings are damaged, replace. Close the chemical valve on the instrument panel. If Outlet check valve is full of debris or the flow meter does not indicate flow, remove debris damaged, not allowing it to close properly Chemical flow or replace check valve, if necessary.
- Page 54 Maintenance PROBLEM CAUSE SOLUTION Waste tank is full. Empty the waste tank. Engine temperature has exceeded Determine the cause of overheating 255°F, triggering the high before restarting the unit. See "Exces- temperature switch to shut the unit sive Heating" in the "Troubleshooting" down.
- Page 55 Notes PROBLEM CAUSE SOLUTION Descale unit, repair or replace damaged Flow restriction caused by hard plumbing components as necessary. water scaling. Install water softener. Excessive heating Unstuck unit, repair or replace damaged Baffle door inside heat exchanger plumbing and electrical components as stuck in heating mode.
- Page 56 Kärcher North America Truckmount Warranty Effective on all products shipped AFTER September 1, 2016 Limited Warranty Kärcher’s liability for special, incidental, or consequential damages is expressly disclaimed. In no event shall Kärcher’s liability exceed the purchase price of the product in question. Kärcher makes every effort to ensure that all illustrations and specifications are correct, however, these do not imply a warranty that the product is merchantable or fit for a particular purpose, or that the product will actually conform to the illustrations and specifications.
- Page 57 Kärcher North America Truckmount Warranty Effective on all products shipped AFTER September 1, 2016 Component Coverage Responsibility Warranty Engine Dependent: Briggs & Stratton – 1.800.233.3723 2 years Engine Kohler – 1.800.544.2444 2 years Kubota ‐ 1.847.955.2500 2 years 2 years or Hyundai Engine www.zenithpp.com/ 1.276.525.4760 2000 hours Monday ‐ Thursday 1.276.645.8679 3 Years or Zenith EFI Emissions Friday only 1.276.477.0653 2500 hours *The servicing dealer must contact engine manufacturer prior to performing service. This Warranty Shall Not Apply To: Any product that has been subject to abuse, misuse, neglect or unauthorized alteration (including the use of incompatible or corrosive chemicals or overloading of capacity).
- Page 59 Spare Parts List (1.001-132.0) Peak GTX2 From Serial Number (Ref No1*) *See Serial Number Page or call manufacturer 86411130-K 04/26/17...
- Page 60 How to Use this Spare Parts List The PARTS LIST section contains assembled parts illustrations and corresponding parts list. The parts lists include a number of columns of information: • REF - column refers to the reference number on the parts illustration. •...
- Page 61 Table of Contents How to Use this Spare Parts List ....2 Table of Contents ......3 Frame 1.
-
Page 62: Frame 1
Frame 1 86411130 Spare Parts List - Peak GTX2 Prochem... -
Page 63: Frame 2
Frame 1 SERIAL NO. PART NO. DESCRIPTION NOTES FROM 86270330 FLATWASHER, 1/4 86177090 CLAMP, CABLE 1/2I.D. 1/4BLT 86005680 NUT, 1/4-20 HEX NYLOCK 86005770 NUT, 3/8-16 HEX NYLOCK 86274000 SCR, 3/8-16 X 3 HHCS GR5 86274750 SCR, 1/4-20 X 3/4 HHCS 86233390 CLAMP, 7/8 DIA P CUSHIONED 86010780... -
Page 64: Frame 3
Frame 2 WATER BOX 86411130 Spare Parts List - Peak GTX2 Prochem... - Page 65 Frame 2 SERIAL NO. PART NO. DESCRIPTION NOTES FROM 86273330 SCR, CAP 1/4-20 X 2.75 HXHD 86270330 FLATWASHER, 1/4 86177260 CLMP,HOS#10 9/16MIN 1-1/ 86188210 NIP, 1/2 X 3/8 HEX BR 86177640 CONN, 1/8P X 1/4POLY BR 86181360 FTTG, BRB 1/2P X 5/8H BR 86179710 DSC, 3/8F X 3/8FP 86178700...
- Page 66 Frame 3 86411130 Spare Parts List - Peak GTX2 Prochem...
- Page 67 Frame 3 SERIAL NO. PART NO. DESCRIPTION NOTES FROM 86273180 SCR, 1/4-20 X 1" HXHD GRD8 86273330 SCR, CAP 1/4-20 X 2.75 HXHD 86270330 FLATWASHER, 1/4 86177040 CLAMP, CABLE 1-1/4 ID 5/16 BLT 86161800 LATCH, CONCEALED KEEPER 86176170 CABL, RETAIN VAC PLG 800 86005680 NUT, 1/4-20 HEX NYLOCK 86270990...
-
Page 68: Side Panel
Side Panel 86411130 Spare Parts List - Peak GTX2 Prochem... - Page 69 Side Panel SERIAL NO. PART NO. DESCRIPTION NOTES FROM 86325380 BRKT, VAC INLET, PGT 86180700 END CAP, VAC INLET, 1-1/2" 86411130 Spare Parts List - Peak GTX2 Prochem...
-
Page 70: Chemical Panel
Chemical Panel 86411130 Spare Parts List - Peak GTX2 Prochem... - Page 71 Chemical Panel SERIAL NO. PART NO. DESCRIPTION NOTES FROM 86273180 SCR, 1/4-20 X 1" HXHD GRD8 86270330 FLATWASHER, 1/4 86176990 CLAMP, HOSE #4 SST 86188000 NIP, 1/8 HX BR 86194160 TEE, 1/8 BR 86177660 CONN, 1/8P X 1/4T 86181300 FTTG, BRB 1/8P X 5/16H 86195050 VALVE, METERING 1/8FP 86181170...
-
Page 72: Control Panel
Control Panel 86411130 Spare Parts List - Peak GTX2 Prochem... - Page 73 Control Panel SERIAL NO. PART NO. DESCRIPTION NOTES FROM 86273180 SCR, 1/4-20 X 1" HXHD GRD8 86270330 FLATWASHER, 1/4 86180350 ELL, 1/4FP X 1/4T BR 86180360 ELL, 1/8P X 1/4T BR 86180380 ELL, 1/4FPx1/4POLY BR 86180420 ELL, 1/8P X 1/4T 45 DEG 86195050 VALVE, METERING 1/8FP 86186020...
-
Page 74: Engine 1
Engine 1 86411130 Spare Parts List - Peak GTX2 Prochem... - Page 75 Engine 1 SERIAL NO. PART NO. DESCRIPTION NOTES FROM 86273440 SCR, MACH 5/16-18 X 1" GR8 86182290 GSKT, EXH, KUB, D902/WG972 86136310 NUT, M5 HEX 86005770 NUT, 3/8-16 HEX NYLOCK 86274000 SCR, 3/8-16 X 3 HHCS GR5 86136640 SCR, M8-1.25 X 20 HHMS PLTD 86275190 SCR, 3/8-16 X 1.25 HHCS SS 86006820...
- Page 76 Engine 2 SUPPLIED WITH ENGINE 12 11 86411130 Spare Parts List - Peak GTX2 Prochem...
-
Page 77: Engine 2
Engine 2 SERIAL NO. PART NO. DESCRIPTION NOTES FROM 86273440 SCR, MACH 5/16-18 X 1" GR8 86180940 FILTER, OIL, KOHLER AEGIS 86185350 HUB, P1 X 1-1/8 86174950 BELT, AX43 GOODYEAR MATCH 86270480 KEY, 1/4 X 1/4 X 2 1/2 86191050 PULL, 2TB68, 405, PWRVC2 86136640 SCR, M8-1.25 X 20 HHMS PLTD... -
Page 78: Vacuum Pump
Vacuum Pump TO WASTE TANK TO SILENCER 86411130 Spare Parts List - Peak GTX2 Prochem... - Page 79 Vacuum Pump SERIAL NO. PART NO. DESCRIPTION NOTES FROM 86273320 SCR, CAP 7/16-14X4 HXHD 86273420 SCR,CAP 3/8-16X3 ALL THD 86273440 SCR, MACH 5/16-18 X 1" GR8 86177010 CLAMP, HOSE #48 86193230 SPRING, VAC REL VLV 86180370 ELL, 1/8P X 1/4 POLY BR 86179580 DIAPHRAM, VAC REL VLV 86180600...
-
Page 80: Solution Pump 1
Solution Pump 1 FROM WATER BOX FROM FLOWMETER 86411130 Spare Parts List - Peak GTX2 Prochem... -
Page 81: Solution Pump 2
Solution Pump 1 SERIAL NO. PART NO. DESCRIPTION NOTES FROM 86326970 BRKT, WTR PMP MTG 86279820 WSHR, .328 ID X 1.00 OD X .119 ZNC 86355300 PMP, WTR, CAT 3CP, HT LEFT INCLUDES 33, 34, 35 86183470 HOS, 3/16X23(1/4FT BS)MET 86191440 PUMP, CHEM, PULSE, GP INCLUDES 2, 14, 30,... - Page 82 Solution Pump 2 86411130 Spare Parts List - Peak GTX2 Prochem...
- Page 83 Solution Pump 2 SERIAL NO. PART NO. DESCRIPTION NOTES FROM 86176520 CAP, OIL FILLER 86189200 O-RING, OIL FILL CAP 86195580 WASHER, KEYHOLE M18 86024830 SLINGER, BARRIER 86189210 O-RING, BEARING CVR 86024780 O-RING, CRANK CVR 86190560 PLUG, VALVE 86024810 RETAINER, SEAL 86024820 RETAINER, PNLGR W/STUD 86190600...
-
Page 84: Vacuum / Exhaust Heat Exchanger And Silencer
Vacuum / Exhaust Heat Exchanger and Silencer 19 21 FROM REGULATOR TO WATER BOX 86411130 Spare Parts List - Peak GTX2 Prochem... - Page 85 Vacuum / Exhaust Heat Exchanger and Silencer SERIAL NO. PART NO. DESCRIPTION NOTES FROM 86325250 BRKT, HE BOX SUPPORT, PGT 86386090 HOUSING, HE BOX, PGTX2 86318840 ASSY, HEATER CORE COPPER, GT 86313690 GASKET, HEATER CORE COVER 86386030 GASKET, HIGH TEMP HE ACCESS COVER 86043150 ASSEMBLY, HEATER CORE SS 86338980...
-
Page 86: Vacuum Actuator
Vacuum Actuator 86411130 Spare Parts List - Peak GTX2 Prochem... - Page 87 Vacuum Actuator SERIAL NO. PART NO. DESCRIPTION NOTES FROM 86386190 DUST/LIQUID PROTECTION ASM 86386180 CLEVIS, M8X1.25RHX57, DIN 71752 86386120 ARM, VAC ACT 86386110 LEG, VAC ACT ARM 86386100 MOUNT, VACUUM ACTUATOR 86379170 BUSHING, .250 X .375 X .500 BRZ 86373170 SPRING, EXT .859OD X 5.75 L 86279510 WASHER, 3/8 FLT STL ZNPLT...
-
Page 88: Solution Outlet
Solution Outlet 86411130 Spare Parts List - Peak GTX2 Prochem... - Page 89 Solution Outlet SERIAL NO. PART NO. DESCRIPTION NOTES FROM 86187260 MANIFOLD, SOLUTION 86190180 PLG,1/8 SOCHD BR 86010780 WASHER, 1/4 SPLIT 86274750 SCR, 1/4-20 X 3/4 HHCS 86247680 NIPPLE, 1/4 HEX 86002450 COUPLER, 1/4 QD 86192490 SENDER, TEMP 140-320 DEG 86176350 86180420 ELL, 1/8P X 1/4T 45 DEG 86180410...
-
Page 90: Water Box
Water Box FROM WATER INLET REAR 86411130 Spare Parts List - Peak GTX2 Prochem... - Page 91 Water Box SERIAL NO. PART NO. DESCRIPTION NOTES FROM 86195060 VALVE, FLOAT INCLUDES 21 & 22 86270770 NUT, 1/4-20 HEX 86056660 ROD, FLOAT (1/4-20 X 4") SS 86348200 BALL, 4" DIA X 5" L, WHITE FLOAT 86181360 FTTG, BRB 1/2P X 5/8H BR 86177260 CLMP,HOS#10 9/16MIN 1-1/ 86175870...
-
Page 92: Regulator
Regulator OUTER SEAT INNER SEAT STEM SPRINGS BODY PRESSURE REGULATOR DETAIL TO COPPER HEATER CORE FROM SOLUTION PUMP TO 2ND HEATER CORE 86411130 Spare Parts List - Peak GTX2 Prochem... - Page 93 Regulator SERIAL NO. PART NO. DESCRIPTION NOTES FROM 86413390 MANIFOLD, PRESSURE REGULATOR 86372700 BRACKET, MANIFOLD 86352940 REG, SUTT SINGL SPRING PRESS 86313740 CAP, STEEL, 3/8-18FPT 86312330 HOSE, PULSE 28", 3/8MPT 86274390 SCREW, 1/4-20 X 2.25 PHPNHMS SS SCREW, 1/4-20 X 2.75 HHCS STL GR5 86273330 ZNPLT 86270330...
-
Page 94: 60 Gallon Waste Tank
60 Gallon Waste Tank PART OF 4 TO VACUUM PUMP 86411130 Spare Parts List - Peak GTX2 Prochem... - Page 95 60 Gallon Waste Tank SERIAL NO. PART NO. DESCRIPTION NOTES FROM 98408750 KIT, WASTE TANK 60G, PC COMPLETE 86190530 PLUG, 1-1/4 HXHD PVC 86180340 ELL, 1/4P X 1/4T BR 86193540 STRNR, WST TNK, RECT, 1.5 86186860 LATCH, DRAW 2-7/8 SST 86043190 STRAINER BOWL, AVENGER 450 86005810...
- Page 96 100 Gallon Waste Tank PART OF 4 13 22 TO VACUUM PUMP 86411130 Spare Parts List - Peak GTX2 Prochem...
- Page 97 100 Gallon Waste Tank SERIAL NO. PART NO. DESCRIPTION NOTES FROM 98408760 KIT, WASTE TANK 100 G, PC COMPLETE 86190530 PLUG, 1-1/4 HXHD PVC 86180340 ELL, 1/4P X 1/4T BR 86193540 STRNR, WST TNK, RECT, 1.5 86186860 LATCH, DRAW 2-7/8 SST 86043190 STRAINER BOWL, AVENGER 450 86005810...
-
Page 98: Fuel Pump
Fuel Pump TO CONSOLE THROUGH VEHICLE FLOOR RETURN TO VEHICLE USE AS NEEDED FUEL SUPPLY MOUNT TO VEHICLE FRAME 11 1 FROM VEHICLE FUEL SUPPLY 86411130 Spare Parts List - Peak GTX2 Prochem... - Page 99 Fuel Pump SERIAL NO. PART NO. DESCRIPTION NOTES FROM 86010630 WASHER, 1/4 ID X 5/8 OD SS 86173340 WASHER, SPLIT LOCK, 1/4, SS 86175970 BUSHING, SNAP HEYCO 2140 86176930 CD, FUEL PUMP, 2003 VAN 86177880 CONN, CORD 1/2 86181300 FTTG, BARB 1/8P X 5/16H 86191420 PUMP, FUEL AIRTEX 86273780...
-
Page 100: Battery Floor Mount
Battery Floor Mount 86411130 Spare Parts List - Peak GTX2 Prochem... - Page 101 Battery Floor Mount SERIAL NO. PART NO. DESCRIPTION NOTES FROM 86030550 KIT,BAT FLR MTG TM COMPLETE 86273780 SCR, 1/4-20 X 3/4 HHCS SS NP 86005680 NUT, 1/4-20 HEX NYLOCK 86174580 BATTERY 86012060 BOX, BATTERY, MODIFIED 86273190 SCR, 1/4-20 X 1-1/2 HXHD 86270330 FLATWASHER, 1/4 86010780...
-
Page 102: Chemical Jug Floor Mount
Chemical Jug Floor Mount 86411130 Spare Parts List - Peak GTX2 Prochem... - Page 103 Chemical Jug Floor Mount SERIAL NO. PART NO. DESCRIPTION NOTES FROM 86298250 HOLDER, 5 GAL JUG 86273190 SCR, 1/4-20 X 1-1/2 HXHD 86270770 NUT, 1/4-20 HEX 86270330 FLATWASHER, 1/4 86185720 JUG,5 GAL, SINGLE HNDL, WHITE 86010780 WASHER 1/4 SPLIT LOCK PLTD 86411130 Spare Parts List - Peak GTX2 Prochem...
-
Page 104: Wiring Diagram
Wiring Diagram 86411130 Spare Parts List - Peak GTX2 Prochem... -
Page 105: Hose Diagram
Hose Diagram 86411130 Spare Parts List - Peak GTX2 Prochem... - Page 106 Notes: 86411130 Spare Parts List - Peak GTX2 Prochem...
- Page 107 Options OPTIONS...
-
Page 108: Hose Accessories
Hose Accessories 86411130 Spare Parts List - Peak GTX2 Prochem... - Page 109 Hose Accessories SERIAL NO. PART NO. DESCRIPTION NOTES FROM 86180980 FITTING, BRB 2H BS PVC 86178640 CUFF, 2” 86184510 HOSE, VAC 2”X50’ W/ CUFFS & HOSE 86247680 NIPPLE, 1/4 HEX 86002450 COUPLER, 1/4 QD 86005580 NIPPLE, 1/4 FPT QD 86184530 HOSE, HP 1/4 X 50FT W/QD &...
-
Page 110: Exhaust - Optional
Exhaust - Optional 86411130 Spare Parts List - Peak GTX2 Prochem... - Page 111 Exhaust - Optional SERIAL NO. PART NO. DESCRIPTION NOTES FROM 86177010 CLAMP, #48 HOSE 86280600 HOSE, 3" X 17" FLEXABLE 86181110 FLANGE, VAC EXH DUCT KIT LG 86192060 SCREW, 1/4-20 X 1-1/4" SST 86005810 NUT, 1/4-20 HEX NYLOCK SS 86030440 KIT, EXHAUST 3"ID, SINGLE KIT COMPLETE 86411130 Spare Parts List - Peak GTX2 Prochem...
-
Page 112: Automatic Pumpout - Dual Diaphragm - Optional
Automatic Pumpout - Dual Diaphragm - Optional PUMPOUT TO ENGINE HARNESS WASTE TANK 86411130 Spare Parts List - Peak GTX2 Prochem... - Page 113 Automatic Pumpout - Dual Diaphragm - Optional SERIAL NO. PART NO. DESCRIPTION NOTES FROM COMPLETE 86335970 ASSY, PUMPOUT, DUAL DIAPHRAGM ASSEMBLY 86010780 WASHER, 1/4 SPLIT LOCK, PLTD 86173530 ADAPTER, HOSE 1/2M X 3/4 MGT 86174260 ASSY, LVL SW WASTE PUMPOUT 86176420 CAP,HOS 3/4 BR 86233110...
-
Page 114: Wand - Titanium Six Jet - Optional
Wand - Titanium Six Jet - Optional 86411130 Spare Parts List - Peak GTX2 Prochem... - Page 115 Wand - Titanium Six Jet - Optional SERIAL NO. PART NO. DESCRIPTION NOTES FROM 86288350 WD, TM, 6 JET, TITANIUM (8001) PC COMPLETE 86273310 SCR, CAP 1/4-20 X 1 1/4 SOC 86192030 SCR, CAP 10-32 X 1 1/4 SOCH 86006680 SCR, 10-32 X 1/4 PPHMS SS 86270990 NUT, 10-32 HEX NYLOCK SS...
-
Page 116: Wand - Ergo Titanium Six Jet - Optional
Wand - Ergo Titanium Six Jet - Optional 86411130 Spare Parts List - Peak GTX2 Prochem... - Page 117 Wand - Ergo Titanium Six Jet - Optional SERIAL NO. PART NO. DESCRIPTION NOTES FROM 86326900 WAND, ERGO TI COMPLETE 86195560 WAND/HEAD WELDMENT 86182820 GUN, PRESS WASH TM 86011740 YG5000 SPRAY GUN ASM 86188590 NIPPLE, 1/4 X 5 SS 86175760 BRKT, HNDL, CLMP 86277760 SCR, 8-32 X 1/4 SHCS SS...
-
Page 118: Wand - Quad Jet - Optional
Wand - Quad Jet - Optional 9, 10 20, 21 18, 19 22A, 22B, 22C 18, 23 86411130 Spare Parts List - Peak GTX2 Prochem... - Page 119 Wand - Quad Jet - Optional SERIAL NO. REF PART NO. DESCRIPTION NOTES FROM 86285570 WAND, TM, QJW (95015) PC COMPLETE 86285580 WAND, TM, QJW (9502) PC COMPLETE 86285560 WAND, TM QJW (9501) PC COMPLETE 86285540 WAND, TM, QJW, (9501) NO DECAL COMPLETE 86005580 NIPPLE, 1/4 FPT QD...
-
Page 120: Wand - Tri Jet -Optional
Wand - Tri Jet -Optional 9, 10 18A, 18B, 18C 19, 20, 21 86411130 Spare Parts List - Peak GTX2 Prochem... - Page 121 Wand - Tri Jet -Optional SERIAL NO. PART NO. DESCRIPTION NOTES FROM 86285520 WAND, TJW (9502) PC COMPLETE 86285510 WAND, TJW, (95015) CUBXL COMPLETE 86285530 WAND, TJW, (9503) PC COMPLETE 86005580 NIPPLE, 1/4 FPT QD 86177860 CONN, 1/4P X 11/16-16M 86195570 WASHER, NYLON 86193490...
-
Page 122: Stair Tool - Optional
Stair Tool - Optional 8, 9 14A, 14B 86411130 Spare Parts List - Peak GTX2 Prochem... - Page 123 Stair Tool - Optional SERIAL NO. PART NO. DESCRIPTION NOTES FROM 86285350 TL, STAIR, LNG, TM DJ (80015) COMPLETE 86285290 TL, STAIR, SHT, TM (80015) COMPLETE INCLUDES PARTS 86135760 HANDLE GRIP ASSEMBLY 1.5" 2, 6 86270770 NUT, 1/4-20 HEX SS 86265730 TIE, CABLE 8”...
-
Page 124: Upholstery Tool - Optional
Upholstery Tool - Optional 86411130 Spare Parts List - Peak GTX2 Prochem... - Page 125 Upholstery Tool - Optional SERIAL NO. PART NO. DESCRIPTION NOTES FROM 86285260 TL, UPHOLST, PC (80015) COMPLETE 86280240 HOSE, VAC 1-1/4X10’ BLU 86178660 CUFF, SWIV 1-1/4HX1-1/4T 86184670 HOSE, 3/16X119-1/2 (1/8PX1/4FT) 86179720 DSC, 1/8FC1/8FP SST 86178550 UPHOLSTERY TL TRIGGER 86273370 SCR, CAP 4-40 X7/32 SHCS SS 86193050 SPRING, VAC ADJ BUTT 86176080...
-
Page 126: Shelf Assembly - Optional
Shelf Assembly - Optional OVERALL DIMENSION: 41-1/2" TALL 50-1/8" WIDE 57" WIDE (WITH TOOL HOLDERS) 7-7/8" DEEP DIMENSIONAL DATA 50 1/8 86411130 Spare Parts List - Peak GTX2 Prochem... - Page 127 Shelf Assembly - Optional SERIAL NO. PART NO. DESCRIPTION NOTES FROM 86354970 ASM, VAN STORAGE UNIT COMPLETE 86363820 SHELF, LOWER TM 86270330 FLATWASHER, 1/4 86010780 WASHER, 1/4 SPLIT LOCK 86274760 SCR, 1/4-20 X 1/2 HHCS PLTD 86274750 SCR, 1/4-20 X 3/4 HHCS PLTD 86398940 BRACKET, SLOTTED SHELF ASSY 86175730...
-
Page 128: Water Tank Dual With Demand Pump - Optional
Water Tank Dual with Demand Pump - Optional TO DEMAND PUMP OVERALL DIMENSION: 32-1/2" TALL 62-5/8" WIDE 15-1/2" DEEP 86411130 Spare Parts List - Peak GTX2 Prochem... - Page 129 Water Tank Dual with Demand Pump - Optional SERIAL NO. PART NO. DESCRIPTION NOTES FROM 86041730 TANK, DUAL SADDLE W/DMD PUMP COMPLETE 86041710 SINGLE SADDLE TANK W/DMND PMP COMPLETE 86048310 HOLD DOWN, SADDLE TANK GRAY 86279510 WASHER, 3/8 FLAT 86010790 WASHER 3/8 SPLIT LOCK 86277830 SCR, 3/8-16 X 2' HXHD...
-
Page 130: Water Tank - Demand Pump - Optional
Water Tank - Demand Pump - Optional 86411130 Spare Parts List - Peak GTX2 Prochem... - Page 131 Water Tank - Demand Pump - Optional SERIAL NO. PART NO. DESCRIPTION NOTES FROM 86191390 PUMP ONLY, TM DEMAND 86186030 KIT SERVICE DEMAND PMP 86006760 SCR, 5/16-18 X 3/4 HHCS GR5 PL TDL 86279130 WASHER, 5/16 SPLIT LOCK PLTD 86278830 WASHER, 5/16 FLAT 86233110 CLAMP, 1.0"...
-
Page 132: Auxiliary Water Tank With Pump-Optional
Auxiliary Water Tank with Pump-Optional 4X Ø.406 2X 18.7 MOUNTING DETAIL 2X 16.8 30.0 WIDE Vehicle Floor 58.6 LENGTH 30.0 TALL 86411130 Spare Parts List - Peak GTX2 Prochem... - Page 133 Auxiliary Water Tank with Pump-Optional SERIAL NO. PART NO. DESCRIPTION NOTES FROM 86041580 ASSY, AUX WTR TNK W/PMP COMPLETE 86277830 SCR, 3/8-16 X 2” HXHD 86277850 SCR, 10-32 X 1” SOCHD SST 86270330 FLATWASHER, 1/4 86233110 CLAMP, 1.0" WORM GEAR 86280550 HOSE, 5/8 ID BLU X 55”...
-
Page 134: Hose Reel - Optional
Hose Reel - Optional OVERALL DIMENSIONS: 47" TALL 40" WIDE 86411130 Spare Parts List - Peak GTX2 Prochem... - Page 135 Hose Reel - Optional SERIAL NO. PART NO. DESCRIPTION NOTES FROM 86373960 HOSE REEL, 300 FT W/SMALL REEL COMPLETE 86411130 Spare Parts List - Peak GTX2 Prochem...
-
Page 136: Motorized Hose Reel - Tank - Optional
Motorized Hose Reel - Tank - Optional 86411130 Spare Parts List - Peak GTX2 Prochem... - Page 137 Motorized Hose Reel - Tank - Optional SERIAL NO. PART NO. DESCRIPTION NOTES FROM 86412620 MOTORIZED HOSE REEL PC, GRY COMPLETE 86412630 BASE, RT SD HOE RL MTR, GRY 86191830 RL, HOS HP SOL 86006760 SCR, 5/16-18 X 3/4 HHCS 86278830 WASHER, 5/16 FLAT PLTD 86005650...
-
Page 138: Motorized Hose Reel - Optional
Motorized Hose Reel - Optional 86411130 Spare Parts List - Peak GTX2 Prochem... - Page 139 Motorized Hose Reel - Optional SERIAL NO. PART NO. DESCRIPTION NOTES FROM 86177270 CLAMP, MFLR 1-3/4 86175990 BUSHING, HOSE REEL 86412680 RL, VAC HOS-HOS RL MTR DR, GRY 86412690 BASE, MTR. HOSE REEL, GRY 86005650 NUT, 5/16-18 HEX 86279130 WASHER, 5/16 SPLIT LOCK PLTD 86047910...
-
Page 140: E Z - Charge Water Softener - Tank & Tray - Optional
E Z - Charge Water Softener - Tank & Tray - Optional 86411130 Spare Parts List - Peak GTX2 Prochem... - Page 141 E Z - Charge Water Softener - Tank & Tray - Optional SERIAL NO. PART NO. DESCRIPTION NOTES FROM 86041740 WATER SOFTENER 30" PC COMPLETE 86179710 DCS, 3/8F X 3/8FP 86188220 NIP, 3/8 X CL SST 86175880 BUSH, 3/4 X 3/8 ALUM 86173650 ADPT, TNK#50-0271 86179650...
-
Page 142: E Z - Charge Water Softener - Filter - Optional
E Z - Charge Water Softener - Filter - Optional 86411130 Spare Parts List - Peak GTX2 Prochem... - Page 143 E Z - Charge Water Softener - Filter - Optional SERIAL NO. PART NO. DESCRIPTION NOTES FROM 86179630 DISCONNECT, 3/8M X 3/8FP 86181400 FTTG, BRB 3/8P X 5/8H BR 86177260 CLMP, HOS#10 9/16MIN 86280140 HOSE, WTR 5/8X 30-1/2 86181360 FTTG, BRB 1/2P X 5/8H BR 86180170 ELL, STREET 1/2 BR 86193510...
-
Page 144: E Z - Charge Water Softener - Brine System - Optional
E Z - Charge Water Softener - Brine System - Optional PART OF ITEM 3 86411130 Spare Parts List - Peak GTX2 Prochem... - Page 145 E Z - Charge Water Softener - Brine System - Optional SERIAL NO. PART NO. DESCRIPTION NOTES FROM 86195930 FUNNEL, BIG BLU 86180470 ELL, 1/4P X 3/8 POLY BR 86177620 CONN, 1/4P BLKHD LNG BR 86180480 ELL, BRB 1/4P X 1/4H BR 86176990 CLAMP, HOSE #4 SST 86280630...
-
Page 146: Serial Numbers
Serial Numbers REF. MODEL: SERIAL # 10011320000607 86411130 Spare Parts List - Peak GTX2 Prochem...
Need help?
Do you have a question about the PROCHEM Peak GTX2 and is the answer not in the manual?
Questions and answers