Table of Contents
Advertisement
Quick Links
Product Name and Model Number
User Manual
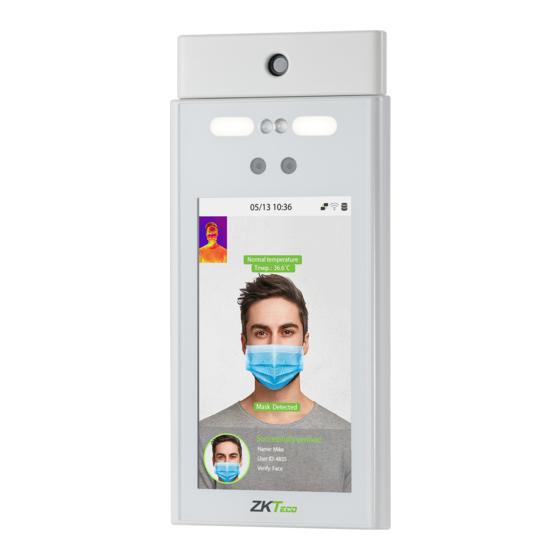
RevFace15
Date: January 2023
Doc Version: 1.1
English
Thank you for choosing our product. Please read the instructions carefully
before operation. Follow these instructions to ensure that the product is
functioning properly. The images shown in this manual are for illustrative
purposes only.
P a g e
| 1
For further details, please visit our Company's website
www.zkteco.com.
Copyright©2020 ZKTECO CO., LTD. All rights reserved.
User Manual
Advertisement
Table of Contents

Subscribe to Our Youtube Channel
Related Manuals for ZKTeco RevFace15


Summary of Contents for ZKTeco RevFace15
- Page 1 Follow these instructions to ensure that the product is functioning properly. The images shown in this manual are for illustrative purposes only. For further details, please visit our Company’s website www.zkteco.com. P a g e Copyright©2020 ZKTECO CO., LTD. All rights reserved.
- Page 2 Copyright © 2023 ZKTECO CO., LTD. All rights reserved. Without the prior written consent of ZKTeco, no portion of this manual can be copied or forwarded in any way or form. All parts of this manual belong to ZKTeco and its subsidiaries (hereinafter the "Company" or "ZKTeco").
- Page 3 RevFace15 User Manual relating to the use of the information contained in or referenced by this manual, even if ZKTeco has been advised of the possibility of such damages. This manual and the information contained therein may include technical, other inaccuracies or typographical errors.
- Page 4 User Manual About the Company ZKTeco is one of the world’s largest manufacturer of RFID and Biometric (Fingerprint, Facial, Finger-vein) readers. Product offerings include Access Control readers and panels, Near & Far-range Facial Recognition Cameras, Elevator/floor access controllers, Turnstiles, License Plate Recognition (LPR) gate controllers and Consumer products including battery-operated fingerprint and face-reader Door Locks.
- Page 5 The general information which helps in performing the operations faster. The information which is significant. Care taken to avoid danger or mistakes. The statement or event that warns of something or that serves as a cautionary example. P a g e Copyright©2023 ZKTECO CO., LTD. All rights reserved.
-
Page 6: Table Of Contents
LOUD ERVER ETTINGS ....................................41 IEGAND ETUP 7.6.1 WIEGAND INPUT ......................................42 7.6.2 WIEGAND OUTPUT ...................................... 44 ..................................45 ETWORK IAGNOSIS SYSTEM SETTINGS ......................... 46 ....................................47 ATE AND P a g e Copyright©2023 ZKTECO CO., LTD. All rights reserved. - Page 7 EQUIREMENTS OF OLLECTION AND EGISTRATION OF ISIBLE IGHT MAGES ....................... 89 EQUIREMENTS FOR ISIBLE IGHT IGITAL MAGE APPENDIX 2 ............................... 90 ......................................90 RIVACY OLICY ................................... 92 FRIENDLY PERATION P a g e Copyright©2023 ZKTECO CO., LTD. All rights reserved.
-
Page 8: Safety Measures
Power sources - Operate the system only from the label's power source form. If the sort of AC adapter to use is unclear, call your dealer. P a g e Copyright©2023 ZKTECO CO., LTD. All rights reserved. - Page 9 Clean the device accessories with a piece of soft cloth or a small amount of cleaning agent. If you have any technical questions regarding usage, contact certified or experienced technical personnel. P a g e Copyright©2023 ZKTECO CO., LTD. All rights reserved.
- Page 10 The warranty service does not cover accidental damage, damage caused by mis-operation, and damage due to independent installation or repair of the product by the user. P a g e Copyright©2023 ZKTECO CO., LTD. All rights reserved.
-
Page 11: Overview
User Manual Overview RevFace15 uses the latest Computer Vision Technology. It supports facial verification with large capacity and quick recognition and also improves security performance in all aspects. It accepts touchless recognition technology and new functions namely Masked Individual Identification which eliminates hygiene concerns effectively. -
Page 12: Instruction For Use
Standing Position, Posture and Facial Expression Recommended Standing Posture and Facial Expression Standing Posture Facial Expression Note: Please keep your facial expression and standing posture natural while enrolment or verification. P a g e | 11 Copyright©2023 ZKTECO CO., LTD. All rights reserved. -
Page 13: Face Registration
Be careful not to display two faces on the screen. Register one person at a time. It is recommended for a user wearing glasses to register both faces with and without glasses. P a g e | 12 Copyright©2023 ZKTECO CO., LTD. All rights reserved. -
Page 14: Standby Interface
Note: For the security of the device, it is recommended to register a super administrator the first time you use the device. P a g e | 13 Copyright©2023 ZKTECO CO., LTD. All rights reserved. -
Page 15: Virtual Keyboard
Press [123] to switch to the numeric and symbolic keyboard. Tap [ABC] to return to the alphabetic keyboard. Tap the input box, a virtual keyboard appears. Tap [ESC] to exit the virtual keyboard. P a g e | 14 Copyright©2023 ZKTECO CO., LTD. All rights reserved. -
Page 16: Verification Mode
When the user enables the Enable Mask Detection function, the device identifies whether the user is wearing a mask while verification or not. The following are the popups of the comparison result prompt interface. P a g e | 15 Copyright©2023 ZKTECO CO., LTD. All rights reserved. - Page 17 In this verification mode, the device compares the face captured by the camera with the facial template related to the entered user ID. Press on the main interface and enter the 1:1 facial verification mode and enter the user ID and tap [OK]. P a g e | 16 Copyright©2023 ZKTECO CO., LTD. All rights reserved.
- Page 18 After successful verification, the prompt box displays "Successfully verified", as shown below: If the verification is failed, it prompts "Please adjust your position! ". P a g e | 17 Copyright©2023 ZKTECO CO., LTD. All rights reserved.
-
Page 19: Multi-Face Verification
When the user enables the Enable mask detection function, the device identifies whether the user is wearing a mask while verification or not. The following are the popups of the comparison result prompt interface. P a g e | 18 Copyright©2023 ZKTECO CO., LTD. All rights reserved. - Page 20 In this verification mode, the device compares the face captured by the camera with the facial template associated to the entered user ID. Press on the main interface and select the 1:1 facial verification mode and enter the user ID and tap [OK]. P a g e | 19 Copyright©2023 ZKTECO CO., LTD. All rights reserved.
- Page 21 Password/Card/Face verification, the following screen will appear. Select the icon to enter the face verification mode. After the verification is successful, the prompt box will display the verification result, as shown in the figure below: P a g e | 20 Copyright©2023 ZKTECO CO., LTD. All rights reserved.
-
Page 22: Card Verification
1:1 Card Verification Tap the button on the main screen to open the 1:1 Card verification mode. Input the user ID and tap [OK]. P a g e | 21 Copyright©2023 ZKTECO CO., LTD. All rights reserved. - Page 23 Password/Face/Card, the following screen will appear. Select the icon to enter the card verification mode. Swipe the card above the card area (the card must be registered first). P a g e | 22 Copyright©2023 ZKTECO CO., LTD. All rights reserved.
-
Page 24: Password Verification
The device compares the entered password with the registered password of the given User ID. Tap the button on the main screen to enter the 1:1 password verification mode. Then, input the user ID and press [OK]. P a g e | 23 Copyright©2023 ZKTECO CO., LTD. All rights reserved. - Page 25 Input the password and press [OK]. Following are the display screen after entering a correct password and a wrong password respectively. P a g e | 24 Copyright©2023 ZKTECO CO., LTD. All rights reserved.
- Page 26 RevFace15 User Manual Successful Verification: Failed Verification: P a g e | 25 Copyright©2023 ZKTECO CO., LTD. All rights reserved.
-
Page 27: Main Menu
To automatically test whether each module functions properly, including the LCD Autotest Screen, Audio, Camera, and real-time clock. System Info To view Data Capacity and Device and Firmware information of the current device. P a g e | 26 Copyright©2023 ZKTECO CO., LTD. All rights reserved. -
Page 28: User Management
You can modify your ID during the initial registration but not after registration. If a message "Duplicated!" pops up, you must choose another ID as the entered User ID already exists. P a g e | 27 Copyright©2023 ZKTECO CO., LTD. All rights reserved. -
Page 29: User Role
displayed as the progress bar completes. If the face is registered already then, the "Duplicate Face" message shows up. The registration interface is as follows: P a g e | 28 Copyright©2023 ZKTECO CO., LTD. All rights reserved. -
Page 30: Password
the message as "Password not match!", where the user needs to re-confirm the password again. Note: The password may contain 1 to 8 digits by default. P a g e | 29 Copyright©2023 ZKTECO CO., LTD. All rights reserved. -
Page 31: Profile Photo
New users belong to Group 1 by default and can be reassigned to other groups. The device supports up to 99 Access Control groups. Tap Time Period, to select the time to use. P a g e | 30 Copyright©2023 ZKTECO CO., LTD. All rights reserved. -
Page 32: Search User
On the All Users interface, tap on the search bar on the user’s list to enter the required retrieval keyword (where the keyword may be the user ID, surname, or full name) and the system will search for the related user information. P a g e | 31 Copyright©2023 ZKTECO CO., LTD. All rights reserved. -
Page 33: Edit User
Delete User: Deletes all the user information (deletes the selected User as a whole) from the Device. Delete Face Only: Deletes the Face information of the selected user. Delete Password Only: Deletes the password information of the selected user. P a g e | 32 Copyright©2023 ZKTECO CO., LTD. All rights reserved. -
Page 34: Display Style
On the Main Menu, tap User Mgt., and then tap Display Style to enter Display Style setting interface. All the Display Styles are shown as below: Single Line Multiple Line Mixed Line P a g e | 33 Copyright©2023 ZKTECO CO., LTD. All rights reserved. -
Page 35: User Role
sub-menus will be listed on its right. First tap on the required Main Menu function name, and then select its required sub-menus from the list. P a g e | 34 Copyright©2023 ZKTECO CO., LTD. All rights reserved. - Page 36 But if there is no super administrator registered in the Device, then the device will prompt "Please enroll super admin first!" when enabling the User Role function. P a g e | 35 Copyright©2023 ZKTECO CO., LTD. All rights reserved.
-
Page 37: Communication Settings
When the device needs to communicate with a PC over the Ethernet, you need to configure network settings and ensure that the device and the PC connect to the same network segment. Tap Ethernet on the Comm. Settings interface to configure the settings. P a g e | 36 Copyright©2023 ZKTECO CO., LTD. All rights reserved. -
Page 38: Serial Comm
Serial Port Print Function: The device can be connected to the printer when RS485 enables the print function. RS485(PC): Communicates with the device through the RS485 serial port. P a g e | 37 Copyright©2023 ZKTECO CO., LTD. All rights reserved. -
Page 39: Pc Connection
WiFi is enabled by default in the device. If you don't need to use the WiFi network, you can toggle the WiFi to disable the button. P a g e | 38 Copyright©2023 ZKTECO CO., LTD. All rights reserved. - Page 40 Connect to WIFI (OK). network list. When the WiFi is connected successfully, the initial interface will display the WiFi logo. P a g e | 39 Copyright©2023 ZKTECO CO., LTD. All rights reserved.
- Page 41 The default Subnet Mask of the WiFi network is 255.255.255.0. It can be modified Subnet Mask according to the network availability. The default Gateway address is 0.0.0.0. It can be modified according to the Gateway network availability. P a g e | 40 Copyright©2023 ZKTECO CO., LTD. All rights reserved.
-
Page 42: Cloud Server Settings
It is used to set the Wiegand input and output parameters. Tap Wiegand Setup on the Comm. Settings interface to set the Wiegand input and output parameters. P a g e | 41 Copyright©2023 ZKTECO CO., LTD. All rights reserved. -
Page 43: Wiegand Input
14 to 25 bits. The 2 to 9 bits is the site codes, while the 10 to 25 bits are the card numbers. P a g e | 42 Copyright©2023 ZKTECO CO., LTD. All rights reserved. - Page 44 "C" denotes the card number; "E" denotes the even parity bit; "O" denotes the odd parity bit; "F" denotes the facility code; "M" denotes the manufacturer code; "P" denotes the parity bit; and "S" denotes the site code. P a g e | 43 Copyright©2023 ZKTECO CO., LTD. All rights reserved.
-
Page 45: Wiegand Output
Pulse Interval(us) The time interval between pulses. ID Type Select the ID types as either User ID or card number. P a g e | 44 Copyright©2023 ZKTECO CO., LTD. All rights reserved. -
Page 46: Network Diagnosis
Tap Network Diagnosis on the Comm. Settings interface. Enter the IP address that needs to be diagnosed and tap Start the Diagnostic Test to check whether the network can connect to the device. P a g e | 45 Copyright©2023 ZKTECO CO., LTD. All rights reserved. -
Page 47: System Settings
It helps to set related system parameters to optimize the accessibility of the device. Tap System on the Main Menu interface to get into its menu options. Access Control Terminal: Time Attendance Terminal: P a g e | 46 Copyright©2023 ZKTECO CO., LTD. All rights reserved. -
Page 48: Date And Time
Tap Daylight Saving Time to enable or disable the function. If enabled, tap Daylight Saving Mode to select a daylight-saving mode and then tap Daylight Saving Setup to set the switch time. Week Mode Date Mode P a g e | 47 Copyright©2023 ZKTECO CO., LTD. All rights reserved. -
Page 49: Access Logs Setting And Attendance
2021. After restoring the factory settings, the time of the device will remain at 18:30 on January 1, 2021. Access Logs Setting and Attendance Tap Access Logs Setting on the System interface. Access Control Terminal: Time Attendance Terminal: P a g e | 48 Copyright©2023 ZKTECO CO., LTD. All rights reserved. - Page 50 Take photo, no save: Photo is taken but not saved during verification. Take photo and save: All the photos taken during verification is saved. Save on successful verification: Photo is taken and saved for each successful P a g e | 49 Copyright©2023 ZKTECO CO., LTD. All rights reserved.
-
Page 51: Face Parameters
The amount of time taken to display a successful verification message. Authentication Timeout(s) Valid value: 1~9 seconds. Face Parameters Tap Face on the System interface to go to the Face parameter settings. P a g e | 50 Copyright©2023 ZKTECO CO., LTD. All rights reserved. - Page 52 The valid value ranges from 0 to 100. The higher the thresholds, the lower the misjudgement rate and the higher the rejection rate, and vice versa. It is recommended to set the default value of 90. P a g e | 51 Copyright©2023 ZKTECO CO., LTD. All rights reserved.
- Page 53 Therefore, adjusting this parameter can adjust the farthest comparison distance of faces. When the value is 0, the face comparison distance is not limited. P a g e | 52 Copyright©2023 ZKTECO CO., LTD. All rights reserved.
- Page 54 Improper adjustment of the exposure and quality parameters may severely affect the performance of the device. Please adjust the exposure parameter only under the guidance of the after-sales service personnel of our company. P a g e | 53 Copyright©2023 ZKTECO CO., LTD. All rights reserved.
-
Page 55: Detection Management
It enables or disables the mask detection function. Enable Mask When enabled, the device identifies whether the user is wearing a mask or not Detection during verification. P a g e | 54 Copyright©2023 ZKTECO CO., LTD. All rights reserved. -
Page 56: Device Type Settings
Set the device as a time attendance terminal or access control terminal. Note: After changing the device type, the device will delete all the data and restart, and some functions will be adjusted accordingly. P a g e | 55 Copyright©2023 ZKTECO CO., LTD. All rights reserved. -
Page 57: Security Settings
(this function does not clear registered user data). Tap Reset on the System interface and then tap OK to restore the default factory settings. P a g e | 56 Copyright©2023 ZKTECO CO., LTD. All rights reserved. - Page 58 RevFace15 User Manual Access Control Terminal: Time Attendance Terminal: P a g e | 57 Copyright©2023 ZKTECO CO., LTD. All rights reserved.
-
Page 59: Personalize Settings
Function Name Description Wallpaper It helps to select the main screen wallpaper according to the user preference. Language It helps to select the language of the device. P a g e | 58 Copyright©2023 ZKTECO CO., LTD. All rights reserved. -
Page 60: Voice Settings
Toggle to enable or disable the voice prompts during function operations. Touch Prompt Toggle to enable or disable the keypad sounds. Volume Adjust the volume of the device which can be set between 0-100. P a g e | 59 Copyright©2023 ZKTECO CO., LTD. All rights reserved. -
Page 61: Bell Schedules
On the All Bell Schedules interface, tap on the required bell schedule, and tap Edit to edit the selected bell schedule. The editing method is the same as the operations of adding a new bell schedule. P a g e | 60 Copyright©2023 ZKTECO CO., LTD. All rights reserved. -
Page 62: Punch States Options
Fixed Mode: Only the manually fixed punch state key will be shown. Users cannot change the status by pressing any other keys. P a g e | 61 Copyright©2023 ZKTECO CO., LTD. All rights reserved. -
Page 63: Shortcut Key Mappings
On the Shortcut Key interface, tap Set Switch Time to set the switch time. On the Switch Cycle interface, select the switch cycle (Monday, Tuesday etc.) as shown in the image below. P a g e | 62 Copyright©2023 ZKTECO CO., LTD. All rights reserved. - Page 64 Once the Switch cycle is selected, set the switch time for each day and tap OK to confirm, as shown in the image below. Note: When the function is set to Undefined, the device will not enable the punch state key. P a g e | 63 Copyright©2023 ZKTECO CO., LTD. All rights reserved.
-
Page 65: Data Management
On the Main Menu, tap Data Mgt. to delete the relevant data in the device. 10.1 Delete Data Tap Delete Data on the Data Mgt. interface to delete the required data. Access Control Terminal: P a g e | 64 Copyright©2023 ZKTECO CO., LTD. All rights reserved. - Page 66 To delete all user photos on the device. Delete Wallpaper To delete all wallpapers in the device. Delete Screen Savers To delete the screen savers in the device. P a g e | 65 Copyright©2023 ZKTECO CO., LTD. All rights reserved.
- Page 67 Selecting Delete by Time Range, you need to set a specific time range to delete all data within a specific period. Select Delete by Time Range. Set the time range and tap OK. P a g e | 66 Copyright©2023 ZKTECO CO., LTD. All rights reserved.
-
Page 68: Access Control
The corresponding user’s group must be already set in the door unlock combination (and if there are other groups, being set in the same access combo, then the verification of those group’s members is also required to unlock the door). P a g e | 67 Copyright©2023 ZKTECO CO., LTD. All rights reserved. -
Page 69: Access Control Options
If the door is not locked and is left open for a certain duration (Door Sensor Delay), an alarm will be triggered. Door Sensor Delay (s) The valid value of Door Sensor Delay ranges from 1 to 255 seconds. P a g e | 68 Copyright©2023 ZKTECO CO., LTD. All rights reserved. - Page 70 Reset Access Setting open time period, master device, and alarm. However, erased access control data in Data Mgt. is excluded. P a g e | 69 Copyright©2023 ZKTECO CO., LTD. All rights reserved.
- Page 71 Retry Times to Alarm to 9 times), the alarm will be triggered. If the set value is None, the alarm will not be triggered after failed verification. P a g e | 70 Copyright©2023 ZKTECO CO., LTD. All rights reserved.
-
Page 72: Time Rule Setting And Time Schedule
24-hour clock. Tap the grey box to search the required Time Zone and specify the required Time Zone number (maximum up to 50 zones). P a g e | 71 Copyright©2023 ZKTECO CO., LTD. All rights reserved. - Page 73 On the selected Time Zone number interface, tap on the required day (that is Monday, Tuesday, etc.) to set the time. Specify the start and the end time, and then tap OK. P a g e | 72 Copyright©2023 ZKTECO CO., LTD. All rights reserved.
-
Page 74: Holidays
Tap Add Holiday on the Holidays interface and set the holiday parameters. Edit a Holiday On the Holidays interface, select a holiday item to be modified. Tap Edit to modify holiday parameters. P a g e | 73 Copyright©2023 ZKTECO CO., LTD. All rights reserved. -
Page 75: Access Groups
When the holiday is set to be valid, the personnel in a group can open the door only when group time period overlaps with the holiday time period. P a g e | 74 Copyright©2023 ZKTECO CO., LTD. All rights reserved. -
Page 76: Combined Verification
On the combined verification interface, tap the Door-unlock combination to be set, and tap the up and down arrows to input the combination number, and then press OK. For Example: P a g e | 75 Copyright©2023 ZKTECO CO., LTD. All rights reserved. -
Page 77: Anti-Passback Setup
Wiegand format and Output type (User ID / Card Number) adopted by the master device and slave device must be consistent. Tap Anti-Passback Setup on the Access Control interface. P a g e | 76 Copyright©2023 ZKTECO CO., LTD. All rights reserved. -
Page 78: Duress Options
At the same time, a signal is sent to trigger the alarm as well. On the Access Control interface, tap Duress Options to configure the duress settings. Access Control Terminal: P a g e | 77 Copyright©2023 ZKTECO CO., LTD. All rights reserved. - Page 79 The alarm signal does not transmit until the alarm delay time elapses. The value Alarm Delay (s) ranges from 1 to 999 seconds. P a g e | 78 Copyright©2023 ZKTECO CO., LTD. All rights reserved.
-
Page 80: Attendance Search
2. Select the time range in which the records need to be searched. you want to search for records of all users, tap OK without entering any user ID. P a g e | 79 Copyright©2023 ZKTECO CO., LTD. All rights reserved. - Page 81 3. Once the record search completes. Tap the 4. The below figure shows the details of the record highlighted in green to view its details. selected record. P a g e | 80 Copyright©2023 ZKTECO CO., LTD. All rights reserved.
-
Page 82: Print Settings
Tap Print on the Main Menu interface. 13.1 Print Data Field Settings Select Data Field Setup on the Print interface. Toggle button to turn on/off the fields requiring a print. P a g e | 81 Copyright©2023 ZKTECO CO., LTD. All rights reserved. -
Page 83: Print Options Settings
Remarks: To turn on the Paper Cut function, it is required to connect the device with a printer with paper cutting function, so that the printer will cut papers according to the selected printing information while printing. P a g e | 82 Copyright©2023 ZKTECO CO., LTD. All rights reserved. -
Page 84: Autotest
To test the RTC. The device checks whether the clock works normally and Test Clock RTC accurately with a stopwatch. Touch the screen to start counting and press it again to stop counting. P a g e | 83 Copyright©2023 ZKTECO CO., LTD. All rights reserved. -
Page 85: System Information
MCU Version, Manufacturer and manufacture date. Firmware Info Displays the firmware version and other version information of the device. Privacy Policy Display the device's privacy policy. P a g e | 84 Copyright©2023 ZKTECO CO., LTD. All rights reserved. -
Page 86: Connect To Zkbioaccess Ivs Software
Software side Login to ZKBioAccess IVS software, click System > Communication > Communication Monitor to set the ADMS service port, as shown in the figure below: P a g e | 85 Copyright©2023 ZKTECO CO., LTD. All rights reserved. -
Page 87: Add Device On The Software
Click [Add] in the operation column, a new window will pop-up. Select Icon type, Area, and Add to Level from each dropdown and click [OK] to add the device. P a g e | 86 Copyright©2023 ZKTECO CO., LTD. All rights reserved. -
Page 88: Add Personnel On The Software
Click Access > Device > Control > Synchronize All Data to Devices to synchronize all the data to the device including the new users. Note: For other specific operations, please refer to ZKBioAccess IVS User Manual. P a g e | 87 Copyright©2023 ZKTECO CO., LTD. All rights reserved. -
Page 89: Requirements Of Live Collection And Registration Of Visible Light Face Images
Do not add more than one face in the capturing area. A distance of 50cm to 80cm is recommended for capturing the image. (the distance is adjustable, subject to body height). P a g e | 88 Copyright©2023 ZKTECO CO., LTD. All rights reserved. -
Page 90: Requirements For Visible Light Digital Face Image Data
The captured person should be easily visible, natural in color, no harsh shadow or light spot or reflection in the face or background. The contrast and lightness level should be appropriate. P a g e | 89 Copyright©2023 ZKTECO CO., LTD. All rights reserved. -
Page 91: Privacy Policy
Privacy Policy Notice: To help you better use the products and services of ZKTeco (hereinafter referred as "we", "our", or "us") a smart service provider, we consistently collect your personal information. Since we understand the importance of your personal information, we took your privacy sincerely and we have formulated this privacy policy to protect your personal information. - Page 92 Welcome to visit our official website at any time to learn our latest privacy policy. P a g e | 91 Copyright©2023 ZKTECO CO., LTD. All rights reserved.
-
Page 93: Eco-Friendly Operation
The components which contain toxins or harmful elements are included due to the current economic or technical limitations which prevent their replacement with non-toxic materials or elements. P a g e | 92 Copyright©2023 ZKTECO CO., LTD. All rights reserved. - Page 94 ZKTeco Industrial Park, No. 32, Industrial Road, Tangxia Town, Dongguan, China. Phone : +86 769 - 82109991 : +86 755 - 89602394 www.zkteco.com Copyright © 2023 ZKTECO CO., LTD. All Rights Reserved.
Need help?
Do you have a question about the RevFace15 and is the answer not in the manual?
Questions and answers