Table of Contents
Advertisement
Advertisement
Chapters
Table of Contents

Related Manuals for ZKTeco C3 Pro


Summary of Contents for ZKTeco C3 Pro
- Page 1 Quick Start Guide C3 Pro ZKBioSecurity 3.0...
-
Page 2: Table Of Contents
Restore factory setting ............DIP Switch Setting ............... RS485 Address ................Terminal Resistance ..............Installation Diagram ............Troubleshooting ..............PC 485 Setting Table ............Electrical Specifications ........... Specifications ................C3 Pro Series Access Control Panels and ZKBioSecurity 3.0 Quick Start Guide... -
Page 3: What's In The Box
What’s in the Box 2 Screws & Anchors 2 Screwdriver 4 Diode C3 Pro Series Access Control Panels and ZKBioSecurity 3.0 Quick Start Guide... -
Page 4: Optional Accessories
Optional accessories Wiegand Card Reader Prox Card C3 Pro Cabinet PTE-1 Exit Button RS485 Convertor Card Enroller Alarm C3 Pro Series Access Control Panels and ZKBioSecurity 3.0 Quick Start Guide... -
Page 5: Safety Precautions
Clean the device often to remove dust on it. In cleaning, do not splash water on the device but wipe it out with smooth cloth or towel. Contact your supplier in case of a problem. C3 Pro Series Access Control Panels and ZKBioSecurity 3.0 Quick Start Guide... -
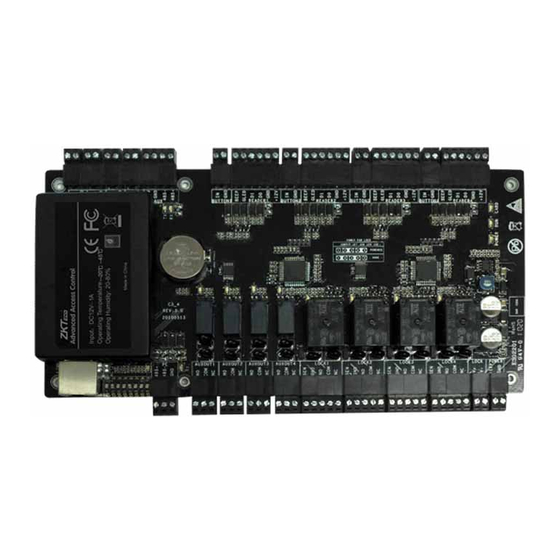
Page 6: Product Pin Diagram
Product PIN Diagram Figure 1 C3 Pro Series Access Control Panels and ZKBioSecurity 3.0 Quick Start Guide... -
Page 7: Led Indicators
Flashing (RUN) Green LED indicates that panel is in normal working state. Figure 6 Flashing (CARD) Yellow LED indicates that the card is read by the panel. Figure 7 C3 Pro Series Access Control Panels and ZKBioSecurity 3.0 Quick Start Guide... -
Page 8: Product Dimension
4.17 in (106 mm) 4.17 in (106 mm) 4.17 in (106 mm) Figure 8 C3 Pro- Metal Cabinet 11.75 in (279.4mm) 13.625 in (330.2 mm) 3.56 in (90.5 mm) Figure 9 C3 Pro Series Access Control Panels and ZKBioSecurity 3.0 Quick Start Guide... -
Page 9: Installation Of Panel & Cabinet
Figure 11 We recommend drilling the mounting plate screws into solid wood (i.e. stud/beam). If a stud/beam cannot be found, then use the supplied drywall plastic mollies (anchors). C3 Pro Series Access Control Panels and ZKBioSecurity 3.0 Quick Start Guide... -
Page 10: Wiring Legend
Wiring Legend Figure 12 C3 Pro Series Access Control Panels and ZKBioSecurity 3.0 Quick Start Guide... -
Page 11: Power Wiring Diagram
READER 2 Without Backup Battery LOCK3 LOCK4 LOCK POWER Ground Switching Power Supply Figure 13 With Backup Battery LOCK3 LOCK4 LOCK POWER Switching Power Supply Ground Figure 14 C3 Pro Series Access Control Panels and ZKBioSecurity 3.0 Quick Start Guide... -
Page 12: Wiegand Connection
Wiegand Connection 16 or 18 AWG shielded cable recommended DC+(6-14V) Wiegand D0 Wiegand D1 Green LED Beeper Wiegand Card Reader Figure 15 C3 Pro Series Access Control Panels and ZKBioSecurity 3.0 Quick Start Guide... -
Page 13: Rex Connections
REX Connections BUTTON 12V DC ( + ) 12V DC ( - ) PTE - 1 Exit Button Separate Power Supply Unused IR Sensor Figure 16 C3 Pro Series Access Control Panels and ZKBioSecurity 3.0 Quick Start Guide... -
Page 14: Lock Connection
Lock Connection Connecting a lock with external power supply OUT4 LOCK1 LOCK2 LOCK3 LOCK4 LOCK POWER ETHERNET Door Contact Sensor Sensor 12V DC FR107 Diode 12V DC Figure 17 C3 Pro Series Access Control Panels and ZKBioSecurity 3.0 Quick Start Guide... - Page 15 Select one Relay 4 Lock Relays Figure 18 Default setting Take off jumpers Jumpers Plug Jumpers 1, 2 - 3, 4 2, 3 - 4, 5 Figure 19 C3 Pro Series Access Control Panels and ZKBioSecurity 3.0 Quick Start Guide...
-
Page 16: Normally Open Lock Powered From Lock Terminal
3 4 5 6 7 8 AUXOUT1 AUXOUT2 AUXOUT3 AUXOUT4 LOCK1 LOCK2 LOCK3 LOCK4 ETHERNET 12V DC FR107 OCK2 LOCK3 LOCK4 LOCK POWER Diode 12V DC Figure 21 C3 Pro Series Access Control Panels and ZKBioSecurity 3.0 Quick Start Guide... -
Page 17: Aux. I/O Connection
1 2 3 4 5 6 7 8 AUXOUT1 AUXOUT2 AUXOUT3 AUXOUT4 LOCK1 +12V ETHERNET BEEP ALARM GLED +12V 12V DC BEEP GLED Figure 23 +12V BEEP C3 Pro Series Access Control Panels and ZKBioSecurity 3.0 Quick Start Guide GLED... -
Page 18: Ethernet Connection
To connect C3-400 Pro with a PC directly, connect both devices with a straight network cable. As the C3-400 Prosupports auto MDI/MDIX, it is not necessary to use a crossover type cable. ETHERNET CR10 Card Issuer Figure 25 C3 Pro Series Access Control Panels and ZKBioSecurity 3.0 Quick Start Guide... -
Page 19: Rs485 Connection
1 2 3 4 5 6 7 8 RS485 + AUXOUT1 AUXOUT2 AUXOUT3 AUXOUT1 AUXOUT4 AUXOUT2 LOCK1 AUXOUT3 AUXOUT4 LOCK2 AUXOUT1 AUXOU LOCK1 #1 C3-400 Pro #2 C3-400 Pro #63 C3-400 Pro Figure 28 C3 Pro Series Access Control Panels and ZKBioSecurity 3.0 Quick Start Guide... -
Page 20: Restore Factory Setting
Repeat process 3 times 2 3 4 5 6 7 8 1 2 3 4 5 6 7 8 1 2 3 4 5 6 7 8 Figure 30 C3 Pro Series Access Control Panels and ZKBioSecurity 3.0 Quick Start Guide... -
Page 21: Dip Switch Setting
1 2 3 4 5 6 7 8 AUXOUT 120 ohm 1 2 3 4 5 6 7 8 1 2 3 4 5 6 7 8 #63 C3-400 Pro Figure 32 C3 Pro Series Access Control Panels and ZKBioSecurity 3.0 Quick Start Guide... -
Page 22: Installation Diagram
Ethernet Communication wire 220/110 V Input C3 Pro Access Control Bundle CEILING Sensor Electric Lock OUTDOOR INDOOR Exit Button Outdoor Wiegand card reader Indoor Wiegand card reader Figure 33 C3 Pro Series Access Control Panels and ZKBioSecurity 3.0 Quick Start Guide... -
Page 23: Troubleshooting
2 Years from original purchase date, replacement/repair of hardware under ZK standard warranty requires an evaluation of the failed system by a ZK Technical Support specialist, and the issuance of a Technical Support RMA number. C3 Pro Series Access Control Panels and ZKBioSecurity 3.0 Quick Start Guide... -
Page 24: Pc 485 Setting Table
PC 485 Setting Table Switch Setting Address No. C3 Pro Series Access Control Panels and ZKBioSecurity 3.0 Quick Start Guide... - Page 25 Switch Setting Address No. C3 Pro Series Access Control Panels and ZKBioSecurity 3.0 Quick Start Guide...
-
Page 26: Electrical Specifications
The input ports are pulled Pull- up resistance (Ω) 4.7k up with 4.7k resistors WIEGAND INPUT Voltage (V) 10.8 13.5 Current (mA) ZK ELECTRIC LOCK Voltage (V) DC 10.8 13.2 Current (mA) C3 Pro Series Access Control Panels and ZKBioSecurity 3.0 Quick Start Guide... -
Page 27: Specifications
Dimensions (Bundle Only) 15.7in. x 3.56in. x 13.0in 400mm(L) x 90.5mm(W) x 330mm(H) Dimensions (Board Only) 8.0in. x 4.17in. 203.2mm(L) x 106mm(W) 32 bit 400MHz 32MB Flash 256MB Certified C3 Pro Series Access Control Panels and ZKBioSecurity 3.0 Quick Start Guide... - Page 28 Enrolling Personnel .............. Enrolling Personnel .............. Wiegand Format ..............Add & Delete Personnel to Access Level ..... Real -Time Monitoring ............Exporting Reports ..............First-Person Normally Open .......... C3 Pro Series Access Control Panels and ZKBioSecurity 3.0 Quick Start Guide...
-
Page 29: Downloading
Go to http://https://zktecousa.com/software-downloads/ Download the latest software and related files as required. Once downloaded, extract the rar file to a new folder. Click on setup to begin installation. C3 Pro Series Access Control Panels and ZKBioSecurity 3.0 Quick Start Guide... -
Page 30: Installation
Add an open port (Default 8088) or ask a network administrator for an open port. Click the check box to add firewall exception for this port. C3 Pro Series Access Control Panels and ZKBioSecurity 3.0 Quick Start Guide... -
Page 31: Installation
Alternative database . Click Browse and choose or create a folder to store your backup files. Select/Create the required folder. Click OK. C3 Pro Series Access Control Panels and ZKBioSecurity 3.0 Quick Start Guide... -
Page 32: Adding Device
Click on Access to get below interface of Access Module of the software. Click on Device. Click on Search Device. Click to search all the access controllers on the network. Search From the list, click to add the required device. C3 Pro Series Access Control Panels and ZKBioSecurity 3.0 Quick Start Guide... -
Page 33: Adding Device
IP address as shown below: When the device is not in the same network with server, customers should down- load the tool and search the device as shown below: C3 Pro Series Access Control Panels and ZKBioSecurity 3.0 Quick Start Guide... -
Page 34: Creating A Time Zone
Click Access Control > Time Zones > Add to access the time zone setting interface. After setting the time zone, click OK to save, and the time zone will appear in the list. C3 Pro Series Access Control Panels and ZKBioSecurity 3.0 Quick Start Guide... -
Page 35: Creating An Access Level
Enter the details and click OK . You need to add doors to the access levels. Select the required door(s). Move the selected door(s). Click OK to finish adding doors. C3 Pro Series Access Control Panels and ZKBioSecurity 3.0 Quick Start Guide... -
Page 36: Enrolling Personnel
It must be a unique 9 characters length with the valid range of 1-79999999. It can be configured based on actual conditions. The Person- nel No. contains only numbers by default but may also include letters after setting parameters. C3 Pro Series Access Control Panels and ZKBioSecurity 3.0 Quick Start Guide... -
Page 37: Enrolling Personnel
Tick the required box. F. Fingerprint: Enroll the Personnel Fingerprint or Duress Fingerprint. Duress Fingerprint is to trigger the alarm and send the signal to the system in case of emergency. C3 Pro Series Access Control Panels and ZKBioSecurity 3.0 Quick Start Guide... -
Page 38: Wiegand Format
“ooooooooooooooooooo”. Card Check Format only can be set “p, x, m, f, c, s”, Parity Check Format only can be set “x, b, o, e. ” C3 Pro Series Access Control Panels and ZKBioSecurity 3.0 Quick Start Guide... -
Page 39: Add & Delete Personnel To Access Level
Click to move the selected level(s) to the right, and then click OK to complete adding. The added level(s) will appear in the list on to the right side. C3 Pro Series Access Control Panels and ZKBioSecurity 3.0 Quick Start Guide... -
Page 40: Real -Time Monitoring
Hover over a door icon to open pop up menu as shown below and click Re- mote Closing, Remote Opening, or Cancel Alarm and more. C3 Pro Series Access Control Panels and ZKBioSecurity 3.0 Quick Start Guide... -
Page 41: Exporting Reports
Click OK. Personnel Module: Click Personnel Click Person Filter the data (Department, Personnel ID, and more) if required and click on search Click on Export to get the list. C3 Pro Series Access Control Panels and ZKBioSecurity 3.0 Quick Start Guide... -
Page 42: First-Person Normally Open
Click Access Control Click First-Person Normally Open Click New Select the door Select the Time Zone. Add the specific person. Once this person checks in, this feature is activated. C3 Pro Series Access Control Panels and ZKBioSecurity 3.0 Quick Start Guide... - Page 43 © Copyright 2018. ZKTECO USA LLC. ZKTeco Logo is a registered trademark of ZKTeco or a related company. All other product and company names mentioned are used for identification purposes only and may be the trademarks of their respective owners. All specifications are subject to change without notice. All rights reserved.
Need help?
Do you have a question about the C3 Pro and is the answer not in the manual?
Questions and answers