Table of Contents
Advertisement
Quick Links
Quick Guide
Roughneck AI License Plate Recognition Camera Kit
V2008-W0950-LPR
XX324-40-00
Cybersecurity Notification:
accessing the device. To that end, these network cameras do not have a default password. A user defined
password with minimum password strength requirements must be set to access the device. See page 16 of
this Quick Guide for set-up instructions.
Be sure to check Vicon's website to be see if you have the most up-to-date camera
Vicon Industries Inc. does not warrant that the functions contained in this equipment will
meet your requirements or that the operation will be entirely error free or perform precisely as
described in the documentation. This system has not been designed to be used in
life-critical situations and must not be used for this purpose.
Document Number: 8009-8324-40-00 Product specifications subject to change without notice.
Issued: 4/2023 Copyright © 2023 Vicon Industries Inc. All rights reserved.
All network connected devices should use best practices for
Link to Setup Guide
firmware.
Vicon Industries Inc.
Tel: 631-952-2288) Fax: 631-951-2288
Toll Free: 800-645-9116
24-Hour Technical Support: 800-34-VICON
UK: 44/(0) 1489-566300
www.vicon-security.com
(800-348-4266)
Advertisement
Table of Contents

Related Manuals for Vicon V2008-W0950-LPR


Summary of Contents for Vicon V2008-W0950-LPR
- Page 1 See page 16 of this Quick Guide for set-up instructions. Be sure to check Vicon’s website to be see if you have the most up-to-date camera firmware.
-
Page 2: Table Of Contents
V2008-W0950-LPR Quick Guide Table of Contents Product Overview Camera Physical Characteristics Housing Physical Characteristics Installation and Mounting Package Contents Installation 2.2.1 Checking Appearance 2.2.2 LPR Guidelines 2.2.3 Installing the Lens 2.2.4 Install the SD Card 2.2.5 Mounting the Camera in the Housing 2.2.6... - Page 3 V2008-W0950-LPR Quick Guide WARNING This camera kit operates at PoE (IEEE 802.3bt). Installation and service should be performed only by qualified and experienced technicians and comply with all local codes and rules to maintain your warranty. We are NOT liable for any damage arising either directly or indirectly from inappropriate installation which ...
- Page 4 V2008-W0950-LPR Quick Guide FCC Compliance Statement Information to the user: This unit has been tested and found to comply with the limits for a Class B digital device pursuant to Part 15 of the FCC Rules. Operation is subject to the following two conditions: (1) this device may not cause harmful interference, and (2) this device must accept any interference received, including interference that may cause undesired operation.
-
Page 5: Product Overview
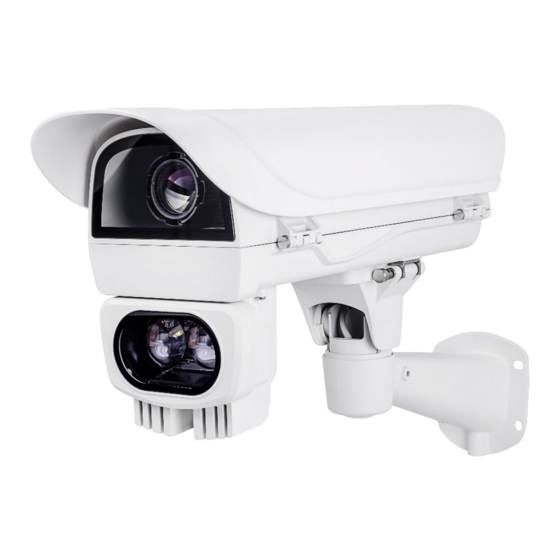
1.1 Camera Physical Characteristics The V2008-W0950-LPR camera kit is supplied with a box camera, iCS lens and camera housing with wall mount and IR illuminator. A micro SD card is also included. An optional pole mount adapter is available, model V-HSG-PM. - Page 6 V2008-W0950-LPR Quick Guide Name Description Lens Lens (supplied) is attachable to the camera’s lens mounting ring. Both top and bottom of the camera housing have one mount screw hole Mount Screw Hole (1/4”-20) for mounting the camera. Use mounting screw provided to mount camera on to camera mounting plate of camera housing.
-
Page 7: Housing Physical Characteristics
V2008-W0950-LPR Quick Guide 1.2 Housing Physical Characteristics The V2008-W0950-LPR camera kit includes a box camera, an iCS lens and a camera housing with wall mount and IR illuminator. Housing Components: IR illuminator module PoE Power distribution board Dimensions in. (mm):... -
Page 8: Installation And Mounting
V2008-W0950-LPR Quick Guide 2 Installation and Mounting Package Contents Check if all items listed below are included in the packing box: Box Camera * 1 Terminal Block * 1 Micro SD Card * 1 iCS Lens * 1 Camera Housing * 1; includes an accessory pack with all necessary hardware for installation, including... - Page 9 720p image with a horizontal Pixels per Foot (PPF)=80. Refer to the Vicon LPR Camera Setup and Integration Guide for details on setting up the proper field-of-view (FOV). On the Live screen on the camera interface, the Calibration pattern can be enabled; calibration lines are shown at 20 pixels.
-
Page 10: Installing The Lens
Install the lens onto the camera, if not already done so. Remove the mounting plate from the housing. Secure the mounting plate to the camera using the ¼-20 mounting hole on the camera with the screw provided (camera positioned so that Vicon reads correctly). - Page 11 V2008-W0950-LPR Quick Guide Place the mounting plate assembly back in the housing, positioning it as far back as possible. Adjust the camera’s position so that the barrel of the lens module just clears the front of the plate. Secure the camera plate, using the screws and washers, to the bottom of the housing.
-
Page 12: Installing And Configuring The Ir Illuminator
V2008-W0950-LPR Quick Guide Terminal Block Pinouts RS485+ For future use RS485- For future use For future use For future use IR illuminator For future use Note that the DO1 is used for the IR Illuminator; this means the tamper switch connection is not available. -
Page 13: Installing The Wall Mount Bracket
V2008-W0950-LPR Quick Guide To install the IR illuminator onto the housing, follow the steps below. 1. Power off the camera housing/camera before installing the IR illuminator. The camera housing/camera will be damaged if the IR illuminator is installed when the camera housing is powered. - Page 14 V2008-W0950-LPR Quick Guide Install the housing to the wall mount bracket by pressing the spring bolt and latching the connection bracket onto the grooves in the spring bolt. Note: To release the wall mount to allow it to swivel to desired position, use the Allen wrench to loosen the screw at the top of the mount.
-
Page 15: Setting The Day Night Switch Control Mode And Lens Type
V2008-W0950-LPR Quick Guide Note that some cables are connected when shipped; there is no need to connect heater, blower and the front IR power wires. It may be necessary to remove the RJ-45 connector and use a crimp tool to connect the Ethernet wires to the RJ-45 connector inside the enclosure. - Page 16 3. Go to the Image page, Exposure, Lens Type. 4. Select the lens type corresponding to the lens that was mounted to the camera. For the the supplied V2008-W0950-LPR, select ICS lens. From the dropdown, select CBC EG6Z0915TCS_MPWIR_I_CS Mount_P.
-
Page 17: Connection
V2008-W0950-LPR Quick Guide 3 Connection Network The camera, which is equipped with Ethernet RJ-45 network interface, can deliver live view image in real time via both Internet and Intranet environments. Review the topology drawings shown below. System Requirements The table below lists the minimum requirement to implement and operate the camera. It is recommended not to use any hardware/software component below these requirements for proper performance. -
Page 18: Connecting Process
The camera can be accessed directly from its web page or using Vicon’s PRONTO Device Manager, which can be found on Vicon’s website. Note that when accessing the camera for the first time, a message will display to reset the password. -
Page 19: Pronto Device Manager
V2008-W0950-LPR Quick Guide PRONTO Device Manager PRONTO is Vicon’s device manager (Discovery tool) that can be used to discover all Vicon cameras on a system. The complete User Manual can be found on Vicon’s website. Figure 3 - 2: PRONTO Interface Upon startup of the PRONTO Device Manager, the tool’s auto-discovery function generates a list of...
Need help?
Do you have a question about the V2008-W0950-LPR and is the answer not in the manual?
Questions and answers