Table of Contents
Advertisement
Quick Links
Advertisement
Table of Contents

Related Manuals for Trotec PAE 49


Summary of Contents for Trotec PAE 49
- Page 1 PAE 49 / PAE 50 OPERATING MANUAL AIR COOLER...
-
Page 2: Table Of Contents
• Do not use the device with wet or damp hands. • Do not expose the device to directly squirting water. • Never insert any objects or limbs into the device. • Do not cover or transport the device during operation. air cooler PAE 49 / PAE 50... - Page 3 • Empty the water tank before transport and storage. Do not drink the water. Health hazard! • Note that high humidity levels may enhance the growth of biological organisms in the environment. air cooler PAE 49 / PAE 50...
- Page 4 This symbol located on the device indicates that the water tank should be cleaned every 3 days. Change the water in the water tank every 3 days. Disconnect the device from the mains before cleaning the water tank. air cooler PAE 49 / PAE 50...
-
Page 5: Information About The Device
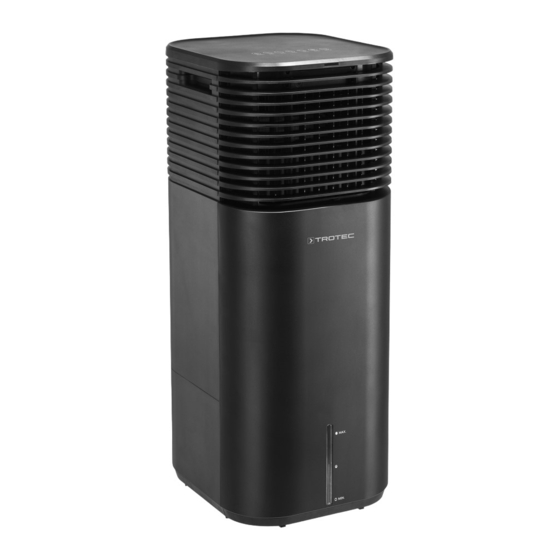
2. In an emergency, disconnect the device from the mains feed-in: Hold onto the mains plug while pulling the power cable out of the mains socket. 3. Do not reconnect a defective device to the mains. air cooler PAE 49 / PAE 50... - Page 6 Hose connection for continuous operation with cover Air inlet with air filter and evaporation filter Water level indicator Air outlet with adjustable ventilation flaps and air flaps for swing function Remote control receiver air cooler PAE 49 / PAE 50...
-
Page 7: Transport And Storage
• with a cover to protect it from invasive dust, if necessary • Place no further devices or objects on top of the device to prevent it from being damaged. • Remove batteries from the remote control. air cooler PAE 49 / PAE 50... - Page 8 2. Fasten each foot on the device with one screw. • Make sure that no curtains or other objects interfere with the air flow. Prior to initial start-up, insert batteries in the remote control. air cooler PAE 49 / PAE 50...
- Page 9 6. Close the flap of the water funnel (3) or reinsert the evaporation filter (5) and the air filter (9). 7. Make sure that the device is neither damp nor wet on the outside. Otherwise wipe it dry. air cooler PAE 49 / PAE 50...
- Page 10 2. Push the scented oil tank back into the holder. 3. Attach the scented oil tank (17) to the device. Adjusting the ventilation flaps • Prior to switching the device on, adjust the ventilation flaps at the air outlet. air cooler PAE 49 / PAE 50...
- Page 11 2. Connect the supplied permanent water connection hose to the hose connection (12). Pay attention to the correct direction of connection. 3. Guide the other hose end to a suitable water connection. The permanent water connection hose must not be kinked. air cooler PAE 49 / PAE 50...
-
Page 12: Operation
ð The pump starts. Indication of the number of hours 2. Press the Speed button (33) to set the desired fan stage of the activated timer 1h, 2h, 4h (1 to 4). and 8h air cooler PAE 49 / PAE 50... - Page 13 • automatic switch-off upon expiry of a preset number of hours. The function can be set in all operating modes and also during stand-by. The number of hours can be set to 1 h, 2 h, 4 h or 8 h. air cooler PAE 49 / PAE 50...
- Page 14 • Only place the ice packs into the designated compartment in the water tank, otherwise the pump will not function properly. Info When using ice packs at high outside temperatures, condensation may form at the water tank and drip onto the floor. air cooler PAE 49 / PAE 50...
- Page 15 • Hold onto the mains plug while pulling the power cable out of the mains socket. • Empty and clean the water tank (see chapter Maintenance). • Clean the device according to the Maintenance chapter. • Store the device according to the Storage chapter. air cooler PAE 49 / PAE 50...
-
Page 16: Available Accessories
Make sure that the pump inlet is not blocked. • In case the pump does not operate despite a correctly filled water tank and activated air cooling mode, the pump might be defective. Please contact the customer service. air cooler PAE 49 / PAE 50... -
Page 17: Maintenance
11. Date: ........12. Date: ........Signature: ........ Signature: ......... Signature: ......... Signature: ......... 13. Date: ......... 14. Date: ........15. Date: ........16. Date: ........Signature: ........ Signature: ......... Signature: ......... Signature: ......... air cooler PAE 49 / PAE 50... - Page 18 Clean the housing with a soft, damp and lint-free cloth. Make sure that no moisture enters the housing. Protect electrical components from moisture. Do not use any aggressive cleaning agents such as cleaning sprays, solvents, alcohol-based or abrasive cleaners to dampen the cloth. air cooler PAE 49 / PAE 50...
- Page 19 4. Reinsert the air filter into the device. Filter reset After an operating time of 200 hours, the Filter reset LED (22) will flash red. After cleaning, press the Humidity button (28) for 2 s to reset the status. air cooler PAE 49 / PAE 50...
- Page 20 If you do not intend to use the device for a considerable time: • Store the device according to the Storage chapter. 2. Dispose of used evaporation filter according to the national regulations. air cooler PAE 49 / PAE 50...
-
Page 21: Technical Annex
European Parliament and of the Council of 6 September 2006 sides (C): 100 cm on batteries and accumulators. Please dispose of batteries and front (D): 100 cm accumulators according to the relevant legal requirements. air cooler PAE 49 / PAE 50... - Page 22 Trotec GmbH Grebbener Str. 7 D-52525 Heinsberg +49 2452 962-400 +49 2452 962-200 info@trotec.com www.trotec.com...
Need help?
Do you have a question about the PAE 49 and is the answer not in the manual?
Questions and answers