Danfoss Ally User Manual
Hide thumbs
Also See for Ally:
- User manual (14 pages) ,
- Instructions (2 pages) ,
- Application manual (20 pages)
Table of Contents
Advertisement
Quick Links
Advertisement
Table of Contents

Subscribe to Our Youtube Channel
Related Manuals for Danfoss Ally


Summary of Contents for Danfoss Ally
- Page 1 User Guide Danfoss Ally™ www.ally.danfoss.com...
-
Page 2: Table Of Contents
6.9 Resetting the Danfoss Ally™ Radiator Thermostat to default Settings ....... -
Page 3: Danfoss Ally™ Introduction
And gives you the complete overview and control at all times. The Danfoss Ally™ smart heating solution is Zigbee 3.0 certified. This means that it speaks the same wireless language as tons of other smart home devices around the globe. Allowing you to connect Danfoss Ally™... -
Page 4: Danfoss Ally™ Components And Communication Map
In a smart ecosystem that allows you to control your world in your way. The Danfoss Ally™ is Zigbee 3.0 certified. This means that it speaks the same wireless language as tons of other smart home devices around the globe. Allowing you to connect Danfoss Ally™... -
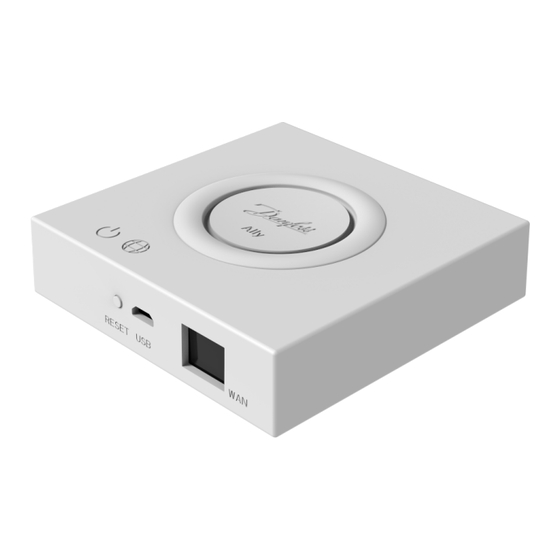
Page 5: Content In The Package Of The Danfoss Ally™ Gateway
User Guide Danfoss Ally™ Gateway Content in the Package of the Danfoss Ally™ Gateway The Danfoss Ally™ Gateway is supplied with the quick guide, LAN cable, power supply cable. Danfoss Ally™ Gateway Quick Guide LAN cable Power supply Technical Specifications Danfoss Ally™... -
Page 6: Download And Install The Danfoss Ally™ App. The First Use
Download and install the Danfoss Ally™ App. The first use The Danfoss Ally™ gives you all the benefits of a full-blown smart heating system – packed in a simple easy-to-use app. No more control unit – now your smartphone is all you need to control and monitor all your radiators and floor heating. - Page 7 Danfoss Ally™ Gateway RESET Danfoss Ally™ Gateway 95 mm RESET Ally Ally Added successfully Added successfully Add another Add device subdevice Screens may be different from the actual ones in the Danfoss Ally™ App BC349733524454en-010401 © Danfoss | FEC | 2023.06 |...
-
Page 8: Main Screen And Menu Overview
Zigbee Module and not put this room on a ‘Vacation’ which have previously been ‘Remove Device‘ from current and such rooms will not appear connected. room. in the room selection list. 8 | © Danfoss | FEC | 2023.06 BC349733524454en-010401... -
Page 9: Rooms With Several Radiator Thermostats
5.1 Rooms with several Radiator Thermostats If several radiator thermostats are assigned to one room, then the Danfoss Ally™ App will automatically create a group tile. This is to ensure settings are synchronized between devices in the same room. It is recommended to always adjust a schedule and preferred temperatures for the entire group, and not for single devices, to ensure the most efficient performance. -
Page 10: Content In The Package Of The Danfoss Ally™ Radiator Thermostat
Danfoss Ally™ Radiator Thermostat Content in the Package of the Danfoss Ally™ Radiator Thermostat 6.1 Content in the Package Danfoss Ally™ Radiator Thermostat is supplied with the adapters as listed in 6.2. In addition each pack contains: Danfoss Ally™ Radiator Thermostat Quick Guide Danfoss Ally™... -
Page 11: Installing The Right Adapter
6.3 Installing the right Adapter The Danfoss Ally™ packaging contains a quick guide to help you find the correct adapter for your valve type. If you need an additional help in finding the correct adapter, please follow the QR code on the quick guide and find “How-to”... -
Page 12: Inserting The Batteries
The low battery symbol is displayed on the Radiator Thermostat and in the Ally™ app approx. one month before the batteries are empty. If the batteries are completely empty, the Danfoss Ally™ Radiator Thermostat will leave the valve in frost pro tection position, which means that the heat flow will run through the radiator and protect the heating system from damage. -
Page 13: Download The Danfoss Ally™ App
A large M is flashing in the display to indicate that installation mode is activated. Press and hold the button for 3 seconds. The temperature set point will show on the screen once the Danfoss Ally™ Radiator Thermostat is mounted. NOTE that you can find how-to videos on the Danfoss Ally™... -
Page 14: Removing The Danfoss Ally™ Radiator Thermostat
Press firmly on the tab and unscrew the Video tutorial: thermostat from the adapter. Danfoss Ally™ Support Page 6.9 Resetting the Danfoss Ally™ Radiator Thermostat to default Settings Press and hold , keep holding while rein- serting the battery. The screen will go blank Remove the cover and take out one battery. -
Page 15: Technical Specifications
20 (not to be used in hazardous installations or in places IP class where it will be exposed to water) Integrations* Partner API, Google Assistant, Amazon Alexa Approvals, markings etc. * Requires the Danfoss Ally™ Gateway The Danfoss Ally™ App software versions BC349733524454en-010401 © Danfoss | FEC | 2023.06 |... - Page 16 If still no positive result, return to a dealer. Valve closing ability. It appears the valve cannot be closed correctly. Please check the installation and/or contact an installer. 16 | © Danfoss | FEC | 2023.06 BC349733524454en-010401...
-
Page 17: Display
Low battery. The battery icon will flash on the display. 8.3 Display Rotation The Danfoss Ally™ Radiator Thermostat can be mounted in a horizontal or vertical position, de- pending on your radiator valve. You can set the display rotation to either ‘horizontal’ or ‘vertical’... -
Page 18: Functions And Settings Overview
When ‘Pre-Heat’ symbol is shown, it means that it is ramping up to the next scheduled ‘At Home’ mode. 9.1 Setting Temperatures Set your own temperatures for your setback periods in the Danfoss Ally™ App. For changing temperature press Menu button on the main screen Settings Set temperature. -
Page 19: Create Your Own Schedule
’Plan‘ . want to set to ‚At home‘ mode, ’Vacation Mode‘ . you must have ‚Sat- urday‘ scheduled beforehand. This is because Ally™ will use the Saturday schedule settings for the ‚Vacation‘ . BC349733524454en-010401 © Danfoss | FEC | 2023.06 |... -
Page 20: Edit A Vacation
9.6 Pause Mode The Pause programme keeps the setback temperature until another programme is selected. When the Danfoss Ally™ system is turned down to a Min lev- el manually, a notification banner is shown, and center icon switches to ‘Pause’ . - Page 21 Danfoss Ally™ can be voice-controlled via Google Home and Amazon Alexa and with the open API, developers can create a real smart home system. Danfoss Ally™ is controlled by a gateway that connects to the home’s router and is operated exclusively via the Danfoss Ally™...
- Page 22 • Can I put my entire heating system on vacation? Yes, you can put all or selected rooms on ‘Vacation’ mode via the Danfoss Ally™ App. Here’s how you do it: 1. Press the ‘Vacation’ button and then select ‘Vacation’ mode: ‘Vacation Away’: Used if the family is away and the temperature of the rooms needs to be lowered.
- Page 23 All these factors could bring some room temperature regulation “tolerance” which we shouldn’t compare with a heat meter tolerance as an example. But the Ally™ regulation efficiency can be automatically adjusted either by the system itself or by a professional installer to the optimal for any specific conditions.
-
Page 24: Danfoss Ally™ Room Sensor
NOTE: If you have a Danfoss Ally™ Room Sensor in your room setup, the front sensor of the Radiator Thermostat, which is responsible for measuring the temperature in the room, will be deactivated. -
Page 25: Technical Specifications
25 g IP class Integrations* Partner API, Google Assistant, Amazon Alexa Approvals, markings etc. * Requires the Danfoss Ally™ Gateway. 10.3 Installation Step 1. Before mounting the sensor, choose correct location in the room following the next recommendations: • 1,5 m minimum height from the floor surface. - Page 26 Danfoss Ally™ Room Sensor Step 3. Click the Gateway tile, then ‘Add subdevice’ and choose the Danfoss Ally™ Room Sensor from the list. Follow the instructions to finish the installation process. Please note, when the sensor is successfully added, immediately assign it to the certain room before finishing the installation! Step 4.
-
Page 27: Danfoss Ally™ Boiler Relay
11.1 Facts about the Danfoss Ally™ Boiler Relay: • Danfoss Ally™ Boiler Relay will activate or diactivate the boiler, depending on the heat de- mand. This assures that the boiler will only be running when there is a heat demand. -
Page 28: Danfoss Ally™ Protect Ra
NOTE: Danfoss Ally™ Protect RA will fit only Radiator Thermostats with RA valve. 12.1 Installation NOTE: Please, connect the Danfoss Ally™ Radiator Thermostat to the Ally™ Gateway, before mounting Danfoss Ally™ Protect RA. 28 | © Danfoss | FEC | 2023.06... -
Page 29: Technical Specifications
II insulation level (Power supply with built-in double or reinforced insulation level between the supply voltage and safe voltage). Danfoss Ally™ Power Module 24V can be used with both Danfoss Ally™ electronic Radiator Thermostats and Danfoss Eco™, as well as in combination with the Danfoss Ally™... -
Page 30: Installation
Danfoss Ally™ Power level (see quick guide attached for details) Module 24V before completing the installation of Danfoss Ally™ Protect RA. The cable should go inside one of the cable tracks. 13.2 Technical Specifications Danfoss Ally™ Power Module 24V... -
Page 31: Danfoss Icon™/Icon 2™ - Room Thermostats For Floor Heating
When you are tired of the heat being unevenly distributed in your home. Or when you just want more comfort and greater savings. Danfoss Icon™ does it all. Quite simple. 14.1 Facts about Danfoss Icon™/Icon2™... -
Page 32: Danfoss Icon™ Specifications
And pre-setting is not necessary. 14.2 Danfoss Icon™ Specifications Danfoss Icon™ comes in 2 modular concepts, that fit the Ally™ system – Wireless and 24V. Wireless Thermostat models... -
Page 33: How To Install Danfoss Icon
Danfoss Icon™ Display is a room thermostat especially designed for floor heating systems. It comes in four different designs to suit markets worldwide. Danfoss Icon™ Display is very intui- tive and easy to use. Just set your desired comfort temperature, and the thermostat will control the room temperature in accordance with your setting. -
Page 34: Connecting Danfoss Icon™ To Danfoss Ally
User Guide Danfoss Icon™/Icon2™ 14.4 Connecting Danfoss Icon™ to Danfoss Ally™ Before you try to connect them, please mount all wires and install all thermostats to the Icon™ system! The zigbee Module must be connected before power the Master Controller. - Page 35 Er05 Communication lost to Radio Mod- Please check that the cable is properly connected ule. in the Radio Module and Danfoss Icon™ Master Controller 24V. Er06 Communication lost to room ther- Identify the room thermostat by looking at the mostat.
-
Page 36: Frequently Asked Questions On Danfoss Icon™ Section
Pairing mode is activated by short pressing the button. The GREEN LED must be rapidly flash- ing while the Danfoss Icon™ Zigbee Module is searching for the Danfoss Ally™ Gateway. If the green LED is not rapidly flashing, then factory reset should be performed: 1. -
Page 37: Danfoss Icon2™ Specifications
User Guide Danfoss Icon™/Icon2™ 14.6 Danfoss Icon2™ Specifications Danfoss Icon2™ comes in 3 modular concepts to cover every application – Wireless, common and wired solution. Wireless solution Common Solution Wired solution Icon2 Wired RT Icon2 Sensor 24V Wired room thermostat... - Page 38 NOTE: To get more information about how to install Danfoss Icon2™ MC and powerline diagrams please, use the installer app as a guideline for installation. Please find “Installer app“ from Danfoss on Google Play and App store. 38 | © Danfoss | FEC | 2023.06...
-
Page 39: Connecting Danfoss Icon2™ To Danfoss Ally
Before you try to connect them, please ensure that the Icon2™ system have been fully configured and powered on. Step 1. In the Ally™ application, click on your Gateway tile, then ‘Add subdevice’ . BC349733524454en-010401 © Danfoss | FEC | 2023.06 |... - Page 40 Choose Danfoss Icon2™ from the list. Step 3. Press and hold the ‘OK’ button to iniate pairing process. Step 4. The LED above ‘>’ button will start to blink rapidly while searching for a gateway. 40 | © Danfoss | FEC | 2023.06 BC349733524454en-010401...
-
Page 41: Data Security
You can find all E-error codes on the Installer App. It is available on Google Play Store and App store. 15. Data Security The data security for of the Danfoss Ally™ Gateway and the Danfoss Ally™ App, that is paired to your smartphone is guaranteed. - Page 42 User Guide Danfoss Ally™ Gateway 42 | © Danfoss | FEC | 2023.06 BC349733524454en-010401...
Need help?
Do you have a question about the Ally and is the answer not in the manual?
Questions and answers