
Related Manuals for Vision Fitness ES80


Summary of Contents for Vision Fitness ES80
- Page 1 ES80_2013 OM English 052213'.qxd 2013/5/22 7:23 PM Page a O w n e r’s G u i d e ES80 INDOOR CYCLE...
- Page 2 ES80_2013 OM English 052213'.qxd 2013/5/22 7:23 PM Page b...
- Page 3 ES80_2013 OM English 052213'.qxd 2013/5/22 7:23 PM Page c...
- Page 4 Bike will be an important tool in helping your members achieve this exercise habit. This Owner’s Guide provides you with basic information on using this VISION FITNESS Bike. A more complete knowledge of your new Bike will assist you in helping your members achieve their goals.
-
Page 5: Table Of Contents
ES80_2013 OM English 052213'.qxd 2013/5/22 7:23 PM Page 1 Table of Contents M O D E L I N F O E S 8 0 SPECIFICATIONS ....2 RESISTANCE &... -
Page 6: Specifications
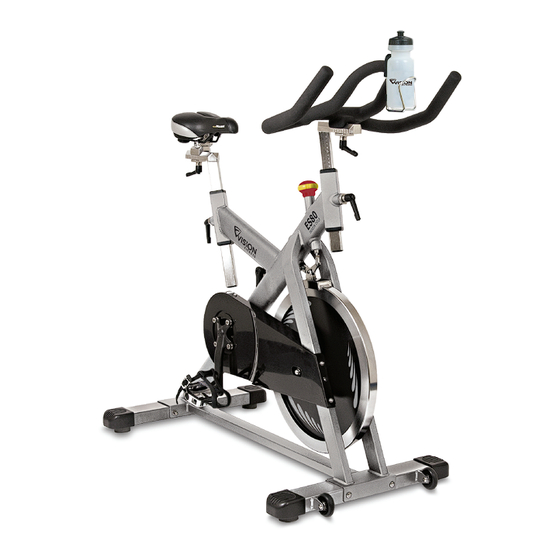
ES80_2013 OM English 052213'.qxd 2013/5/22 7:23 PM Page 2 HANDLEBAR SADDLE SEAT POST HANDLEBAR STEM FRICTION SYSTEM BELT GUARD FLYWHEEL FRAME E S 8 0 I N D O O R C Y C L E... - Page 7 ES80_2013 OM English 052213'.qxd 2013/5/22 7:23 PM Page 3 FRAME – Zinc coated, heavy gauge steel BELT GUARD – Black Plastic HANDLEBAR STEM – Stainless steel stem with adjustment scale for height and fore/aft positioning HANDLEBAR – Ergonomic PVC coated design that includes aerobars and fore/aft adjustment SADDLE –...
-
Page 8: Safety Instructions
ES80_2013 OM English 052213'.qxd 2013/5/22 7:23 PM Page 4 IMPORTANT SAFETY INSTRUCTIONS SAVE THESE INSTRUCTIONS READ ALL INSTRUCTIONS BEFORE USING THIS EXERCISE EQUIPMENT. • Keep children off your Bike at all times. • When the Bike is in use, young children and pets should be kept at least 10 feet away. -
Page 9: Assembly
ES80_2013 OM English 052213'.qxd 2013/5/22 7:23 PM Page 5 ASSEMBLY Tools needed: 4mm Allen Wrench, 5mm Allen Wrench, and 15mm Pedal Wrench. FRONT FOOT STEP • Remove bolts, washers, and nuts from the frame bracket for the front foot. • Remove the plastic spacers from the bracket of the front foot. •... -
Page 10: Step 2: Rear Foot
ES80_2013 OM English 052213'.qxd 2013/5/22 7:23 PM Page 6 REAR FOOT STEP • Remove bolts, washers, and nuts from the frame bracket for the rear foot. • Remove the plastic spacers from the bracket of the rear foot. • Attach the rear foot using the bolts, washers, and nuts removed earlier. -
Page 11: Step 3: Pedals
ES80_2013 OM English 052213'.qxd 2013/5/22 7:23 PM Page 7 PEDALS STEP • Attach the pedals to the crank arms. Each pedal is marked with the letter L (left) or R (right) to denote the side of the spinning bike they are on. Be careful to align the threads correctly to avoid damage. -
Page 12: Step 4: Handlebars
ES80_2013 OM English 052213'.qxd 2013/5/22 7:23 PM Page 8 HANDLEBARS STEP • Place the handlebar on the handlebar stem. Position handlebar bracket beneath the handlebar stem and insert the socket head cap screw so that it inserts into the bottom of the handlebar. Tighten with the 5mm allen wrench. -
Page 13: Step 5 Water Bottle Cage
ES80_2013 OM English 052213'.qxd 2013/5/22 7:23 PM Page 9 WATER BOTTLE CAGE STEP • Attach water bottle cage to the handlebars using the provided screws. Tighten with a 4mm allen wrench. -
Page 14: Resistance & Seat Adjustment
ES80_2013 OM English 052213'.qxd 2013/5/22 7:23 PM Page 10 RESISTANCE ADJUSTMENT The ergonomic resistance control knob located just below the handlebars on the bike frame easily controls pedaling resistance. Turning the knob in a clockwise direction increases pedal resistance. Turning the knob in a counter clockwise direction decreases pedal resistance. -
Page 15: Handlebar Adjustment
ES80_2013 OM English 052213'.qxd 2013/5/22 7:23 PM Page 11 HANDLEBAR ADJUSTMENT The handlebar position is based on comfort and may be adjusted to more accurately simulate the upper body position on a road bike. Typically the handlebar position is positioned slightly higher then the seat position for beginning cyclists. -
Page 16: Pedal Strap Adjustment
ES80_2013 OM English 052213'.qxd 2013/5/22 7:23 PM Page 12 PEDAL STRAP ADJUSTMENT Place the ball of each foot in the toe clip so the shoe fits snugly into the clip of the cage. Rotate one of the pedals to within arms reach. Pull on the strap of the clip to tighten the clip snugly around your shoe and tuck in excess strap. -
Page 17: Dismounting The Unit
DISMOUNTING THE UNIT WARNING! The ES80 uses a fixed flywheel that builds momentum and will keep the pedals turning even after the user stops pedaling or if the users feet slip off. DO NOT ATTEMPT TO REMOVE YOUR FEET FROM THE PEDALS OR DISMOUNT THE MACHINE UNTIL BOTH THE PEDALS AND THE FLYWHEEL HAVE COMPLETELY STOPPED. -
Page 18: Moving And Leveling
Be careful when moving the bike to prevent a sudden impact that could harm the bike or its surroundings. LEVELING THE ES80 The ES80 should operate on a level surface with no lateral movement. There... -
Page 19: Preventive Maintenance
• Check that the pedals are in good condition and properly tightened to prevent damage. • Simply dry the ES80 with a towel to remove sweat and dirt. NOTE: Never use abrasive cleaning liquids or petroleum-based solvents when wiping down the cycle! - Page 20 WEEKLY MAINTENANCE These procedures are intended to maintain the overall performance of your ES80 Indoor Cycle: Have an experienced rider or instructor ride each cycle to review the overall performance of each cycle; focus on vibrations or possible loose assemblies.
- Page 21 Page 17 MONTHLY MAINTENANCE These procedures are meant to be a comprehensive inspection of the overall frame and components of the ES80 Indoor Cycle: Inspect wear items for adjustment or possible replacement. Give special attention to the following: • Remove the brake assembly, and inspect brake pads for wear. Spray silicone on the brake pad to prevent glazing or hardening of the pad.
-
Page 22: Commercial Warranty
Labor for repair and replacement of Frames and Parts under this warranty, so long as the device remains in the possession of the original owner. WEAR ITEMS - 90 DAYS VISION FITNESS warrants Wear Items, such as pedals, seat, friction resistance system, etc., against defects in workmanship and materials for a period of 90 days from date of original purchase, so long as the device remains in possession of the original owner. - Page 23 WARRANTY REGISTRATION Your warranty card must be completed and sent to VISION FITNESS before a warranty claim can be processed. We suggest that commercial facilities register via our website at www.visionfitness.com and complete the commercial customer survey.
-
Page 24: Developing A Fitness Program
Page 20 DEVELOPING A FITNESS PROGRAM By purchasing this piece of VISION FITNESS exercise equipment, you have made a commitment to exercise and now have the convenience of exercising in your own home. Your new equipment offers the flexibility to exercise at whatever time suits you best. -
Page 25: Exercise Guidelines
Rate of Perceived Exertion (RPE). CAUTION ES80 Indoor Cycle is available with the maximum weight of 300 lbs /136 kg. Seat and handlebar adjustment is never over the marked STOP on the handlebar stem and seat post. -
Page 26: Target Heart Rate
ES80_2013 OM English 052213'.qxd 2013/5/22 7:23 PM Page 22 TARGET HEART RATE Target Heart Rate is a percentage of your maximum heart rate. Target Heart Rate will vary for each individual depending on age, current level of conditioning, and personal fitness goals. Exercise heart rate should range from 55% to 85% of your maximum heart rate. -
Page 27: Rate Of Perceived Exertion
ES80_2013 OM English 052213'.qxd 2013/5/22 7:23 PM Page 23 RATE OF PERCEIVED EXERTION Rate of Perceived Exertion (RPE) is one of the easiest ways to monitor exercise intensity. By becoming familiar with the RPE scale, you can continually assess your level of intensity and insure a level of exertion that is comfortable. -
Page 28: Balanced Fitness
ES80_2013 OM English 052213'.qxd 2013/5/22 7:23 PM Page 24 BALANCED FITNESS While cardiovascular exercise has been the primary method of fitness for many programs over the years, it should not be the only method. Strength Training and Flexibility Training have become more popular as exercise has developed. -
Page 29: Stretching
ES80_2013 OM English 052213'.qxd 2013/5/22 7:23 PM Page 25 STRETCHING Flexibility Training is not associated with fitness as often as cardiovascular exercise or Strength Training, even though it is just as important. A good stretching program will help to maintain flexibility of the hips and lower back. - Page 30 ES80_2013 OM English 052213'.qxd 2013/5/22 7:23 PM Page 26 STANDING QUADRICEPS STRETCH Using a wall to provide balance, grasp your left ankle with your left hand and hold to stretch. Your knee should be pointing toward the floor. Hold the stretch for 15 to 30 seconds.
- Page 31 ES80_2013 OM English 052213'.qxd 2013/5/22 7:23 PM Page 27...
-
Page 32: Weekly Workout Logs
ES80_2013 OM English 052213'.qxd 2013/5/22 7:23 PM Page 28... - Page 33 ES80_2013 OM English 052213'.qxd 2013/5/22 7:23 PM Page 29...
-
Page 34: Monthly Workout Logs
ES80_2013 OM English 052213'.qxd 2013/5/22 7:23 PM Page 30... - Page 35 ES80_2013 OM English 052213'.qxd 2013/5/22 7:23 PM Page 31...
- Page 36 ES80_2013 OM English 052213'.qxd 2013/5/22 7:23 PM Page 32 i t a l l s t a r t s w i t h a v i s i o n www.visionfitness.com ©2013 Vision Fitness. All Rights Reserved. 05.22 REV1...
Need help?
Do you have a question about the ES80 and is the answer not in the manual?
Questions and answers