Vision Fitness R2000 Owner's Manual
Fitness bikes
Hide thumbs
Also See for R2000:
- Owner's manual (64 pages) ,
- Assembly manual (9 pages) ,
- Assembly instruction manual (8 pages)
Table of Contents
Advertisement
Advertisement
Table of Contents

Related Manuals for Vision Fitness R2000


Summary of Contents for Vision Fitness R2000
- Page 1 O w n e r’s G u i d e R2000, R2100, E3000, E3100 FITNESS BIKES...
- Page 4 VISION FITNESS bike. You’ve taken an important step in developing and sustaining an exercise program! Your bike is a tremendously effective tool for achieving your personal fitness goals. Regular use of your bike can improve the quality of your life in so many ways…...
-
Page 5: Table Of Contents
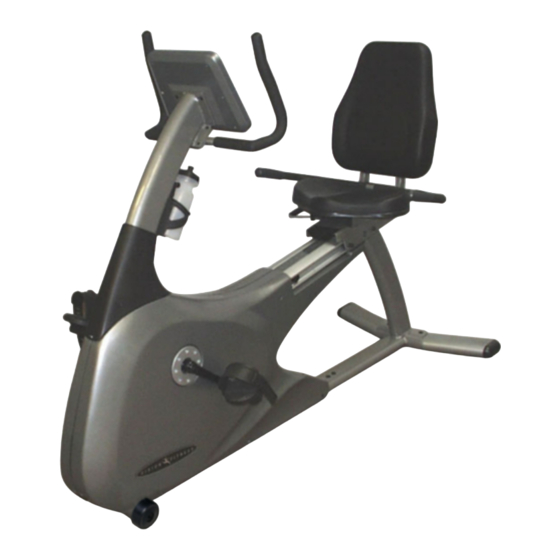
Table of Contents A L L M O D E L S G E N E R A L SAFETY INSTRUCTIONS ..4 SERVICE AND TROUBLESHOOTING . . 24 ASSEMBLY, PLACEMENT, MOVING . . . 6 HOME WARRANTY . - Page 6 CONSOLE TENSION KNOB SEAT RAIL SEAT ADJUSTMENT REAR FOOT FRONT FOOT & TRANSPORT WHEELS R 2 0 0 0 R 2 1 0 0 S E M I - R E C U M B E N T F I T N E S S C Y C L E S...
- Page 7 CONSOLE TENSION KNOB SEAT ADJUSTMENT REAR FOOT FRONT FOOT & TRANSPORT WHEELS E 3 0 0 0 E 3 1 0 0 U P R I G H T F I T N E S S C Y C L E S...
-
Page 8: Safety Instructions
To disconnect, turn the switch to the OFF position, then remove plug from outlet. • Only use the power cord provided with your VISION FITNESS Bike. • Never place the power cord under carpeting or place any object on top of the power cord, which may pinch and damage it. - Page 9 OTHER SAFETY TIPS FOR YOUR VISION FITNESS BIKE CAUTION! If you experience chest pains, nausea, dizziness or shortness of breath, stop exercising immediately and consult your physician before continuing. bike • Do not wear loose clothing that might catch on any part of the bike •...
-
Page 10: Assembly, Placement, Moving
Bike, contact your retailer. MOVING Your VISION FITNESS Bike has transport wheels included for ease of mobility. To move your semi-recumbent Bike, firmly grasp the rear of the seat rail or the rear of the frame assembly. Carefully lift and roll on the transport wheels. - Page 11 Your Bike uses a wall mount external power supply. Use only the power supply provided with your Bike. If you misplace this power supply, please contact your authorized Vision Fitness retailer for an original replacement. Use of the wrong power supply may cause damage to your Bike.
-
Page 12: Seat Adjustment
SEAT POSITIONING To determine proper seat position, sit on the seat and position the ball of your foot on the center of the pedal. Your knee should bend slightly at the furthest pedal position. You should be able to pedal without locking your knees or shifting your weight from side to side. -
Page 13: Pedal Strap Adjustment
SEMI-RECUMBENT SEAT ADJUSTMENT While seated on the Bike, lift the seat lever on the right side of the seat to make adjustments. Slide the seat forward or backward to desired location. Push the seat lever down to lock in place. PEDAL STRAP ADJUSTMENT The straps are designed to fit your individual foot size and should be... -
Page 14: Contact Heart Rate
CONTACT HEART RATE HAND PULSE HEART RATE SENSORS The Contact Hand Pulse Sensors are included on each product to monitor your heart rate. To use, grasp the sensors with a comfortable grip during your workout. The console will display your heart rate. Although your signal will be displayed immediately, it may take the system a few seconds to zero in on your actual heart rate. -
Page 16: Overview
000 SERIES CONSOLE DISPLAY CONSOLE OVERVIEW The computerized display allows the user to set the workout time and monitor exercise feedback over the duration of the workout. -
Page 17: Display Console Descriptions
DISPLAY CONSOLE DESCRIPTIONS A. BATTERY POCKET Make sure two AA batteries are inserted prior to use. If the LCD screen begins to fade, change the batteries. B. BIKE OR ELLIPTICAL SWITCH This console can be used on both products, so make sure the switch is set to BIKE mode. -
Page 18: Overview
100 SERIES CONSOLE DISPLAY CONSOLE OVERVIEW The computerized display allows the user to select a workout that meets their desired fitness goals. It also allows the user to monitor the progress and feedback of each workout, so they can track improvements in overall fitness over time. -
Page 19: Display Console Descriptions
DISPLAY CONSOLE DESCRIPTIONS A. POWER SWITCH Turn off power to your console if your bike will not be used for an extended period of time. B. BIKE OR ELLIPTICAL SWITCH This console can be used on both products, so make sure the switch is set to BIKE mode. - Page 20 DISPLAY CONSOLE DESCRIPTIONS (continued) G. START/PAUSE/HOLD TO RESET BUTTON Press the START button to begin exercising at the set default time. Press START when instructed to by the scrolling LCD message center to begin a program. When exercising, press the PAUSE button to pause your workout.
-
Page 22: The Programs
THE PROGRAMS WORKOUT OVERVIEW EASY START Simply press START and you will skip the setup of specific workouts and begin exercising at a constant level (manual) workout. The resistance levels do not change automatically, but you can adjust the resistance with the arrows as you choose. - Page 23 WEIGHT LOSS is a program intended to target your stored body fat. This program is generally used at a slightly lower intensity, but runs for longer durations than other programs (30 to 60 minutes is recommended). MOUNTAIN features gradual increases in resistance to simulate riding through a mountain range.
-
Page 24: Using The Programs
USING THE PROGRAMS CHOOSING EASY START Easy Start is the fastest way to begin exercising, as it allows you to bypass the setup steps required for the preset programs. Simply press START and you will begin a constant resistance level workout. The resistance levels will not change automatically, but you can adjust the resistance by using the arrow buttons. - Page 25 CHOOSING RESISTANCE LEVEL The LCD message board will scroll instructions for setting LEVEL. The default level will be flashing in the LEVEL window. Set the LEVEL using the UP ▲ or DOWN ▼ buttons. When you arrive at your chosen intensity level, press the ENTER button.
-
Page 26: Default Settings
DEFAULT SETTINGS ( R2100/E3100 ONLY) Use this optional USER SET Mode to set default values or view accumulated variables. ENTERING AND USING USER SET MODE • Press and hold the UP ▲ and DOWN ▼ buttons simultaneously for five seconds. •... - Page 27 VIEWING ACCUMULATED VARIABLES • Accumulated Time is displayed in the SPEED (middle-left) window and will show accumulated hours of use. • Accumulated Distance is displayed in the DISTANCE (middle-right) window and will show accumulated distance in miles or kilometers. EXIT USER SET MODE •...
-
Page 28: Service And Troubleshooting
SERVICE AND TROUBLESHOOTING PREVENTATIVE MAINTENANCE TIPS • Locate Bike in a cool, dry place. • Clean the top surface of the pedal regularly. • Make sure pedals are kept tight to crank arms. • Keep the display console free from fingerprints and salt build-up caused by sweat. - Page 29 SOLUTION: Make sure the two AA batteries are plugged in and in working order ( R2000/E3000 only). SOLUTION: Make sure the power adapter is plugged into the base of the bike ( R2100/E3100 only).
-
Page 30: Home Warranty
LABOR - ONE YEAR VISION FITNESS shall cover the Labor cost for the repair of the device for a period of one year from the date of original purchase, so long as... - Page 31 WARRANTY REGISTRATION Your warranty card must be completed and sent to VISION FITNESS before a warranty claim can be processed. You may also register via our website at www.visionfitness.com. Inside the enclosed warranty card you will find a customer survey.
-
Page 32: Developing Fitness Program
DEVELOPING A FITNESS PROGRAM By purchasing this piece of VISION FITNESS exercise equipment, you have made a commitment to exercise and now have the convenience of exercising in your own home. Your new equipment offers the flexibility to exercise at whatever time suits you best. It will be easier to maintain a consistent exercise program that will help you achieve your fitness goals. -
Page 33: Exercise Guidelines
EXERCISE GUIDELINES EXERCISE DURATION A common question asked is, “how much exercise do I need?” We recommend following the guidelines set up by the American College of Sports Medicine (ACSM) for healthy aerobic activity. • Exercise three to five days per week. •... -
Page 34: Target Heart Rate
TARGET HEART RATE Target Heart Rate is a percentage of your maximum heart rate. Target Heart Rate will vary for each individual depending on age, current level of conditioning, and personal fitness goals. Exercise heart rate should range from 55% to 85% of your maximum heart rate. As a point of reference, we use the predicted maximum heart rate formula of (220 minus age) to determine your heart rate training zone. -
Page 35: Rate Of Perceived Exertion
RATE OF PERCEIVED EXERTION Rate of Perceived Exertion is one of the easiest ways to monitor exercise intensity. By becoming familiar with the RPE scale, you can continually assess your level of intensity and insure a level of exertion that is comfortable. -
Page 36: Balanced Fitness
BALANCED FITNESS While cardiovascular exercise has been the primary method of fitness for many programs over the years, it should not be the only method. Strength Training and Flexibility Training have become more popular as exercise has developed. Incorporating strength and flexibility training into your current exercise program will give you the balance you need to improve your athletic performance, reduce susceptibility to injury, increase metabolic rate, increase bone density, and reach your goals faster. -
Page 37: Stretching
STRETCHING Flexibility training is not associated with fitness as often as cardiovascular exercise or strength training, even though it is just as important. A good stretching program will help to maintain flexibility of the hips and lower back. A flexible person will be less likely to injure themselves in common activities, such as reaching, twisting and turning, or in uncommon activities such as the annual softball tournament. - Page 38 STANDING QUADRICEPS STRETCH Using a wall to provide balance, grasp your left ankle with your left hand and hold to stretch. Your knee should be pointing toward the floor. Hold the stretch for 15 to 30 seconds. Repeat with your right leg, and continue to alternate as necessary.
- Page 44 500 South C.P. Avenue • P.O. Box 280 Lake Mills, WI 53551 toll free 1.800.335.4348 • phone 1.920.648.4090 fax 1.920.648.3373 www.visionfitness.com ©2004 Vision Fitness. All Rights Reserved. HRT is a Trademark of Vision Fitness. 5.05 Part #Z20RB104-OM OM18.16PRD REV3...
Need help?
Do you have a question about the R2000 and is the answer not in the manual?
Questions and answers