
Related Manuals for SHOWTEC Phantom 3R Beam V1


Summary of Contents for SHOWTEC Phantom 3R Beam V1
- Page 1 MANUAL ENGLISH Phantom 3R Beam Ordercode: 40079 Highlite International B.V. – Vestastraat 2 – 6468 EX – Kerkrade – the Netherlands...
-
Page 2: Table Of Contents
Phantom 3R Beam Table of contents Warning ....................................2 Safety Instructions ................................. 2 Operating Determinations ............................4 Rigging .................................... 4 Connection with the mains............................5 Return Procedure ................................5 Claims ....................................5 Description of the device ..............................6 Features ..................................6 Frontside.................................. -
Page 3: Warning
Save the carton and all packing materials. In the event that a fixture must be returned to the factory, it is important that the fixture be returned in the original factory box and packing. Your shipment includes: ● Showtec Phantom 3R Beam ● Pro power cable (1,5 m) ●... - Page 4 ● If your Showtec device fails to work properly, discontinue the use immediately. Pack the unit securely (preferably in the original packing material), and return it to your Showtec dealer for service.
-
Page 5: Operating Determinations
Phantom 3R Beam Operating Determinations ● This device is not designed for permanent operation. Consistent operation breaks will ensure that the device will serve you for a long time without defects. ● The minimum distance between light output and the illuminated surface must be bigger than 10 meters. -
Page 6: Connection With The Mains
Phantom 3R Beam Connection with the mains Connect the device to the mains with the power-plug. Always check if the right color cable is connected to the right place. International EU Cable UK Cable US Cable BROWN YELLOW/COPPER PHASE BLUE BLACK SILVER NEUTRAL... -
Page 7: Description Of The Device
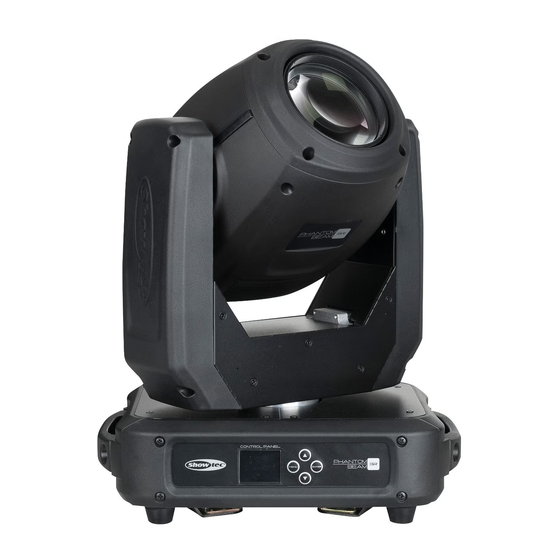
Phantom 3R Beam Description of the device Features The Phantom 3R Beam is a moving head with high output and great effects. ● Input voltage: 100-240V AC, 50/60Hz ● Power consumption: 255W ● Light source: 1 x 3R/150W, 8600K ● Dimmer: 0-100% ●... -
Page 8: Backside
Damages caused by non-observance are not subject to warranty. Installing the Lamp The Showtec Phantom 3R Beam uses the Osram Sirius HRI lamp, 140W (ordercode 81011). Use only the appropriate lamp for your unit. Note that product versions, that use other lamps, may be offered in the future. -
Page 9: Set Up And Operation
Phantom 3R Beam Fig. 03 Fig. 04 Fig. 05 Fig. 06 Fig. 07 Set Up and Operation Follow the directions below, as they pertain to your preferred operation mode. Before plugging the unit in, always make sure that the power supply matches the product specification voltage. -
Page 10: Control Modes
Phantom 3R Beam Control Modes There are 5 modes: ● Stand-alone (Auto) ● Manual ● Sound-controlled ● Master/Slave ● DMX-512 (10CH, 14CH) One Phantom (Auto, Manual) 01) Fasten the effect light to a firm trussing. Leave at least 0,5 meter on all sides for air circulation. 02) Plug the end of the electric mains power cord into a proper electric power supply socket. -
Page 11: Multiple Phantoms (Dmx Control)
Phantom 3R Beam Multiple Phantoms (DMX Control) 01) Fasten the effect light to a firm trussing. Leave at least 0,5 meter on all sides for air circulation. 02) Always use a safety cable (ordercode 70140 / 70141). 03) Use a 3-pin XLR cable to connect the Phantoms and other devices. 04) Link the units as shown in fig. -
Page 12: Fixture Linking
Phantom 3R Beam Fixture Linking You will need a serial data link to run light shows of one or more fixtures using a DMX-512 controller or to run synchronized shows of two or more fixtures set to a master/slave operating mode. The combined number of channels required by all the fixtures on a serial data link determines the number of fixtures the data link can support. -
Page 13: Control Panel
Phantom 3R Beam The Phantom 3R Beam can be operated with a controller in control mode or without the controller in stand-alone mode. Control Panel A) LCD display UP button C) ENTER button D) DOWN button MENU button Fig. 10 Control Mode The fixtures are individually addressed on a data-link and connected to the controller. -
Page 14: Menu Overview
Phantom 3R Beam Menu Overview Ordercode: 40079... -
Page 15: Main Menu Options
Phantom 3R Beam Main Menu Options DMX Addressing DMX mode / Master-Slave / Auto / Sound-controlled / Manual Pan and Tilt Reverse / Screen Reverse / Pan and Tilt Angle / Sound Sensitivity / Wireless Enable / Wireless Unlink / Lamp Settings / Maintenance / Reset / Factory Reset System Information Upon start-up, the device will show its currently active mode, as well as the information concerning Pan... -
Page 16: Built-In Programs Mode
Phantom 3R Beam Built-in Programs Mode You can run the auto programs when using the Phantom. 01) While in the main menu, press the UP/DOWN buttons until the display shows 02) Press the ENTER button to open the menu. 03) Press the UP/DOWN buttons to select one of the 5 modes: 1. -
Page 17: Manual Mode
Phantom 3R Beam 5. Manual Mode 01) Press the UP/DOWN buttons until the display shows MANUAL. 02) Press the ENTER button to activate the Manual mode. 03) The display will show: 04) Press the UP/DOWN buttons to choose one of the following options: ... -
Page 18: Advanced Settings
Phantom 3R Beam Advanced Settings 01) While in the main menu, press the UP/DOWN buttons until the display shows 02) Press the ENTER button to open the menu. 03) The display will show: 04) Press the UP/DOWN buttons to toggle between the following options: ... -
Page 19: Lamp Settings
Phantom 3R Beam 1. Lamp Settings 01) If you have chosen LAMP SETTINGS (in step 4, page 17), the display will show: 02) Press the UP/DOWN buttons to toggle between the following options: On/Off (switch the lamp on and off, ON/OFF) ... -
Page 20: System Information
Phantom 3R Beam System Information In this menu you can see the currently active mode, the DMX starting address, the current software version, lamp on time (lamp’s operating hours) and remain time (time which needs to pass before a safety check should take place). 01) While in the main menu, press the UP/DOWN buttons until the display shows 02) Press the ENTER button to open the menu and view the parameters. - Page 21 Phantom 3R Beam Channel 5 – Color wheel Linear color change following the movement of the slider. Between 128-191 and 192-255, the color wheel rotates continuously (so-called “Rainbow” effect). Open / White 8-11 Yellow 12-15 Green 16-19 Light Blue 20-23 Pink 24-27 Lime...
- Page 22 Phantom 3R Beam 80-83 Gobo Shake 15 from slow to fast 84-87 Gobo Shake 14 from slow to fast 88-91 Gobo Shake 13 from slow to fast 92-95 Gobo Shake 12 from slow to fast 96-99 Gobo Shake 11 from slow to fast 100-103 Gobo Shake 10 from slow to fast 104-107...
-
Page 23: Channels
Phantom 3R Beam 14 Channels Channel 1 – Horizontal movement (Pan) Move the slider up, in order to move head horizontally (PAN). Gradual head adjustment from one end of the slider to the other (0-255, 128-center). The head can be turned by 540° and stopped at any position you wish. Channel 2 –... - Page 24 Phantom 3R Beam 96-99 Split color Purple + Light Green 100-103 Split color Light Green + CTO 104-107 Split color CTO + ½ CTO 108-111 Split color ½ CTO + CTB 112-115 Split color CTB + Magenta 116-119 Split color Magenta + UV 120-127 Split color UV + open 128-191...
- Page 25 Phantom 3R Beam Channel 11 – Focus 0-255 Continuous adjustment Channel 12 – Frost 0-255 Frost adjustment, from OFF to full frost Channel 13 – Channel Functions Not functional 8-15 Blackout during Pan/Tilt movement 16-23 Blackout during color wheel movement 24-31 Blackout during gobo wheel movement 32-39...
-
Page 26: Maintenance
Phantom 3R Beam Maintenance The operator has to make sure that safety-related and machine-technical installations are to be inspected by an expert after every year in the course of an acceptance test. The operator has to make sure that safety-related and machine-technical installations are to be inspected by a skilled person once a year. -
Page 27: Static Gobo Wheel + Color Wheel
05) If you are unable to determine the cause of the problem, do not open the Phantom, as this may damage the unit and the warranty will become void. 06) Return the device to your Showtec dealer. No Response to DMX Suspect the DMX cable or connectors, a controller malfunction, a light effect DMX card malfunction. - Page 28 Phantom 3R Beam Problem Probable cause(s) Remedy One or more No power to the fixture. Check if power is switched on and fixtures do not cables are plugged in. function at all Primary fuse blown. Replace fuse. Fixtures reset The controller is not connected.
-
Page 29: Product Specifications
Phantom 3R Beam Product Specifications Model: Showtec Phantom 3R Beam Input voltage: 100-240V AC, 50/60Hz Power consumption: 255W (full output) DMX linking: 30pcs Fuse: F4AL/250V Dimensions: 325 x 210 x 420 mm (LxWxH) Weight: 12,5 kg Operating and Programming: Signal pin OUT:... -
Page 30: Dimensions
Phantom 3R Beam Dimensions Ordercode: 40079... - Page 31 Phantom 3R Beam Ordercode: 40079...
- Page 32 ©2019 Showtec...
Need help?
Do you have a question about the Phantom 3R Beam V1 and is the answer not in the manual?
Questions and answers