Hettich MIKRO 220 Operating Instructions Manual
Hide thumbs
Also See for MIKRO 220:
- Manual (42 pages) ,
- Operating instructions manual (50 pages) ,
- Operating instructions manual (178 pages)
Table of Contents
Advertisement
Available languages
Available languages
Bedienungsanleitung ..................................................... 14
DE
Operating Instructions ................................................... 34
EN
Mode d'emploi ................................................................ 56
FR
Istruzioni per l'uso ......................................................... 77
IT
Rev. 12 / 12.2022
Andreas Hettich GmbH & Co. KG
MIKRO 220
MIKRO 220R
AB2200DEENFRIT
Advertisement
Chapters
Table of Contents

Related Manuals for Hettich MIKRO 220


Summary of Contents for Hettich MIKRO 220
- Page 1 MIKRO 220 MIKRO 220R Bedienungsanleitung ............. 14 Operating Instructions ........... 34 Mode d'emploi ..............56 Istruzioni per l'uso ............77 Rev. 12 / 12.2022 Andreas Hettich GmbH & Co. KG AB2200DEENFRIT...
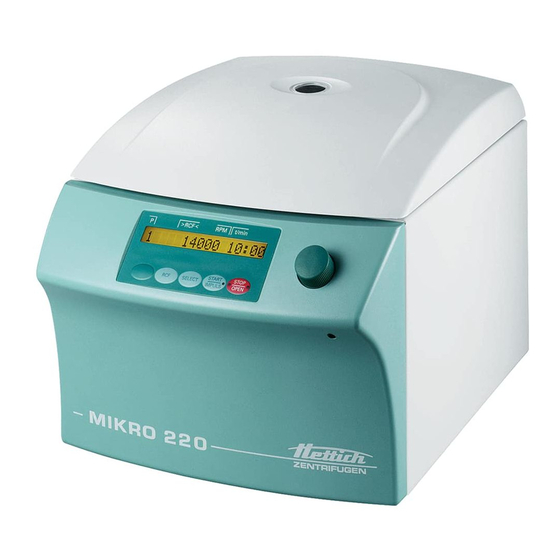
- Page 2 Fig. 1 >RCF< t/min START STOP SELECT IMPULS OPEN Fig. 2 MIKRO 220 T/°C >RCF< t/min STOP START SELECT IMPULS OPEN Fig. 3 MIKRO 220R 2/107 Rev. 12 / 12.2022 AB2200DEENFRIT...
- Page 3 AB2200DEENFRIT Rev. 12 / 12.2022 3/107...
- Page 4 4/107 Rev. 12 / 12.2022 AB2200DEENFRIT...
- Page 5 AB2200DEENFRIT Rev. 12 / 12.2022 5/107...
- Page 6 6/107 Rev. 12 / 12.2022 AB2200DEENFRIT...
- Page 7 AB2200DEENFRIT Rev. 12 / 12.2022 7/107...
- Page 8 8/107 Rev. 12 / 12.2022 AB2200DEENFRIT...
- Page 9 Für dieses Gerät gültige Normen und Vorschriften Das Gerät ist ein Produkt mit einem sehr hohen technischen Niveau. Es unterliegt umfangreichen Prüf- und Zertifizierungsverfahren gemäß folgenden Normen und Vorschriften in deren jeweils gültigen Fassung: Elektrische und mechanische Sicherheit für Konstruktion und Endprüfung: Normbaureihe: IEC 61010 (entspricht der Normenreihe DIN EN 61010) •...
- Page 10 Standards and regulations which apply to this device The device is a high-end technical product. It is subject to extensive testing and certification procedures according to the following standards and regulations in their respectively valid version: Electrical and mechanical safety for design and final testing: Standard series: IEC 61010 (conform to standards of DIN EN 61010) •...
- Page 11 Normes et règles en vigueur pour cet appareil Cet appareil est un produit avec un très haut niveau technique. Il est soumis à des vastes procédures de vérification et de certification, d'après les normes et prescriptions suivantes, dans leur version actuelle : Sécurité...
- Page 12 Norme e direttive valide per questo apparecchio L'apparecchio è un dispositivo di elevatissimo livello tecnico. È sottoposto a numerosi procedimenti di collaudo e certificazione, in conformità alle seguenti norme e direttive nella corrispondente versione di validità: Sicurezza elettrica e meccanica per la costruzione ed il collaudo finale: Serie di norma: IEC 61010 (corrisponde alla serie di norma DIN EN 61010) •...
- Page 13 Single Registration Number: DE-MF-000010680 © 2008 by Andreas Hettich GmbH & Co. KG All rights reserved. No part of this publication may be reproduced without the prior written permission of the copyright owner. Änderungen vorbehalten! , Modifications reserved! , Sous réserve de modifications ! , Con riserva di modifiche! AB2200DEENFRIT / Rev.
-
Page 14: Table Of Contents
Inhaltsverzeichnis Bestimmungsgemäße Verwendung ........................16 Restrisiken ................................16 Technische Daten ..............................16 Sicherheitshinweise .............................. 17 Transport und Lagerung ............................18 Transport ............................... 18 Lagerung ............................... 18 Bedeutung der Symbole ............................19 Lieferumfang ................................. 20 Auspacken der Zentrifuge ............................. 20 Inbetriebnahme ..............................20 Deckel öffnen und schließen .......................... - Page 15 Rücksendung von Geräten ..........................33 Entsorgung ................................ 33 Anhang / Appendix ............................98 30.1 Rotoren und Zubehör / Rotors and accessories ..................98 30.1.1 MIKRO 220 / MIKRO 220R ......................... 98 30.1.2 MIKRO 220 ............................103 30.1.3 MIKRO 220R............................. 104 AB2200DEENFRIT Rev.
-
Page 16: Bestimmungsgemäße Verwendung
Bestimmungsgemäße Verwendung Bei der Zentrifuge MIKRO 220 / MIKRO 220 R handelt es sich um ein In-vitro-Diagnostikum gemäß der Verordnung über In-Vitro-Diagnostika (EU) 2017/746. Das Gerät dient zum Zentrifugieren sowie zur Anreicherung von Probenmaterial menschlichen Ursprungs für eine anschließende Weiterverarbeitung für diagnostische Zwecke. Der Anwender kann jeweils die veränderbaren physikalischen Parameter innerhalb der vom Gerät vorgegebenen Grenzen einstellen. -
Page 17: Sicherheitshinweise
Die Zentrifuge darf nicht mehr in Betrieb genommen werden, wenn der Schleuderraum sicherheitsrelevante Schäden aufweist. • Bei Ausschwingrotoren müssen die Tragzapfen regelmäßig gefettet werden (Hettich-Schmierfett Nr. 4051), um ein gleichmäßiges Ausschwingen der Gehänge zu gewährleisten. • Bei Zentrifugen ohne Temperaturregelung kann es bei erhöhter Raumtemperatur und/oder bei häufigem Gebrauch des Gerätes zur Erwärmung des Schleuderraums kommen. -
Page 18: Transport Und Lagerung
Gehängen und Zubehörteilen beeinträchtigen können, ist nicht erlaubt. • Reparaturen dürfen nur von einer vom Hersteller autorisierten Person ausgeführt werden. • Es dürfen nur Originalersatzteile und zugelassenes Originalzubehör der Firma Andreas Hettich GmbH & Co. KG verwendet werden. • Es gelten die folgenden Sicherheitsbestimmungen: EN / IEC 61010-1 und EN / IEC 61010-2-020 sowie deren nationalen Abweichungen. -
Page 19: Bedeutung Der Symbole
Bedeutung der Symbole Symbol am Gerät: Achtung, allgemeine Gefahrenstelle. Symbol am Gerät: Bedienungsanleitung beachten. Dieses Symbol verweist darauf hin, dass der Anwender die bereitgestellte Bedienungsanleitung beachten muss. Symbol in diesem Dokument: Achtung, allgemeine Gefahrenstelle. Dieses Symbol kennzeichnet sicherheitsrelevante Hinweise und deutet auf mögliche gefährliche Situationen hin. -
Page 20: Lieferumfang
Lieferumfang 1 Anschlusskabel 1 Sechskant-Stiftschlüssel 1 Bedienungsanleitung 1 Hinweisblatt Transportsicherung Rotor(en) und das entsprechende Zubehör werden je nach Bestellung mitgeliefert. Auspacken der Zentrifuge • Den Karton nach oben abheben und die Polsterung entfernen. • Nicht an der Frontblende anheben. Das Gewicht der Zentrifuge beachten, siehe Kapitel "Technische Daten". Die Zentrifuge, mit der angemessenen Anzahl von Helfern, an beiden Seiten anheben und auf den Labortisch stellen. -
Page 21: Deckel Öffnen Und Schließen
Deckel öffnen und schließen 10.1 Deckel öffnen Der Deckel lässt sich nur öffnen, wenn die Zentrifuge eingeschaltet ist und der Rotor stillsteht. Sollte dies nicht möglich sein, siehe Kapitel "Notentriegelung". • Die Taste drücken. Der Deckel entriegelt motorisch und die linke LED in der Taste OPEN / STOP OPEN / STOP erlischt. -
Page 22: Beladen Des Rotors
Beladen des Rotors Standard-Zentrifugiergefäße aus Glas sind belastbar bis RZB 4000 (DIN 58970 Teil 2). • Den Rotor auf festen Sitz prüfen. • Bei Ausschwingrotoren müssen alle Plätze des Rotors mit gleichen Gehängen besetzt sein. Bestimmte Gehänge sind mit der Nummer des Rotorplatzes gekennzeichnet. Diese Gehänge dürfen nur in den entsprechenden Platz des Rotors eingesetzt werden. -
Page 23: Verschließen Von Bio-Sicherheitssystemen
• Die vom Hersteller angegebene maximale Füllmenge der Zentrifugiergefäße darf nicht überschritten werden. Bei Winkelrotoren dürfen die Zentrifugierge- Flüssigkeit fäße nur soweit befüllt werden, dass während des Zentrifugationslaufes keine Flüssigkeit aus Gefäßen herausgeschleudert werden kann. Zentrifugalkraft • Beim Beladen der Winkelrotoren darf keine Flüssigkeit in die Winkelrotoren und in den Schleuderraum gelangen. •... -
Page 24: Bedien- Und Anzeigeelemente
Bedien- und Anzeigeelemente Siehe Abbildung auf Seite 2. Fig. 2, Fig. 3: Anzeige- und Bedienfeld 14.1 Drehknopf Zum Einstellen der einzelnen Parameter. Drehen entgegen dem Uhrzeigersinn erniedrigt den Wert. Drehen im Uhrzeigersinn erhöht den Wert. 14.2 Tasten des Bedienfeldes • Wähltaste zum Anwählen der einzelnen Parameter. -
Page 25: Zentrifugations-Parameter Eingeben
T/°C Temperatur-Sollwert (nur bei Zentrifuge mit Kühlung). Einstellbar von -20°C bis +40°C, in 1°C-Schritten. Die tiefste erreichbare Temperatur ist rotorabhängig (siehe Kapitel "Anhang/Appendix, Rotoren und Zubehör/Rotors and accessories"). PROG STO Programmplatz auf dem das Programm gespeichert wird. Es können 9 Programme gespeichert werden (Programmplätze 1 - 2 - 3 - ... -
Page 26: Schreibschutz Für Die Programme
16.3 Schreibschutz für die Programme Die Programme können gegen unbeabsichtigtes Ändern geschützt werden. Der Schreibschutz kann, bei Stillstand des Rotors, wie folgt aktiviert oder deaktiviert werden: • Die Taste 8 s gedrückt halten. SELECT Nach 8 s erscheint SOUND / BELL in der Anzeige. •... -
Page 27: Not-Stop
Not-Stop • Die Taste 2x drücken. OPEN / STOP Beim Not-Stop erfolgt der Auslauf mit Bremsstufe 9 (kürzeste Auslaufzeit). Die Bremsstufe 9 wird angezeigt. War die Bremsstufe 0 vorgewählt, so ist die Auslaufzeit technisch bedingt länger als mit Bremsstufe 9. Akustisches Signal Das akustische Signal ertönt: •... -
Page 28: Vorkühlen Des Rotors
21.2 Vorkühlen des Rotors • Die Taste drücken. Die LED in der Taste leuchtet solange der Rotor dreht. START / IMPULS • Die Taste drücken um die Vorkühlung zu beenden. Der Auslauf erfolgt mit der angewählten OPEN / STOP Bremsstufe. Die Bremsstufe wird angezeigt. Während des Zentrifugationslaufes werden die Drehzahl des Rotors oder der RCF-Wert, die Temperatur im Schleuderraum, und die gelaufene Zeit angezeigt. -
Page 29: Rotorerkennung
Rotorerkennung Nach Start eines jeden Zentrifugationslaufes wird eine Rotorerkennung durchgeführt. Wurde der Rotor gewechselt, wird der Zentrifugationslauf nach der Rotorerkennung abgebrochen. Der Rotorcode (rot xx) des Rotors wird angezeigt. Der Rotorcode (R xx) sowie die maximale Drehzahl (n-max=xxxxx) des Rotors werden angezeigt. -
Page 30: Zentrifuge (Gehäuse, Deckel Und Schleuderraum)
26.1 Zentrifuge (Gehäuse, Deckel und Schleuderraum) 26.1.1 Oberflächenreinigung und -pflege • Das Gehäuse der Zentrifuge und den Schleuderraum regelmäßig säubern und bei Bedarf mit Seife oder einem milden Reinigungsmittel und einem feuchten Tuch reinigen. Dies dient zum einen der Hygiene und es verhindert Korrosion durch anhaftende Verunreinigungen. -
Page 31: Desinfektion
26.2.2 Desinfektion • Gelangt infektiöses Material auf die Rotoren oder auf das Zubehör, so muss eine geeignete Desinfektion durchgeführt werden. • Inhaltsstoffe geeigneter Desinfektionsmittel: Äthanol, n-Propanol, Ethylhexanol, anionische Tenside, Korrosionsinhibitoren. • Nach dem Einsatz von Desinfektionsmitteln, die Reste des Desinfektionsmittels, durch Nachspülen mit Wasser (nur außerhalb der Zentrifuge) oder Nachwischen mit einem feuchten Tuch, entfernen. -
Page 32: Störungen
Störungen Lässt sich der Fehler laut Störungstabelle nicht beheben, so ist der Kundendienst zu benachrichtigen. Bitte den Zentrifugentyp und die Seriennummer angeben. Beide Nummern sind auf dem Typenschild der Zentrifuge ersichtlich. Einen NETZ-RESET durchführen: − Den Netzschalter ausschalten (Schalterstellung "0"). −... -
Page 33: 28 Rücksendung Von Geräten
Vor der Rücksendung des Gerätes muss die Transportsicherung eingebaut werden. Wird das Gerät oder dessen Zubehör an die Firma Andreas Hettich GmbH & Co. KG zurückgesandt, so muss dieses, zum Schutz von Personen, Umwelt und Material, vor dem Versand dekontaminiert und gereinigt werden. - Page 34 Contents Use according to specification ..........................36 Remaining risks ..............................36 Technical specifications ............................36 Notes on safety ..............................37 Transport and storage ............................38 Transport ............................... 38 Storage ................................38 Symbol meanings ..............................39 Delivery checklist ..............................40 Unpacking the centrifuge ............................40 Initial operation ..............................
- Page 35 Returning Devices ............................. 55 Disposal ................................55 Anhang / Appendix ............................98 30.1 Rotoren und Zubehör / Rotors and accessories ..................98 30.1.1 MIKRO 220 / MIKRO 220R ......................... 98 30.1.2 MIKRO 220 ............................103 30.1.3 MIKRO 220R............................. 104 AB2200DEENFRIT Rev.
-
Page 36: Use According To Specification
Intended use also includes observing all instructions in the Operating Manual and compliance with the required inspection and maintenance work. Any other use or use beyond this is considered improper. Andreas Hettich GmbH & Co. KG shall not be liable for any damage arising from this. -
Page 37: Notes On Safety
The centrifuge may no longer be put into operation when the centrifuging chamber has safety- related damages. • With swing-out rotors the trunnions must be regularly lubricated (Hettich Lubricating Grease No. 4051) in order to ensure consistent swinging out of the hangers. •... -
Page 38: Transport And Storage
• Repairs must only be carried out by personnel authorised to do so by the manufacturer. • Only original spare parts and original accessories licensed by the Andreas Hettich GmbH & Co. KG company are allowed to be utilised. •... -
Page 39: Symbol Meanings
Symbol meanings Symbol on the device: Attention, general hazard area. Symbol on the device: Observe operating instructions. This symbol indicates that the user must observe the operating instructions provided. Symbol in this document: Attention, general hazard area. This symbol refers to safety relevant warnings and indicates possibly dangerous situations. The non-adherence to these warnings can lead to material damage and injury to personal. -
Page 40: Delivery Checklist
Delivery checklist 1 Connecting cable 1 Hexagonal pin-type spanner 1 Operating instructions 1 Notes on moving the equipment safely The rotor(s) and associated accessories are included in the delivery in the quantity ordered. Unpacking the centrifuge • Lift the carton upward and remove the padding. •... -
Page 41: Opening And Closing The Lid
Opening and closing the lid 10.1 Opening the lid The lid can only be opened when the centrifuge is switched on and the rotor is at rest. If it cannot be opened under these circumstances, see the section on “Emergency release”. •... -
Page 42: Loading The Rotor
Loading the rotor Standard centrifuge containers of glass will not stand RCF values exceeding 4000 (DIN 58970, pg. 2). • Check the rotor for firm seating. • With swing-out rotors all rotor positions must be lined with identical hangers. Certain hangers are marked with the number of the rotor position. -
Page 43: Closing Biosafety Systems
• The maximum filling quantity for the centrifuge containers specified by the manufacturer must not be exceeded. In the case of angle rotors, the centrifuging Fluid vessels may only be filled so far that no fluid can be expelled from them while the centrifuge is running. -
Page 44: Control And Display Elements
Control and display elements See figure on page 2. Fig. 2, Fig. 3: Display and control panel 14.1 Control knob For setting the individual parameters. Turning anticlockwise reduces the value. Turning clockwise increases the value. 14.2 Control panel pushbuttons (keys) •... -
Page 45: Adjustment Possibilities
14.3 Adjustment possibilities PROG RCL Program position of the called-up program. t/min Running time. Settable from 0 - 99 min, in 1 min increments. t/sec Running time. Settable from 0 - 59 s, in 1 second increments. Continuous run "". Set parameter t/min and t/sec to zero. Revolutions per minute. -
Page 46: Entering Centrifugation Parameter
Entering centrifugation parameter If no key is pressed for 8 seconds long after the selection or during the input of parameters, the previous values will be shown in the display. The input of parameter then has to be executed again. If no parameters can be entered, then the programs are write-protected. -
Page 47: Write Protection For The Programs
16.3 Write protection for the programs The programs can be protected against unintentional modification. The write protection can be activated or deactivated as follows when the rotor is at a standstill: • Press and hold the key for 8 seconds. SELECT After 8 seconds, SOUND / BELL appears in the display. -
Page 48: Short-Term Centrifugation
17.3 Short-term centrifugation • Hold down the key . The LED in the button lights up for as long as the rotor turns. The START / IMPULS START / IMPULS time metering begins at 00:00. • Let go of the key again in order to stop the centrifugation run. -
Page 49: Cooling (Only In Centrifuges With Cooling)
Cooling (only in centrifuges with cooling) The temperature set-point can be adjusted from -20°C to +40°C. The lowest obtainable temperature is dependent on the rotor (see Chapter "Anhang/Appendix, Rotoren und Zubehör/Rotors and accessories"). 21.1 Standby-cooling With rotor standstill and closed lid the centrifugal chamber is cooled to the pre-selected temperature. The temperature set-point is shown in the display. -
Page 50: Centrifugation Of Materials Or Mixtures Of Materials With A Density Higher Than 1.2 Kg/Dm
Centrifugation of materials or mixtures of materials with a density higher than 1.2 kg/dm When centrifuging with maxim revolutions per minute the density of the materials or the material mixtures may not exceed 1.2 kg/dm The speed must be reduced for materials or mixtures of materials with a higher density. The permissible speed can be calculated using the following formula: Reduced speed... -
Page 51: Maintenance And Servicing
Maintenance and servicing The device can be contaminated. Pull the mains plug before cleaning. Before any other cleaning or decontamination process other than that recommended by the manufacturer is applied, the user has to check with the manufacturer that the planned process does not damage the device. •... -
Page 52: Rotors And Attachments
26.2 Rotors and Attachments 26.2.1 Cleaning and care • In order to avoid corrosion and changes in materials, the rotors and accessories have to be cleaned regularly with soap or with a mild cleaning agent and a moist cloth. Cleaning is recommended at least once a week. Contaminants must be removed immediately. -
Page 53: Autoclaving
26.3 Autoclaving The following accessories may be autoclaved at 121°C / 250°F (20 min): • Swing-out rotors • Angle rotors made of aluminium • Hangers made of metal • Lid with bio-seal • Adapter Nothing definitive can be said about the degree of sterility. The lids of the rotors and containers must be removed before autoclaving. -
Page 54: Faults
Faults If the fault cannot be eliminated with the help of the fault table, please inform Customer Service. Please specify the type of centrifuge and the serial number. Both numbers can be found on the name plate of the centrifuge. Perform a MAINS RESET: −... -
Page 55: Returning Devices
Before returning the device, a transport securing device has to be installed. If the device or its accessories are returned to Andreas Hettich GmbH & Co. KG, in order to provide protection for people, the environment and materials, it has to be decontaminated and cleaned before being shipped. - Page 56 Table des matières Usage conforme ..............................58 Risques résiduels ..............................58 Données techniques ............................. 58 Consignes de sécurité ............................59 Transport et stockage ............................60 Transport ............................... 60 Stockage ............................... 60 Signification des symboles ........................... 61 Composition de la livraison ........................... 62 Déballer la centrifugeuse ............................
- Page 57 Renvoi d'appareils au fabricant ......................... 76 Mise au rebut ..............................76 Anhang / Appendix ............................98 30.1 Rotoren und Zubehör / Rotors and accessories ..................98 30.1.1 MIKRO 220 / MIKRO 220R ......................... 98 30.1.2 MIKRO 220 ............................103 30.1.3 MIKRO 220R............................. 104 AB2200DEENFRIT Rev.
-
Page 58: Mikro 220
Usage conforme La centrifugeuse MIKRO 220 / MIKRO 220 R est un dispositif de diagnostic in vitro conformément au règlement relatif aux dispositifs de diagnostic in vitro (UE) 2017/746. Le dispositif sert à centrifuger ainsi qu'à enrichir des échantillons d'origine humaine pour un traitement ultérieur à des fins de diagnostic. -
Page 59: Consignes De Sécurité
à la sécurité. • Les goupilles de fixation des rotors à amortissement doivent être graissées régulièrement (graisse de lubrification Hettich n° 4051) de manière à assurer le balancement régulier de la suspension. • Concernant les centrifugeuses sans réglage de température, il peut y avoir un réchauffement dans la cuve de centrifugeuse en cas de température ambiante élevée et/ou d'utilisation fréquente de... -
Page 60: Transport Et Stockage
Les réparations ne peuvent être effectuées que par une personne autorisée à cet effet par le fabricant. • Utiliser uniquement les pièces de rechange originales et les accessoires d'origine homologués par les Etablissements Andreas Hettich GmbH & Co. KG. • Les dispositions de sécurité suivantes font foi : EN / IEC 61010-1 et EN / IEC 61010-2-020 ainsi que les dérogations nationales. -
Page 61: Signification Des Symboles
Signification des symboles Symbole sur l'appareil : Attention, zone de danger général. Symbole sur l'appareil : respecter le mode d'emploi. Ce symbole indique que l'utilisateur doit respecter le mode d'emploi mis à disposition. Symbole dans ce document: Attention, zone de danger général. Ce symbole indique des consignes de sécurité... -
Page 62: Composition De La Livraison
Composition de la livraison 1 Câble de connexion 1 Clé hexagonale 1 Mode d’emploi 1 Fiche de consignes pour le transport Le(s) rotor(s) et accessoires correspondant sont livrés selon les spécifications de la commande. Déballer la centrifugeuse • Soulever le carton et retirer le matériau d'amortissement. •... -
Page 63: Ouvrir Et Fermer Le Couvercle
Ouvrir et fermer le couvercle 10.1 Ouvrir le couvercle Le capot ne peut être ouvert que lorsque la centrifugeuse est sous tension et que le rotor est à l’arrêt. Dans les autres cas, voir le chapitre, "Déverrouillage d’urgence". • Appuyer sur la touche Le couvercle est déverrouillé... -
Page 64: Chargement Du Rotor
Chargement du rotor Des récipients standard de centrifugation en verre sont résistants jusqu' à un ACR de 4000 (DIN 58970, partie 2). • Vérifier la stabilité d'assise du rotor. • Dans le cas des rotors à balanciers, toutes les positions des rotors doivent être équipées avec les mêmes balanciers. -
Page 65: Fermeture Des Systèmes De Sécurité Biologique
• La quantité maximale de remplissage indiquée par le fabricant pour les récipients de centrifugation ne doit pas être dépassée. Pour rotors angulaires, remplir Liquide réservoirs de centrifugation de sorte que du liquide ne puisse pas être projeté à l'extérieur pendant le cycle de centrifugation Force centrifuge •... -
Page 66: Organes De Commande Et Indicateurs
Organes de commande et indicateurs Voir illustration sur la page 2. Fig. 2, Fig. 3: Console des indicateurs et organes de commande 14.1 Bouton de réglage Pour le réglage des paramètres individuels. Pour faire décroître la valeur, tourner le bouton dans le sens anti-horaire. Pour augmenter la valeur, tourner le bouton dans le sens horaire. -
Page 67: Saisie Des Paramètres De Centrifugation
Etages de montée en puissance de 1 à 9. Etage 9 = temps de montée en puissance le plus court, étage 1 = temps de montée en puissance le plus long. Etages de décélération de 0 à 9. Etage 9 = temps de décélération le plus court, étage 1 = étage de décélération long, étage 0 = étage de décélération le plus long (décélération par inertie, sans freinage). -
Page 68: Appel De Programme
16.2 Appel de programme • Sélectionner le paramètre PROG RCL en appuyant sur la touche et configurer la position de programme SELECT souhaitée sur le bouton radio . • Appuyer sur la touche Les données de centrifugation pour la position de programme sélectionnée START / IMPULS sont affichées. -
Page 69: Centrifugation Continue
17.2 Centrifugation continue • Ajuster sur l'icône ou appeler un programme de centrifugation continue (voir le Chapitre "Programmation"). • Appuyer sur la touche . La DEL incorporée dans la touche reste allumée tant que le START / IMPULS START / IMPULS rotor tourne. -
Page 70: Refroidissement (Uniquement Sur Centrifugeuse Avec Refroidissement)
Refroidissement (uniquement sur centrifugeuse avec refroidissement) La température de consigne peut être réglée sur une plage de -20 °C à +40 °C. Le minimum de température possible est fonction du rotor (voir le Chapitre "Anhang/Appendix, Rotoren und Zubehör/Rotors and accessories"). 21.1 Refroidissement en veilleuse A l'arrêt du rotor et lorsque le couvercle est fermé, le bol de centrifugeuse est refroidi à... -
Page 71: Accélération Centrifuge Relative (Rcf)
Accélération centrifuge relative (RCF) L'accélération centrifuge relative (RCF) est indiqué en tant que multiple de l'accélération gravitationnelle (g). Il s'agit d'une valeur dépourvue d'unité, qui sert à la comparaison entre la puissance de séparation et de sédimentation. Le calcul s’effectue à l’aide de la formule suivante: ... -
Page 72: Identification Du Rotor
Identification du rotor Une identification du rotor est effectuée après le démarrage de chaque cycle de centrifugation. Si le rotor a été remplacé, le cycle de centrifugation s'interrompt après l'identification du rotor. L'afficheur indique le code (R xx) et la vitesse de rotation maximale (n-max=xxxxx) du rotor. Toute commande ultérieure de la centrifuge n’est possible qu’après une ouverture du couvercle. -
Page 73: Désinfection Des Surfaces
26.1.2 Désinfection des surfaces • Le bol de la centrifugeuse doit être nettoyé immédiatement dans le cas où un matériau infectieux a pénétré dans le bol de la centrifugeuse. • Substances des désinfectants adéquats : éthanol, n-propanol, éthylènehexanol, agents anioniques, inhibiteurs de corrosion. •... -
Page 74: Rotors Et Accessoires À Durée D'utilisation Limitée
26.2.4 Rotors et accessoires à durée d'utilisation limitée L'utilisation de certains rotors, balanciers et accessoires est limitée dans le temps. Ces limites sont indiquées par le nombre maximum de cycles ou la date limite d'utilisation et le nombre maximum de cycles, ou simplement la date limite d'utilisation, par ex. -
Page 75: 27 Défauts
Défauts Si l'erreur ne peut pas être éliminée d'après le tableau des défauts, il faut alors avertir le service après-vente. Veuillez indiquer le type de centrifuge et le numéro de série. Les deux numéros sont indiqués sur la plaque signalétique de la centrifugeuse. Effectuer une RÉINITIALISATION DU SECTEUR : −... -
Page 76: Renvoi D'appareils Au Fabricant
Avant de renvoyer l'appareil, il faut monter le dispositif de fixation pour le transport. Dans le cas où l'appareil ou ses accessoires doivent être retournés à la société Andreas Hettich GmbH & Co. KG, il faut les décontaminer et les nettoyer avant expédition, dans le but d'assurer la protection des personnes, de l'environnement et du matériel. - Page 77 Indice Uso previsto ................................79 Rischi residui ................................ 79 Dati tecnic ................................79 Indicazioni inerenti la sicurezza ..........................80 Trasporto ed immagazzinaggio ..........................81 Trasporto ............................... 81 Immagazzinaggio ............................81 Significato dei simboli ............................82 Contenuto della fornitura ............................83 Disimballo della centrifuga ............................
- Page 78 Rispedizione di apparecchi ..........................97 Smaltimento ..............................97 Anhang / Appendix ............................98 30.1 Rotoren und Zubehör / Rotors and accessories..................98 30.1.1 MIKRO 220 / MIKRO 220R ......................... 98 30.1.2 MIKRO 220 ............................103 30.1.3 MIKRO 220R ............................ 104 78/107 Rev.
-
Page 79: Uso Previsto
Uso previsto La centrifuga MIKRO 220 / MIKRO 220 R è un dispositivo medico diagnostico in vitro conformemente al regolamento (UE) 2017/746 sui dispositivi medici diagnostici in vitro. Il dispositivo è utilizzato per la centrifugazione e l'arricchimento di campioni di origine umana per un successivo trattamento a fini diagnostici. -
Page 80: Indicazioni Inerenti La Sicurezza
• In rotori oscillanti, i perni di trascinamento devono essere lubrificati regolarmente (Grasso lubrificante Hettich no. d’ord. 4051) per consentire un’oscillazione equilibrata dei ganci. • Nel caso di centrifughe senza regolazione termica, con temperature ambiente elevate e/o con frequente impiego dell'apparecchiatura può... -
Page 81: Trasporto Ed Immagazzinaggio
Gli interventi di riparazione devono essere effettuati esclusivamente da una persona autorizzata dal costruttore. • Devono essere impiegati solo ed esclusivamente pezzi di ricambio originali ed accessori autorizzati della ditta Andreas Hettich GmbH & Co. KG. • Sono di validità le seguenti norme di sicurezza: EN / IEC 61010-1 e EN / IEC 61010-2-020 come anche le loro nazionali varianti. -
Page 82: Significato Dei Simboli
Significato dei simboli Simbolo sull'apparecchio: Attenzione, punto pericoloso generico. Symbole sur l'appareil : respecter le mode d'emploi. Ce symbole indique que l'utilisateur doit respecter le mode d'emploi mis à disposition. Simbolo in questo documento. Attenzione, punto pericoloso generico. Questo simbolo contraddistingue le avvertenze relative alla sicurezza e indica situazioni potenzialmente pericolose . -
Page 83: Contenuto Della Fornitura
Contenuto della fornitura 1 cavo elettrico 1 chiave a forcella 1 istruzioni per l'uso 1 istruzioni per la sicurezza durante il trasporto Rotore/i e i corrispondenti accessori vengono forniti in base alla commessa. Disimballo della centrifuga • Levare il cartone verso l’alto e togliere l‘imbottitura. •... -
Page 84: Apertura E Chiusura Del Coperchio
Apertura e chiusura del coperchio 10.1 Apertura del coperchio E' possibile aprire il coperchio solo se la centrifuga è accesa ed il rotore è fermo. Se non dovesse essere possibile, vedi capitolo "Sblocco di emergenza". • Premere il tasto . Il coperchio si sblocca a motore e il LED sinistro nel tasto si spegne. -
Page 85: Carico Del Rotore
Carico del rotore Lo standard dei recipienti di vetro centrifugati sono da caricare fino a RCF 4000 (DIN 58970 capoverso 2). • Verificare che il rotore sia fissato. • Nel caso di rotori oscillanti, tutti i siti del rotore devono essere muniti di ganci uguali. Particolari ganci sono contrassegnati con il numero del sito del rotore. -
Page 86: Chiudere I Sistemi Biologici Di Sicurezza
• Nel caso di contenitori con inserimenti in gomma, deve essere sempre mantenuto lo stesso numero di inserimenti in gomma sotto i contenitori di centrifugazione. • L'operazione di riempimento dei contenitori di centrifugazione è ammessa solo al di fuori della centrifuga. •... -
Page 87: Elementi Di Operazione E Visualizzazione
Elementi di operazione e visualizzazione Vedere illustrazione alla pagina 2 Fig. 2, Fig. 3: Display 14.1 Manopola Per l'impostazione dei singoli parametri. La rotazione in senso antiorario riduce il valore. La rotazione in senso orario aumenta il valore. 14.2 Tasti del display •... -
Page 88: Inserire I Parametri Di Centrifugazione
Livelli di inizio 1 - 9. Livello 9 = tempo di avvio più breve, livello 1 = tempo di avvio più lungo Livelli di frenatura 0 - 9. Livello 9 = tempo di arresto più breve, livello 1 = tempo di arresto più lungo Livello 0 = tempo di arresto più... -
Page 89: Protezione Da Scrittura Per I Programmi
16.3 Protezione da scrittura per i programmi I programmi possono venire protetti contro una loro modificazione non autorizzata. La protezione da scrittura può essere attivata o disattivata, a rotore fermo, nel modo seguente: • Tener premuto il tasto 8 s. SELECT Dopo 8 s compare SOUND / BELL sul display. -
Page 90: Centrifugazione Breve
17.3 Centrifugazione breve • Tenere premuto il tasto . Il LED del tasto rimane acceso fintanto che il rotore gira. Il START / IMPULS START / IMPULS conteggio del tempo inizia da 00:00. • per terminare la corsa di centrifugazione. L’arresto avviene con il livello di Togliere il dito dal tasto START / IMPULS frenatura selezionato. -
Page 91: Pre-Raffreddamento Del Rotore
21.2 Pre-raffreddamento del rotore • Premere il tasto . Il LED del tasto rimane acceso fintanto che il rotore gira. START / IMPULS • per terminare il pre-raffreddamento. L’arresto avviene con il livello di frenatura Premere il tasto OPEN / STOP selezionato. -
Page 92: Accelerazione Centrifuga Relativa (Rcf)
Accelerazione centrifuga relativa (RCF) L’accelerazione centrifuga relativa (RCF) è indicata come un multiplo dell’accelerazione terrestre (g). È un valore numerico privo di unità e funge per paragonare le prestazioni di separazione de sedimentazione. Il calcolo viene eseguito in base alla formula: ... -
Page 93: Sblocco Di Emergenza
Sblocco di emergenza In caso di una caduta di tensione, il coperchio non può essere sbloccato a motore. Deve essere effettuata manualmente uno sblocco di emergenza. Per lo sblocco di emergenza, disconnettere la centrifuga dalla rete elettrica. Aprire il coperchio solo con l’arresto del rotore. Vedere illustrazione alla pagina 2. -
Page 94: Rimuovere Contaminazioni Radioattive
26.1.3 Rimuovere contaminazioni radioattive • La sostanza deve essere certificata in modo speciale per rimuovere contaminazioni radioattive. • Ingredienti di sostanze adatte alla rimozione di contaminazioni radioattive: tensidi anionici, tensidi non ionici, etanolo poliidrato. • Dopo aver rimosso le contaminazioni radioattive, rimuovere i resti della sostanza pulendo di nuovo con un panno umido. -
Page 95: Rotori Ed Accessori Con Limitata Durata Di Impiego
26.2.4 Rotori ed accessori con limitata durata di impiego L'impiego di particolari rotori, ganci ed elementi accessori è limitato nel tempo. Questi sono contrassegnati con la quantità max. di cicli di funzionamento o dalla data di scadenza ed il numero massimo di cicli di funzionamento o solo con la data di scadenza, p.es.: - "einsetzbar bis Ende: V. -
Page 96: Guasti
Guasti Se non si riesce a eliminare l’errore seguendo le indicazioni della tabella guasti, informare il servizio assistenza clienti. Si prega di indicare il tipo di centrifuga e il numero di serie. Entrambi i numeri sono visibili sulla targhetta di modello della centrifuga. -
Page 97: Rispedizione Di Apparecchi
Prima di rispedire un apparecchio deve essere montata la protezione per il trasporto. Se l'apparecchio o uno dei suoi accessori viene rispedito alla ditta Andreas Hettich GmbH & Co. KG, esso deve essere prima decontaminato e pulito per la tutela di persone, ambiente e materiale. -
Page 98: Anhang / Appendix
Anhang / Appendix 30.1 Rotoren und Zubehör / Rotors and accessories 1189 / 1195 Nicht in MIKRO 220 / 220 R zugelassen. Not permitted in MIKRO 220 / 220 R. 30.1.1 MIKRO 220 / MIKRO 220R 1158-L 2031 2023 2024... - Page 99 1189-A 2031 2023 2024 Winkelrotor 30-fach / Angle rotor 30-times 0788 2078 0536 45° mit Bioabdichtung / with bio-containment Kapazität / capacity Maße / dimensions x L 11 x 38 8 x 30 8 x 45 6 x 18 6 x 45 10,7 x 36 Anzahl p.
- Page 100 2218-A 2031 2023 2024 Winkelrotor 12-fach / Angle rotor 12-times 0788 2078 0536 45° Kapazität / capacity Maße / dimensions x L 11 x 38 8 x 30 8 x 45 6 x 18 6 x 45 10,7 x 36 Anzahl p.
- Page 101 1154-L 2031 2023 2024 Ausschwingrotor 24-fach / Swing out rotor 24-times 2078 0536 90° max.Beladung / max. load: 24x4,5g Kapazität / capacity Maße / dimensions x L 11 x 38 8 x 30 8 x 45 6 x 18 6 x 45 11 x 38 Anzahl p.
- Page 102 1161 1377 1379 1378 Topfrotor 6-fach / Pot rotor 6-times 2078 0536 90° Kapazität / capacity Maße / dimensions x L 11 x 38 8 x 30 8 x 45 6 x 18 6 x 45 Anzahl p. Rotor / number p. rotor Drehzahl / speed 13000 14171...
-
Page 103: Mikro 220
30.1.2 MIKRO 220 1163 Topfrotor 6-fach / Pot rotor 6-times Microtiter-strips 8-times 90° Kapazität / capacity 12 x 8 Drehzahl / speed 12000 10947 RZB / RCF Radius / radius 9 (97%) Probenerwärmung/Sample temp. rise Probenerwärmung bei maximaler Drehzahl und Sample temp. -
Page 104: Mikro 220
30.1.3 MIKRO 220R 1015 6305 1063 Winkelrotor 12-fach / Angle rotor 12-times 35° 9 – 10 Kapazität / capacity 4,5 - 5 7,5 x 8,2 Maße / dimensions x L 11 x 92 13 x 90 15 x92 16 x 92 15 x 102 10 x 88 11 x 38... - Page 105 1015 1054-A Winkelrotor 12-fach / Angle rotor 12-times 0553 0501 0701 35° 1,6 – 5,0 2,6 –3,4 Kapazität / capacity 1,1 -1,4 2,7 - 3 Maße / dimensions x L 12 x 60 12 x 75 13 x 75 13 x 75 12 x 82 8 x 66...
- Page 106 1016 1635 + 1054-A Winkelrotor 6-fach / Angle rotor 6-times 1635 1632 0578 0518 0507 35° 1,6 – 5,0 Kapazität / capacity 9-10 4 - 7 Maße / dimensions x L 17 x 100 13x100 13 x 75 12 x 100 16 x 92 15 x 102 Anzahl p.
- Page 107 2226 Ausschwingrotor 12-fach / Swing out rotor 12-times 1127 0553 60° 1,6 – 5 2,7 – 3 2,6 – 3,4 Kapazität / capacity Maße / dimensions x L 12 x 75 13 x 75 11 x 66 13 x 65 Anzahl p.
Need help?
Do you have a question about the MIKRO 220 and is the answer not in the manual?
Questions and answers