Igloohome Deadbolt 2S Installer/User Manual
Hide thumbs
Also See for Deadbolt 2S:
- Installer/user manual (30 pages) ,
- Installer/user manual (28 pages) ,
- User manual
Table of Contents
Advertisement
Quick Links
Advertisement
Table of Contents

Related Manuals for Igloohome Deadbolt 2S


Summary of Contents for Igloohome Deadbolt 2S
- Page 1 Installers & User guide Deadbolt 2S Metal Grey. Version 0.5 07/22...
- Page 2 LinkedIn YouTube Instagram We’re always updating our guides because we want to keep things fresh! You can visit igloohome.co/support periodically to view the latest version, unless, this is the latest version. Hello you, igloohomie from the future, wow!
-
Page 3: Table Of Contents
Table of Contents What’s Included Specifications Installation Guide Requirements Prepare Door for Installation Prepare Lock for Installation Installation Instructions Test Lock Prepare the Door Frame User Guide Lock Anatomy Features Modes of Access App Onboarding Managing Access via the app Manage Ecosystem Products via the app Manage Lock Features Manage Lock Settings... -
Page 4: What's Included
What’s Included Back Plate Back Assembly Back Assembly Front Assembly Rubber Gasket & Rubber Gasket AA Alkaline Batteries x4 Strike Plate Housing & Bolt Assembly Screw Holder Strike Plate Keys x4 Edge of the door Face of the door 10mm (Optional) 5mm (0.019”) 8mm (0.03”) Drill for:... -
Page 5: Specifications
Specifications Model IGB4 Weight Net: 1.2kg, Gross: 1.6kg Body Zinc Alloy, ABS, Acrylic Modes of Access (Entry) PIN codes, Bluetooth keys, Mechanical keys Modes of Access (Exit) Thumbturn Power Type 4 AA alkaline batteries Battery Life Up to 10 months Emergency Power 9V Alkaline Battery Battery Operating Temp. -
Page 6: Installation Guide
Installation Guide Requirements Clearance Door Thickness Measurements 35mm (1.37”) to 60mm (2.36”) 10mm (0.39”) 20mm (0.78”) >110mm (4.33”) for 60mm (2.36”) / >120mm (4.72”) for 70mm (2.75”) backset 50mm (1.96”) -
Page 7: Prepare Door For Installation
Please ensure that there is an existing handle on your door for push - pull access. Not for: metal gates, glass doors or sliding doors. If you are unsure if your door is suitable, send us web links to your door pictures to info@igloohome.co... - Page 8 How to use the Drill Sheet Drilling (Door) Fold here Make sure this is before drilling aligned to the centre holes for side of door edge 10mm (0.39“) Drill Bit 25mm (0.98”) Spade Bit 54mm (2.12”) Hole Saw Door edge 2.7mm (0.11”) 60-70mm Chiselling...
-
Page 9: Prepare Lock For Installation
Prepare Lock For Installation Set Back Assembly for Left / Right Hand Installation Left Hand Installation Set the toggle to ‘LH’ for Hinge left-hand installation * Hinge is on your left. Outside Right Hand Installation Set the toggle to ‘RH’ for Hinge right-hand installation * Hinge is on your right. -
Page 10: Installation Instructions
Installation Instructions Measure If you are replacing your current deadbolt lock, industry standards are 60mm (2.36”) or 70mm (2.75”) backset. To determine which backset length you should use, so measure the distance (x) between the center of 54mm (2.12”) hole to door edge. 54mm (2.12”) Hole... - Page 11 Insert bolt and front assembly into door edge The ‘+ ‘ hole on the backset should be in the middle of the hole. Screw Holder Screws Please ensure that tailpiece is in vertical position. 15mm (0.59”) Measure and cut the tailpiece if necessary After inserting the tailpiece, measure the distance of protrusion from the door.
- Page 12 Secure the Front Assembly using the Back Plate. To do this, place the Back Plate (ensuring the correct side placement). Follow this orientation Screws 43mm (1.69”) Door Sensor Installation Adjust the position of the door sensor according to the door handling (left or right hand installation). Use the 2 x 5mm (0.19”) screws to secure the door sensor to the back plate.
- Page 13 Fit in the Rubber Gasket Insert the front assembly cable through the rectangular hole on the rubber gasket. The hole should be on the right side of the rubber gasket. Door Sensor Cable goes through the arched hole on the Rubber Gasket Assembly Cable Right-hand Installation...
- Page 14 Connect Assembly Cable Connect the sensor cable to the Back Assembly then connect the assembly cable from the Front assembly through the 54mm (2.12”) hole to the Back Assembly. Ensure that the wire is installed properly and securely. Door Sensor Cable Assembly Cable...
- Page 15 Fit Back Assembly to the Door Tailpiece Ensure thumbturn position is turned to ‘unlock’ position. Right-hand Installation Left-hand Installation Thumbturn Thumbturn is is in vertical in horizontal position position Secure the Back Assembly Do not overtighten the screws Screws 8mm (0.31”) 20mm (0.78”)
- Page 16 Insert 4 AA Alkaline Batteries and push the battery case lid inwards to close Side View...
-
Page 17: Test Lock
Tailpiece and/or thumbturn Left-Right toggle incorrectly set incorrectly set Troubleshoot: Try Setting the Troubleshoot: Dissemble lock left-right toggle on your back and install it again. assembly to the correct side. (See Pg. 10) Still experiencing issues? Go to igloohome.co/support for more help... -
Page 18: Prepare The Door Frame
Prepare the Door Frame Mark out where the bolt tongue locks then Ensure to align the lock to the door frame drill a corresponding hole on door frame. and mark it down. Chisel to fit the strike plate in as well. Door Frame 20mm... -
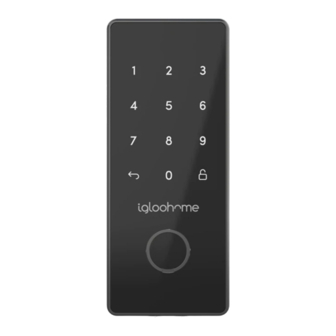
Page 19: User Guide
User Guide Lock Anatomy Front & Back Assembly Battery Cover Release Touch Screen Keypad Battery Cover Unlock Key hole Cover (Remove cover to access Thumbturn physical key unlock) 9V Jumpstart Clear... -
Page 20: Features
Auto Lock Manual Relock Heighten security and throw off Hold the ‘Unlock’ button for 1 second onlookers by entering random digits to manually lock the Deadbolt 2S. before your actual PIN code. Battery Emergency Jumpstart Low Battery Alert Easily jumpstart the lock with a 9V An intuitive audio and LED alert will battery if batteries are drained. -
Page 21: Modes Of Access
Features Security / Alarms Security Lockout Tamper Alarm The lock will sound an alarm if it is Keypad is disabled after several being pried from the door to alert and incorrect access attempts to ensure deter potential tampering attempts. your property is always secure. Privacy Mode Obstruction Alarm The lock will sound an alarm if the... - Page 22 Mode of Access igloohome App Bluetooth Home Basic Unlock Deadbolt Warehouse Julia PIN Code Basic Access Logs Settings igloohome App Guest Home Thumbturn Bluetooth Key Deadbolt Warehouse John Physical Key Android-Create IOS-Claim Feb 12, 2019 Sep 30, 2019 20:00 SGT...
-
Page 23: App Onboarding
App Store Google Play Register for an igloohome account 1) Launch the igloohome app and tap [Create new account] 2) Fill in the fields shown on the screen. 3) Accept the terms of services and privacy policy. 4) Tap [Create account]. - Page 24 3. Tap on [Add Lock]. 4. Select the property you created. 5. Follow the instructions on the screen. If you’re pairing the lock to an existing igloohome account: and select [Add and manage]. 1. Tap on 2. Tap on [Add Lock].
- Page 25 You can customise this to something that is easier for you. Before you do this, ensure you are within Bluetooth range of the lock and your Bluetooth function is turned on. 1. On the igloohome mobile app, tap on the icon. 2. Tap on [Master PIN Code].
-
Page 26: Managing Access Via The App
PIN code validity durations to manage access for different users. a) If you are away from your property, generate PIN codes on the go with our unique algoPIN™ technology: 1. On the igloohome mobile app, tap on the icon. 2. Tap on [+Access]. - Page 27 (Text, Email, WhatsApp, Facebook Messenger etc.) to claim the Bluetooth key. Your guest will either need to download the igloohome mobile app and register for an account or claim the Bluetooth key with their existing igloohome account.
-
Page 28: Manage Ecosystem Products Via The App
Manage Ecosystem Products via the app Keypad a) Pair the Keypad to your account Before linking the Keypad to a lock, you need to add the device to your account: *Please ensure you are within Bluetooth range of the Keypad and your Bluetooth function is turned on. - Page 29 Key Fob a) Pair the Key Fob to your account Before linking the Key Fob to a lock, you need to add the device to your account: *Please ensure you are within Bluetooth range of the Key Fob and your Bluetooth function is turned on.
- Page 30 Bridge a) Link the Bridge to a lock or other ecosystem products 1. Tap on and select [Add and manage]. 2. Tap [Bridges]. 3. Select the Bridge you want to link your lock to. 4. Tap [Linked locks and devices]. 5.
-
Page 31: Manage Lock Features
*Please ensure you are within Bluetooth range of the lock and your Bluetooth function is turned on. 1. On your igloohome app, tap on 2. Select [Auto Lock Timer] 3. Select from the list of preset durations, or customise the number of seconds, Auto Lock or choose to never automatically lock. - Page 32 *Please ensure you are within Bluetooth range of the lock and your Bluetooth func- tion is turned on. Volume Control 1. On your igloohome app, tap on 2. Select [Volume]. 3. Select the volume level from 0 to 5 (softest to loudest).
-
Page 33: Manage Lock Settings
*Please ensure you are within Bluetooth range of the lock and your Bluetooth function is turned on. Delete Lock 1. On your igloohome app, tap on 2. Select [Delete Lock]. 3. Follow the instructions shown on the pop-up and tap [Ok]. -
Page 34: View Activity Logs
You can keep track of all lock activities to ensure you’re letting the right ones in. 1. On your igloohome app, tap on You will see all PIN code activities from when you last synced the lock with your account, and all Bluetooth key access. -
Page 35: Emergency Jumpstart
2. While holding the 9V battery to the jumpstart, key in your PIN code on the keypad followed by the ‘Unlock’ icon Please ensure terminals of the 9V battery are in contact with the Jump Start contact points of the lock for 2 seconds to activate your Deadbolt 2S. -
Page 36: Physical Key
Physical Keys Unlocking Orientation 1. Insert the provided physcial key horizontally. 2. Turn the key in an anticlockwise direction to unlock. 3. To remove key, turn the key back to clockwise direction. Physical keys can only be inserted and removed in this exact same position. -
Page 37: Connect With Airbnb
• If the access mail has been sent, changing these details will only affect the next reservation. • Changing these details on the igloohome app does not update the check-in/check-out time on the listing on the Airbnb website. Disconnect Airbnb Should you prefer to generate PIN codes for your guests manually, you may disconnect your Airbnb listing from the igloohome home listing with the steps below. -
Page 38: Audio And Led Indications
Indications Bluetooth Connection ‘Unlock’ icon flashes Blue Successfully Unlocked 4 fast ascending tones after unlocked Successfully Locked 1 long beep after Deadbolt 2S is locked Incorrect PIN 4 short beeps Deleted PIN 3 sets of 4 short beeps Obstruction Alarm... -
Page 39: Intergrations
Integrations SmartThings This lock is supported on SmartThings. To learn how to use your smart lock with SmartThings visit igloohome.co/integrations/smartthings View the full SmartThings FAQ... -
Page 40: Troubleshooting
• Use the spare QR sticker that is provided in when it is supposed to lock. the Deadbolt 2S box. • Check the LH/RH toggle and ensure that it The lock is beeping loudly continuously is at the correct side. - Page 41 For enquiries go to: igloohome.co/support...
Need help?
Do you have a question about the Deadbolt 2S and is the answer not in the manual?
Questions and answers