
Related Manuals for Axminster AW405FS


Summary of Contents for Axminster AW405FS
- Page 1 Code 108360 Original Instructions AW405FS Scroll Saw AT: 05/12/2022 BOOK VERSION: 01...
-
Page 2: Table Of Contents
INDEX OF CONTENTS What’s Included General Note Introduction General Safety Instructions for 230V Machines Specific Safety Precautions for Scroll Saws Specification Assembly 06-07 Mounting the Scroll Saw Illustration and Parts Description 08-09 Setup and Adjustment 10-11 Operating Instructions 12-13 Changing the Blade 14-15-16 Maintenance 17-18... -
Page 3: What's Included
WHAT’S INCLUDED Quantity Item Part Model Number AW405FS 405mm Scroll Saw Blade Guard Pinless Blade ‘T’ Handle Hex Key Multi-Tool Kit Multi-Tool Flexi-Shaft with a 3.2mm Chuck 3.2mm Spanner Multi-Tool Shaft Locking Pin Instruction Manual Extraction port transport cover GENERAL NOTE... -
Page 4: Introduction
INTRODUCTION The AC405SS variable speed (550-1,600/min) scroll saw comes 254mm) with a 406mm (16”) throat, tilts to 45° for bevel with a powerful DC motor and can easily cope with cutting a cutting. The saw accepts pinned or plain end blades. The clamps wide variety of materials up to 50mm deep. -
Page 5: Specific Safety Precautions For Scroll Saws
10. Keep your fingers away from the blade. Use a push stick 19. Use ONLY approved replacement saw blades. Contact your as you near the end of the cut. local Axminster Tool Centre for advice. The use of inferior blades may increase the risk of injury. SPECIFICATION... -
Page 6: Assembly
ASSEMBLY Having unpacked your scroll saw and its accessories please dispose of any unwanted packaging properly. The cardboard packaging is biodegradable. PLEASE DISPOSE OF ANY UNWANTED PACKAGING PROPERLY. THE POLYTHENE, POLYSTYRENE AND CARD IS RECYCLABLE Your scroll saw is fully assembled, except for the Blade Guard assembly (B) and the hose for the blower. -
Page 7: Mounting The Scroll Saw
ASSEMBLY 3.2mm Collet chuck Shaft locking pin access hole MOUNTING THE SCROLL SAW It is strongly recommended that you mount the machine NOTE: Fretsaw Stand Only. You may need to add a larger to a workbench or to a purpose built scroll saw stand. sub-table (MDF or Plywood plate) to give extra support A pad between the saw and the workbench/stand is also to larger models. -
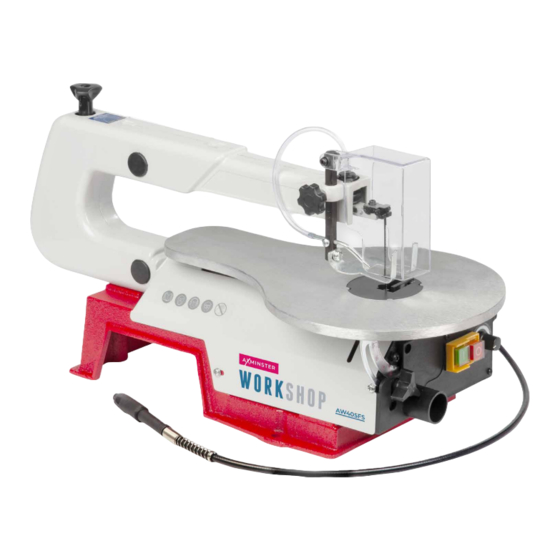
Page 8: Illustration And Parts Description
ILLUSTRATION AND PARTS DESCRIPTION Blade tensioning knob Rocker arm bearing Drop foot clamping knob access ports Drop foot assembly Blade guard Air blower nozzle Table insert Cast iron chassis NVR switch & variable speed control 35mm Dust Side access panel extraction port Table clamping knob Air hose... - Page 9 ILLUSTRATION AND PARTS DESCRIPTION NVR ON/OFF switch (A), Variable speed control (B) 0-45˚ Degrees scale & pointer 35mm dust extraction port (A), Table clamping star knob (B) Blade tensioning knob Air pump bellows Anti-kick back guide (A), Air blower nozzle (B), Upper blade holder cradle assembly (C)
-
Page 10: Setup And Adjustment
SETUP AND ADJUSTMENT The scroll saw comes with the blade assembled. Please Setting the Table follow the instruction below on how to tension your saw. 1. Place an engineer’s square on the table and position it up-against the blade, making sure that the square is not in Tensioning the Blade contact with any of the teeth. -
Page 11: Operating Instructions
SETUP AND ADJUSTMENT Setting the Anti-kick back guide Setting the Air Blower Nozzle Place your work on top of the work table and lower the Loosen the screw (A) holding the air blower nozzle and adjust anti-kick back guide by loosening the drop foot clamping knob. so its pointing towards the front of the blade, see fig 12-13. - Page 12 OPERATING INSTRUCTIONS Fig 14-15 DISCONNECT THE SCROLL SAW FROM THE MAINS SUPPLY! Fig 17 4. If you have finished using the scroll saw, clean above and below the work table and wipe the scroll saw over, see fig 17. 5. If the scroll saw is not going to be used for a period of time, use ‘Ambersil Dry PTFE Film Antistick’...
- Page 13 OPERATING INSTRUCTIONS 4. The teeth on the blade will wear out sooner or later. The CONNECT THE SCROLL SAW blade must therefore be replaced often to obtain the best TO THE MAINS SUPPLY! cutting results. A blade will stay sharp for half an hour to 2 hours of continuous running, depending on the material 2.
-
Page 14: Changing The Blade
CHANGING THE BLADE Standard Pin Blades DISCONNECT THE SCROLL SAW FROM THE MAINS BEFORE CONTINUING! 1. Turn the blade tensioning knob anti-clockwise to release tension on the blade and remove the table insert, see fig 21-22. Fig 21-22 lower blade holder 3. - Page 15 CHANGING THE BLADE 4. Clean both blade holders and remove any compacted crud 7. Make sure that the pins are seated correctly in both cradles before fitting a new blade. and nip up both blade holder caphead screws. Replace the table insert, see fig 31 and re-tension the blade as described 5.
- Page 16 CHANGING THE BLADE Notes on Saw Blades BLADES BREAK FOR FIVE PRINCIPAL REASONS 1. Too much tension or too little tension on the blade. Blade holder slot 2. Overworking the blade by feeding the work piece too fast. 3. Twisting or bending the blade by feeding the work piece off-centre.
-
Page 17: Maintenance
The motor is permanently lubricated. Do not try to oil the motor bearings or service any internal parts of the motor. If the power cord is worn, frayed, cut or damaged, contact Axminster Tools & Machinery. Do not try to patch it up with electrical tape, this NOTE: Be careful when removing the plug, the motor brush could lead to more trouble. - Page 18 MAINTENANCE Rocker Arm Bearing Bushes WARNING! WEAR A DUST MASK After a period of use it is recommended to lightly oil the upper AND EYE PROTECTION. and lower rocker arm bearings, see fig 45-46-47. Cleaning Fig 45-46-47 1. Remove the scroll saws side access panel and table insert plate.
-
Page 19: Troubleshooting
1. Unplug saw, replace defective parts. 2. Defective motor. 2. Repairs MUST be made by a qualified Motor will Not Run technician. Call Axminster Tool Centre. (Technical Sales Phone: 0800 371822). 1. Improper mounting of saw. 1. See proper mounting instructions. -
Page 20: Exploded Diagrams/Lists
EXPLODED DIAGRAMS/LISTS... - Page 21 EXPLODED DIAGRAMS/LISTS Description Specification Radial ball bearing with dust cover Philips screw M5X8 Hex nut Type I Flat washer Connecting block press- Side cover ing plate Hex nut, Type I Self tapping screw ST4.2X9.5 Standard spring washer Small cushion Base Hex cylindrical head M5X20 screw...
-
Page 22: Wiring Diagram
EXPLODED DIAGRAMS/LISTS Bearing 80018 Big pulley Circlip for hole Dust cover External Circlips Blast pipe Small pulley Philips screw M5X6 Pipe coupling Kits box Philips screw M5X12 Philips screw M4X12 Safety cover Strain relief Flexible shaft Flexible shaft wrench - type L Cover Flexible shaft Elastic cylindrical pin... -
Page 23: Declaration Of Conformity
‘original’ Product model: Axminster Tools AW405FS Scroll Saw Name and address of the manufacturer: Axminster Tool Centre Ltd, Unit 10 Weycroft Avenue, Axminster, Devon EX13 5PH, United Kingdom This declaration of conformity is issued under the sole responsibility of the manufacturer. - Page 24 ‘original’ Product model: Axminster Tools AW405FS Scroll Saw Name and address of the manufacturer: Axminster Tool Centre Ltd, Unit 10 Weycroft Avenue, Axminster, Devon EX13 5PH, United Kingdom This declaration of conformity is issued under the sole responsibility of the manufacturer.
- Page 28 The packaging is suitable for recycling. Please dispose of it in a responsible manner. EU Countries Only Do not dispose of electric tools together with household waste material. By law they must be collected and recycled separately. Axminster Tools, Axminster Devon EX13 5PH axminstertools.com...
Need help?
Do you have a question about the AW405FS and is the answer not in the manual?
Questions and answers