Table of Contents
Advertisement
Quick Links
Advertisement
Table of Contents

Related Manuals for Panasonic AV-UHS5M6G


Summary of Contents for Panasonic AV-UHS5M6G
- Page 1 Operating Instructions NDI I/F Unit AV-UHS5M6G Model No. Before operating this product, please read the instructions carefully and save this manual for future use. Please carefully read the “Read this first!” (pages 3 to 5) of this Manual before use.
- Page 2 Model number given in Model number of unit manual AV-UHS5M6 AV-UHS5M6G About copyright and licence AV-UHS500P AV-UHS500 AV-UHS500E Distributing, copying, disassembling, reverse compiling, reverse engineering, and also exporting in violation of export laws of the software provided with this unit are expressly prohibited.
-
Page 3: Read This First
FCC NOTICE (USA) Supplier’s Declaration of Conformity Model Number: AV-UHS5M6G Trade Name: Panasonic Responsible Party: Panasonic Corporation of North America Two Riverfront Plaza, Newark, NJ 07102 Support contact: 1-800-524-1448 This device complies with part 15 of the FCC Rules. Operation is subject to the following two conditions: (1) This device may not cause harmful interference, and (2) this device must accept any interference received, including interference that may cause undesired operation. - Page 4 4-1-62 Minoshima, Hakata-ku, Fukuoka 812-8531, Japan Importer: Panasonic Connect Europe GmbH Authorized Representative in EU: Panasonic Testing Centre Winsbergring 15, 22525 Hamburg, Germany Importer for UK: Panasonic Connect UK, a branch of Panasonic Connect Europe GmbH, Maxis 2, Western Road, Bracknell, Berkshire, RG12 1RT...
- Page 5 Read this first! ІНФОРМАЦІЯ ПРО ПІДТВЕРДЖЕННЯ ВІДПОВІДНОСТІ ПРОДУКТУ Виробник: Panasonic Connect Co., Ltd. Панасонік Коннект Ко., Лтд. Адреса виробника: Fukuoka, Japan Фукуока Японія Країна походження: Japan Японія Імпортер: ТОВ “ПАНАСОНІК УКРАЇНА ЛТД” Адреса Імпортера: вул. Васильківська, буд. 30, м. Київ 03022, Україна...
-
Page 6: Table Of Contents
Contents Read this first! ..........3 Recalling preset memories ..........28 Appearance ..........29 Before use ............ 7 Overview ................7 Specifications ..........30 Disclaimer of warranty ............ 7 Network security .............. 7 Setting menu table ........31 Precautions for use ........8 Features ............ -
Page 7: Before Use
If the unit is connected to equipment whose segments are different, events dependent upon the settings inherent IN NO EVENT SHALL Panasonic Connect Co., Ltd. BE to the network equipment, for instance, may occur so LIABLE TO ANY PARTY OR ANY PERSON, EXCEPT FOR... -
Page 8: Precautions For Use
Precautions for use p Handle carefully. p Precaution to be observed during production Do not drop the product, or subject it to strong shock or vibration. This is important to prevent malfunctioning or The image switching and image effect functions of accidents. -
Page 9: Installation And Connections
Installation and connections (Be sure to ask your dealer.) w How to install the unit SLOT A IN-A1, IN-A2, IN-A3, IN-A4, OUT-A1, OUT-A2 AV-UHS5M6 SLOT B IN-B1, IN-B2, IN-B3, IN-B4, OUT-B1, OUT-B2 Notes p p Before installing or removing the unit, turn off the power of AV-UHS500 and disconnect the power plug. p p Before touching this unit, touch some grounded metal to discharge any static electricity stored in your body. -
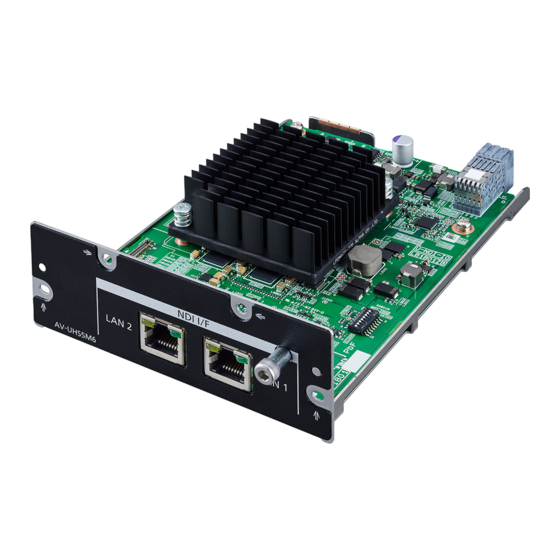
Page 10: Parts And Their Functions
Installation and connections (Be sure to ask your dealer.) 4 Secure this unit with the 4 screws. Clamping torque: 0.7 N•m Screw Screw 5 After connecting the necessary cables, plug the power cable into the power outlet, and turn on the power. Parts and their functions NDI I/F LAN 2... -
Page 11: List Of Functions
NDI from hereon. |HX version1 input ® A protocol developed by Panasonic is used to search for remote cameras and other image transmission devices that support NDI |HX. Only compatible with H.264. Audio is AAC ®... -
Page 12: Common Settings
Common settings Network interface settings Displaying the MAC address Make network settings required for the input and output of CONF 1 Press the button to light its indicator, and display NDI signals. the System menu. The system must be restarted for the settings to take effect. Turn off the main unit, then turn the main unit on again. -
Page 13: Version Information
Common settings Version information Updating the version Displays the software version information for the unit. It is possible to update the system core version of this unit. CONF CONF 1 Press the button to light its indicator, and display 1 Press the button to light its indicator, and display the System menu. -
Page 14: Settings Related To Input
Settings related to input The NDI/NDI|HX signals that can be input to this unit are as follows: Format Maximum inputs NDI/NDI|HX signals This is the maximum number of inputs when only NDI signals are input. Up to 2 NDI|HX signals can be mixed. NDI|HX input is not possible. -
Page 15: Checking The Input Signal Status
Settings related to input Checking the input signal status Setting the material names You can check the status of the NDI signal being input to this Material names can be given to the input signals. unit. These names can be selected from the default settings or user settings. -
Page 16: Setting Groups
Settings related to input Setting groups RTSP port settings By setting NDI senders and receivers in groups to which each You can set the port and the request URL of the AV-UHS500 belongs, you can specify the group to be searched when to match the RTSP port settings of the camera to be performing machine searches. -
Page 17: Settings Related To Output
Settings related to output The NDI signals that can be output by this unit are as follows: Format Maximum outputs NDI signals NDI High Bandwidth and Low Bandwidth are output constantly. NDI High Bandwidth and Low Bandwidth are output constantly. NDI|HX output is not possible. -
Page 18: Multicast Settings
Settings related to output Multicast settings Setting groups Set whether to enable or disable multicast transmission for By setting NDI senders and receivers in groups to which each the NDI receiver. belongs, you can specify the group to be searched when When multicast transmissions are to be enabled, performing machine searches. -
Page 19: Remote Camera Link Functions
Each AV-UHS500 unit can connect to a maximum of 4 remote cameras via NDI connection, and these can be remotely controlled. For compatibility with remote camera products that can be connected, refer to the AV-UHS500 page on the following website: https://pro-av.panasonic.net/en wpExamples of connections Remote camera (maximum 16, NDI connection only: maximum 8) -
Page 20: Checking The Remote Camera Connection Status
The name set on the remote camera is displayed. 5 Use [F2] to set the control method in the Connection item. Panasonic This is the conventional remote camera control method up to now. Refer to “Remote camera link functions” in the operating instructions for AV-UHS500. -
Page 21: Remote Camera Operation Direction Settings
Remote camera link functions 6 In the Focus Direction item, set the focus control Remote camera operation direction settings direction of the remote camera when [F4] on AV-UHS500 is used. The pan, tilt, zoom, focus, and iris of the remote cameras Normal Focus moves to the far side with a clockwise connected to AV-UHS500 can be controlled using the... -
Page 22: Selecting The Cameras To Be Operated
Remote camera link functions Selecting the cameras to be operated By connecting remote cameras to AV-UHS500, it is possible to control remote cameras from AV-UHS500 using the positioner and encoder. 1 Assign the remote cameras connected to XPT. Refer to “Remote camera control method settings” for information on how to assign. -
Page 23: Controlling In The Camera Control Screen
Remote camera link functions Controlling in the camera control screen When a remote camera has been connected to AV-UHS500, it is possible to control the camera whose input images are selected while displaying on the built-in display in the camera control screen. 1 With the AV-UHS500 and the remote camera connected, press the button. -
Page 24: Remote Camera Control Speed Settings
Remote camera link functions Remote camera lens control settings Remote camera control speed settings The following is a description of the operations in the camera Set the pan/tilt control, zoom control speed, focus control control screen. speed, and iris control speed of remote cameras connected to AV-UHS500. -
Page 25: Disabling Remote Camera Control
Remote camera link functions 6 Use [F5] to set the iris control and speed adjustment Disabling remote camera control control enable/disable of the remote camera in the Iris Lock item. Disable the control of pan/tilt, zoom, focus, and iris for remote Disable cameras connected to AV-UHS500. -
Page 26: Controlling In The Camera Preset Memory Screen
Remote camera link functions Controlling in the camera preset memory screen When a remote camera has been connected to AV-UHS500, it is possible to control the camera whose camera preset memory thumbnail images are selected while displaying on the built-in display in the camera preset screen. 1 Press the button. - Page 27 Remote camera link functions Input source information display The following information is displayed. The CAM bus source material name/Machine Name (Source Name) The name set on the remote camera is displayed in Machine Name (Source Name). Camera status Power On Normal situation...
-
Page 28: Recalling Preset Memories
Remote camera link functions Storing preset memories 1 Operate the button to make it turn amber. PMEM 2 Operate the button to make it turn red. STORE 3 Hold down the number key that corresponds to the preset memory to be stored to store. p Preset memories can be stored in number keys 1 to 10. -
Page 29: Appearance
Appearance Unit: mm (inch) 42 (1-21/32) 112 (4-13/32) 154 (6-1/16) 166 (6-17/32) -
Page 30: Specifications
Specifications Power supply: DC ( ) 12 V Supplied by AV-UHS500 indicates safety information. <LAN 1> and <LAN 2> Specifications Compatible with 1000Base-T, AUTO-MDIX, 2 lines* terminals p p Connectors: RJ-45×2, GbE p p Cable connections: LAN cable (we recommend CAT5e or better, STP (Shielded Twisted Pair), maximum 100 m (328 ft)) Supported formats High Bandwidth NDI/Low Bandwidth NDI/NDI|HX*... -
Page 31: Setting Menu Table
Setting menu table Sub menu Parameter 1 Parameter 2 Parameter 3 Parameter 4 Menu Use [F1] to select. Use [F2] to select. Use [F3] to select. Use [F4] to select. Use [F5] to select. Parameter System NDI I/F Slot A IP Address Subnet Mask Default... - Page 32 Parameter PTZ Control Connection Setting range Panasonic, NDI Default value Panasonic *1 p The X part shows IN-A1 to 4 and IN-B1 to 4. This becomes IN-A1 and IN-B1 for 4K. p The *** part shows the source name. (Can be up to 32 characters. “...” is shown at the end if it does not fit.)
- Page 33 Setting menu table Sub menu Parameter 1 Parameter 2 Parameter 3 Parameter 4 Menu Use [F1] to select. Use [F2] to select. Use [F3] to select. Use [F4] to select. Use [F5] to select. Parameter Input (NDI) / Name Type Name Copy From NDI X(***)
- Page 34 Setting menu table Sub menu Parameter 1 Parameter 2 Parameter 3 Parameter 4 Menu Use [F1] to select. Use [F2] to select. Use [F3] to select. Use [F4] to select. Use [F5] to select. Parameter Output (NDI) / Y Assign Source Setting range PGM, PVW,...
- Page 35 Setting menu table Sub menu Parameter 1 Parameter 2 Parameter 3 Parameter 4 Menu Use [F1] to select. Use [F2] to select. Use [F3] to select. Use [F4] to select. Use [F5] to select. Parameter Camera Camera Input Selection Name Model Status Information...
- Page 36 Web Site: https://pro-av.panasonic.net/en/ © Panasonic Connect Co., Ltd. 2022...
Need help?
Do you have a question about the AV-UHS5M6G and is the answer not in the manual?
Questions and answers