
Related Manuals for FSR DV-T6SS4K-41A


Summary of Contents for FSR DV-T6SS4K-41A
- Page 1 DV-T6SS4K-41A 4x1 Scaler Switcher 4K 60Hz HDMI 2.0 User Manual V1.0 244 Bergen Blvd Woodland Park NJ 07424 973-785-4347 www.fsrinc.com 43409 LIT1809 1 / 78...
- Page 2 Feature List 4 x HDMI video inputs: HDMI inputs support up to 4Kx2K@60Hz Supports multiple HDMI output resolutions, such as 4Kx2K@60Hz, 4Kx2K@30Hz and 1080P. Independent automatic or fixed scaler setting per input. HDCP 2.2 & 1.4 compliant. ...
-
Page 3: Table Of Contents
Front Panel ........................... 5 Rear Panel ............................ 7 Power Cord and Adapter ......................10 Installation ............................11 How to Connect the DV-T6SS4K-41A Multi-format Presentation Scaler Switcher .... 11 Wiring Diagram .......................... 12 Operating ..............................12 Display On/Off ..........................12 Video Source Selection Switch ...................... 14 Audio Selection Mode Switch ...................... - Page 4 Command List ..........................20 WEB Setting ............................. 51 General Settings ........................53 Advanced Settings ........................60 EDID Managemet ........................64 Standby Player ........................... 67 External Control ......................... 69 Update ............................74 Other ................................ 75 Factory Reset ........................... 75 F/W Update ............................76 Electrical Parameters ........................
-
Page 5: Getting Started
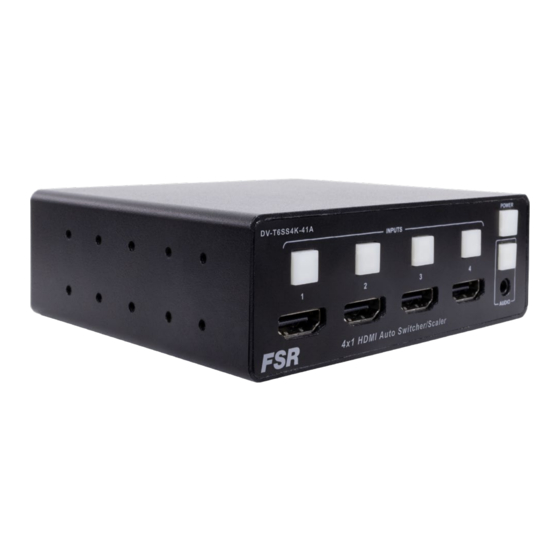
2019, July, 3rd Updated product design pictures 2020, June, 8 Updated product rear panel design 2020, June, 11 Updated command list Getting Started Panel Layout Front Panel 5 / 78... - Page 6 Name Description Turns the output on and off, sends out CEC and Serial Display On/Off display control commands if setup in the GUI. Input select buttons used to select inputs 1~4. The indicators Input Buttons and Indicator display the selected video audio input. HDMI input 1~4 HDMI video input connectors support four 4K 60Hz sources.
-
Page 7: Rear Panel
Rear Panel 7 / 78... - Page 8 Name Description Reset Restores the unit to the factory default setting. Connect an Ethernet cable between this jack and a LAN to use the web GUI or IP control. Refer to RS-232 and IP Configuration for more information on setting up IP control. USB port for upgrading or charging.
- Page 9 RS232 and IP Configuration for more information on setting up RS232 control. Analog stereo audio output, Connect a 3.5mm mini-stereo cable Line Out from this jack to the line-in jack of a multimedia system. Connect an HDMI cable from this port to an HDMI output HDMI display.
-
Page 10: Power Cord And Adapter
Power Cord and Adapter The DV-T6SS4K-41A multi-format presentation scaling switcher adopts international standard 12V AC-DC power adopter. Voltage: 12V, Max Current: 4A. Attention: A variety of different country specific plug adaptors are included with the standard package. 10 / 78... -
Page 11: Installation
Connect four 4K or HD HDMI sources to the input ports (HDMI 1 - HDMI 4) on the DV-T6SS4K-41A. Connect a 4K or HD display to the HDMI Output port on the DV-T6SS4K-41A. OPTIONAL: Connect analog audio to the audio line-in port on the DV-T6SS4K- 41A. -
Page 12: Wiring Diagram
Wiring Diagram Operating Display On/Off The “Power” button on the front panel, turns the DV-T6SS4K-41A output on and off and optionally will send an HDMI CEC turn-on or turn-off command or serial command to the display. 12 / 78... - Page 13 HDMI CEC turn-on command to the display; this is shown as follows. This indicator will turn off when the DV-T6SS4K-41A output is shut off and optionally sends an HDMI CEC turn-off command to the screen; this is shown as follows.
-
Page 14: Video Source Selection Switch
Video Source Selection Switch Use the INPUT buttons on the front panel or web GUI to switch between input source devices. HDMI 1 selected for output; this is shown as follows. Audio Selection Mode Switch Use AUDIO button on the front panel or web GUI to replace HDMI output audio with Analog source. -
Page 15: Output Resolution
Analog audio-in mode enabled, this is shown as follows. Embedded HDMI mode, this is shown as follows. Output Resolution HDMI output resolutions support multiple modes. Use the Web GUI to configure via the drop-down menu. Auto 15 / 78... - Page 16 3840x2160@60Hz 3840x2160@50Hz 3840x2160@30Hz 1920x1200@60Hz 1920x1080@60Hz 1920x1080@50Hz 1280x720@60Hz 1280x720@50Hz 1680x1050@60Hz 1600x1200@60Hz 1600x900@60Hz 1400x1050@60Hz 1400x900@60Hz 1366x768@60Hz 1360x768@60Hz 1280x1024@60H 1280x800@60Hz 1280x768@60Hz 1024x768@60Hz 800x600@60Hz 16 / 78...
-
Page 17: Advanced Settings
Auto means that it outputs the HDMI resolutions based on the EDID information read from the display device. Advanced Settings RS232 Setting RS-232 port: 17 / 78... - Page 18 RS-232 Device Switcher Connect to RXD, TXD, GND only RS232 Settings: Description Setting Baud rate 115200 Data bits Parity None Stop bits Hardware flow control None Notes: For more information about serial command, see the command list chapter. 18 / 78...
-
Page 19: Ip Setting
IP Setting The DV-T6SS4K-41A supports web control and TCP control. There are two methods to obtain the IP address: Obtain the IP address and port number via the information from the on-screen display (OSD). Send an RS232 command to obtain the IP address, for example, send RS232 commands like “... -
Page 20: Command List
The IP address is 192.168.1.150 and the port number is 23. Command List The DV-T6SS4K-41A can be controlled or operated through the commands from RS232 or TCP. Command head: # Length: <=255 Ending: 0x0D Band rate: default 115200,all commands are added to the end of the "<CR>“ (hex is 0x0D) - Page 21 <INPUT-SEL 1> input 1 was selected <INPUT-SEL 2> input 2 was selected get current input #INPUT-SEL? <INPUT-SEL 3> port which was <CR> input 3 was selected selected <INPUT-SEL 4> input 4 was selected <INPUT-SEL 5> input 5 was selected #INPUT-SEL #INPUT-SEL select input port <INPUT-SEL 1>...
- Page 22 video on output is disable <VID-MUTE 1> video on output is enable <VID-MUTE 2> output video is force set to black video #VID-MUTE disable video on <VID-MUTE 0> 0<CR> output #VID-MUTE enable video on <VID-MUTE 1> 1<CR> output #VID-MUTE black video force <VID-MUTE 2>...
- Page 23 <AUD-MUTE 1> HDMI output audio is #AUD-MUTE? get audio mute disable <CR> status <AUD-MUTE 0> HDMI output audio is enables #AUD-MUTE set HDMI output #AUD-MUTE audio on(audio <AUD-MUTE 0> 0<CR> output) set HDMI output #AUD-MUTE audio off(no audio <AUD-MUTE 1> 1<CR>...
- Page 24 auto(hdmi->analo set audio mode #AUD-PRI-MOD on embedded <AUD-PRI-MOD 1> 1<CR> hdmi #AUD-PRI-MOD set audio mode <AUD-PRI-MOD 2> 2<CR> on analog audio a response will be sent <INPUT-SIGNAL 1,0> after every signal locked of change, #INPUT-SIGNAL? check signal lock input 1 input signal 1<CR>...
- Page 25 <INPUT-SIGNAL 3,0> signal locked of #INPUT-SIGNAL? check signal lock input 3 3<CR> or not of input 3 <INPUT-SIGNAL 3,1> signal no lock of input 3 <INPUT-SIGNAL 4,0> signal locked of #INPUT-SIGNAL? check signal lock input 4 4<CR> or not of input 4 <INPUT-SIGNAL 4,1>...
- Page 26 get current #BOTTOM- <BOTTOM-BANNER 0: disable bottom banner BANNER? <CR> 0> 1: enable status #BOTTOM- #BOTTOM- set bottom banner <BOTTOM-BANNER BANNER BANNER 0<CR> 0> #BOTTOM- set bottom banner <BOTTOM-BANNER BANNER 1<CR> 1> Standby Player On/Off Control #STANDBY- get current <STANDBY- 0: disable PLAYER-FUNC? standby player...
- Page 27 #MP-P-TIMER? get photo play <MP-P-TIMER 5> default is 5s <CR> time to next photo #MP-P-TIMER set photo play min force <MP-P-TIMER 5> 5<CR> time to next to 5S set to 3s set photo play #MP-P-TIMER #MP-P-TIMER time to next to <MP-P-TIMER 10>...
- Page 28 #CEC-FUNC set current CEC <CEC-FUNC 0> 0<CR> #CEC-FUNC set current CEC <CEC-FUNC 1> 1<CR> CEC Standby Delay Time Control #CEC-STANDBY- get CEC standby <CEC-STANDBY- default is TIME? <CR> time TIME 5> #CEC-STANDBY- set CEC standby <CEC-STANDBY- min force #CEC- TIME 5<CR> time to 5s TIME 5>...
- Page 29 #DATA-PORT- set current data <DATA-PORT-CMD CMD 0<CR> port command off 0> #DATA-PORT- set current data <DATA-PORT-CMD CMD 1<CR> port command on 1> Baud rate Control get current baud #CTRL-BAUD- <CTRL-BAUD-RATE rate of control RATE? <CR> 115200> port <CTRL-BAUD-RATE get support list of #CTRL-BAUD- 9600,14400,19200,28 baud rate of...
- Page 30 set control serial #CTRL-BAUD- <CTRL-BAUD-RATE port baud rate to RATE 28800<CR> 28800> 28800 set control serial #CTRL-BAUD- <CTRL-BAUD-RATE port baud rate to RATE 38400<CR> 38400> 38400 set control serial #CTRL-BAUD- <CTRL-BAUD-RATE port baud rate to RATE 57600<CR> 57600> 57600 #CTRL-BAUD- set control serial <CTRL-BAUD-RATE RATE...
- Page 31 set data serial #DATA-BAUD- <DATA-BAUD-RATE port baud rate to RATE 9600<CR> 9600> 9600 set data serial #DATA-BAUD- <DATA-BAUD-RATE port baud rate to RATE 19200<CR> 19200> 19200 set data serial #DATA-BAUD- <DATA-BAUD-RATE port baud rate to RATE 38400<CR> 38400> 38400 set data serial #DATA-BAUD- <DATA-BAUD-RATE port baud rate to...
- Page 32 <HDCP-SUPPORT 0,2,1> #HDCP- get HDCP mode input2 HDCP is on SUPPORT? of input 2 <HDCP-SUPPORT 0,2<CR> 0,2,0> input2 HDCP is off <HDCP-SUPPORT 0,3,1> #HDCP- get HDCP mode input3 HDCP is on SUPPORT? of input 3 <HDCP-SUPPORT 0,3<CR> 0,3,0> input3 HDCP is off <HDCP-SUPPORT 0,4,1>...
- Page 33 <HDCP-SUPPORT 0,2,1> #HDCP-SUPPORT 0,2,1<CR> set HDCP mode of set HDCP to on #HDCP-SUPPORT input 2 to on/off <HDCP-SUPPORT 0,2,0<CR> 0,2,0> set HDCP to off <HDCP-SUPPORT #HDCP-SUPPORT 0,3,1> 0,3,1<CR> set HDCP mode of Set HDCP to on #HDCP-SUPPORT input 3 to on/off <HDCP-SUPPORT 0,3,0<CR>...
- Page 34 HDCP key <HDCP-STAT 1,1,0> output HDMI data no encrypted <HDCP-STAT 1,1,1> input 1 HDMI data encrypted with #HDCP-STAT? get HDCP encrypt HDCP key 0,1<CR> status of input 1 <HDCP-STAT 1,1,0> input 1 HDMI data no encrypted <HDCP-STAT 1,1,1> input 2 HDMI data encrypted with #HDCP-STAT? get HDCP encrypt...
- Page 35 input 3 HDMI data no encrypted <HDCP-STAT 1,1,1> input 4 HDMI data encrypted with #HDCP-STAT? get HDCP encrypt HDCP key 0,4<CR> status of input 4 <HDCP-STAT 1,1,0> input 4 HDMI data no encrypted Output Resolution Control <OUTPUT-RES 3> pls check: get current output #OUTPUT-RES? current output...
- Page 36 Network Configuration Commands <NET-PORT TCP,23> #NET-PORT? get TCP port current TCP port TCP<CR> number number is 23 set TCP port #NET-PORT #NET-PORT TCP number x<CR> port number <NET-PORT TCP,23> #NET-PORT TCP (1~65535) except 23<CR> port 80 <NET-CONFIG-ALL #NET-CONFIG- #NET-CONFIG- get ethernet IP, 192.168.1.150,255.25 ALL? <CR>...
- Page 37 #NET-CONFIG- set DHCP mode <NET-CONFIG-DHCP DHCP 0<CR> 0> #NET-CONFIG- Set DHCP mode <NET-CONFIG-DHCP DHCP 1<CR> 1> #NET-CONFIG-IP? <NET-CONFIG-IP get IP address <CR> 192.168.1.150> #NET-CONFIG-IP #NET-CONFIG- xxx.xxx.xxx.xxx< CR> set IP address x: <NET-CONFIG-IP #NET-CONFIG-IP 192.168.003.123> 192.168.003.123< CR> #NET-CONFIG- <NET-CONFIG-MASK get subnet mask MASK? <CR>...
- Page 38 #NET-CONFIG- <NET-CONFIG-GATE get gateway IP GATE? <CR> 192.168.1.1> #NET-CONFIG- GATE #NET-CONFIG- xxx.xxx.xxx.xxx< GATE set gateway IP x: <NET-CONFIG-GATE CR> 192.168.3.1> #NET-CONFIG- GATE 192.168.3.1<CR> Copy EDID to input 1 copy EDID to #COPY-EDID #COPY-EDID input 1 from HDMI <COPY-EDID 1,1,0,1> 1,1,0,1<CR> output copy EDID to default EDID...
- Page 39 copy EDID to default EDID #COPY-EDID input 1 from <COPY-EDID 2,3,0,1> 3 is HDMI 2,3,0,1<CR> default EDID 3 4k_2k_60hz copy EDID to #COPY-EDID input 1 from <COPY-EDID 3,1,0,1> 3,1,0,1<CR> customer EDID 1 copy EDID to #COPY-EDID input 1 from <COPY-EDID 3,2,0,1> 3,2,0,1<CR>...
- Page 40 copy EDID to #COPY-EDID input 2 from HDMI <COPY-EDID 1,1,0,2> #COPY-EDID 1,1,0,2<CR> output copy EDID to default EDID #COPY-EDID input 2 from <COPY-EDID 2,1,0,2> 1 is VGA 2,1,0,2<CR> default EDID 1 1080p copy EDID to default EDID #COPY-EDID #COPY-EDID input 2 from <COPY-EDID 2,2,0,2>...
- Page 41 copy EDID to #COPY-EDID input 2 from <COPY-EDID 3,4,0,2> 3,4,0,2<CR> customer EDID 4 copy EDID to #COPY-EDID input 2 from <COPY-EDID 3,5,0,2> 3,5,0,2<CR> customer EDID 5 Copy EDID to input 3 copy EDID to #COPY-EDID #COPY-EDID input 3 from HDMI <COPY-EDID 1,1,0,3>...
- Page 42 copy EDID to #COPY-EDID input 3 from <COPY-EDID 3,1,0,3> 3,1,0,3<CR> customer EDID 1 copy EDID to #COPY-EDID input 3 from <COPY-EDID 3,2,0,3> 3,2,0,3<CR> customer EDID 2 copy EDID to #COPY-EDID #COPY-EDID input 3 from <COPY-EDID 3,3,0,3> 3,3,0,3<CR> customer EDID 3 copy EDID to #COPY-EDID input 3 from...
- Page 43 copy EDID to default EDID #COPY-EDID input 4 from <COPY-EDID 2,1,0,4> 1 is VGA 2,1,0,4<CR> default EDID 1 1080p copy EDID to default EDID #COPY-EDID #COPY-EDID input 4 from <COPY-EDID 2,2,0,4> 2 is HDMI 2,2,0,4<CR> default EDID 2 4k_2k_30hz copy EDID to default EDID #COPY-EDID input 4 from...
- Page 44 copy EDID to #COPY-EDID input 4 from <COPY-EDID 3,5,0,4> 3,5,0,4<CR> customer EDID 5 Copy EDID to customer 1 copy EDID to #COPY-EDID customer 1 from <COPY-EDID 0,1,3,1> 0,1,3,1<CR> input EDID 1 copy EDID to #COPY-EDID customer 1 from <COPY-EDID 0,2,3,1> 0,2,3,1<CR>...
- Page 45 copy EDID to #COPY-EDID customer 1 from <COPY-EDID 1,1,3,1> #COPY-EDID 1,1,3,1<CR> HDMI output copy EDID to default EDID #COPY-EDID customer 1 from <COPY-EDID 2,1,3,1> 1 is VGA 2,1,3,1<CR> default EDID 1 1080p copy EDID to default EDID #COPY-EDID #COPY-EDID customer 1 from <COPY-EDID 2,2,3,1>...
- Page 46 copy EDID to #COPY-EDID customer 2 from <COPY-EDID 0,3,3,2> 0,3,3,2<CR> input EDID 3 copy EDID to #COPY-EDID customer 2 from <COPY-EDID 0,4,3,2> 0,4,3,2<CR> input EDID 4 copy EDID to #COPY-EDID customer 2 from <COPY-EDID 0,5,3,2> 0,5,3,2<CR> input EDID 5 copy EDID to #COPY-EDID #COPY-EDID customer 2 from...
- Page 47 Copy EDID to customer 3 copy EDID to #COPY-EDID customer 3 from <COPY-EDID 0,1,3,3> 0,1,3,3<CR> input EDID 1 copy EDID to #COPY-EDID customer 3 from <COPY-EDID 0,2,3,3> 0,2,3,3<CR> input EDID 2 copy EDID to #COPY-EDID #COPY-EDID customer 3 from <COPY-EDID 0,3,3,3> 0,3,3,3<CR>...
- Page 48 copy EDID to default EDID #COPY-EDID customer 3 from <COPY-EDID 2,1,3,3> 1 is VGA 2,1,3,3<CR> default EDID 1 1080p copy EDID to default EDID #COPY-EDID #COPY-EDID customer 3 from <COPY-EDID 2,2,3,3> 2 is HDMI 2,2,3,3<CR> default EDID 2 4k_2k_30hz copy EDID to default EDID #COPY-EDID customer 3 from...
- Page 49 copy EDID to #COPY-EDID customer 4 from <COPY-EDID 0,4,3,4> 0,4,3,4<CR> input EDID 4 copy EDID to #COPY-EDID customer 4 from <COPY-EDID 0,5,3,4> 0,5,3,4<CR> input EDID 5 copy EDID to #COPY-EDID #COPY-EDID customer 4 from <COPY-EDID 1,1,3,4> 1,1,3,4<CR> HDMI output copy EDID to default EDID #COPY-EDID customer 4 from...
- Page 50 copy EDID to #COPY-EDID customer 5 from <COPY-EDID 0,1,3,5> 0,1,3,5<CR> input EDID 1 copy EDID to #COPY-EDID customer 5 from <COPY-EDID 0,2,3,5> 0,2,3,5<CR> input EDID 2 copy EDID to #COPY-EDID #COPY-EDID customer 5 from <COPY-EDID 0,3,3,5> 0,3,3,5<CR> input EDID 3 copy EDID to #COPY-EDID customer 5 from...
-
Page 51: Web Setting
2,3,3,5<CR> default EDID 3 4k_2k_60hz Upload EDID only WEB GUI support upload EDID to input1~4 or custormer1~5 WEB GUI Setting and Control The DV-T6SS4K-41A can be controlled via web browser, which contains General Advanced EDID Standby Player ... - Page 52 After the cables are connected, the IP address is obtained and the IP address is entered in the web browser, the DV-T6SS4K-41A can now be controlled. For more information about how to obtain the IP address, see the chapter IP Setting above.
-
Page 53: General Settings
Password: Admin (Attention: case sensitive) General Settings Contains the following options. Video Audio Other 53 / 78... - Page 54 Video Video selection ranges from 1 to 4, corresponding to the four video inputs. Select the related parameters and click the input button for it to take effect. 54 / 78...
- Page 55 Video output resolution drop-down if used, will change the DV-T6SS4K-41A scaling switcher HDMI output resolution. User can select the output resolution from the resolutions listed below: Auto 3840x2160_60 3840_2160_50 3840_2160_30 1920_1200_60 1920_1080_60 1920_1080_50 1280_720_60 1280_720_50 1680_1050_60 1600_1200_60 1600_900_60 1400_1050_60 1440_900_60...
- Page 56 1366_768_60 1360_768_60 1280_1024_60 1280_800_60 1280_768_60 1024_768_60 800_600_60 User can select the video switching mode, including Manual Auto: Last-connect switch 56 / 78...
- Page 57 Auto: Auto-Scan Priority When Manual is selected, the DV-T6SS4K-41A switches according to the manually selection, for instance pushing the front panel button, or web page input selection button, etc. When Auto: Last-connect switch is selected and when the current input signal is lost the DV- T6SS4K-41A will switch to the prior video input which was auto selected by the DV-T6SS4K- 41A.
- Page 58 Video auto-switching priority is a user configurable list. The user can drag-and-drop the button to change the order. The higher priority input source shows on the top. 2. Audio Volume Control ranges from 0-100. 90 is the default by-pass level or unity gain. User can select the analog or HDMI audio mode Embedded HDMI ...
- Page 59 HDMI output port and the audio line out port. Note: The front panel buttons override the Web GUI settings. Other Model: model name Series number: the production series number Mac address: the mac address of the DV-T6SS4K-41A scaling switcher. 59 / 78...
-
Page 60: Advanced Settings
Advanced Settings Contain the following options. OSD (on-screen display) control HDCP Support Network Serial Port Authentication Other 60 / 78... - Page 61 OSD Control Set the bottom banner switch, turning on will show the bottom banner and turning off will hide the bottom banner. HDCP Support Set the input HDCP switch, turning it on means it will support HDCP and turning it off will turn off HDCP.
- Page 62 Network The Ethernet setting includes DHCP: set DHCP or static IP IP Address: Enter the IP address when DHCP is set OFF. Mask Address: as appointed Gateway address: as appointed TCP port: configurable TCP port for communication with the scaler switcher. 62 / 78...
- Page 63 Serial Port Serial control port setting. Default baud rate is 115200. Authentication 63 / 78...
-
Page 64: Edid Managemet
Authentication is used to change the setting of the login password. Click the “ ON” or “ OFF” selector to enable or disable the login password to access the web setting page. The password can also be changed at this point. Enter the old password, then enter the new password, retype new password again and click the “... - Page 65 EDID Copy: Select each EDID from the list, to be assigned to each HDMI input. The EDID list includes 65 / 78...
- Page 66 One output EDID packet. Default three EDID packets, including 1080P, 4Kx2K@30Hz, 4Kx2K@60Hz. Five custom EDID packets. EDID Upload: Upload an EDID file from the web GUI to the five custom EDIDs. EDID Download: Select EDID file to download (Left-click or Right-click and save target / link as...) 66 / 78...
-
Page 67: Standby Player
Standby Player Standby Player Control Standby player and CEC are mutually exclusive, if you want to use the standby player function, then you must turn off the CEC function. 67 / 78... - Page 68 Standby Player Settings Play Mode: the following content cannot be edited. Pause Mode: the following content can be edited. 68 / 78...
-
Page 69: External Control
Current play mode contains image and video; the image play interval time can only be adjusted in image mode. The range is 3-254(sec). Add content: you can upload video and image files from the web page to the player. The file size limit is 40M. - Page 70 Data Port Serial Commands 70 / 78...
- Page 71 Any of the three actions trigger the CEC turn-on command, including • Powering on the unit. • Switching the inputs. • New active source connected. No active signal on current input in manual mode or no video found in the last connected or scan modes will trigger the CEC turn-off command.
- Page 72 In the data port serial setting you can set the parity, data bits, flow control, baud rate and stop bits. For the DV-T6SS4K-41A, currently only the baud rate is configurable. Users can select the needed baud rate from the drop-down list. After selecting the related parameters and clicking the save button the changes will take effect.
- Page 73 DV-T6SS4K-41A to control another third-party device upon the receipt of the trigger command. By pre-storing the “ Command” , “ Delay” time (seconds), and the “ Enable” , the DV-T6SS4K-41A will send the “ Command” through the RS232 data port, after the “ Delay” time upon the receipt of the “...
-
Page 74: Update
Update Update page 74 / 78... -
Page 75: Other
The FW file includes both firmware and web page updates. The user can store the update files on their PC and then click “ Choose File” to upload the file to the DV-T6SS4K-41A. Click update to start the progress. The unit will automatically update and reboot. This function is browser dependent and you may need to try multiple browsers based on your specific PC. -
Page 76: F/W Update
1. Connect the DV-T6SS4K-41A to a display device. 2. Copy the “update.bin” to the PC. 3. Connect the PC to the DV-T6SS4K-41A, enter the webpage for the DV-T6SS4K-41A, and select the update page to select the stored “update.bin” to start the upgrade. -
Page 77: Electrical Parameters
Electrical Parameters Specifications Supported Formats • 3840x2160 @60Hz (4K x 2K Resolutions (max.) @60Hz) Electrical Video Select Buttons • 4 x Tact-type, backlight Inputs Select Buttons • 4 x Tact-type, backlight Connectors Video Input • 4 x HDMI Type A 19-pin, female, Video Output •... - Page 78 Dimensions (W x H x D) • 111.0mm x 35.2mm x 111.0mm Unit Weight • 3.3 LBS (1.5 kg) CONTACT INFORMATION FSR INC. 244 Bergen Blvd. Woodland Park, NJ 07424 Phone: (973) 785-4347 Order Desk Fax: (973) 785-4207 E-mail: sales@fsrinc.com Web Site: http://www.fsrinc.com...
Need help?
Do you have a question about the DV-T6SS4K-41A and is the answer not in the manual?
Questions and answers