Table of Contents
Advertisement
Quick Links
Neon
NxT Electroporation System
™
USER GUIDE
For electroporation of mammalian cells, including primary and
stem cells, with high transfection efficiency
Catalog Numbers NEON1, NEON1SK, NEON1P, NEON1PS
Publication Number MAN0026677
Revision A.0
For Research Use Only. Not for use in diagnostic procedures.
Advertisement
Table of Contents

Related Manuals for ThermoFisher Scientific Invitrogen NEON1


Summary of Contents for ThermoFisher Scientific Invitrogen NEON1
- Page 1 Neon NxT Electroporation System ™ USER GUIDE For electroporation of mammalian cells, including primary and stem cells, with high transfection efficiency Catalog Numbers NEON1, NEON1SK, NEON1P, NEON1PS Publication Number MAN0026677 Revision A.0 For Research Use Only. Not for use in diagnostic procedures.
- Page 2 Life Technologies Holdings Pte Ltd | Block 33 | Marsiling Industrial Estate Road 3 | #07-06, Singapore 739256 For descriptions of symbols on product labels or product documents, go to thermofisher.com/symbols-definition. Revision history: Pub. No. MAN0026677 Revision Date Description 22 March 2023 New product manual for the Neon NxT Electroporation System.
-
Page 3: Table Of Contents
Contents ■ CHAPTER 1 Product information ..........6 Product description . - Page 4 Contents ■ CHAPTER 2 Methods ............. 28 Electroporation protocol options .
- Page 5 Contents ■ APPENDIX C Recommended instrument settings ......61 About Instrument ............. . 61 Recommended instrument settings .
-
Page 6: Chapter 1 Product Information
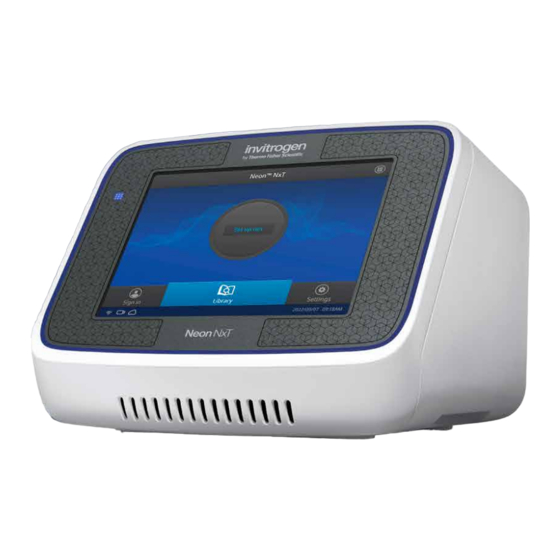
Product information Product description The Neon NxT Electroporation System is a benchtop electroporation device that employs an ™ electroporation technology which uses a pipette tip as an electroporation chamber to efficiently transfect mammalian cells including primary and immortalized hematopoietic cells, stem cells, and primary cells. -
Page 7: Features
Chapter 1 Product information Product contents Features Important features of the Neon NxT Electroporation System are listed below: ™ • Small footprint—the benchtop design fits inside a tissue culture hood, reducing contamination risk. • Preserves samples—minimize sample transfer loss with the complete elimination of an electroporation cuvette and associated pipetting steps. -
Page 8: Neon ™ Nxt Kit Contents
Chapter 1 Product information Product contents Neon NxT Kit contents ™ Neon NxT Kits are used with the Neon NxT Electroporation System for efficient transfection of ™ ™ mammalian cells and are available as standalone products (see “Accessory products” page 70). The kits consist of two components which are not sold individually (a Tips/Tubes Kit, and a Buffer Kit), and are available in two formats (for electroporation of 10 µL samples, and 100 µL samples). -
Page 9: System Components
Chapter 1 Product information System components System components Neon NxT device ™ The electrical parameters of the Neon NxT device are factory set and do not require calibration. It is ™ used with the Neon NxT Pipette Station and Neon NxT Kits to efficiently transfect mammalian cells ™... -
Page 10: Neon ™ Nxt Pipette Station
Chapter 1 Product information System components LED status indicators LED color Status Blue Instrument is idle. Green Instrument is in operation. Blinking green Instrument high voltage subsystem in operation. Blinking amber Warning/error About the covered ports Do not access the covered ports at the rear of the device during electroporation. The ports should remain covered during the protocol, and should only be accessed when the device is in idle mode. -
Page 11: Neon ™ Nxt Pipette
Chapter 1 Product information System components Neon NxT Pipette ™ The Neon NxT Pipette utilizes a positive displacement ™ pipette mechanism for pipetting mixtures containing cells and payload (such as nucleic acid). The Neon NxT Pipette ™ is a fixed volume pipette and permanently calibrated at the manufacturing stage and does not require any further calibration. -
Page 12: Neon ™ Nxt Tube
Chapter 1 Product information Upon receiving the device Neon NxT Tube ™ The Neon NxT Tube holds electrolytic buffer during ™ electroporation and is inserted into the Neon NxT Pipette ™ Station. The Neon NxT Pipette with the Neon NxT Tip ™ ™... -
Page 13: Getting Started
Chapter 1 Product information Getting started Getting started Set up the Neon NxT Electroporation System ™ 1. Unpack the Neon NxT Electroporation System as described in “Unpacking instructions” ™ page 12. 2. Place the Neon NxT device on a level laboratory bench. Keep an area of free space at least 10 ™... - Page 14 Chapter 1 Product information Getting started 5. Connect the high voltage and low voltage interface connectors on the Neon NxT Pipette Station ™ to high voltage and low voltage interface ports at the rear of the Neon NxT device. ™ Be sure to align the ridge on the connector of the cable with the groove on the port of the Neon ™...
- Page 15 Chapter 1 Product information Getting started 7. Attach the power cord to the AC inlet at the rear of the Neon NxT device, then plug the cord into ™ an electrical outlet. Use only properly grounded AC outlets and power cords. The instrument operates at voltages of 100–240 VAC and the frequency range of 50/60 Hz. Ensure that the local supply voltage in the laboratory conforms to that specified on the type label on the back of the instrument 8.
-
Page 16: User Interface Overview
Chapter 1 Product information Getting started User interface overview Symbol Function Main dial • Set up run • Select a protocol or plate map • Create a new protocol (see “Create or edit protocols” on page 29 for more details) • Create a new plate map (see “Create or edit plate maps” on page 31 for more details) Displays the instrument status when a protocol is run (see “Touchscreen status indicators”... - Page 17 Chapter 1 Product information Getting started Touchscreen status indicators Table 2 Status indicators Button Function Indicates whether a USB device is inserted into the instrument. Indicates whether the Wi-Fi is on or off. Indicates whether the instrument is connected to wired network. Indicates whether the instrument is connected to the Thermo Fisher Connect Platform.
- Page 18 Chapter 1 Product information Getting started Enter numbers When you press a field that requires a numerical input, the numeric editor, as seen in the following figure, opens. Enter a number Close and save Delete/backspace Close without saving Neon NxT Electroporation System User Guide ™...
-
Page 19: Connect The Instrument To The Internet
Chapter 1 Product information Getting started Connect the instrument to the Internet The instrument can connect to the Internet by either wired or wireless methods. To connect by wired method through the instrument Ethernet port using a cable, see “Set up a wired connection”... - Page 20 Chapter 1 Product information Getting started 3. In the Instrument Settings screen, select Network configuration. 4. In the Network Connection screen, select a field in the Wired panel. Wireless panel Wired panel 5. Select a method to enter an IP address. a. Select DHCP to obtain an IP address automatically. A check mark appears when DHCP is selected.
- Page 21 Chapter 1 Product information Getting started b. Select Static IP to enter an IP address manually, then enter the appropriate IP addresses for the instrument, the Subnet Mask, and, optionally, the Default Gateway, the Primary DNS Server, and the Secondary DNS Server using the numeric editor. Addresses are in the form of X.X.X.X, where each X is a 3- digit number, from 001 to 255.
- Page 22 Chapter 1 Product information Getting started Set up a wireless connection Connect the High-Power USB Wi-Fi Module (Cat. No. A26774 to the USB wireless adapter port (see “Front and rear view” on page 9 for port location). 1. See “Set up a wired connection” on page 19 Steps 1 through 3 to find the Network configuration screen.
-
Page 23: Create A User Profile On The Instrument
Chapter 1 Product information Getting started • Open • WPA2 Personal • WEP • WPA Enterprise • WPA Personal • WPA2 Enterprise Note: The above options are available only if Join Other Network was selected in Step 3. You cannot change the security type if you selected an existing network. 6. - Page 24 Chapter 1 Product information Getting started Change a user PIN 1. Select Edit. 2. Enter the old PIN. 3. Enter a new four digit PIN. 4. Re-enter the new PIN, then select Done Delete a user PIN If a user PIN is forgotten, an administrator can delete the existing PIN to allow a new one to be created. This function resets a PIN, so the user with a deleted PIN is prompted to create a new PIN the next time they sign in) 1.
-
Page 25: About The Thermo Fisher ™ Connect Platform
Chapter 1 Product information About the Thermo Fisher Connect Platform ™ About the Thermo Fisher Connect Platform ™ The Thermo Fisher Connect Platform enables access to the Neon NxT device through ™ ™ InstrumentConnect by way of a web browser or mobile device. This cloud-based tool allows the user to perform the following functions when the instrument has Internet connectivity. -
Page 26: Set Up A New Administrator
Chapter 1 Product information About the Thermo Fisher Connect Platform ™ Set up a new administrator 1. To set up a new adminstrator, log in to current administrator Connect Platform account. 2. Select Instruments 3. Select the Neon NxT device for the current administrator. ™... - Page 27 Chapter 1 Product information About the Thermo Fisher Connect Platform ™ Add an instrument to your Connect account (PC) 1. Log in to your Connect account using a web browser. 2. Select (InstrumentConnect) from the left navigation strip. 3. Select (Add an Instrument) from the top navigation strip. 4.
-
Page 28: Chapter 2 Methods
Methods Electroporation protocol options If a protocol with the necessary electroporation parameters for your cell type already exists, the protocol can be chosen from the Protocol Library by selecting Library4Protocol Library. • The Protocol Library contains a list of all available protocols stored on the instrument. Swipe up or down in the list pane to scroll through the protocols. -
Page 29: Create Or Edit Protocols
Chapter 2 Methods Create or edit protocols The individual parameters (voltage, pulse width, pulse number) have their own independent upper limits. However, some combinations of these variables can exceed the energy limit of the system even if still within the individual limit. For example, a protocol of 2300 V/30 ms/3-pulses has all variables within acceptable limits, but cannot be run as it exceeds the energy limit of the system. -
Page 30: Edit A Protocol
Chapter 2 Methods Create or edit protocols Edit a protocol 1. In the Home screen, select Set up run4Quick run, or select Library. 2. Select a text field or open a dropdown menu to set the electroporation parameters for the protocol. 3. Select Save protocol (see “Save a Protocol” page 30), Electroporate to run the protocol, or Cancel. -
Page 31: Create Or Edit Plate Maps
Chapter 2 Methods Create or edit plate maps Create or edit plate maps Plate maps are used to plan out how cells are plated after electroportation. Fill the wells where cells will be plated with the appropriate cell culture media. Create a plate map A plate map is created from the plate view. -
Page 32: Edit A Plate Map
Chapter 2 Methods Create or edit plate maps d. Select Done to assign a protocol to the selected wells. 6. Select Save plate (see “Save a Protocol” page 30), , or . a. Select Save plate (see “Save a Protocol” page 30). b. Select Next to proceed to electroporation. c. -
Page 33: Save A Plate Map
Chapter 2 Methods Manage protocols 4. Select Save protocol (see “Save a Protocol” page 30), Clear,Cancel, or Done. 5. Select Save plate (see “Save a Protocol” page 30), Next, Cancel, or Actions. Save a plate map 1. Once edits to a protocol are complete, select Save to save the plate map. 2. - Page 34 Chapter 2 Methods Manage protocols Import a protocol 1. Select Library4Import. 2. Select the location from which the files will be imported (Thermo Fisher Connect Platform, USB ™ drive, network drive) Note: To make a network drive connection, see “Set up or change a network drive connection” page 36.
- Page 35 Chapter 2 Methods Manage protocols 3. Select the protocols to import, then select Import. Export a protocol 1. Select Library4Protocol Library, then select the protocols to be exported. Neon NxT Electroporation System User Guide ™...
- Page 36 Chapter 2 Methods Manage protocols 2. Select Export, then select the destination for the files to be exported (Thermo Fisher Connect ™ Platform, USB drive, network drive) Note: To make a network drive connection, see “Set up or change a network drive connection” page 36.
-
Page 37: General Guidelines
Chapter 2 Methods General guidelines 2. Enter the network drive details (drive location, domain name, user name, password) in the Network Drive screen, then select Connect. General guidelines Recommended kits To use the Neon NxT device for electroporation of mammalian cells, you need to purchase the Neon ™... -
Page 38: Recommended Buffers
Chapter 2 Methods General guidelines Recommended buffers There are different cell resuspension buffers available for use with the Neon NxT Electroporation ™ System. Use the appropriate resuspension buffer based on the voltage. • Use Resuspension R Buffer for all cell types and electroporation protocols. •... -
Page 39: Using The Neon ™ Nxt Electroporation System
Chapter 2 Methods Using the Neon NxT Electroporation System ™ siRNA control The success of electroporation is influenced by the type and quality of siRNA used. Therefore, using both a positive and negative control to evaluate the effectiveness of transfecting with siRNA is recommend. -
Page 40: Calculate Electroporation Volumes For Cell Suspension
Chapter 2 Methods Using the Neon NxT Electroporation System ™ IMPORTANT! · To obtain the highest transfection efficiency, optimize transfection conditions by varying electrical parameters as described in Appendix B, “Optimization” using preprogrammed optimization protocols. · Since the cell culture conditions vary from user to user, be sure to use low passage number, actively dividing cells (for dividing cells) Calculate electroporation volumes for cell suspension Select and enter the appropriate parameters into the calculator to determine the appropriate volumes of... - Page 41 Chapter 2 Methods Using the Neon NxT Electroporation System ™ 8. Wash cells with PBS (without Ca and Mg ) by centrifugation at 100–400 × g for 5–10 minutes at room temperature. 9. Aspirate the PBS and resuspend the cell pellet in Resuspension Buffer R (or Resuspension Buffer T for programs ≥1900V) at a final density of 1–5 × 10 cells/mL.
-
Page 42: Prepare Suspension Cells
Chapter 2 Methods Using the Neon NxT Electroporation System ™ Prepare suspension cells 1. Cultivate the required number of cells (cell density ∼1–3 × 10 cells/T-25 flask) by seeding a flask containing fresh growth medium 1–2 days prior to electroporation. For most optimized protocols, seed with: •... -
Page 43: Set Up The Pipette Station
Chapter 2 Methods Using the Neon NxT Electroporation System ™ Set up the pipette station 1. Ensure the Neon NxT Pipette Station is connected to the Neon NxT device (see page 28). ™ ™ 2. Attach the tube chamber containing the Neon NxT Tube into the Neon NxT Pipette Station. - Page 44 Chapter 2 Methods Using the Neon NxT Electroporation System ™ 6. Press the plunger on the Neon NxT Pipette to the first stop and immerse the tip into the cell- ™ payload mixture. Slowly release the plunger to aspirate the cell-payload mixture into the Neon ™...
-
Page 45: Run Electroporation Protocol
Chapter 2 Methods Using the Neon NxT Electroporation System ™ Run electroporation protocol 1. Ensure that the recommended amount of payload, cell number, and volume of plating medium is used for each electroporation sample. 2. Select the protocol or plate map that you want to use to perform electroporation. a. - Page 46 Chapter 2 Methods Using the Neon NxT Electroporation System ™ 5. After delivering the electric pulse, Complete is displayed on the main dial to indicate that electroporation is complete. Protocol completed normally Protocol failed (select the circle to view the error message) 6.
-
Page 47: Maintenance
Chapter 2 Methods Maintenance Maintenance Cleaning and maintenance CAUTION! Cleaning and decontamination. Use only the cleaning and decontamination methods specified in the user documentation. It is the responsibility of the operator (or other responsible person) to ensure the following requirements are met: ·... -
Page 48: Replace The Fuses
Chapter 2 Methods Maintenance Replace the fuses Required materials • Two IEC/UL listed fuses, rated 10 A, type T (time-lag), 250 VAC, 5 × 20 mm • Small flat-tip screwdriver Replace fuses DANGER! ELECTRICAL SHOCK HAZARD. Severe electrical shock, which could cause physical injury or death, can result from working on an instrument when the high voltage power supply is operating. - Page 49 Chapter 2 Methods Maintenance Determine firmware version on instrument When a new firmware version is released, you may be required to load the new firmware on the instrument. You will need a USB memory device and, if your instrument requires login, the login details to upgrade the firmware.
-
Page 50: Self Verification Test
Chapter 2 Methods Maintenance Upgrade the instrument firmware (USB drive) IMPORTANT! You cannot upgrade the firmware while a run is in progress. 1. Insert the USB memory device (FAT32 format file system) with the new firmware in the USB port of your instrument. Note: For instruments with the USB shortcuts feature enabled, you will be directed to the USB shortcuts screen. -
Page 51: Restore Factory Settings (Administrator Profile Only)
Chapter 2 Methods Maintenance Restore factory settings (Administrator profile only) Select Restore factory settings to remove all the data and customized settings and revert to factory settings. All data and settings will be erased once factory settings are restored. At the end of the restoration process, the message, "Your instrument has been restored."... - Page 52 Chapter 2 Methods Maintenance Repackaging and storage instructions 1. Turn off the main power switch at the rear of the instrument and detach the power cord from the rear of instrument. 2. Place the instrument in the original box including the original packing foam. 3.
-
Page 53: Appendix A Troubleshooting
Troubleshooting Observation Possible cause Recommended action No power (the display remains AC power cord is not Check AC power cord connections at both blank when the power is turned connected. ends. Use the correct cords. Cannot detect pipette The pipette is not fully inserted Ensure the Neon NxT Tube is inserted ™... - Page 54 Appendix A Troubleshooting Maintenance Observation Possible cause Recommended action Connection failure Wrong buffers used. Use electrolytic buffer (Buffer E for 10 µL tip (continued) and Buffer E2 for 100 µL tip) in the Neon ™ NxT Tube and sample in Resuspension Buffer in the Neon NxT Tip.
-
Page 55: Instrument Error Codes
Appendix A Troubleshooting Instrument error codes Observation Possible cause Recommended action Low transfection efficiency Poor plasmid DNA quality or Use high quality plasmid DNA for (continued) the plasmid DNA is low. transfection (see page 38 for guidelines and recommendations on DNA quality). Start with 0.5 µg plasmid DNA per sample. - Page 56 Appendix A Troubleshooting Instrument error codes (continued) Error message Possible cause Action Protocol/plate template cannot be Save protocol/plate same name as Please edit the name or save with overwritten template protocols a different name. Other user’s protocol/plate cannot Save protocol/plate same name as Please edit the name or save with be overwritten other user’s protocol...
- Page 57 Appendix A Troubleshooting Instrument error codes (continued) Error message Possible cause Action Tip type is unknown Tip detection error during Check tip is attached properly or electroporation run tip attached contains air bubbles. Please make sure all components Components are not connected Check all components (pipette are connected properly and try when electroporation is initiated...
- Page 58 Appendix A Troubleshooting Instrument error codes (continued) Error message Possible cause Action Failed to connect to network drive Unable to connect network drive Ensure network details are correct and try again. Instrument settings errors Network is not connected Network cable is not connected Check network cable is connected when setting up network using and try again.
- Page 59 Appendix A Troubleshooting Instrument error codes (continued) Error message Possible cause Action Unable to read upgrade package Fatal error Reboot instrument, run a self-test, version. – 0x8865 and if error persistent please contract service Unable to locate upgrade package. – 0x8864 Unable to extract upgrade files. – 0x8863 Unable to verify upgrade package signature.
-
Page 60: Appendix B Optimization
Optimization Optimization protocol Electroporation is mainly dependent on the combination of three electric parameters such as the electric field, pulse width, pulse interval, and pulse number. Based on your initial results, you may need to optimize the electroporation parameters for your cell type and payload. The process involves applying electrical energy to cells to achieve temporary pores that allow for the transfer of genetic material across the cell membrane. -
Page 61: Appendix C Recommended Instrument Settings
Recommended instrument settings About Instrument Select Settings4About Instrument to find out more information about the instrument (e.g., firmware version and instrument statistics). • Select EULA to view the End User License Agreement, or download it to a USB drive. • Select Check updates to find out if updates are available for the instrument . Recommended instrument settings Select (Settings) and access the Settings screen to configure the instrument. -
Page 62: Instrument Settings (Administrator Only)
Appendix C Recommended instrument settings Recommended instrument settings Instrument settings (Administrator only) Select Instrument settings to set the following instrument parameters. • Instrument name Select the Instrument name field to activate the text editor. Enter up to 25 alphanumeric characters to identify the instrument. Note: The instrument name cannot have spaces. - Page 63 Appendix C Recommended instrument settings Recommended instrument settings • Sleep mode Use the Off and On toggle to disable or enable sleep mode. In the 'On' mode, select the Edit Time field to activate the numeric editor to set the time after which the instrument will go from idle mode to standby mode.
- Page 64 Appendix C Recommended instrument settings Recommended instrument settings • Brightness Use the slider to adjust the brightness of the touch screen. • Network configuration Use the toggle to select the type of network connection to connect the instrument to the Internet . For details on using the Wireless and Ethernet options, see “Connect the instrument to the Internet”...
-
Page 65: Maintenance & Services
Appendix C Recommended instrument settings Maintenance & services Maintenance & services Select Maintenance & Services to set the following instrument parameters. • (Administrator only) Select Software Update to update the System firmware. See “Upgrade the system firmware” on page 48 for instructions on updating the firmware. •... -
Page 66: Run History
Appendix C Recommended instrument settings Run History Run History Select Run History to display the entire list of runs performed by the instrument. • Select a particular file to view the details of that run. • Select Export to save the run details to a USB memory device, or Delete to delete the the run history file. - Page 67 Appendix C Recommended instrument settings Run History – Delete a run report – Export a run report Neon NxT Electroporation System User Guide ™...
-
Page 68: Appendix D Specifications
Specifications Product specifications Operating Power: 100–240 VAC, Frequency 50/60 Hz, 270 W Output: 0.5-2.5 kV Pulse Width: 1-100 ms Maximum Duty Cycle: Charging Time: Maximum 6 seconds Altitude: Up to 2,000 meters Operating Temperature: 15℃ to 30℃ Maximum Relative Humidity: Up to 80% Degree of Protection: IPX0 Protective Earthing: Class I (earthed) -
Page 69: Networking Requirements
Appendix D Specifications Networking requirements Networking requirements Configure the system behind a firewall. If outbound traffic is limited, the following firewall exceptions are required to support system features: Firewall lexception requirements Port Purpose Applies to… *.instrumentconnect.com outbound 443 To support instrument Thermo Fisher Connect ™... -
Page 70: Appendix E Related Products
Related products Accessory products Additional products The following products are for use with the Neon NxT Electroporation System and are available ™ separately. For more information, go to thermofisher.com or contact Technical Support. Catalog numbers that appear as links open the web pages for those products. Product Quantity Catalog no. - Page 71 Appendix E Related products Accessory products (continued) Product Quantity Catalog no. DynaMag Magnet 1 each 12102 ™ ™ DynaCellect Magnetic Separation 1 system A55867 ™ ™ System Rotea Single-Use Kit 10 kits A49585 ™ ™ 5 kits A49313 Rotea Hi‑Flow Single-Use Kit 10 kits A46575 ™...
- Page 72 Appendix E Related products Accessory products (continued) Product Quantity Catalog no. Dynabeads Untouched Human CD4 T 1 kit 11346D ™ ™ Cells Kit 11352D DynaMag 1 unit 12321D ‑2 Magnet ™ DynaMag 1 unit 12301D ‑15 Magnet ™ DynaMag 1 unit 12303D ‑5 Magnet ™ DynaMag -50 Magnet 1 unit...
- Page 73 Appendix E Related products Accessory products (continued) Product Quantity Catalog no. Precision gRNA Synthesis Kit 1 kit A29377 GeneArt CRISPR Nuclease mRNA 15 µg A29378 ™ TrueTag Donor DNA Kit, RFP 1 kit A42993 ™ TrueTag Knockout Enrichment Donor 1 kit A53815 ™ DNA Kit FlexCut TALEN mRNA Pairs...
- Page 74 Appendix E Related products Accessory products (continued) Product Quantity Catalog no. Products for cell culture IMDM 500 mL 12440053 1 L 12440046 NK‑Xpander Medium 5 L A5019002 ™ ™ DPBS with calcium, magnesium , 2 L A4737901 ™ bag format DPBS without calcium chloride, 2 L A1285602 ™...
- Page 75 Appendix E Related products Accessory products (continued) Product Quantity Catalog no. CytKick Autosampler 1 unit A42901 ™ CytKick Max Autosampler 1 unit A51849 ™ Luminex xMAP INTELLIFLEX System 1 system APX2020 ™ ™ Luminex Instrument System 1 system APX10031 ™ ™ Luminex FLEXMAP Instrument System 1 system...
- Page 76 Appendix E Related products Accessory products (continued) Product Quantity Catalog no. HID Ion Chef Instrument 1 instrument A30070 ™ GeneChip Scanner 3000 7G System 1 instrument 00-0210 ™ GeneTitan MC Instrument 1 instrument 00-0373 ™ Ion GeneStudio S5 System 1 instrument A38194 ™ 3500xL Genetic Analyzer 1 instrument 4406016...
- Page 77 Appendix E Related products Accessory products (continued) Product Quantity Catalog no. eBioscience Human Regulatory T Cell 1 kit 88-8999-40 ™ Staining Kit eBioscience Antibodies custom thermofisher.com/us/en/home/life- ™ science/antibodies/ebioscience.html Neon NxT Electroporation System User Guide ™...
-
Page 78: Appendix F Safety
Safety Safety information Follow the instructions in this section to ensure safe operation of the Neon NxT device. The Neon ™ ™ NxT Electroporation System is designed to meet EN61010-1 Safety Standards. To ensure safe, reliable operation, always operate the Neon NxT Electroporation System according to the instructions in this ™... - Page 79 Appendix F Safety Informational symbols (continued) Symbol and description WEEE (Waste Electrical and Electronic Equipment) symbol indicates that this product should not be disposed of in unsorted municipal waste. Follow local municipal waste ordinances for proper disposal provisions to reduce the environmental impact of WEEE. This instrument meets European requirement WEEE Directive 2012/19/EU.
-
Page 80: Informations De Sécurité
Appendix F Safety Informations de sécurité Informations de sécurité Suivez les instructions de cette section pour vous assurer d’utiliser l’appareil Neon NxT en toute ™ sécurité. Le Neon NxT Electroporation System est conçu pour répondre aux normes de sécurité ™ EN61010-1. Pour assurer un fonctionnement sûr et fiable, utilisez toujours le Neon NxT Electroporation ™... - Page 81 Appendix F Safety Informational symbols (continued) Symbol and description ON (MARCHE) (alimentation) OFF (ARRÊT) (alimentation) Protection par la mise à la terre (masse) La marque CE est un symbole indiquant que le produit est conforme à toutes les dispositions applicables de la Communauté européenne pour lesquelles ce marquage est obligatoire.
-
Page 82: Environmental Requirements
Appendix F Safety Environmental requirements Environmental requirements Condition Acceptable Range Installation site Indoor use only Electromagnetic interference Do not use this device in close proximity to sources of strong electromagnetic radiation (for example, unshielded intentional RF sources). Strong electromagnetic radiation may interfere with the proper operation of the device. -
Page 83: Safety And Electromagnetic Compatibility (Emc) Standards
Appendix F Safety Safety and electromagnetic compatibility (EMC) standards Safety and electromagnetic compatibility (EMC) standards The instrument design and manufacture complies with the following standards and requirements for safety and electromagnetic compatibility. Safety Reference Description EU Directive 2014/35/EU European Union “Low Voltage Directive” IEC 61010-1 Safety requirements for electrical equipment for measurement, control, and laboratory use –... -
Page 84: Environmental Design Standards
Appendix F Safety Electrical safety Environmental design standards Reference Description EU Directive 2012/19/EU European Union “WEEE Directive”—Waste electrical and electronic equipment EU Directive 2011/65/EU European Union “RoHS Directive”—Restriction of hazardous substances in electrical and electronic equipment Commission Delegated Directive (EU) 2015/863 Regulation EC 1907/2006 European Union “REACH Directive”—Registration, Evaluation, Authorisation and Restriction of Chemicals SJ/T 11364-2014... - Page 85 Appendix F Safety Electrical safety • Ensure that the connections with information technology equipment, e.g. PCs or other industrial computers, comply with the IEC60950-1/EN60950-1, IEC61010-1/EN 61010-1, or IEC 62368-1/EN 62368-1 standards that apply in each case. • Unless expressly permitted, never remove the cover or any part of the housing while the product is in operation.
-
Page 86: Chemical Safety
Appendix F Safety Chemical safety Chemical safety WARNING! GENERAL CHEMICAL HANDLING. To minimize hazards, ensure laboratory personnel read and practice the general safety guidelines for chemical usage, storage, and waste provided below. Consult the relevant SDS for specific precautions and instructions: · Read and understand the Safety Data Sheets (SDSs) provided by the chemical manufacturer before you store, handle, or work with any chemicals or hazardous materials. -
Page 87: Biological Hazard Safety
Appendix F Safety Biological hazard safety Biological hazard safety WARNING! Potential Biohazard. Depending on the samples used on this instrument, the surface may be considered a biohazard. Use appropriate decontamination methods when working with biohazards. WARNING! BIOHAZARD. Biological samples such as tissues, body fluids, infectious agents, and blood of humans and other animals have the potential to transmit infectious diseases. -
Page 88: Appendix G Documentation And Support
Documentation and support Customer and technical support Visit thermofisher.com/support for the latest service and support information. • Worldwide contact telephone numbers • Product support information – Product FAQs – Software, patches, and updates – Training for many applications and instruments •... - Page 90 Neon NxT Electroporation System-v1-GUID-42F0C04D-C894-49E6-9BE2-F1E0DA163DEF-2022/04/20 22:45:36 en 00:16:41.391Z thermofisher.com/support | thermofisher.com/askaquestion thermofisher.com 22 March 2023...
Need help?
Do you have a question about the Invitrogen NEON1 and is the answer not in the manual?
Questions and answers