quadient iX-5 Series Quick Installation Manual
Hide thumbs
Also See for iX-5 Series:
- User manual (328 pages) ,
- Quick installation manual (4 pages) ,
- Replacement manual (2 pages)
Advertisement
Quick Links
iX-5 Series Base
Quick Installation Guide
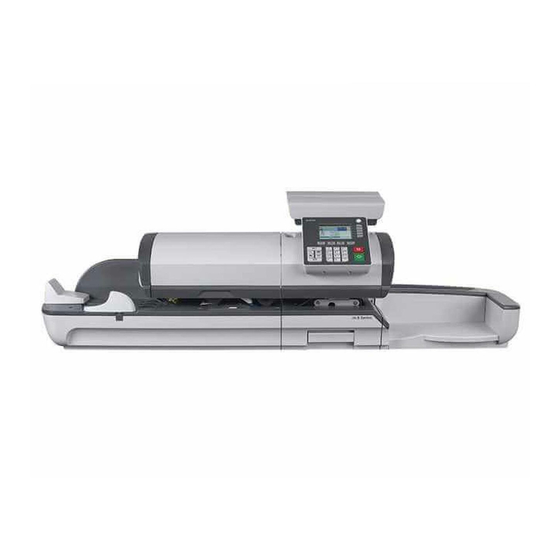
Machine components:
Automatic
feeder cable
k
Automatic
feeder
1
1
Unpack all components from the box, remove packaging
and any transit tape.
5
Lift machine slightly on the left hand side and align the hooks to attach the automatic feeder
– attach the catch tray
(c)
to the right hand side of the machine.
9
Installation Process
1 LAN
OK
Select LAN and press
to test connection type.
For more help with your installation, please visit:
Machine Base
Catch Tray
Back of the machine
2
Lift the cover of the machine to reveal the
ink cartridge
(i)
and meter
(j)
locations.
6
(b)
Attach the weighing platform
shelf (if applicable)
10
Installation Process
Enter the registration PIN code
00000
OK
Mem
Enter the registration PIN code : 00000
Shelf
Weighing Platform
3
Place the meter
(j)
into the meter bay and slide in until it fi ts securely
into position.
7
(e)
and
Connect the weighing platform connector
cable
(k)
at the back of the machine. Then connect the LAN cable
(d).
(g)
and power cable
11
Installation Process
Press the 'Next' to start the
Online service
declaration.
Next
Follow the steps on screen to complete the
procedure
kb.quadient.co.uk/ix5_install
LAN Cable
Weighing Platform
Cable
4
Insert the ink cartridge
(i)
and 'LOCK' stickers facing upwards. Push the ink cartridge
the back of the machine until you hear a 'click' - close the cover of the
machine.
k
(f)
and automatic feeder
(h)
to either side of the machine.
For more information or if you experience any issues, please visit :
kbhelp.quadient.com/ix5_ug_en_dl
Power Cable
Ink Cartridge
Meter
at an angle into the machine with the 'TOP'
(i)
towards
8
Turn on the machine using the switch behind the
power cable
(h)
and follow the steps on screen.
Advertisement

Related Manuals for quadient iX-5 Series


Summary of Contents for quadient iX-5 Series
- Page 1 Series Base For more help with your installation, please visit: kb.quadient.co.uk/ix5_install Quick Installation Guide Machine components: Automatic feeder cable Shelf LAN Cable Power Cable Ink Cartridge Meter Machine Base Automatic feeder Weighing Platform Catch Tray Weighing Platform Cable Back of the machine...
- Page 2 Series Quick Start Guide Getting to know your franking machine Quick steps to franking your mail If Jamming occurs Screen Information To weigh an item: To reset the machine... Press: 1. Press on the 1. Check that the A3 icon is 1st Inl.
Need help?
Do you have a question about the iX-5 Series and is the answer not in the manual?
Questions and answers