
Related Manuals for BDI LINQ 9186


Summary of Contents for BDI LINQ 9186
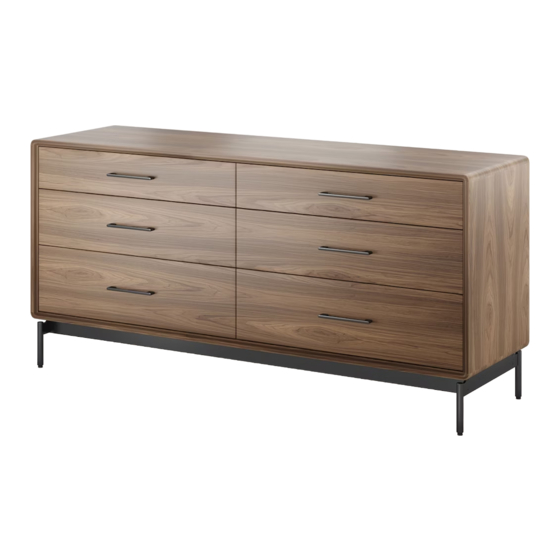
- Page 1 LINQ 9186 ™ DRESSER INSTRUCTION MANUAL LET’S GET STARTED. DESIGNED BY MATTHEW WEATHERLY...
- Page 2 Congratulations on the purchase of your LINQ Dresser 9186 from BDI. Your dresser has been designed to provide a lifetime of enjoyment. This manual will provide assembly instructions and other helpful information to ensure you get the most out of your product.
- Page 3 HARDWARE AND COMPONENTS Unpack and identify the parts listed below. The assembly workspace should be a non-marring surface, such as carpet. For missing hardware pieces, please contact BDI Customer Service at customerservice@bdiusa.com. For all other concerns, please contact your BDI retailer.
- Page 4 HARDWARE AND COMPONENTS HARDWARE AND COMPONENTS Spanner (C1) QTY: 2 Leg (C2) QTY: 2 Cabinet (C3) QTY: 1 Drawer Pull (C4) QTY: 6 KLEET (C5) QTY: 2 Anchor Strap (C6) QTY: 1 4 | BDIUSA.COM LINQ 9186...
- Page 5 STEP 1. ASSEMBLE BASE ASSEMBLY Lay the Spanners (C1) on a soft, non-marring surface, like carpet. Attach the Legs (C2) to the HEX WRENCH – T1 Spanners (C1) using 8 Screws (H1) and tighten with Hex Wrench (T1). SCREW – H1 NEED ASSISTANCE? customerservice@bdiusa.com BDIUSA.COM | 5...
- Page 6 SCREW – H2 Position the as shown and attach with Base 6 Screws (H2). Tighten with Hex Wrench (T1). NOTE: The packing material creates finger space to lift the cabinet after attaching the base. Honeycomb packing material 6 | BDIUSA.COM LINQ 9186...
- Page 7 STEP 3. ATTACH DRAWER PULLS ASSEMBLY With the help of another person, carefully turn NOT INCLUDED the Dresser onto its feet. One row at a time, PHILLIPS SCREWDRIVER open the drawers, cut the ribbon off the drawer, and install the 6 Drawer Pulls (C4) using 12 Screws (H3).
- Page 8 ASSEMBLY STEP 4. INSTALL KLEETS Install the KLEETS (C5) to the back of the NOT INCLUDED Cabinet using 4 Wood Screws (H4). Tighten PHILLIPS SCREWDRIVER with Phillips Head Screwdriver (not included). SCREW – H4 8 | BDIUSA.COM LINQ 9186...
- Page 9 2 PERSON TASK STEP 5. INSTALL ANCHOR STRAP & SECURE CABINET ASSEMBLY With help from another person, carefully walk NOT INCLUDED the cabinet into the desired position against PHILLIPS SCREWDRIVER the wall. It is strongly recommended that you anchor your NOT INCLUDED LINQ Dresser to the wall using the provided WALL ANCHOR...
-
Page 10: Fine Tuning
If your cabinet is on carpeting, check your front to back level after loading the cabinet and opening the heaviest drawers. This will ensure the cabinet remains level during operation and reduce the risk of tip-over. Dial down 10 | BDIUSA.COM LINQ 9186... -
Page 11: Care And Maintenance
While BDI’s stained wood finishes are stable in tone & appearance, all finishes are subject to some degree of discoloration with prolonged exposure to direct sunlight. Please avoid positioning your BDI cabinet in any area with ample direct sunlight. -
Page 12: Warranty
The decision to repair or replace will be at BDI’s sole discretion. BDI furniture is warranted for three (3) years from the date of purchase, as shown on your sales receipt. The warranty period starts from the date of purchase. This warranty extends only to the original purchasers who acquire new products from BDI Authorized Resellers.
Need help?
Do you have a question about the LINQ 9186 and is the answer not in the manual?
Questions and answers